cargo 缓存机制
cargo 默认不缓存中间件(依赖在编译过程中产生的文件),因此每次要 install 新的程序,总要把之前所有编译好的程序重新编译,非常费事。但是 cargo 本身是具备缓存机制的,即 build 或者 install 使用已编译好的中间件而不再重复编译。
最重要的是设置 target 目录。例如在 ~/.cargo/config 文件所在的主目录 ~/.cargo 中新建 target 文件夹,在 config 文件中的 build 下加入:
[build]target-dir = "target" # “target” 为存放缓存文件的目录,具体说明可见下面的链接
注意: cargo 全局安装运行程序(有时称为 CI),一般需要像上面那昂手动设置一个 target 文件。而具体项目在编译的前无需设置,cargo 会在项目的 Cargo.toml 目录下自动建立 target 文件夹,把缓存放入其中。
官方 cargo install 说明中指出以下情况会重新编译:
If the package is already installed, Cargo will reinstall it if the installed version does not appear to be up-to-date. If any of the following values change, then Cargo will reinstall the package:
- The package version and source.
- The set of binary names installed.
- The chosen features.
- The release mode (—debug).
- The target (—target).
Installing with
--pathwill always build and install, unless there are conflicting binaries from another package. The--forceflag may be used to force Cargo to always reinstall the package.
缓存管理工具
sccache
这是 Mozilla 社区开发的具有更丰富缓存机制的工具,比 cargo target 缓存方案更优。
使用方法:
- 安装 sccache,windows 下可用
scoop install sccache(前提有 scoop)或者cargo install sccache(后者会编译源码,较为耗系统资源) 在
.../.cargo/config文件的 build 部分加入以下一行:目的是用 sccache 命令替换 rustc 命令[build]rustc-wrapper = "./bin/sccache" # 填入 sccache.exe 所在目录,用 cargo install 默认安装在 bin 目录下
sccache 支持 local、S3、Redis、Memcached、Google Cloud Storage、Azure 方式进行缓存。
默认使用 local 本地磁盘缓存机制,可通过设置系统环境变量SCCACHE_DIR改变缓存目录位置(默认安装在~/.cache/sccacheon Linux,%LOCALAPPDATA%\Mozilla\sccacheon Windows, and~/Library/Caches/Mozilla.sccacheon MacOS,不过我修改了并没有生效)、SCCACHE_CACHE_SIZE="1G"限制缓存大小(默认10G)cargo-cache
cargo-cache 是一个缓存管理小工具,用于查看
~/.cargo/缓存情况、适当精简缓存。
如果使用 cargo 缓存机制(使用了 sccache 就不必安装这个软件了)。
安装方式:cargo install cargo-cache
运行cargo cache查看缓存信息、cargo cache -a自动清理缓存。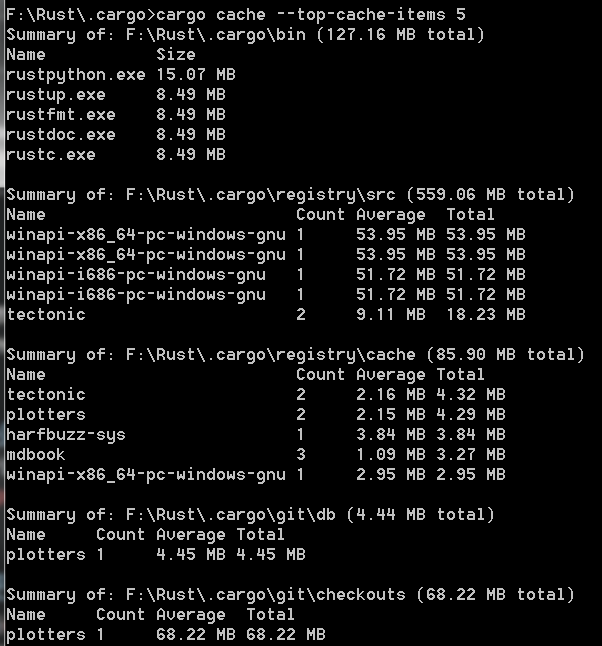

项目 dependencies 可视化
cargo tree
这是 cargo 自带的打印依赖关系的命令。使用方法:
cd到项目主目录(Cargo.toml 所在的目录)cargo tree打印所有依赖cargo tree -d打印重复编译的依赖(编译了多个版本的依赖)cargo tree -e features -i syn打印 syn 包(某个项目的依赖)的 feature 和与此相关的依赖- 更多参数和用法见官方文档
cargo-deps
简单而有用的 dependencies 可视化工具,根据 Rust 项目文件中的 Cargo.toml 找到 build 时的相关依赖,绘制成网络图。安装命令:cargo install cargo-deps,且电脑安装了 graphviz
基本用法:cd到项目 Cargo.toml 所在目录,使用以下命令绘制 dependencies 网络图cargo deps | dot -Tpng > graph.png
- 说明:
- 这段命令分为两部分,
|之前是 deps 的命令,之后是 graphviz 的命令。 car deps -h可查看更多参数,用于筛选特定的依赖。常用的有--no-transitive-deps不展示传递关系(指 A-B-C 和 A-C 都存在情况下,不显示 A-B-C 的传递路径,从而减少冗余)、--depth控制节点深度等- png 图片在网络复杂的情况下会模糊,更改成矢量图只需把
-Tpng命令改成-Tpdf或者-Tsvg,把文件名后缀也进行相应更改 - 此外可以替换
dot布局引擎,只需把命令替换成以下一种即可circo dot fdp neato nop nop1 nop2 osage patchwork sfdp twopi(我试过全部布局,且过滤掉一些冗余,发现默认的 dot 布局美观且清晰) - 颜色和优先级说明:
Dependencies are colored depending on their kind: Black: regular dependency Purple: build dependency Blue: dev dependency Red: optional dependency A dependency can be of more than one kind. In such cases, it is colored with the following priority: Regular -> Build -> Dev -> Optional For example, if a dependency is both a build and a dev dependency, then it will be colored as a build dependency. If, however, you pass the —dev-deps option instead of —all-deps, the dependency will be colored as a dev dependency (as the build-dependency graph will not be shown).
- 示例:针对 mdBook 例子进行依赖关系可视化,得到如下两个文件:完整的关系、消除冗余的关系
第二张图生成的命令为(注意我新建了文件夹 graph-deps):cargo deps --no-transitive-deps --depth 2 | dot -Tpdf > ./graph-deps/graph-deps-dot-notr-2.pdf
graph-deps.pdf
graph-deps-dot-notr-2.pdf
mdBook 是依赖比较多的库了,安装的时候需要编译 100 多个依赖库,所以即使到 2 级关系,看起来依然复杂。
cargo-depgraph
这是 deps 的“替代品”,增加了颜色和样式把依赖关系进行更加详细地分类,并且能展示更丰富的关系(但在复杂的依赖情况下,即使消除一些冗余,也难以看清楚关系网)。
安装命令: cargo install cargo-depgraph ,且电脑安装了 graphviz
基本用法: cd 到项目 Cargo.toml 所在目录,使用以下命令绘制 dependencies 网络图
cargo depgraph | dot -Tpng > graph.png
- 说明:
- 使用方法与
cargo-deps类似:两部分的命令结构,后半部分是 graphviz 命令 - 但是前半部分添加的参数不同。depgraph 使用
--dedup-transitive-deps清除传递关系;不支持深度参数;筛选特定的依赖关系上所用的参数名称不太一样。具体使用cargo depgraph -h查看。 - 颜色和形状说明(优先级未知):
square node = root / workspace member grey background = target-specific dependency dotted lines = optional dependency (could be removed by disabling a cargo feature) dashed lines = transitively optional dependency (could be removed by removing one of the dotted edges) line colors = dependency kinds w.r.t. root / workspace members black = normal blue = dev-dependency green = build-dependency light turquoise = build-dependency of a dev-dependency dark green = both normal and build-dependency violet = both dev-dependency and build-dependency … not seen in the wild yet, but theoretically possible: dark turquoise = both normal and build-dependency of a dev-dependency pastel blue = both dev-dependency and build-dependency of a dev-dependency red = you broke it
- 示例:附上同一个项目的依赖关系图:完整版、消除传递关系+只看 build 依赖
第二个文件生成的命令(注意我新建了文件夹 graph-deps):cargo depgraph --dedup-transitive-deps --build-deps | dot -Tpdf > ./graph-deps/graph-depgraph-dot-ded-build.pdf
graph-depgraph.pdf
graph-depgraph-dot-ded-build.pdf

若有收获,就点个赞吧
0 人点赞
