箭头函数
理解:一种简洁的函数简写
重点
()=>{
}
<script>//普通函数--匿名let func = function () {console.log("456")}func()//🔥箭头函数 简写 更简单 简洁//🎃箭头不能拆开let fun = () => {console.log('123')}fun()//🌈传递参数个数是一个时,小括号才可以被省略;其他都不行//传递参数为0个,小括号不能省略let fun1 = (a) => {console.log(a)}fun1(12)let fun3 = a => {console.log(a)}fun3(2)let fun2 = (a, b) => {console.log(a, b)}fun2(7, 8)// let fun4 = => {// console.log(c)// }// fun4() 报错//💥当箭头函数,函数体中只有一行代码的时候://1. 大括号可以省略;其他不行//2. 默认返回 这行代码的运行结果🔥 (默认添加return)let func4 = () => { console.log('098') }func4()let fun4 = () => console.log('098')fun4()//console.log()没有返回值,是undefinedlet fun5 = () => { console.log('110') }let fun6 = () => fun5()console.log(fun6()) //结果显示 undefinedlet fun7 = () => 110let fun8 = () => fun7()let result = fun8()console.log(result) //结果显示110//🌈箭头函数 🔥返回类型let fun9 = () => 11; //返回值类型 数字 11console.log(fun9())let fun10 = () => "11"; //返回值类型 字符串 11console.log(fun10())let fun11 = () => [11, 10]; //返回值类型 数组 [11,10]console.log(fun11())🎃let fun12 = () => { }; //返回值类型 undefinedconsole.log(fun12())//因为JS中 {} 意思不同//两种意思:// 大括号 对象 符号 返回类型对象// 大括号 在函数内 包含==函数体==结构 符号 undefined 浏览器解析正解//想要实现函数体 返回对象类型 🌈要加小括号⚡let func1 = () => ({ a: 1 })console.log(func1()) //返回值 { a: 1 } 类型:对象</script>
解构
释义:获取数据的简写
可对复杂数据类型:数组,对象,函数(形参)简写
<script>//高级写法//查数组💥const arr = ['a', 'b', 'c']// const [str0,str1,str3] = arr// console.log(str0,str1,str3) //结果 a b cconst [str1, str3] = arr //不是下标,[]里面变量任意命名,//---------------------------按数组顺序查出console.log(str1, str3) //结果 a b//交换变量🔥//传统 :两值交换 ,需要设置第三值 来交换//高级:let a = 100let b = 200; //加分号 ,否则会报错[a, b] = [b, a]console.log(a, b)//对象解构🎃const obj = {name: "金角",height: 180}const { name, height } = obj; //获取属性console.log(name, height) //得到属性值//函数 形参function fun1({ username }) {console.log(username)}fun1({ username: '银角' })</script>
简写
<script>//对象简写🔥 常用const username = '迪克'const obj2 = {username, /🔥/username=uaername 简写username// 对象体 内 --函数简写say() {console.log("我是大魔王")} //函数这样写在外面会报错};console.log(username);//==访问的是 obj2里面的usernameconsole.log(obj2.username);// 普通写法function sing() {console.log('我是小仙女')}sing();// function show(a) {// // if判断// //三元// a === undefined ? console.log('你好') : console.log('你很好')// }//突然感觉 赋传值很强大function show(aa = "你好") { //默认值 你好console.log(aa)}show();//你好show("你很好")//你很好</script>
… 运算符
通过 ...符号来获取剩下的参数
剩余运算符
<script>//剩余运算符 .../*对象🚀*/const obj = { a: 1 }const { a, ...b } = obj //a取a的值,b取除a以外的值console.log(a) // 1console.log(b) // 没有剩余的值,返回是空对象//有值的话,返回的是带属性值的对象// 数组同上/*函数🍄 获取的 都是数组 */function calc(...arr) {console.log(arr) //返回值数组 [1,2]}calc(1, 2)/* ...单独放,或者放后面*/</script>
拓展、延展、展开运算符
//复杂类型传的是地址🎃//... 是复制数据值const list = [1, 2, 3, 4, 5, 6]const newList = [...list] //复制数据newList.push(7, 8)console.log(list)console.log(newList)const obj1 = {name: "大圣",age: 180}//对象// const obj2 = obj1// obj2.height = "5000px"// console.log(obj1)// console.log(obj2) //obj1和obj2值一样const obj2 = { ...obj1 }obj2.height = 5000console.log(obj1)console.log(obj2)//obj1和obj2值不同//数组合并const list1 = [1, 2, 3]const list2 = [4, 5, 6]const list3 = [...list1, ...list2]//对象-----注意:合并中// 🌸🍁相同的属性名只能有一个,否则后面同名会覆盖前面的属性名const obj3 = {name: '八戒',age: 200}const obj4 = {name: '悟空',height: 800}const obj6 = { ...obj3, ...obj4 }console.log(obj6)//{name: '悟空', age: 200, height: 800} 同名name属性被覆盖掉了
数组方法
| 方法 | 描述 |
|---|---|
| every() | 检测数值元素的每个元素是否都符合条件。 |
| filter() | 检测数值元素,并返回符合条件所有元素的数组。 |
| find() | 返回符合传入测试(函数)条件的数组元素。 |
| findIndex() | 返回符合传入测试(函数)条件的数组元素索引。 |
| forEach() | 数组每个元素都执行一次回调函数。 |
| includes() | 判断一个数组是否包含一个指定的值。 |
| indexOf() | 搜索数组中的元素,并返回它所在的位置。 |
| isArray() | 判断对象是否为数组。 |
| join() | 把数组的所有元素放入一个字符串。 |
| map() | 通过指定函数处理数组的每个元素,并返回处理后的数组。 |
| reduce() | 将数组元素计算为一个值(从左到右)。 |
| reverse() | 反转数组的元素顺序。 |
| some() | 检测数组元素中是否有元素符合指定条件。 |
| sort() | 对数组的元素进行排序。 |
forEach()
遍历数组元素,两个值:值,下标
/* forEach 遍历 和for 遍历 功能很相似forEach 遍历数组,接收一个回调函数;并且会在每一次遍历被使用2.回调函数 会接收两个参数1. 参数 被循环的元素2. 参数 被循环的元素的下标 索引3. 回调函数 修改为箭头函数 简洁4. for循环 可以被break打断 被终止break 不能打断forEach或终止*/const arr = ['a', 'b', 'c', 'd']arr.forEach((item, index) => {console.log(`元素本身${item} 下标${index}`)})
some()
检测满足条件的元素,只有有一个满足,后面的就不在检测
//检测数组元素中是否有元素符合指定条件。//找到一个满足条件,剩下的就不再遍历// some() 🛕/*1 数组的方法 some 会遍历 数组2 some 会接收 一个回调函数3 回调函数 接收两个参数1 参数一 元素本身2 参数二 元素下标4 some方法 就会返回 寻找的结果 true 或false🔥如果我们在回调函数中 return 了 true => 找到满足条件的元素*/const arr1 = ['绿色','绿色','绿色','红色','绿色'];let result = arr1.some((item, index) => {console.log(index, item)if (item === "红色") {return true;} else {return false;}});//根据判断条件进行简写,//分析 判断一个值,传一个值,小括号可以缩写;// 自带 返回值是=> 后面的;只有一行代码的时候,大括号也省略let result2 = arr1.some(item => item === "红色")//判断 有没有找到if (result) {console.log("找到红衣人")} else {console.log("安全")}
every()
检测每个元素是否满足条件,全部满足返回true
//every 💢💥 检测每一个元素是否符合条件/*1 数组的方法 some 会遍历 数组2 some 会接收 一个回调函数3 回调函数 接收两个参数1 参数一 元素本身2 参数二 元素下标4 some方法 就会返回 寻找的结果 true 或false🔥如果我们在回调函数中 return 了 true => 找到满足条件的元素*/const arr2 = ['绿色','绿色','绿色','红色','绿色'];let result1 = arr2.every((item, index) => {console.log(index, item)if (item === "绿色") {return true;} else {return false;}});if (result1) {//全部通过console.log('安全')} else {console.log('有问题')}
join()
把数组转换成字符串
const arr = ['a', 'b', 'c']let res = arr.map(item => `<p>${item}</p>`);console.log(res)let html1 = res.join('')document.querySelector('div').innerHTml = html1
map()
数组改造成新数组
遍历通过指定函数处理数组的每个元素,重新返回处理后的新数组
1 数组的方法 map 会遍历 数组2 map 会接收 一个回调函数3 回调函数 接收两个参数1 参数一 元素本身2 参数二 元素下标3 回调函数中 都需要返回一个改造好的元素4 map函数会返回一个新数组 改元素中每一个元素 等于 回调函数中每一个返回的元素

**trim()** 方法
会从一个字符串的两端删除空白字符 ;当判断输入框是否为空的时候,可以用用
filter()方法
过滤符合条件的每一项,必须要return true或false 表示当前元素是否满足你的要求
filter 本身存在返回值 ,数组中存放满足条件的元素
find()方法
查找目标值
返回符合条件的目标值
findIndex()方法
查找目标值
找到返回索引值
找不到返回-1
includes()方法
判断是否包含指定的值
例如:在输入框中搜索 同姓 的人
<script>/*filter 检测数值元素,并返回符合条件所有元素的数组🔥1. 会遍历每一个数组元素2. filter 接收 回调函数3. 回调函数 有两个参数参数一 元素本身 元素下标必须要return true或false 表示当前元素是否满足你的要求💥filter 本身存在返回值 ,数组中存放满足条件的元素💥*/// const list = [19, 29, 39, 49, 59, 60, 80, 90, 88, 89, 83]// const newList = list.filter((item) => item > 80)// console.log(newList)const list = ['王五', '贺一', '王四', '王三', '李子', '王二', '梅子', '王一'];const inputs = document.querySelector('input')const ul = document.querySelector('ul')//input 事件 输入框发生变化 都会触发//change事件 输入框发生变化,而且失去焦点,才会触发inputs.addEventListener('input', function () {//输入框 两边不能删除空白符的时候,为空的时候if (!this.value.trim()) {ul.innerHTML = '';return}render()})function render() {const value = inputs.value//默认值 item.includes(value) 包含value值的const filterList = list.filter((item) => item.includes(value));const html = filterList.map((item) => `<li>${item}</li>`).join("")ul.innerHTML = html}</script>
Set 对象
理解
不会有重复对象的元素 不是数组,但当成数组使用
const s=new Set()
Set也是一个构造函数
Set对象转为数组
const set = new Set([1, 5, 3, 4]); //将数组转成对象set.add(5);set.add(5);console.log(set); //结果 Set(4) {1, 5, 3, 4} 对象类型,添加重复对象无效const arr = [...set];// 再将set对象转数组 ...剩余运算符console.log(arr);
例子

<body><input type="text" /><ul></ul><script>const input = document.querySelector('input');const ul = document.querySelector('ul');let arr = ['西瓜', '苹果'];const renderHTML = () => {let html = '';arr.forEach((value) => (html += `<li>${value}</li>`));ul.innerHTML = html;};renderHTML(); //基础渲染数据//判断输入input.addEventListener('keyup', function (event) {// 按下回车if (event.key === 'Enter') {const arrs = new Set(arr) //筛选重复 对象arrs.add(input.value) //加入对象arr = [...arrs]renderHTML();}});</script></body>
面向对象
ES5
ES6
概念
项目级别,代码封装,代码设计的思想
特点
封装:
方便维护代码 ,实现业务需求
继承
多态
而在js中,面对对象只体现 封装 继承
对象在内存中的分配🔥
可看构造函数的应用
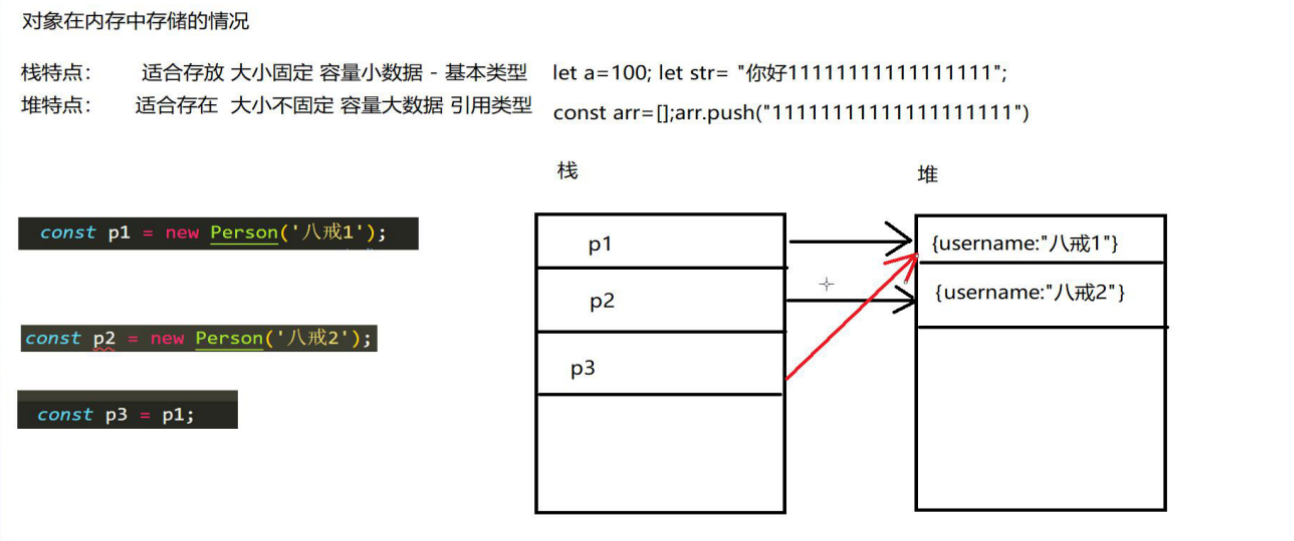
复杂数据类型 在栈中 存储的是地址
创建对象
字面量
理解看图 右边的设值 就是字面量
- 简单方便 用在小案例 复用代码
- 不适合创建多个同样类型的对象的场景
- 不好维护

工厂函数
- 容易理解 ;但是打印代码的时候,分不清出这个对象是属于谁,失去所属亲缘关系
- 无法复用功能;无法实现面对对象的两大特征:封装与继承
了解console.dir()
console.dir()是在控制台中查看指定JavaScript对象的所有属性的方法,开发人员可以通过它轻松获取对象的属性。

构造函数
理解:
制定了一种创建对象的模板;方便
- 本质是一个函数
- 命名 首字母大写
- 必须使用new 创建(实例化)对象,否则没意义
结合代码理解:
  <script>
        function Person() {    //普通函数

            //this  代表后面定义声明出来的 实例:p、s、n
              this选中属性 赋值
            this.name = "大圣"
        }
        const p = new Person() //new后 变成构造函数 首字母大写  使用new
        //----------------通过构造函数所创建出来的这些实例--属性等 一模一样
        const s = new Person()
        const n = new Person()
        console.log(p) // p变量是实例💥

        // 个人理解 new 实例化对象
    </script>
应用
 <script>
        function Render(username, height) {
            this.name = username;
            this.height = height
        }
        const p = new Render('11', 110)
        const s = new Render('22', 220)

        const w = new Render()//undefined;没有值或者只要一个值传递的时候,
                                 缺少的属性值为undefined

        console.log(p)
        console.log(s)
        console.log(w)
    </script>

须知
- 笔试题比较常见
构造函数复用的时候,调用的是地址,所有在判断 内置对象中方法是否相等时,结果为true
代码
 <script>
      function Person(username, height) {
        this.username = username;
      }
      const p1 = new Person('八戒1');
      // const p2 = new Person('八戒2');

      // 判断 p1 和 p2 在内存中 是否共用一个地址
      // console.log(p1 === p2); false

      const p3 = p1;
      //判断 p1 和 p2 在内存中是否 共用一个地址
      // console.log(p1 === p3);  true
      p3.username="悟空";
      console.log(p1);
    </script>
工作原理:
- 创建一个空对象,把它的地址赋值给this
- 把一些属性和方法添加到this上
- 把this的proto指向 构造函数的prototype
- 把this指向实例
构造函数的弊端
- 不同实例调用同一个方法,都会在栈中开辟一个空间,存储对应的数据地址;
🌈地址则指向放在堆中的方法属性,值等;
🔥这也就造成了内存消耗,复用一次方法,就占用一个新内存
代码:
function createStudent(name, age) {
      this.name = name;
      this.age = age;
      this.say = function () {       构造函数中 有方法say
        console.log(this.name);
      }
    }
    const obj = new createStudent("悟能1", 83);
    const obj1 = new createStudent("悟能2", 84);
    一个 实例化 调用一次;多个调用多次,占用多个内存
    console.log(obj.say === obj1.say); // false不是同一say方法 浪费了内存

解决内存消耗
将方法函数 写在构造函数体外面;可以理解为一个单独的个体,方法函数多次调用,存放地址不变
- 也造成了污染全局变量的问题
 // 提前将say 声明好,单独写出来
    function say() {  // 污染全局变量
      console.log(this.name);
    }
    function createStudent(name, age) {
      this.name = name;
      this.age = age;
      this.say = say
    }
    const obj = new createStudent("悟能1", 83);
    const obj1 = new createStudent("悟能2", 84);

    console.log(obj.say === obj1.say); // true

原型技术
在构造函数的原型上 存放函数方法
同时解决了浪费内存问题和污染全局变量问题
prototype🔥
理解
- 原型的单词是
prototype, 原型的这个名字是行业内共同认可的名字。 - 原型本质是一个对象,理解为
JavaScript自动帮我们添加的 - 原型是
JavaScript自动帮我们在定义构造函数的时候添加的 - 所有构造函数的实例,共享一个原型,内置原型
prototype,可添加 - 原型上一般是挂载函数
` 
通用代码设计
    <script>
       通用代码 的设计
       function Person() {
            //💥在构造函数内部,只会定义一些 非函数类型的属性🔥(普通属性)
                 也就是实例.普通属性 都用this
            this.name = '斑马';
             this.height = 180
             this.color = '白色'
         }
        //🌈方法 函数(行为) 全部定义在  构造函数的原型上🌸
       Person.prototype.say = function () {
          console.log('say 函数');
        };
         Person.prototype.toggle = function () {
             console.log('toggle');
        };
       const p1 = new Person()
        console.log(p1)


        function Person(username, height) {
            this.username = username
            this.height = height
        }
        //原型上的方法也可以通过 this 来访问实例的属性

        Person.prototype.sayName = function () {
            console.log(this.username)
        }
        const p1 = new Person('wu空', 180)
        const p2 = new Person('八戒', 180)
        p1.sayName()
        p1.sayHeight()
        // console.log(p1)
        // console.log()
        // p1.toString() 原型--原型内置的函数
        p2.sayName()
        p2.sayHeight()
    </script>
小整合代码
将以往正常实现功能需求的代码,利用构造函数封装起来,简化升级
思维养成!!!构思!!!
敲代码
实现:
<!DOCTYPE html>
<html lang="en">
<head>
    <meta charset="UTF-8">
    <meta http-equiv="X-UA-Compatible" content="IE=edge">
    <meta name="viewport" content="width=device-width, initial-scale=1.0">
    <title>Document</title>
    <style>
        div {
            width: 100px;
            height: 100px;
            background-color: red;
            margin: 100px 0 0 100px;
        }
    </style>
</head>
<body>
    <button>按钮一:点击一下出现div效果</button>
    <button>按钮二:点击一下div效果放大</button>
    <script>
        //使用构造函数  将实现功能封装起来

        //获取button
        const btn1 = document.querySelector('button:nth-Child(1)')
        const btn2 = document.querySelector('button:nth-Child(2)')

        //构造函数
        function Drr() {
            //实例.属性=。。。。。。
            this.dom = document.createElement("div")
        }
        //避免消耗内存和污染全局变量,,使用原型prototype
        // 构造函数名.原型.函数名 =  function () {}
        Drr.prototype.appendChild = function () {
            //(插入的位置).appendChild(元素)
            document.body.appendChild(this.dom)
        }
        Drr.prototype.scale = function () {
            this.dom.style.transform = "scale(2)"
            this.dom.style.transition = "3s"
        }

        //构造函数封装  功能函数
        const a = new Drr()
        //绑定点击事件
        btn1.addEventListener('click', function () {
            a.appendChild()
        })
        btn2.addEventListener('click', function () {
            a.scale()
        })
    </script>

</body>
</html>
原型链继承
call()借调
借用别人的函数,给自己使用
可以修改this指向
a.方法.call(b) b调用了a的方法
体验
子类继承父类
   <script>
      function Parent(name, color, height, weight) {
        // 本来 this的指向 =  Parent 的实例!!
        this.name = name;
        this.color = color;
        this.height = height;
        this.weight = weight;
      }
      function Son(name, color, height, weight, money) {
        // Son   this 指向 Son的实例!!
        // call()    ehis借用了Parent方法  来给Son的实例 赋值!!!
        🔥Parent.call(this, name, color, height, weight);
          // 儿子 继承了父亲的属性
        this.money = money;
      }
      Parent.prototype.say = function () {
        console.log('这个是父亲的行为');
      };
      🔥Son.prototype.say = Parent.prototype.say;
             // 儿子 继承 了父亲的行为 方法//下面有升级
      const s= new Son(1,2,3,4,5);
      console.log(s);
    </script>
  </body>
</html>
es5使用-面对对象
构造函数+原型+call来实现;
目前主流浏览器都通用;难
代码理解
<body>
    <script>
        function Parent(name, color, height) {
            this.name = name;
            this.color = color;
            this.height = height;
        }
        Parent.prototype.say = function () {
            console.log("这个是父亲的行为")
        }//父类  可以有多种不同的方法

        Parent.prototype.say = function () {
            console.log("这个是父亲的行为")
        }

        function Son(name, color, height) {
            //父亲的值  借调
            Parent.call(this, name, color, height);
            this.money = money
        }

        //子原型方法say=父原型方法say
        // Son.prototype.say = Parent.prototype.say //一种方法,这样写可以,多种父方法继承就比较繁琐

        // Son.prototype=Parent.prototype //子  继承父的原型链;但如果在子上添加方法,这样写也会增加父  的方法

        //所以使用  剩余运算符...
        Son.prototype = { ...Parent.prototype }
        Son.prototype.a = function () { }  //满足继承,又不影响父 的原型

        console.log(Parent.prototype)
        console.log(Son.prototype)
        const s = new Son(1, 2, 3)
        console.log(s)

    </script>
</body>
案例优化体验:
 <body>
    <script>
      // 父亲 共有 构造函数
      function Element(tagName) {
        // 创建元素
        this.dom = document.createElement(tagName);
      }

      Element.prototype.appendBody = function () {
        document.body.appendChild(this.dom);
      };
      // 儿子1
      function DivElement(content) {
        // this.dom = document.createElement('div');
        💥Element.call(this, 'div');
        this.dom.innerText = content;
      }
      💥DivElement.prototype = { ...Element.prototype };

      // 儿子2
      function ImgElement(src) {
        Element.call(this, 'img');
        this.dom.src = src;
      }
      ImgElement.prototype = { ...Element.prototype };

      const divElement = new DivElement('这个是div的 内容');

      setTimeout(() => {
        divElement.appendBody();
      }, 1000);

      const imgElement = new ImgElement('./images/1.jpg');
      setTimeout(() => {
        imgElement.appendBody();
      }, 2000);
    </script>
  </body>
</html>
es6 -面对对象
使用class类
很常用;简单
同时解决了内存消耗和污染全局变量的 问题
继承写法:
//class 首字母大写
class Parent{
    //构造器🌸
    constructor{
        //super()写在构造器内部  //需要继承父类的话,可添加super()
        super()🍄  //相当于调用父级的构造函数
    }
//方法函数写构造器外面🎃
   say(){

   }
}
Code example理解
 <script>
     //简单常规写法
        class DivElement {
            🍁constructor(text) {
                this.dom = document.createElement('div')
                this.dom.innerHTML = text
            }
            //函数简写
            appendBody() {
                document.body.appendChild(this.dom)
            }
        }
        console.dir(DivElement)
        const divElement = new DivElement('添加成功')
        setTimeout(() => {
            divElement.appendBody()
        }, 1000)
    </script>
使用class类 继承
    <script>
        //父类
        class Parent {
            constructor(username) {
                console.log("父类的构造器")
                this.username = username
            }
            sau() {
                console.log('父类中的方法')
            }
        }
        //子类 extends  继承父类:
        //1.不写构造器constructor,默认自己加构造器+并调用调用super(),===默认调用父类的构造器

        //  2. 写构造器  里面调用super();
        //  理解为父类的构造器===Person.call(this)
        class Son extends Parent {
            constructor(username, height) {
                super(username) //使用super()就是调用父类的构造器constructor
                this.height = height // 子类添加 新属性
            }
            fly() {   // 子类添加 新方法
                console.log('我会飞')
            }
        }
        const s = new Son('儿子', 200) //new Son()就代表调用 构造器
        console.log(s)
        console.dir(Parent)
    </script>
再次优化案例
    <script>
        //共有 父类
        class Parent {
            constructor(tagName) {
                this.dom = document.createElement(tagName)

            }
            appendBody() {
                document.body.appendChild(this.dom)
            }
            scale(rate) {
                this.dom.style.transition = '1s'
                setTimeout(() => {
                    this.dom.style.transform = `scale(${rate})`
                }, 500)

            }
        }

        class DivElement extends Parent {
            constructor(text) {
                super("div");
                //调用父类的构造器
                this.dom.innerHTML = text
            }
        }

        class ImgElement extends Parent {
            constructor(src) {
                super('img');
                this.dom.src = src
            }
        }

        const divElement = new DivElement('div添加成功')
        setTimeout(() => {
            divElement.appendBody()
        }, 1000)
        const imgElement = new ImgElement('./images/1.png')
        setTimeout(() => {
            imgElement.scale(.3)
            imgElement.appendBody()
        }, 2000)
    </script>
call bind apply
共同点与区别;面试常问
<script>
        /*
        call   bind   apply
        1. 共同点:都可以修改 this 的指向
          写法:1.1  call  apply  直接使用 ; bind不能直接使用
                    obj.say.call(newObj)
                    obj.say.apply(newObj)
               1.2 bind被使用的时候,不会直接调用原来函数的方法say,
                    而是会返回一个新函数,需要我们自己去调用
        */
     /*  2. call 和 apply 区别   传递参数的写法 不同!!
           1 obj.say.call(newObj,1,2);  在实例后面直接写值,逗号隔开

           2 obj.say.apply(newObj,[1,2]); apply传递的是数组,需要用[]包裹值

           3 (obj.say.bind(newObj))(1,2); bind在调用成功后,
             (obj.say.bind(newObj,1,2))();   值写在后面的小括号,或者和实例中的括号里,都可以比较随意
       */
        const obj = {
            username: "八戒",
            say(a, b) {
                console.log(this)
                console.log(a, b)
            }
        };
        const newObj = {
            username: '悟空'
        }
        obj.say.call(newObj)
        obj.say.apply(newObj)

          obj.say.bind(newObj)❌❌❌
         💛const newSay = obj.say.bind(newObj); // newObj
         newSay();    可以使用或者下一写法
         🧡(obj.say.bind(newObj))(); // newObj

        // obj.say.call(newObj,1,2);// 传参
        // obj.say.apply(newObj,[1,2]);// 传参 数组
        (obj.say.bind(newObj))(1,2);

    </script>
检测数据类型
typeof--检测简单(基础)数据类型


instanceof---检测复杂数据类型(引用);
             同时可以判断实例和构造函数的关系,
             是通过new()出来的构造函数,返回true;
             不是,返回false
 <script>
        //复杂数据类型  instanceof
        function Person() {
        }
        function Pe() {
        }
        const p1 = new Person()
        const p2 = new Pe()
        console.log(p1 instanceof Person)  //true
        console.log(p1 instanceof Pe)    //false
    </script>
箭头函数没有 this指向

原型链
 <script>
      /*
      原型链   一层关系  多个对象 可以通过 原型 技术 层层的关联
      prototype  构造函数点出来
      __proto__  实例点
       */
      // const div=document.querySelector("div")
      // console.dir(div)

      function Person() {}

      const p1 = new Person();
      // console.log(Person.prototype === p1.__proto__);
      p1._
    </script>
可参考 js高级

若有收获,就点个赞吧
0 人点赞
