weex组件
组件的定义
组件的定义与写页面没有区别,它是页面某一块UI的拆分,同时其维护简单可扩展程度高
// 定义了一个展示aaa的组件<template><text>aaa</text></template>
组件参数定义
<template><text>{{ showText }}</text></template><script>export default {// 2种写法,推荐使用第一种// 定义传入参数的类型和默认值props: {showText: {type: String,default: ''}}// 仅定义传入参数的名称props: [ 'showText' ]// 下面列出一些常用的props的写法props: {// 基础的类型检查 (`null` 和 `undefined` 会通过任何类型验证)propA: Number,// 多个可能的类型propB: [String, Number],// 必填的字符串propC: {type: String,required: true},// 带有默认值的数字propD: {type: Number,default: 100},// 带有默认值的对象propE: {type: Object,// 对象或数组默认值必须从一个工厂函数获取default: function () {return { message: 'hello' }}},// 自定义验证函数propF: {validator: function (value) {// 这个值必须匹配下列字符串中的一个return ['success', 'warning', 'danger'].indexOf(value) !== -1}}}}</script>
当 prop 验证失败的时候,Vue 将会产生一个控制台的警告。
组件传值
// 传值分为静态传值与动态传值

// 定义了一个text-component的组件,用以展示传入的文本数据
// text-component.vue
<template>
  <text>{{ showText }}</text>
</template>

<script>
  export default {
    props: {
      showText: {
        type: String,
        default: ''
      },
    }
  }
</script>

// page/index.vue主页面
<template>
    <!-- 静态传值 -->
    <text-component showText="xxxx" />
    <!-- 动态传值 这里的「:」是v-bind的简写 -->
    <text-component :showText="someText" />
</template>

<script>
  import textComponent from '@/src/components/text-component'
  export default {
    components: {
      textComponent
    },
    data() {
      return {
          someText: 'abcd'
        }
    }
  }
</script>
组件事件响应
通常我们定义组件的时候,往往会需要把点击事件响应给父级组件
扩展阅读:vue自定义事件
// 定义了一个text-component的组件,用以展示传入的文本数据
// 给text绑定一个点击事件(onTextClick),以告知父级组件子组件点击了文本
// text-component.vue
<template>
  <text @click="onTextClick">{{ showText }}</text>
</template>

<script>
  export default {
    props: {
      showText: {
        type: String,
        default: ''
      },
    },
    methods: {
      onTextClick() {
        this.$emit('onTextClick', this.showText)
      }
    }
  }
</script>

// index.vue主页面
<template>
    <!-- 接收text-component 提供的文本点击事件(onTextClick) -->
    <text-component :showText="someText" @onTextClick="onComponentTextClick"/>
</template>

<script>
  import TextComponent from '@/src/components/text-component'
  export default {
    components: {
      TextComponent
    },
    data() {
      return {
          someText: 'abcd'
        }
    },
    methods: {
      onComponentTextClick(text) {
        console.log('text = ', text)
      }
    }
  }
</script>
组件插槽
为了保证业务的复用性及可维护性,我们将特定业务封装起来,并提供插槽给外部使用,以达到同一个逻辑能适用其他业务
如卡片多选、列表的头部、卡片、尾部等
扩展阅读:vue插槽
// 没想到例子
原生组件
关于原生组件以iOS为例
原生组件的注册与使用,需要借助weexSDK的模块注册自定义组件
扩展阅读:weex扩展组件、weex组件生命周期
创建流程:
- 创建weex原生组件,继承自
WXComponent,默认能力与div一致 - 复写相关生命周期方法
- 实例方法(相关内容的初始化) ```objectivec
(instancetype)initWithRef:(NSString )ref type:(NSString )type styles:(NSDictionary )styles attributes:(NSDictionary )attributes events:(NSArray )events weexInstance:(WXSDKInstance )weexInstance { if (self = [super initWithRef:ref type:type styles:styles attributes:attributes events:events weexInstance:weexInstance]) {
  // do something  ...
  YYLable *yyLabel = [[YYLabel alloc] init];
  // ...
} return self; } ```
loadView
提供内容容器。如果未覆盖 loadView 提供自定义 view,会让 WXComponent 基类创建 WXView。WXView 继承自 UIView 。如利用 YYLabel 实现富文本
@property (nonatomic, strong) YYLabel *richLabel;

- (UIView *)loadView {
    return _richLabel;
}
viewDidLoad对组件 view 需要做一些配置,比如设置 delegate,可以在viewDidLoad生命周期做。如果当前 view 没有添加 subview 的话,不要设置 view 的 frame,WeexSDK 会根据 style 进行排版后设置。如果当前组件需要自己撑开容器,则需要指定容器的高度
- (void)viewDidLoad {
    _yyLabel.delegate = self;
}

// 如果遇到组件其高度是不定的,需要提前计算好高度后,通过以下方法返回给weex
- (CGSize (^)(CGSize))measureBlock {
    return ^(CGSize size){
        return CGSizeMake(100, 100);
    };
}
- 注册相关组件
[WXSDKEngine registerComponent:@"fg-rich-text" withClass:[FGRitchTextComponent class]];
weex页面使用原生组件
上面例子定义了一个fg-rich-text的原生组件,在weex的使用方式如下,无需额外的注册代码
<template>
    <fg-rich-text></fg-rich-text>
</template>
原生组件参数定义与传值
// 原生组件内部实现
- (instancetype)initWithRef:(NSString *)ref type:(NSString *)type styles:(NSDictionary *)styles attributes:(NSDictionary *)attributes events:(NSArray *)events weexInstance:(WXSDKInstance *)weexInstance {
    if (self = [super initWithRef:ref type:type styles:styles attributes:attributes events:events weexInstance:weexInstance]) {
        // do something  ...
        // attributes 为组件参数的传递,这里定义一个content来表述富文本字段
        NSString *content = attributesarr[@'content'];
        YYLable *yyLabel = [[YYLabel alloc] init];
        yylabel.attributedText = [[NSAttributedString alloc] initWithString:content];
        // ...
    }
    return self;
}

// 当content属性变化时,需要同步给组件内部
- (void)updateAttributes:(NSDictionary *)attributes {
    if (attributes[@"content"]) {
        NSString *content = attributesarr[@'content'];
        _yylabel.attributedText = [[NSAttributedString alloc] initWithString:content];
    }
}

// weex的实现
<template>
    <fg-rich-text content="hello world!"></fg-rich-text>
</template>
原生组件事件响应
添加自定义事件
假设给fg-rich-text组件添加一个点击事件
<template>
    <fg-rich-text @textClick="textClick"></fg-rich-text>
</template>
<script>
  export default {
    methods: {
      textClick(params) {
        console.log('rich-text click', JSON.stringify(params))
      }
    }
  }
</script>
// FGRichTextComponent.m

// 覆盖组件生命周期方法,记录事件是否需要处理
// 添加额外的成员变量,以记录是否处理该事件
- (void)addEvent:(NSString *)eventName {
    if ([eventName isEqualToString:@"textClick"]) {
        _recordTextClick = YES;
    }
}

- (void)removeEvent:(NSString *)eventName {
    if ([eventName isEqualToString:@"textClick"]) {
        _recordTextClick = NO;
    }
}

// 在对应业务添加相关事件
- (void)onRichTextClick {
    if (_recordTextClick) {
        [self fireEvent:@"textClick" params:@{@"text":@"aabbcc"} domChanges:nil];
    }
}
添加组件对象方法
需要在原生组件使用SDK提供的宏 WX_EXPORT_METHOD 声明组件方法提供给前端使用
// FGRichTextComponent.m

@implementation FGRichTextComponent

WX_EXPORT_METHOD(@selector(focus))

- (void)focus {
    NSLog(@"hello word!");
}

@end
<template>
    <fg-rich-text ref="richText"></fg-rich-text>
</template>

<script>
  export default {
    mounted() {
      this.$refs.richText.focus()
    }
  }
</script>
页面布局
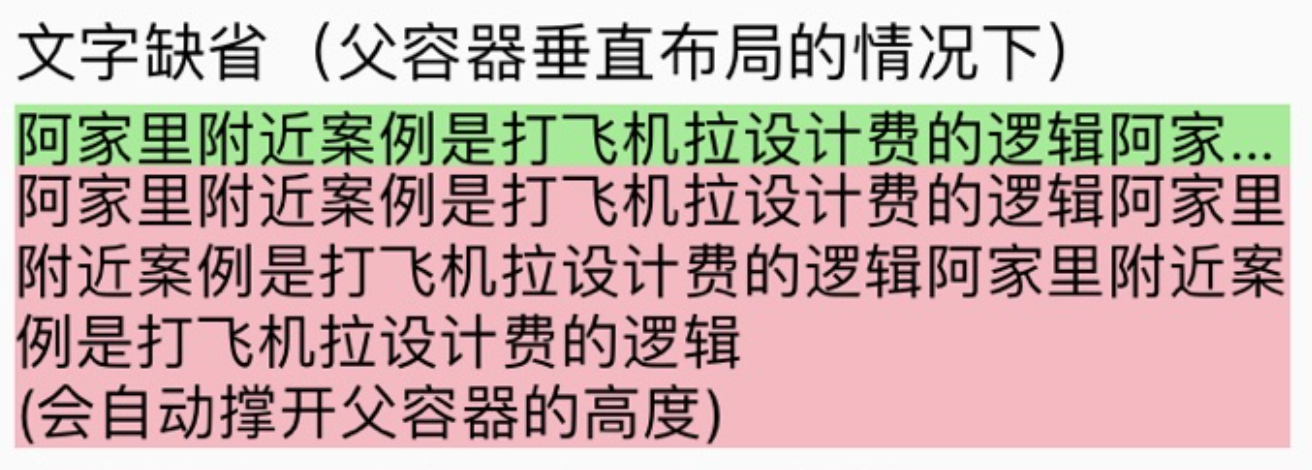
文本缺省
当文本长度超出规定的宽度时,需要展示…
// 普通情况
<text class="ellipsis">123</text>
.ellipsis {
    text-overflow: ellipsis;
}
当父容器为垂直布局
<template>
  <div class="block">
    <text class="ellipsis-text">{{ '阿家里附近案例是打飞机拉设计费的逻辑阿家里附近案例是打飞机拉设计费的逻辑阿家里附近案例是打飞机拉设计费的逻辑\n(会自动撑开父容器的高度)' }}</text>
    </div>
</template>
<style>
/* 垂直布局文本缺省 */
.block {
  flex-direction: column;
}
.ellipsis-text {
  /* 无需额外属性 */
}
</style>
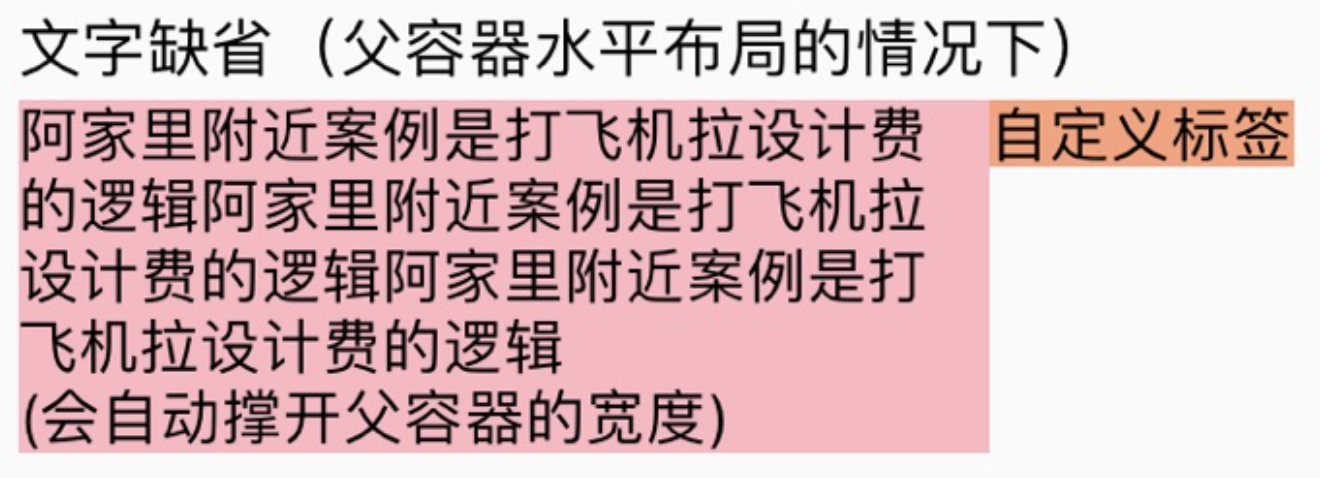
当父容器为水平布局
<template>
  <div class="horizal-text-wrapper">
    <div class="horizal-text-container">
      <text class="horizal-text">{{ '阿家里附近案例是打飞机拉设计费的逻辑阿家里附近案例是打飞机拉设计费的逻辑阿家里附近案例是打飞机拉设计费的逻辑\n(会自动撑开父容器的高度)' }}</text>
         </div>
    <text class="tag">自定义标签</text>
    </div>
</template>
<style>
/* 水平布局文本缺省 */
.horizal-text-wrapper {
  flex-direction: row;
  align-items: flex-start; /* 撑开父容器关键代码 */
}
.horizal-text-container {
  flex: 1;
}
.horizal-text {
  /* lines: 2;
  text-overflow: ellipsis; */
}
.tag {
  background-color: lightsalmon;
}
</style>
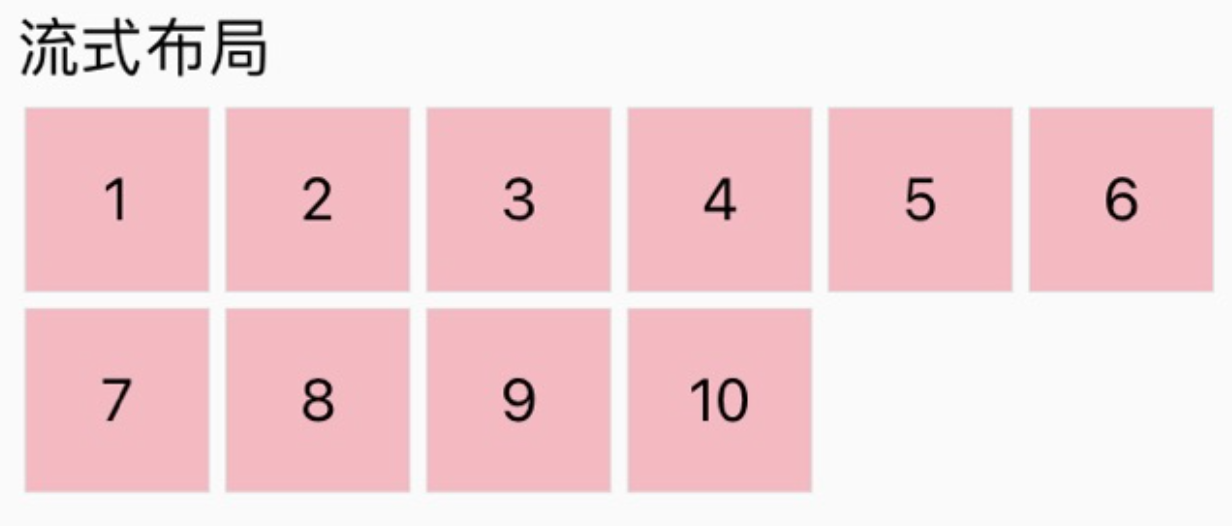
流式布局
<template>
  <div class="flex-wrap-container">
    <div v-for="key in 10" :key="key" class="flex-item">
      <text>{{ key }}</text>
    </div>
  </div>
</template>

<style>
/* 流式布局 */
.flex-wrap-container {
  flex-direction: row;
  flex-wrap: wrap;
}
.flex-item {
  width: 50wx;
  height: 50wx;
  border-color: #e1e1e1;
  border-width: 1px;
  margin: 2wx 2wx;
  justify-content: center;
  align-items: center;
  background-color: lightpink;
}

</style>
布局练习(骰子)
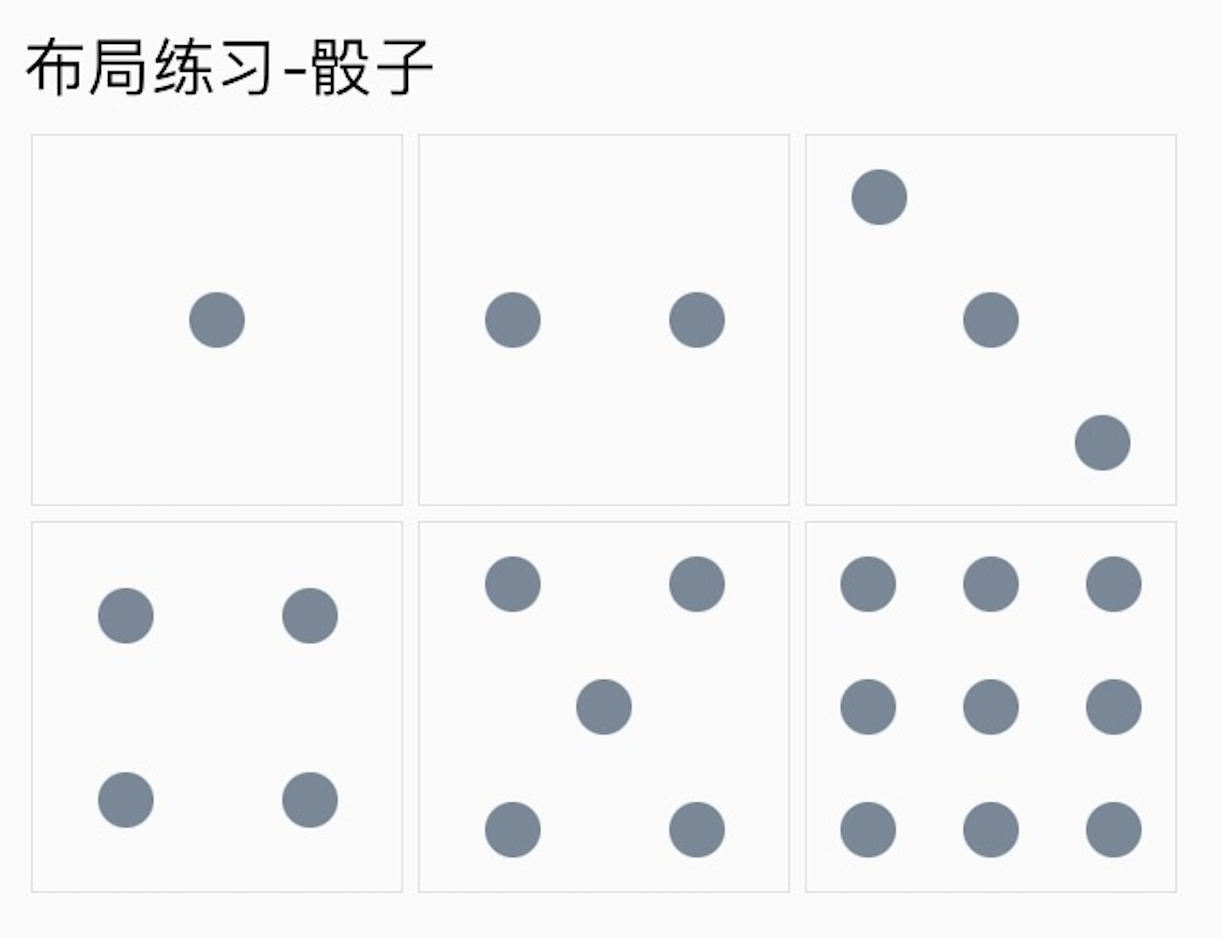
使用 flex 布局实现上述功能,相关代码查看 layout-demo/index.vue
Lodash赋值&逻辑判断
扩展阅读:Lodash
取值 - get
// 获取对象的某个属性,可以是较深层级的
const dataList = [{ id: 'aaa' , model: { a: 'a', b: 'b' }}, { id: 'bbb', model: { a: 'a', b: 'b' } }]

// 获取第一个对象的id
_.get(dataList, '0.id', '')
// => id: 'aaa'

// 获取第一个对象的model的a属性
_.get(dataList, '0.model.a', '')
// => a: 'a'
对象添加特定业务属性 - assign
// 卡片数据添加一个isSelected属性,用以判断是否选中
const listData = { id: 'xx' }
const newListData = _.assign({}, listData, { isSelected: true })
数组添加元素 - push
const list = [1,2,3]
list.push(4)
// => list = [1,2,3,4]
数组过滤指定元素 - filter/reject
// 过滤掉返回值为true的元素
var users = [
  { 'user': 'barney', 'age': 30, 'active': true },
  { 'user': 'fred',   'age': 40, 'active': false }
];

_.filter(users, (user) => {
  return user.age > 35 // 关键代码
})
// => Objects for ['barney']


// 过滤掉返回值为false的元素
_.reject(users, (user) => {
  return user.age > 35 // 关键代码
})
// => Object for ['fred']
遍历-全遍历 - forEach
var users = [
  { 'user': 'barney', 'age': 30, 'active': true },
  { 'user': 'fred',   'age': 40, 'active': false }
];

user.forEach((user) => {
  console.log('user = ', JSON.stringify(user))
})
遍历-条件终止 - every
// 在遍历过程中遇到假值,则停止遍历
var users = [
  { 'user': 'barney', 'age': 30, 'active': true },
  { 'user': 'fred',   'age': 40, 'active': false }
];

// 检查是否都大于18岁
_.every(users, (user) => {
  return user.aget > 18
})
// => true

_.every(users, (user) => {  // 如果是属性的检查可简写成 _.every(users, 'active')
  return user.active
})
// => false
遍历-修改数据 - map
// 遍历数组,并返回新的结构
var users = [
  { 'user': 'barney', 'age': 30, 'active': true },
  { 'user': 'fred',   'age': 40, 'active': false }
];

_map(users, (user) => {
  return user.age
})
// => [30, 40]
查找数组特定数据 - find
// 返回第一个满足的元素
var users = [
  { 'user': 'barney',  'age': 30, 'active': true },
  { 'user': 'fred',    'age': 40, 'active': false },
  { 'user': 'pebbles', 'age': 1,  'active': true }
];

_.find(users, (user) => {
  return user.age > 35
})
// => Object for 'fred'
查找数组元素下标 - findIndex
// 查找第一个满足条件的元素下标
var users = [
  { 'user': 'barney',  'age': 30, 'active': true },
  { 'user': 'fred',    'age': 40, 'active': false },
  { 'user': 'pebbles', 'age': 1,  'active': true }
];

_.findIndex(users, (user) => {
  return user.age > 35
})
// => 1
摘取对象特定的属性 - pick
// 摘取对象中的某些成员变量
var object = { 'a': 1, 'b': '2', 'c': 3 };

_.pick(object, ['a', 'c']);
// => { 'a': 1, 'c': 3 }
全局存储
对于weex而言已经拥有 storage 服务来提供全局的存储服务。项目中的 storageService 以更内聚的方式来管理weex应用内的存储细节,其中需要在配置表中配置你需要存储数据的唯一值
使用方式
// 文件路径`modules/storageService/index.js`
在 stroageMapList 中配置用以存储的唯一值,如果唯一值重复,则取顺序找到的第一个值
const stroageMapList = [
  {
    // 门店签到缓存
    type: 'shopCheckin',
    cacheKey: 'CHECKIN_CACHE_FORM',
  },
]

// 缓存服务引用
const storageService = require('@/modules/storageService/index')
增/改
// 缓存服务引用
const storageService = require('@/modules/storageService/index')

// 存储对象
storageService.saveWithStorage('shopCheckin', {name: '111', address: 'bbbb'})
    .then(() => {
      // handle save Success action
    })
    .catch((error) => {
      // handle save Error action
    })

// 存储数字
storageService.saveWithStorage('isFistShow', 1)

// 存储布尔值
storageService.saveWithStorage('isFistShow', true)
删
// 缓存服务引用
const storageService = require('@/modules/storageService/index')

// 删除全局缓存
storageService.removeStorage('isFistShow')
查
// 缓存服务引用
const storageService = require('@/modules/storageService/index')

// 删除全局缓存
storageService.getStorage('isFistShow')
    .then((result) => {
      // result = 存进去的值,可以是data、Number、Boolean
    })
定时存储
对于特定的需求例如表单,会有定时保存表单的需求,在尖毛草就很常见,基于这个场景封装了一个可以定时存储的API
/**
 * 自动保存数据(默认5s一次)
 * @param {String} type
 * @param {Function} getDataFunction 获取data的一个函数,需要返回存储信息
 * @param {Number} interval 间隔时间
 */
function autoSaveStorage(type, getDataFunction = () => ({}), interval = 5000) {...}

// 使用
// 缓存服务引用
const storageService = require('@/modules/storageService/index')

storageService.autoSaveStorage('shopCheckin', () => {
    return {
        title: this.title,
    name: this.name
  }
}, 5000)
跨页面传值
channel监听
监听一次
// 注册channel
const receiver = new BroadcastChannel('CHANNEL_KEY_NAME')
receiver.onmessage = (event) => {
  receiver.close() // 主动关闭接收器
}

// 也可以在外部关闭接收器
receiver.close()
监听多次
// 与监听一次的形式类似,只是不主动关闭接收器
// 注册channel
const receiver = new BroadcastChannel('CHANNEL_KEY_NAME')
receiver.onmessage = (event) => {
    // do something
  ...
}
响应式
开发过程中,在某些值变更的时候,我们期望能够接收到此次变更的时机以及内容,这时候需要用到vue其中一个钩子函数 watch
扩展阅读:vue的watch函数
监听对象变化
<script>
    export default {
    data() {
      return {
        a: 1,
        b: 2,
        c: 3,
        d: 4,
        e: {
          f: {
            g: 5
          }
        }
      }
    },
    watch: {

    }
  }
</script>
// 这里区分2种情况
// 1.1 - 监听对象整体变化
watch: {
  // 监听a的变化,同时吧新值、旧值同时返回
  a(val, oldVal) {
    console.log('新值 =', val, '旧值 = ', oldVal)
  },
}

// 1.2 - 监听对象某个属性的变化
watch: {
    // 监听this.e.f的值变化
    'e.f': {
        handler(object) {
            console.log('object = ', JSON.stringify(object))
        },
    immediate: true, // 开始之后马上被调用
    }
}
数组元素的变化
扩展阅读:vue检测变化注意事项
// 通常会有这么一个场景,我们需要监听一个数组对象的变化,如一个已选系统id列表,当值的变更,判断数组有无包含特殊的id,从而展示不同的表单项
如:
<template>
  <div v-if="isCustomSystem">
    // 自定义系统
  </div>
  <div v-else>
    // 内置系统
  </div>
</template>

<script>
  export default {
    data: {
      return {
          isCustomSystem: false,
          query: { // 表单数据结构
          selectedSystemList: [], // 已选系统列表
            },
          systemList: [
              {
                  key: 1,
                  name: '其他系统'
                },
          {
                  key: 2,
                  name: '小鹿系统'
                },
          {
                  key: 3,
                  name: '房友系统'
                },
          ]
        }
    },
        watch: {
      // 观测selectedSystemList的变化,从而改变是否展示自定义系统的逻辑
      'query.selectedSystemList': {
        handler(selectedSystemList) {
          const systemKey = _.first(selectedSystemList)
          const system = _.find(this.systemList, (sysyem) => sysyem.key === 1)
          if (_.find(this.systemList, (sysyem) => sysyem.key === 1) !== undefined) {
            this.isCustomSystem = true
          } else {
            this.isCustomSystem = false
          }
        }
      }
    },
    methods: {
      onAddSystemList() {
        // 赋值
        this.query.selectedSystemList = [1]
      }
    }
  }
</script>
从上面的例子可以看出,监听的意义在于业务的分离,以及可以保持组件的单一原则。让组件单纯做选择逻辑,而判断逻辑可以从组件分离出来

若有收获,就点个赞吧
0 人点赞
