微信登录
uniapp实现微信授权登录功能,微信授权登录主要是用到了三个api,分别是uni.getProvider,uni.login,uni.getUserInfo但是在此之前,先要做一些准备
如果是APP端
微信授权登录的前提是有微信appid,和appsercret
需要去微信开发者平台创建app,或者小程序填写相关信息申请应用的appid和appSecret,直接登录微信开发者平台微信开放平台 然后登录,按照提示进行申请就好啦,然后在manifest.json中进行配置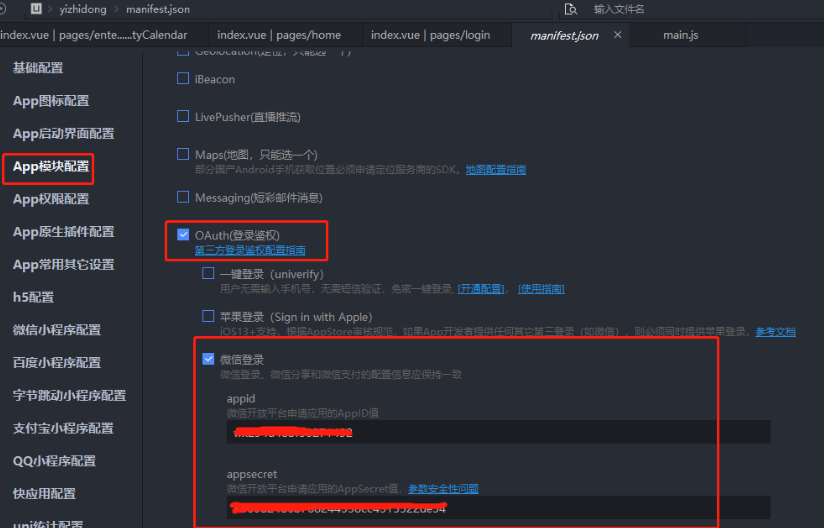
如果是没有appid和appSecret是无法是现在功能的
getUserInfo() {return new Promise((resolve, reject) => {uni.getUserProfile({lang: 'zh_CN',desc: '用户登录', // 声明获取用户个人信息后的用途,后续会展示在弹窗中,success: (res) => {console.log(res, 'resss')resolve(res.userInfo)},fail: (err) => {reject(err)}})})},//先登录,获取access_token,refresh_token,expiires_in,openid,scope,unionidgetLogin() {return new Promise((resolve, reject) => {uni.login({success(res) {console.log(res, 'res')//微信成功登录,获取到coderesolve(res)},fail: (err) => {console.log(err, 'logoer')reject(err)}})})},weixinLogin() {let that = this;uni.getProvider({service: 'oauth',success: function(res) {//支持微信、qq和微博等if (~res.provider.indexOf('weixin')) {console.log(res, 'ress')let userInfo = that.getUserInfo();let loginRes = that.getLogin();Promise.all([userInfo, loginRes]).then((result) =>{let userInfo = result[0];let loginRes = result[1];let access_token = loginRes.authResult.access_token;let openid = loginRes.authResult.openid;let data = Object.assign(loginRes.authResult, userInfo);that.$store.dispatch('Login', {type: 'weixin',url: that.url,data}).then(r => {if (r == 'ok') {uni.hideLoading()}}).catch(err => {uni.hideLoading();uni.showToast({icon: 'none',title: err})})})}},fail: function(err) {uni.hideLoading();uni.showToast({icon: 'none',title: err})}})},
对于微信小程序的微信登录,不用去配置权限,也不用使用getProvider,直接调用uni.login,uni.getUserInfo就可以啦
这里出现了新的api,uni.getUserProfile (微信基础库2.10.4版本对用户信息相关接口进行了调整,使用 uni.getUserInfo 获取得到的 userInfo 为匿名数据,建议使用 uni.getUserProfile 获取用户信息。)
为什么要用promise拉成平级?
在实践过程中,如果在uni.login中嵌套uni.getUserProfile会出现直接不能弹出获取授权弹框,因为login失败就不会在调用getUserProfile(授权行为) - 用户提现会相对较差
因此promise在这个时候就重出江湖 - 和上面是一样的,只是删除了其他多么的代码
getUserInfo() {return new Promise((resolve, reject) => {wx.getUserProfile({lang: 'zh_CN',desc: '用户登录',success: (res) => {resolve(res.userInfo)},fail: (err) => {reject(err)}})})},getLogin() {return new Promise((resolve, reject) => {wx.login({success(res) {resolve(res.code)},fail: (err) => {reject(err)}})})},login() {let userInfo = this.getUserInfo();let wxCode = this.getLogin();Promise.all([userInfo, wxCode]).then((res) => {//都获取权限成功}).catch(err => {})}
app实现微信登录
uni.getProvider({service: 'oauth',success: function(res) {//支持微信、qq和微博等if (~res.provider.indexOf('weixin')) {uni.login({provider: 'weixin',success: function(loginRes) {// 获取用户信息uni.getUserInfo({provider: 'weixin',success: function(infoRes) {let data = Object.assign(loginRes.authResult, infoRes);that.$store.dispatch('Login', {type: 'weixin',url: that.url,data}).then(res => {if (res == 'ok') {uni.hideLoading()}fail: function(err) {uni.hideLoading();uni.showToast({icon: 'none',title: err})}})},fail: function(err) {uni.hideLoading();uni.showToast({icon: 'none',title: err})}});}},fail: function(err) {uni.hideLoading();uni.showToast({icon: 'none',title: err})}})},
app的微信登录需要进行前面的配置,其次是不用进行getUserProfile。
简易版本
直接登录获取用户信息
uni.login({provider: 'weixin',success: function (loginRes) {console.log(loginRes.authResult);// 获取用户信息uni.getUserInfo({provider: 'weixin',success: function (infoRes) {console.log('用户昵称为:' + infoRes.userInfo.nickName);}});}});
获取地理位置*
https://blog.csdn.net/qq_37899792/article/details/111572423https://blog.csdn.net/oneya1/article/details/112708216
1.源生小程序
原生的微信小程序需要在app.json中配置permission字段。uni-app则需要在manifest.json中配置,如下图: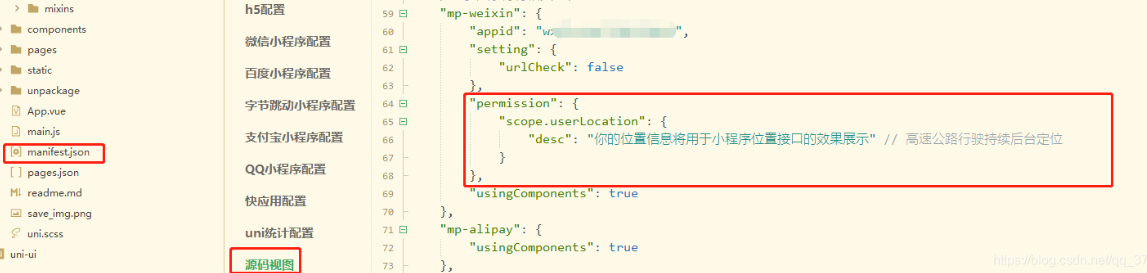
2.查看授权以及申请授权获取地理位置
getUserLocation() {uni.getSetting({success: (res) => {if (!res.authSetting['scope.userLocation']) {console.log(res)uni.authorize({scope: 'scope.userLocation',success: () => { //1.1 允许授权this.geo();},fail:()=> { //1.2 拒绝授权console.log('拒绝')this.postAddress('')}})} else {this.geo();}}})},
uni.authorize
提前向用户发起授权请求。调用后会立刻弹窗询问用户是否同意授权小程序使用某项功能或获取用户的某些数据,但不会实际调用对应接口。如果用户之前已经同意授权,则不会出现弹窗,直接返回成功。如果用户之前拒绝了授权,此接口会直接进入失败回调,一般搭配uni.getSetting和uni.openSetting使用
3.获取经纬度之后,再借助第三方接口,将获取到的经纬度转为具体的地理位置(可以借助百度的或者腾讯的)。这里用的是腾讯的
注:这个第三方接口(https://apis.map.qq.com)需要在小程序平台设置request安全域名
1 在腾讯平台申请自己的秘钥(申请地址:腾讯位置服务 - 立足生态,连接未来)
2下载小程序js微信小程序JavaScriptSDK v1.0 引入自己的文件
3 var QQMapWX = require(‘@/common/js/qqmap-wx-jssdk.min.js’);
具体代码如下:
// 获取定位城市//引入第三方接口geo() {var QQMapWX = require('@/common/js/qqmap-wx-jssdk.min.js');this.qqmapsdk = new QQMapWX({key: 'DL6BZ-***************-6XBEQ' //自己的key秘钥 http://lbs.qq.com/console/mykey.html 在这个网址申请});//使用接口获取本地地址uni.getLocation({type: 'wgs84',success: (res) => {var latitude = res.latitudevar longitude = res.longitudevar speed = res.speedvar accuracy = res.accuracy//第三方接口this.qqmapsdk.reverseGeocoder({location: {latitude: latitude,longitude: longitude},success: (res) => {let loginAddress = res.result.ad_info.namethis.postAddress(loginAddress)},fail: (res) => {console.log("fail");console.log(res);},complete: (res) => {}});}})},//postAddress请求后台接口postAddress(loginAddress) {let shareUserId = uni.getStorageSync('shareUserId')//分享人id//wx.getLaunchOptionsSync()获取小程序启动时的参数。与 App.onLaunch 的回调参数一致。let scene = wx.getLaunchOptionsSync().scene//登录场景this.$http({method: 'POST',hideLoading: true,url: '/api/****Info',data: {shareUserId,scene,loginAddress},}).then(res => {console.log(res)if (res.code == 0) {}}).catch(() => {}).finally(res => {})},
完整流程
// 初次位置授权getAuthorize() {return new Promise((resolve, reject) => {uni.authorize({scope: "scope.userLocation",success: () => {resolve(); // 允许授权},fail: () => {reject(); // 拒绝授权},});});},// 确认授权后,获取用户位置getLocationInfo() {const that = this;uni.getLocation({type: "gcj02",success: function(res) {// 暂时that.longitude = res.longitude; //118.787575;that.latitude = res.latitude; //32.05024;console.log("获取当前的用户经度", that.longitude);console.log("获取当前的用户纬度", that.latitude);var long = 0;var lat = 0;//小数点保留六位 经度if (that.longitude.toString().indexOf('.') > 0) {const longlatsplit = that.longitude.toString().split('.');if (longlatsplit.length >= 2) {long = parseFloat(longlatsplit[0] === "" ? 0 : longlatsplit[0]) + parseFloat("." + longlatsplit[1].slice(0,6));}}if (that.latitude.toString().indexOf('.') > 0) {const longlatsplit1 = that.latitude.toString().split('.');if (longlatsplit1.length >= 2) {lat = parseFloat(longlatsplit1[0] === "" ? 0 : longlatsplit1[0]) + parseFloat("." + longlatsplit1[1].slice(0,6));}}cookie.set("longitude",long);cookie.set("latitude",lat);console.log("纬度", lat);// this.distance(that.latitude,that.longitude);that.markers = [{id: "",latitude: res.latitude,longitude: res.longitude,iconPath: "../../static/img/phone.png",width: that.markerHeight, //宽height: that.markerHeight, //高}, ];that.getList();},});},// 拒绝授权后,弹框提示是否手动打开位置授权openConfirm() {return new Promise((resolve, reject) => {uni.showModal({title: "请求授权当前位置",content: "我们需要获取地理位置信息,为您推荐附近的美食",success: (res) => {if (res.confirm) {uni.openSetting().then((res) => {if (res[1].authSetting["scope.userLocation"] === true) {resolve(); // 打开地图权限设置} else {reject();}});} else if (res.cancel) {reject();}},});});},// 彻底拒绝位置获取rejectGetLocation() {uni.showToast({title: "你拒绝了授权,无法获得周边信息",icon: "none",duration: 2000,});},getList() {console.log("获取周围美食");},onReady() {// wx请求获取位置权限this.getAuthorize().then(() => {// 同意后获取this.getLocationInfo();}).catch(() => {// 不同意给出弹框,再次确认this.openConfirm().then(() => {this.getLocationInfo();}).catch(() => {this.rejectGetLocation();});});},
实现uniapp打开地图app,并且将要去得店铺标记经纬度传入
注意:uni.openLocation({latitude: parseFloat(lat),//------》传入的经纬度必须是浮点数, 不能传入字符串,否则地图打不开longitude:parseFloat(lon),scale: 18})
methods{//先获取当前位置,然后通过位置坐标,在内置地图中定位到当前位置openMap(lon,lat){console.log("获取经纬度ssssfff",lon,lat);//打开地图,并将门店位置传入uni.getLocation({success: res => {// res.latitude=lat;// res.longitude=lon;console.log('location success', parseFloat(lat),parseFloat(lon))uni.openLocation({latitude: parseFloat(lat),longitude:parseFloat(lon),scale: 18})}})},}
实现当前定位到门店位置距离计算:
//进行经纬度转换为距离的计算Rad(d) {return d * Math.PI / 180.0; //经纬度转换成三角函数中度分表形式。},/*计算距离,参数分别为第一点的纬度,经度;第二点的纬度,经度默认单位km*/getMapDistance(lat1, lng1, lat2, lng2) {var radLat1 = this.Rad(lat1);var radLat2 = this.Rad(lat2);var a = radLat1 - radLat2;var b = this.Rad(lng1) - this.Rad(lng2);var s = 2 * Math.asin(Math.sqrt(Math.pow(Math.sin(a / 2), 2) +Math.cos(radLat1) * Math.cos(radLat2) * Math.pow(Math.sin(b / 2), 2)));s = s * 6378.137; // EARTH_RADIUS;s = Math.round(s * 10000) / 10000; //输出为公里//s=s.toFixed(2);return s;},
完整代码
<template><view class="content"><view class="text-area"><view class="item"><image class="logo" src="/static/logo.png"></image></view><view class="item item_two"><view class="title" @tap="openMap('104.060268','30.642047')">{{title}}(点击跳转)</view><view class="distance">距离:{{distance}}km</view></view></view></view></template><script>export default {data() {return {title: '四川大学华西医院',distance: 0, //"距离"latitude: 39.909, // 默认定在首都longitude: 116.39742,scale: 12, // 默认16markers: [],markerHeight: 30,doorAddress: [], //门店地址}},onLoad() {},mounted() {this.distance = this.getMapDistance('104.04311','30.64242','104.060268','30.642047');console.log('距离',this.distance);},methods: {// 确认授权后,获取用户位置getLocationInfo() {const that = this;uni.getLocation({type: "gcj02",success: function(res) {// 暂时that.longitude = res.longitude; //118.787575;that.latitude = res.latitude; //32.05024;console.log("获取当前的用户经度", that.longitude);console.log("获取当前的用户纬度", that.latitude);var long = 0;var lat = 0;//小数点保留六位 经度if (that.longitude.toString().indexOf('.') > 0) {const longlatsplit = that.longitude.toString().split('.');if (longlatsplit.length >= 2) {long = parseFloat(longlatsplit[0] === "" ? 0 : longlatsplit[0]) + parseFloat("." + longlatsplit[1].slice(0,6));}}if (that.latitude.toString().indexOf('.') > 0) {const longlatsplit1 = that.latitude.toString().split('.');if (longlatsplit1.length >= 2) {lat = parseFloat(longlatsplit1[0] === "" ? 0 : longlatsplit1[0]) + parseFloat("." + longlatsplit1[1].slice(0,6));}}// cookie.set("longitude", long);// cookie.set("latitude", lat);console.log("纬度", lat);// this.distance(that.latitude,that.longitude);that.markers = [{id: "",latitude: res.latitude,longitude: res.longitude,iconPath: "../../static/img/phone.png",width: that.markerHeight, //宽height: that.markerHeight, //高}, ];that.getList();},});},// 拒绝授权后,弹框提示是否手动打开位置授权openConfirm() {return new Promise((resolve, reject) => {uni.showModal({title: "请求授权当前位置",content: "我们需要获取地理位置信息,为您推荐附近的美食",success: (res) => {if (res.confirm) {uni.openSetting().then((res) => {if (res[1].authSetting["scope.userLocation"] === true) {resolve(); // 打开地图权限设置} else {reject();}});} else if (res.cancel) {reject();}},});});},// 彻底拒绝位置获取rejectGetLocation() {uni.showToast({title: "你拒绝了授权,无法获得周边信息",icon: "none",duration: 2000,});},getList() {console.log("获取周围美食");},onReady() {// wx请求获取位置权限this.getAuthorize().then(() => {// 同意后获取this.getLocationInfo();}).catch(() => {// 不同意给出弹框,再次确认this.openConfirm().then(() => {this.getLocationInfo();}).catch(() => {this.rejectGetLocation();});});},openMap(lon,lat) {console.log("获取经纬度ssssfff", lon, lat);//打开地图,并将门店位置传入uni.getLocation({success: res => {// res.latitude=lat;// res.longitude=lon;console.log('location success', parseFloat(lat), parseFloat(lon))uni.openLocation({latitude: parseFloat(lat),longitude: parseFloat(lon),scale: 18})}})},//进行经纬度转换为距离的计算Rad(d) {return d * Math.PI / 180.0; //经纬度转换成三角函数中度分表形式。},/*计算距离,参数分别为第一点的纬度,经度;第二点的纬度,经度默认单位km*/getMapDistance(lat1, lng1, lat2, lng2) {var radLat1 = this.Rad(lat1);var radLat2 = this.Rad(lat2);var a = radLat1 - radLat2;var b = this.Rad(lng1) - this.Rad(lng2);var s = 2 * Math.asin(Math.sqrt(Math.pow(Math.sin(a / 2), 2) +Math.cos(radLat1) * Math.cos(radLat2) * Math.pow(Math.sin(b / 2), 2)));s = s * 6378.137; // EARTH_RADIUS;s = Math.round(s * 10000) / 10000; //输出为公里//s=s.toFixed(2);return s;},//计算距离// 初次位置授权getAuthorize() {return new Promise((resolve, reject) => {uni.authorize({scope: "scope.userLocation",success: () => {resolve(); // 允许授权},fail: () => {reject(); // 拒绝授权},});});},}}</script><style>.content {display: flex;flex-direction: column;align-items: center;justify-content: center;}.logo {width: 100%;height: 100%;}.text-area {border: 1px solid #CCCCCC;padding: 4px 4px;width: 95%;height: 200rpx;display: flex;justify-content:space-around;}.title {/* border: 1px solid; */font-size: 39rpx;color: #8f8f94;flex: 1;}.distance{font-size: 25rpx;color:red;/* border: 1px solid; */flex: 1;}.item{/* border: 1px solid; */flex: 1;}.item_two{padding-left: 5px;flex: 3;display: flex;flex-direction: column;}</style>
选择位置(地址)
wx.chooseLocation(Object object)
打开地图选择位置。
- latitude:目标地纬度;longitude:目标地经度;
这里我们要先使用wx.getLocation获取到经度、纬度,然后给wx.chooseLocation使用就可以了,下面看代码:
wx.getLocation({type: "wgs84",success(res) {wx.chooseLocation({latitude: res.latitude,longitude: res.longitude,success: function(data){console.log(data)}})}})
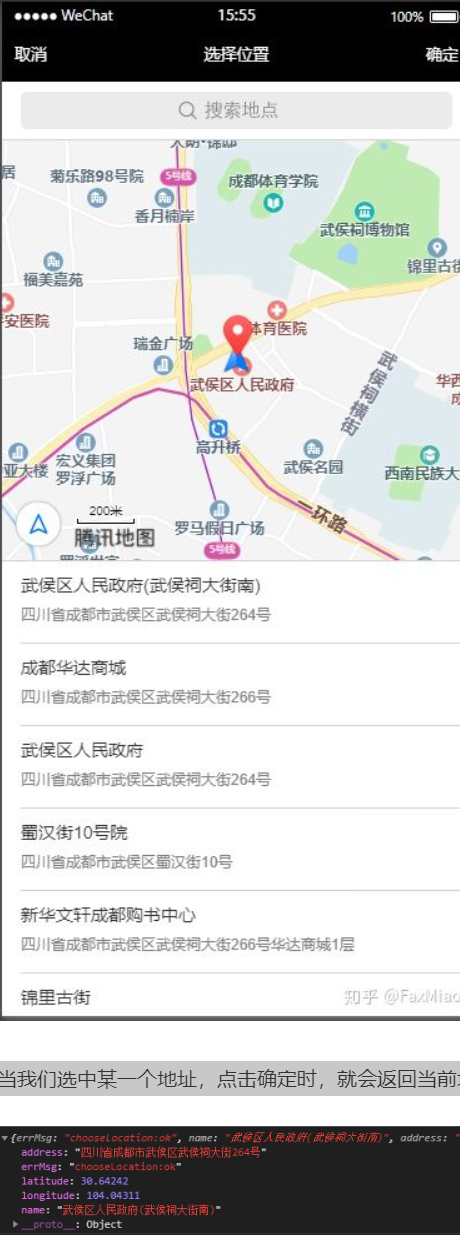
当我们选中某一个地址,点击确定时,就会返回当前地址的信息:
参数说明:
name:位置名称;address:详细地址;latitude:纬度,浮点数,范围为-90~90,负数表示南纬。使用 gcj02 国测局坐标系;longitude:经度,浮点数,范围为-180~180,负数表示西经。使用 gcj02 国测局坐标系;
使用微信内置地图查看位置信息
wx.openLocation(Object object)
使用微信内置地图查看位置
latitude:纬度,范围为-90~90,负数表示南纬。使用 gcj02 国测局坐标系longitude:经度,范围为-180~180,负数表示西经。使用 gcj02 国测局坐标系scale:缩放比例,范围5~18name:位置名address:地址的详细说明
wx.openLocation({latitude: 30.64242,longitude: 104.04311,name: "武侯区人民政府(武侯祠大街南)",address: "四川省成都市武侯区武侯祠大街264号"})
另外,当我们点击右下角绿色按钮(到这去)时,它会自动调用本地地图,可以直接导航,相当方便。
微信支付*
https://blog.csdn.net/zlk4524718/article/details/118895849
获取手机号
第一步 需要用户获取code,
2. 拿code获取openId 和 session_key,
3. 拉去获取手机号码权限,允许授权 获取encryptedData和iv
4. 手机号码是在后台获取的,我们只需要传 encryptedData,iv,sessionKey,openId这个四个字段就能获取到用户手机号了。具体详细步骤请看下面。1.用户获取code
调用login方法获取code ```javascript onLoad(){
this.getuserNew(); // 获取openid
},
methods:{
// 获取codegetuserNew(){uni.login({provider: 'weixin',success:res=>{console.log(res.code);}});},
}
<a name="iBlVk"></a>## 2.通过code获取获取openId 和 session_key方法1, 通过微信官方接口获取```javascriptuni.request({url: 'https://api.weixin.qq.com/sns/jscode2session',method:'GET',data: {appid: 'wx9*******214e0', //你的小程序的APPIDsecret: '33c4d17e4********71253', //你的小程序的secret,js_code:res.code, //wx.login 登录成功后的codegrant_type: 'authorization_code',},success: (cts) => {// 换取成功后 暂存这些数据 留作后续操作this.openId=cts.data.openid //openid 用户唯一标识this.unionid=cts.data.unionid //unionid 开放平台唯一标识 当公众号和小程序同时登录过才会有this.session_key=cts.data.session_key //session_key 会话密钥console.log(cts)console.log(this.openId,this.session_key)}});
方法2 通过后台接口获取
传我们在第一步获取的code参数去获取openId 和 session_key,
uni.request({url:"http://192.168.0.93:6042/login/verifyMini****Code",method:"POST",data:{data:{code:res.code,}},success:(res)=>{if(res.data.errorinfo == null){console.log(res.data)this.openId=res.data.data.openId //openid 用户唯一标识this.session_key=res.data.data.sessionKey //session_key 会话密钥console.log(this.openId,this.session_key);}}})
3.拉去获取手机号码权限,允许授权 获取encryptedData和iv
<button open-type="getPhoneNumber" @getphonenumber="getPhoneNumber">唤起授权手机号</button>
// 获取用户手机号getPhoneNumber(e){console.log(e.detail.errMsg) // 判断用户是否允许获取手机号console.log(e.detail.iv) // 参数 ivconsole.log(e.detail.encryptedData) // 参数encryptedDataif(e.detail.errMsg == "getPhoneNumber:ok"){ // 用户允许或去手机号uni.request({url:"http://192.168.0.93:6042/login/miniProgramLogin",method:"POST",data:{data:{encryptedData: e.detail.encryptedData,iv: e.detail.iv,sessionKey: this.session_key,openId: this.openId,}},success:(res)=>{if(res.data.errorinfo == null){console.log(res.data) // 这个里面就有手机号了}}})}},
onLoad() {//获取appid// #ifdef MP-ALIPAYconsole.log('获取appid')const appIdRes = my.getAppIdSync();console.log("支付宝端appId :", appIdRes.appId);this.appID = appIdRes.appId// #endif// #ifdef MP-WEIXINconsole.log('获取appid')const accountInfo = uni.getAccountInfoSync();console.log("微信端appid :",accountInfo.miniProgram.appId); // 小程序 appIdthis.appID = accountInfo.miniProgram.appId// #endifvar that = this//获取 loginRes.codeuni.login({provider: 'weixin',success: function(loginRes) {console.log("loginRes: ",loginRes);console.log("loginRes.code", loginRes.code);that.loginResCode = loginRes.code}});},//这样就获取到了手机号码。
//获取手机号 发送到后台解密手机号getPhoneNumber(e) {console.log("errMsg", e.detail.errMsg)var that = thisif (e.detail.errMsg == 'getPhoneNumber:fail user deny') {console.log('用户拒绝提供手机号');} else {console.log('用户同意提供手机号');console.log("iv", e.detail.iv)console.log("encryptedData", e.detail.encryptedData)var encryptedData = e.detail.encryptedDatavar iv = e.detail.iv//检查登录uni.checkSession({success: (res) => {console.log("checkSession--success---res", res)if (res.errMsg == 'checkSession:ok') {console.log(res);console.log('登录暂未过期');if (encryptedData !== undefined && iv !== undefined) {that.getPhone(that.loginResCode, encryptedData, iv)}}},fail: (res) => {console.log("checkSession---fail---res", res)console.log('登录已过期');//再执行一次loginuni.login({provider: 'weixin',success: function(loginRes) {console.log("loginRes.code", loginRes.code);that.loginResCode = loginRes.codeif (encryptedData !== undefined && iv !== undefined) {that.getPhone(that.loginResCode, encryptedData, iv)}}});}})}//e.detail.errMsg == 'getPhoneNumber:fail Error: 用户未绑定手机,请先在微信客户端进行绑定后重试' 微信会自动引导用户去绑定手机},//手机号发送至后台解密getPhone(loginResCode, encryptData, ivStr) {uni.request({url: this.$URL + '/school/app/getMobilePhone',method: 'GET',data: {appId: this.appID,code: loginResCode,encryptData: encryptData,ivStr: ivStr,},header: {'Content-Type': 'application/json;charset=utf-8'},success: (res) => {console.log("获取解密后的手机号 -res:", res)if (res.data.code == 200) {console.log("手机号: ", res.data.obj);this.phone = res.data.obj} else {console.log('获取解密后的手机号失败', res.data.obj)uni.showToast({title: '获取手机失败,请重试',icon: 'none',duration: 1500,})}}})},

若有收获,就点个赞吧
0 人点赞
