uni-app评论组件
<view class="uni-comment-list"><view class="uni-comment-face"><image src="" mode="widthFix"></image></view><view class="uni-comment-body"><view class="uni-comment-top"><text>大猫咪</text></view><view class="uni-comment-content">支持国产,支持DCloud</view><view class="uni-comment-date"><view class="">2天气</view><view class="uni-comment-replay-btn">恢复</view></view></view></view>

分享组件
弹出层组件
<uni-popup ref="popup" type="bottom"></uni-popup>//ref 方便调用popup中的方法//type 弹出层出现的位置
地图map
https://www.php.cn/uni-app/492750.html
<button @click="getlocations">获取地址</button><view class="map"><map name="" :latitude="latitude" :longitude="longitude" :markers="points"></map></view>//给markers的数据(用于显示标记点)points:[{id:1,//点击事件会调用此id,建议不同点设置不同idtitle:'兰州',//标记点的名称latitude:31.26249,//纬度longitude:120.63212,//经度iconPath:'/static/a.png',//图标样式路径,用绝对路径,不要写前面的../width:30,//图标宽度height:30,//图标高度}],
//获取位置信息(经纬度)getlocations(){const that = thisreturn uni.getLocation({//默认wgs84 返回 gps 坐标,gcj02 返回国测局坐标,//可用于 uni.openLocation 和 map 组件坐标,//App 和 H5 需配置定位 SDK 信息才可支持 gcj02。type:'gcj02',success: function(res) {that.latitude = res.latitudethat.longitude = res.longitude}})},
导航
所需配置
需要先在manifest.json中的 app模块中配置地图,并添加相关地图的key,如果没有可在相关开发者平台进行申请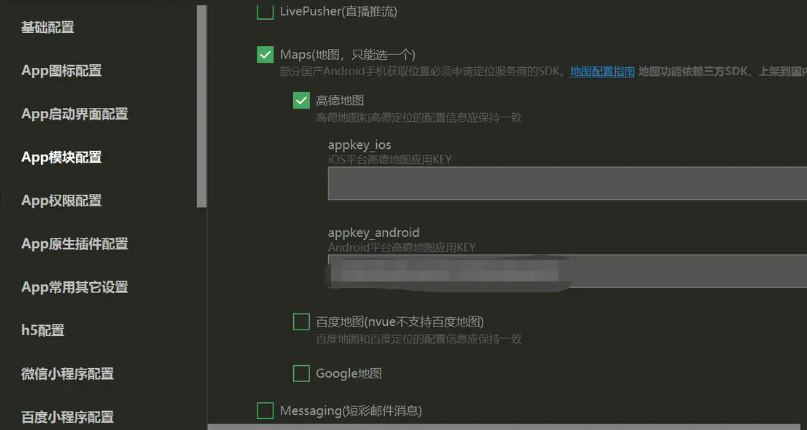
配置好这一部分就可以开始使用map组件了
地图标记点
在uniapp map中想创建标记点就需要使用到一个属性 markers。
我们先来看一下markers的常用属性
| 名称 | 说明 | 类型 | 必填 |
|---|---|---|---|
| id | 标记点id | number | true |
| latitude | 纬度 | number | true |
| longitude | 经度 | number | true |
| iconPath | 显示的图标 | string | false |
| callout | 自定义标记点上方的气泡框 | Object | false |
| label | 为标记点傍边增加标签 | Object | false |
了解过这些我们就可以使用markers属性创建标记点了, markers属性是数组类型的,所以应该这样创建标记点
this.covers = [{id: 1,latitude: 34.7486,longitude: 113.6709,iconPath: '../../static/shop.png',title: "目的地"}];
如果想添加更多的标记点就可以继续在数组中添加object,
每个object都代表了一个标记点
挂载
<map :markers="covers"></map>
坐标连线
想让我们的坐标连线就需要使用到 polyline 属性。
我们先来看一下polyline的常用属性
| 名称 | 说明 | 类型 | 必填 |
|---|---|---|---|
| points | 经纬度数组 | Array | true |
| color | 线的颜色 | string | false |
| width | 线宽 | Number | false |
| iconPath | 显示的图标 | string | false |
| arrowLine | 带箭头的线 | Boolean | false |
| colorList | 彩虹显 | Array | false |
这里我们要注意 两个坑
- polyline 属性是一个数组polyline 之所以是一个数组是因为他可以同时创建多条线并且连线,每条线还可以有着不同的颜色、箭头、图标等。
- points 也是一个数组points之所以是一个数组是因为他要确定某一条线上的每一个点,且每个点都应该由经纬度构成
所以 polyline 的正确写法应该是这样的
// 连线this.polyline = [// 第一条线{// 每个点的经纬度points: [{34.7486, 113.6709}, {28.7486, 113.6709}],// 颜色color: "#000",// 宽度width: 10}]
如果想添加第二条线仅仅只需要在 polyline 中在添加一个 Object。挂载
<map :polyline="polyline"></map>
回到指定位置
想要地图回到指定的位置也非常简单,只需要使用 uni.createMapContext() 方法创建一个 mapContent 对象 在使用 附带的 moveToLocatio 方法便可让地图回到指定的位置。
// 回到定位点goBackToLocation() {uni.createMapContext("map").moveToLocation({34.7486, 113.6709});},
放大缩小
map 的放大缩依赖于 scale 属性 所以只需要动态改变 scale 属性的值就可以了。 但这里要注意 scale 的取值范围为 3~20,数字类型
这就是放大缩小功能的依赖
导航弹框
选择弹框是使用了 h5Plus 的
nativeUI.actionSheet 方法 创建了弹框
runtime.openURL 方法 打开了 导航软件 或 h5 页面导航
// 导航 会打开导航菜单供用户选择openNavigation(longitude, latitude, name) {let url = ""; // app urllet webUrl = ""; // web url 用来为用户未安装导航软件时打开浏览器所使用urlplus.nativeUI.actionSheet({ //选择菜单title: "选择地图应用",cancel: "取消",buttons: [{title: "高德地图"}] // 可选的地图类型}, (e)=> {// 判断用户选择的地图switch (e.index) {//下面是拼接url,不同系统以及不同地图都有不同的拼接字段case 1:// 安卓if(plus.os.name == "Android") {url = `androidamap://viewMap?sourceApplication=appname&poiname=${name}&lat=${latitude}&lon=${longitude}&dev=0`;}else {url = `iosamap://viewMap?sourceApplication=applicationName&poiname=${name}&lat=${latitude}&lon=${longitude}&dev=0`;}webUrl = `https://uri.amap.com/marker?position=${longitude},${latitude}&name=${name}&src=mypage&coordinate=gaode`break;}// 如果选中if (url != "") {url = encodeURI(url);// 打开 app 导航plus.runtime.openURL(url, (err)=>{ // 失败回到// 如果失败则说明未安装 直接 打开网页版进行导航// 毕竟用户可能没有安装app但一定安装的有浏览器plus.runtime.openURL(webUrl);});}})}
常用
腾讯app url
let appUrl = `qqmap://map/geocoder?coord=${latitude},${longitude}&referer=${腾讯地图key}`
web url
let webUrl = `https://apis.map.qq.com/uri/v1/marker?marker=coord:经度,纬度;title:名称;addr:地址&referer=myapp`
百度app url
let appUrl = `baidumap://map/marker?location=${latitude},${longitude}&title=${name}&coord_type=gcj02&src=andr.baidu.openAPIdemo`
web url
let webUrl = `http://api.map.baidu.com/marker?location=${latitude},${longitude}&title=${name}&content=${content}&output=html&src=webapp.baidu.openAPIdemo`
地图路线导航
https://blog.csdn.net/oneya1/article/details/112708216

若有收获,就点个赞吧
0 人点赞
