事件
事件的相关概念:
事件的三要素:事件元素、事件类型、事件对象;
事件对象的使用,必须有事件的产生;
为什么要用事件对象:事件对象包含相关事件的属性值;
事件对象的兼容写法:
document.onclick = function(evt){var e = evt || event;console.log(e);}
鼠标事件对象:
(1)pageX / pageY 相对于整个文档左顶点的坐标(常用);
(2)clientX / clientY 相对于可视窗口左顶点的坐标 ;
(3)offsetX /offsetY 相对于距离自己最近的元素左顶点的坐标(常用于拖拽);
小老虎跳一跳案例:见第十一天代码
小老虎跟随鼠标移动案例:见第十一天代码
document.onclick = function(evt){var e = evt || event;console.log("page:"+e.pageX+","+e.pageY); //page:强调的是整个页面的坐标 通常用这个console.log("client:"+e.clientX+","+e.clientY); //client:强调可视窗口的坐标console.log("offset:"+e.offsetX+","+e.offsetY); //offset:针对于距离自己最近的父元素左顶点的坐标,常用于拖拽} h
键盘事件对象:
1、键盘事件目前的事件源都是document;
(1)onkeyup:键盘弹起的那一刻触发事件;
(2)onkeydown:键盘按下的那一刻触发事件;
(3)onkeypress:键盘按下产生一个字符后触发事件;(按功能键是不会触发的)
2、获取按下的键盘对应字符的ASCII码(兼容写法):
var key = e.keyCode || e.charCode || e.which;
3、ctrl + 回车 返回10;
4、判断ctrl是否被按下,返回布尔值:console.log(e.ctrlKey);
document.onkeypress = function(evt){var e = evt || event;var key = e.keyCode || e.charCode || e.which;console.log(key); //按下键盘字符返回对应的ASCII码console.log(String.fromCharCode(key)); //将ASCII码转为字符console.log(e.ctrlKey); //按了ctrl返回true,不按ctrl返回false}
事件流:
当某个事件执行时,从子元素向父元素触发或从父元素向子元素触发,称为事件流;
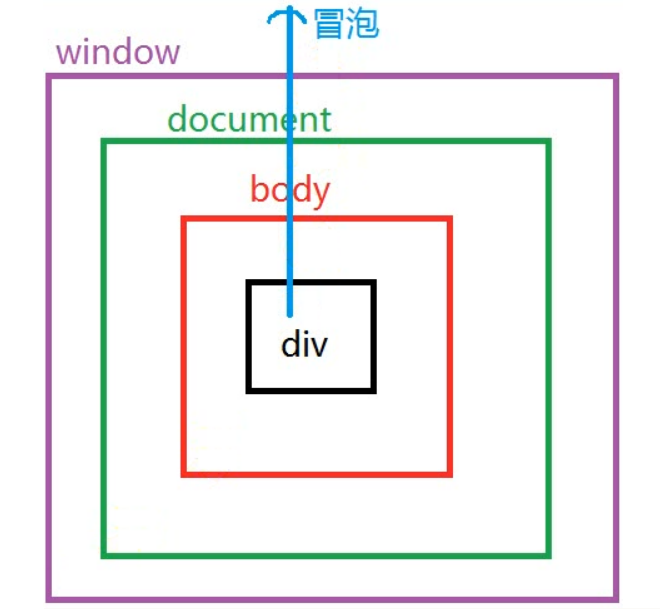
<style>#box1{width: 200px;height: 200px;border: 1px solid red;}#box2{width: 100px;height: 100px;border: 1px solid red;}</style><body><div id="box1"><div id="box2"></div></div></body><script>var oBox1 = document.querySelector("#box1");var oBox2 = document.querySelector("#box2");oBox2.onclick = function(){alert("oBox2");}oBox1.onclick = function(){alert("oBox1");}document.body.onclick = function(){alert("body");}document.onclick = function(){alert("document");}window.onclick = function(){alert("window");}</script> //最终效果为:点击一下oBox2,会弹出oBox2、oBox1、body、document、window(由于事件流)
阻止事件冒泡(兼容写法)
e.stopPropagation?e.stopPropagation() :e.cancelBubble = true;
阻止事件冒泡案例:见代码第十一天
阻止浏览器默认行为(兼容写法)
e.preventDefault?e.preventDefault():e.returnValue = false;
或者return false; (用这种写法需写到函数的最后一行,因为遇到return会跳出函数)
<body><a href="http://www.baidu.com">跳转</a></body>var oA = document.querySelector("a");oA.onclick = function(evt){console.log("heihei");var e = evt || event;return false; //阻止a链接默认点击就跳转的行为}
document.oncontextmenu = function(){console.log("haha");return false; //阻止鼠标右击的默认行为}
事件监听
1、通过HTML元素绑定:
<body><button type="button" onclick="fun()">点击</button></body><script>var fun = function(){console.log("heihei");}</script>
2、通过JS的方式绑定:
<body><button type="button">点击</button></body><script>var oBtn = document.querySelector("button");oBtn.onclick = function(){console.log("haha");}</script>
3、事件监听:
(1)事件监听的好处:
① 允许为同一个元素多次绑定相同的事件;
② 可以决定当前的事件流传递是冒泡还是捕获;
(2)事件监听的语法: 默认不写参数为false,就是冒泡
Dom对象.addEventListener(去掉on的事件,回调函数,[是否捕获]);
document.addEventListener("click",function(){alert(1);});document.addEventListener("click",function(){alert(2);}); //点击一下document,会弹出1、2(好处1)
document.addEventListener("click",function(){alert("document");},true);window.addEventListener("click",function(){alert("window");},true); //true为捕获,点击一下,会弹出window,document(好处2)
事件委托:
事件委托:某个事件让其他元素来完成;
例如:页面上有1000个li,为每一个li添加单机事件,使用委托只需要在li父级上加一次事件就可以;
委托的机制就是通过冒泡传递流,通过父元素实现子元素的功能;
事件委托的好处:
(1)可以为大量相同的子元素添加事件委托,将事件绑定在其父元素上,提高程序的执行效率;
//用事件委托实现点击li出现高亮效果<body><ul><li>1</li><li>2</li><li>3</li><li>4</li><li>5</li></ul></body><script>var oUl = document.querySelector("ul");oUl.onclick = function(evt){var e = evt || event;var target = e.target || e.srcElement; //获取真实的操作源if (target.tagName == "LI"){ //LI 是大写target.style.backgroundColor = "yellow";}}</script>
使用事件委托就要获取真实的操作源:(兼容写法)
var target = e.target || e.srcElement;
(2)可以为未来添加的子元素提前绑定事件;
<body><ul><li>1</li><li>2</li><li>3</li><li>4</li><li>5</li></ul><button type="button">添加</button></body><script type="text/javascript">var oUl = document.querySelector("ul");var oBtn = document.querySelector("button");oUl.onmouseover = function(evt){ //鼠标移入li,变高亮var e = evt || event;var target = e.target || e.srcElement;if(target.tagName == "LI"){target.style.backgroundColor = "yellow";}}oUl.onmouseout = function(evt){ //鼠标移出li,颜色消失var e = evt || event;var target = e.target || e.srcElement;if(target.tagName == "LI"){target.style.backgroundColor = "";}}oBtn.onclick = function(){ //新添加的li也会有上面的效果var oLi = document.createElement("li");oLi.innerHTML = "heihei";oUl.appendChild(oLi);}</script>
三、事件拖拽案例:见第十二天代码(重要)
可视窗口的高:innerHeight ,返回的是数字;
可视窗口的宽:innerWidth ,返回的是数字;
四、json:见day7 01-json对象

若有收获,就点个赞吧
0 人点赞
