Nginx 最全操作总结 - 腾讯技术工程的文章 - 知乎 https://zhuanlan.zhihu.com/p/384752564
Nginx 最全操作总结 (qq.com)
Nginx 从入门到实践,万字详解! (juejin.cn)
《神器 Nginx 的学习手册 ( 建议收藏 )》
https://mp.weixin.qq.com/s/e8v8v4IK8cdHDTbT_7kLHA
《彻底搞懂 Nginx 的五大应用场景》
https://mp.weixin.qq.com/s/APJ6xdqTgQjBszy72i2PqA
安装Nginx
netstat -ntpl | grep 80
wget nginx.org/download/nginx-1.17.2.tar.gz解压tar -xzvf nginx-1.17.2.tar.gzcd nginx-1.17.2./configure通过安装前的配置检查,发现有报错。检查中发现一些依赖库没有找到,这时候需要先安装 nginx 的一些依赖库yum -y install pcre* #安装使nginx支持rewriteyum -y install gcc-c++yum -y install zlib*yum -y install openssl openssl-devel编译之前,先创建nginx临时目录,如果不创建,在启动nginx的过程中会报错mkdir /var/temp/nginx -p./configure --prefix=/usr/local/nginx --with-http_ssl_module --with-http_v2_module --with-http_realip_module --with-http_addition_module --with-http_sub_module --with-http_dav_module --with-http_flv_module --with-http_mp4_module --with-http_gunzip_module --with-http_gzip_static_module --with-http_auth_request_module --with-http_random_index_module --with-http_secure_link_module --with-http_degradation_module --with-http_slice_module --with-http_stub_status_module --with-mail --with-mail_ssl_module --with-stream --with-stream_ssl_module --with-stream_realip_module --with-stream_ssl_preread_module --with-threads --user=www --group=www编译make && make install查看 nginx 安装后在的目录,可以看到已经安装到 /usr/local/nginx 目录了whereis nginx
启动nginx服务cd /usr/local/nginx/sbin/./nginx报错:nginx: [emerg] getpwnam("www") failed错误的原因是没有创建www这个用户,应该在服务器系统中添加www用户组和用户www,如下命令:/usr/sbin/groupadd -f www/usr/sbin/useradd -g www www重新执行./nginx在浏览器中输入阿里云主机地址:47.94.156.242在其他云主机中curl:curl http://47.94.156.242/
配置
目录结构
main # 全局配置,对全局生效├── events # 配置影响 nginx 服务器或与用户的网络连接├── http # 配置代理,缓存,日志定义等绝大多数功能和第三方模块的配置│ ├── upstream # 配置后端服务器具体地址,负载均衡配置不可或缺的部分│ ├── server # 配置虚拟主机的相关参数,一个 http 块中可以有多个 server 块│ ├── server││ ├── location # server 块可以包含多个 location 块,location 指令用于匹配 uri│ │ ├── location│ │ └── ...│ └── ...└── ...
常用命令
nginx -s reload # 向主进程发送信号,重新加载配置文件,热重启nginx -s reopen # 重启 Nginxnginx -s stop # 快速关闭nginx -s quit # 等待工作进程处理完成后关闭nginx -T # 查看当前 Nginx 最终的配置nginx -t -c <配置路径> # 检查配置是否有问题,如果已经在配置目录,则不需要 -c
开机自启动
如果用 yum install 命令安装的 nginx,yum 命令会自动创建 nginx.service 文件,直接用命令:systemctl enable nginx # 设置开机启动 Nginxsystemctl disable nginx # 关闭开机启动 Nginx问题:[root@zm sbin]# systemctl enable nginxFailed to execute operation: No such file or directoryhttps://forums.centos.org/viewtopic.php?t=58317
配置 nginx 全局可用
通过把 nginx 配置到环境变量里,用 nginx 执行指令即可vi /etc/profileexport PATH=$PATH:/usr/local/nginx/sbinsource /etc/profile
主要功能
反向代理
正向代理:局域网中的电脑用户想要直接访问网络是不可行的,只能通过代理服务器来访问,这种代理服务就被称为正向代理。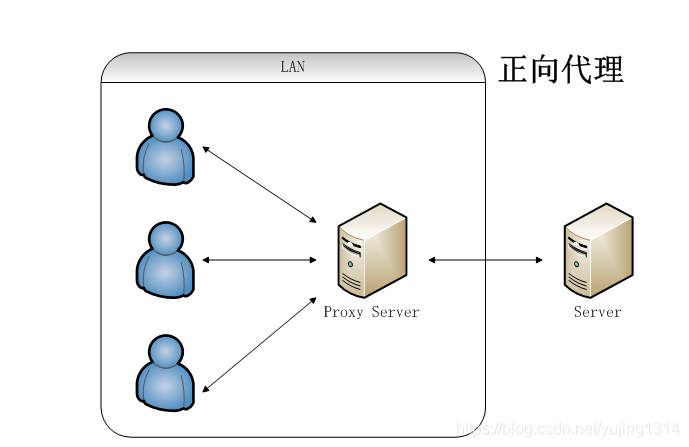
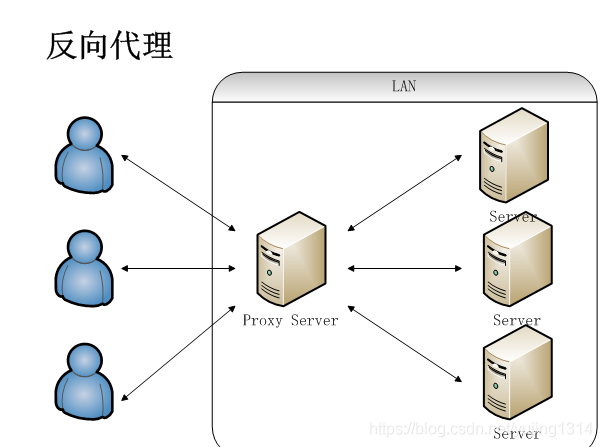
反向代理:只要把请求发送到反向代理服务器,由反向代理服务器去选择目标服务器获取数据,然后再返回到客户端。
此时反向代理服务器和目标服务器对外就是一个服务器,暴露的是代理服务器地址,隐藏了真实服务器 IP 地址。
我们最常说的反向代理的是通过反向代理解决跨域问题。
其实反向代理还可以用来控制缓存(代理缓存 proxy cache),进行访问控制等等,以及后面说的负载均衡其实都是通过反向代理来实现的。
server {listen 8080;# 用户访问 ip:8080/test 下的所有路径代理到 githublocation /test {proxy_pass https://github.com;}# 所有 /api 下的接口访问都代理到本地的 8888 端口# 例如你本地运行的 java 服务的端口是 8888,接口都是以 /api 开头location /api {proxy_pass http://127.0.0.1:8888;}}
负载均衡
客户端发送多个请求到服务器,服务器处理请求,有一些可能要与数据库进行交互,服务器处理完毕之后,再将结果返回给客户端。
普通请求和响应过程如下图:

但是随着信息数量增长,访问量和数据量飞速增长,普通架构无法满足现在的需求。
我们首先想到的是升级服务器配置,可以由于摩尔定律的日益失效,单纯从硬件提升性能已经逐渐不可取了,怎么解决这种需求呢?
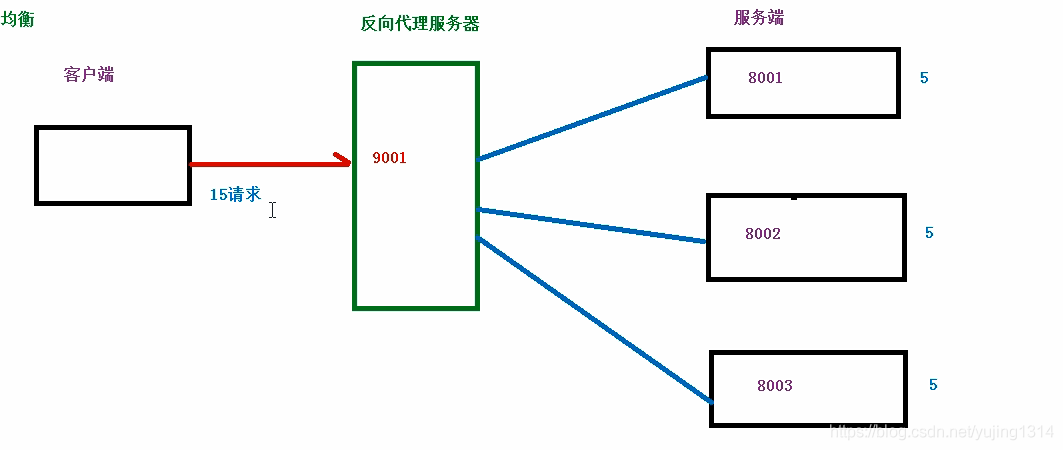
我们可以增加服务器的数量,构建集群,将请求分发到各个服务器上,将原来请求集中到单个服务器的情况改为请求分发到多个服务器,也就是我们说的负载均衡。
图解负载均衡:
通过负载均衡充利用服务器资源,nginx 目前支持自带 4 种负载均衡策略,还有 2 种常用的第三方策略。
轮询策略(默认)
http {upstream test.com {server 192.168.1.12:8887;server 192.168.1.13:8888;}server {location /api {proxy_pass http://test.com;}}}
根据服务器权重
http {upstream test.com {server 192.168.1.12:8887 weight=9;server 192.168.1.13:8888 weight=1;}server {location /api {proxy_pass http://test.com;}}}
客户端 ip 绑定(ip_hash)
http {upstream test.com {ip_hash;server 192.168.1.12:8887;server 192.168.1.13:8888;}server {location /api {proxy_pass http://test.com;}}}
最小连接数策略
http {upstream test.com {least_conn;server 192.168.1.12:8887;server 192.168.1.13:8888;}server {location /api {proxy_pass http://test.com;}}}
gzip 压缩
开启 gzip 压缩可以大幅减少 http 传输过程中文件的大小,可以极大的提高网站的访问速度,基本是必不可少的优化操作

若有收获,就点个赞吧
0 人点赞
