CLI 是 Command-Line Interface 缩写,是命令行交互的意思,使用过 vue-cli 或者 create-react-app 一定会对脚手架给日常开发带来的效率提升印象深刻,这也是 Node.js 的一个典型应用场景——为前端解决代码初始化、构建甚至发布功能
需求分析
一个简单的 react 前端应用目录大概是这样的 https://github.com/Samaritan89/react-project-demo
.├── src│ ├── app.less│ ├── app.tsx│ ├── index.html│ └── index.tsx├── test│ └── app.test.js├── .eslintrc.js├── .gitignore├── README.md├── babel.config.js├── jest.config.js├── package.json├── tsconfig.json└── webpack.config.js
除了目录结构本身还有大量的配置文件,每次从头开始非常麻烦,可以使用 Node.js 实现 CLI 工具,通过命令 sly 和用户做简单信息确认后直接生成对应的目录结构和内容,执行过程大概如下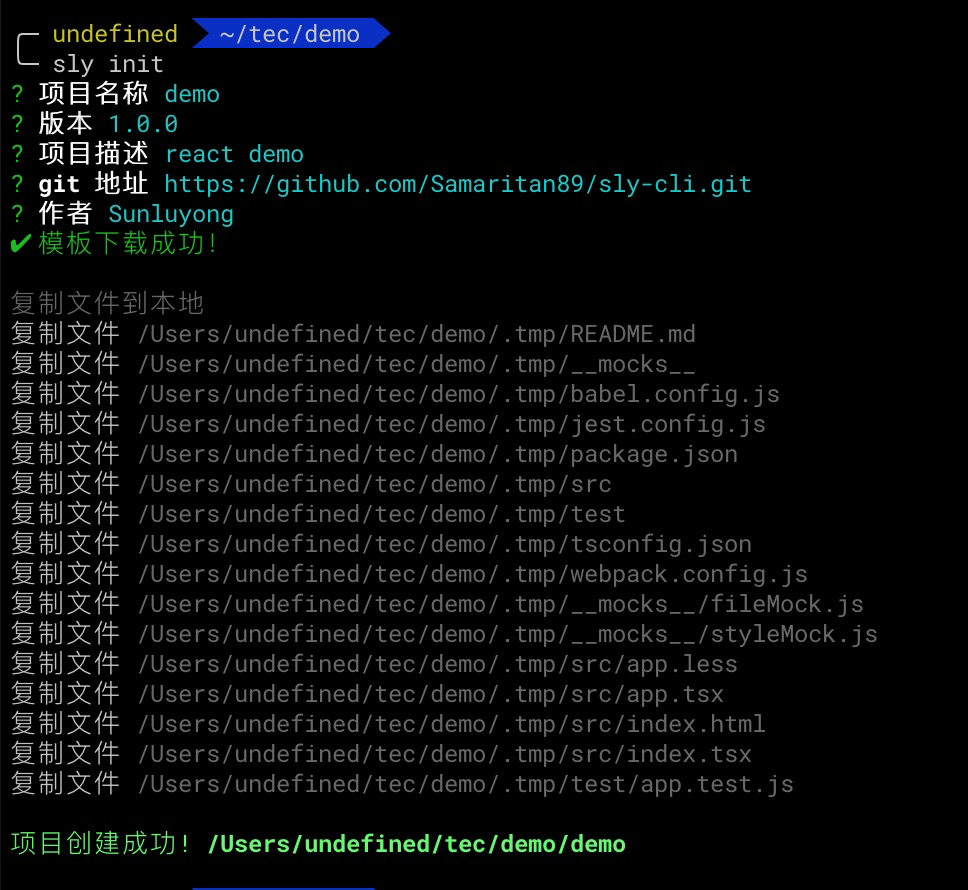
命令是如何被执行的
在 Linux/Mac 最常用的命令就是 cd
$ cd /home/admin
cd 首先是一个可被 Shell 执行的程序,通过 where 命令可以查看其存储位置
$ where cd/usr/bin/cd
之所以可以省略路径直接使用 cd 命令,是因为操作系统会尝试在几个预置的目录中匹配可执行程序名称,预置目录的配置在环境变量 $PATH 中
$ echo $PATH/usr/local/bin:/usr/bin:/bin:/usr/sbin:/sbin:/usr/local/go/bin
POSIX 多个 PATH 使用
:分隔,Windows 使用;分隔
npm 通过 package.json 的 bin 字段提供了自动注册环境变量的功能
{..."bin": {"sly": "src/index.js"}}
这样配置后,当用户全局安装 package 就会把 sly 命令添加到 /usr/local/bin 目录
$ where sly/usr/local/bin/sly
npm init
理解了命令注册后就可以开始动手写命令行工具的实现代码了,首先创建目录后执行 npm init
$ mkdir sly-cli$ cd sly-cli$ npm init
在 package.json 文件手工添加 bin 配置
{..."bin": {"sly": "src/index.js"}}
为了让 Shell 知道使用 node 解析执行 src/index.js 需要在文件顶部添加 Shebang
Shebang是一个由井号和叹号构成的字符序列#!,其出现在文本文件的第一行的前两个字符。 在文件中存在Shebang的情况下,类Unix操作系统的程序加载器会分析Shebang后的内容,将这些内容作为解释器指令,并调用该指令,并将载有Shebang的文件路径作为该解释器的参数
src/index.js
#!/usr/bin/env node// node code
命令行交互
为了在命令行和用户形成问答交互需要两个工具
- commander Node.js 命令行工具书写框架,使用可以参考文档
- inquirer 在命令行提供和用户问答的交互 ```javascript const inquirer = require(‘inquirer’); const program = require(‘commander’);
const { version } = require(‘../package.json’);
const questions = [ { type: ‘input’, name: ‘name’, message: ‘项目名称’, }, { type: ‘input’, name: ‘version’, message: ‘版本’, default: ‘1.0.0’ }, { type: ‘input’, name: ‘description’, message: ‘项目描述’ }, { type: ‘input’, name: ‘gitUrl’, message: ‘git 地址’, }, { type: ‘input’, name: ‘author’, message: ‘作者’, } ]
program .version(version, ‘-v, —version’) .command(‘init’) .action(async () => { const questions = []; const answers = await inquirer.prompt(questions); // TODO: 更根据 anwsers 渲染模板,复制到本地 });
program.parse(process.argv);
为了防止用户输入过多信息比较繁琐,可以为每个问题通过 `default` 属性设置默认值```javascriptconst path = require('path');const gitRemoteOriginUrl = require('git-remote-origin-url');const gitRepoInfo = require('git-repo-info');const defaultName = path.parse(process.cwd()).name;let author = '';let repoUrl = '';try {const gitInfo = gitRepoInfo();author = gitInfo.author;repoUrl = await gitRemoteOriginUrl();} catch (ex) {}
模板下载
文章开始展示的 react 项目代码中模块名称、版本号、描述、作者、git 地址等都是固定的,需要稍微修改为变量的方式,结合用户输入,生成正确内容
模板化后 package.json 部分内容
{"name": "{{name}}","version": "{{version}}","description": "{{description}}","main": "lib/index.js","repository": {"type": "git","url": "{{gitUrl}}"},"author": "{{author}}","license": "ISC","dependencies": {}}
模板完整代码:https://github.com/Samaritan89/react-project-demo/tree/template
模板使用了 Handlebars 语法,为了让用户可以实时获取最新内容,需要把模板文件存储在网络,每次执行命令的时候下载最新版本,可以借助 download-git-repo 实现
const { promisify } = require('util');const downloadGitRepo = require('download-git-repo');const download = promisify(downloadGitRepo);async (){const downloadFolder = path.join(process.cwd(), '.tmp');await download('direct:https://github.com/Samaritan89/react-project-demo.git#template',downloadFolder,{ clone: true });}
url 地址 hash #template 是因为模板文件在
template分支
生成本地文件
模板下载完成后使用 Handlerbas 渲染引擎传入用户交互数据即可渲染为最终文件内容,因为涉及多个文件 使用 vinyl-fs 方便处理
src/copy.js
const chalk = require('chalk');const vfs = require('vinyl-fs');const through = require('through2');const Handlebars = require('handlebars');function tpl(data) {return through.obj(function (file, encoding, callback) {console.log(`复制文件 ${chalk.grey(file.path)}`);if (file.contents) {const content = file.contents.toString(encoding);const template = Handlebars.compile(content);file.contents = Buffer.from(template(data), encoding);}this.push(file);callback();});}function copy(source, dest, data) {const worker = vfs.src(source).pipe(tpl(data)).pipe(vfs.dest(dest));return new Promise(resolve => {worker.on('finish', () => {resolve();});});}module.exports = copy;
复制模板功能也可以使用 mem-fs-editor 实现
const memFs = require("mem-fs");const editor = require("mem-fs-editor");const store = memFs.create();const fs = editor.create(store);fs.copyTpl(from, to, context[, templateOptions [, copyOptions]]);
测试
把主要代码串联一下开发工具就完成了
- 和用户交互,收集名称、版本、描述、作者、git 地址等信息
- 下载模板
- 复制模板到本地
完整代码:https://github.com/Samaritan89/sly-cli
可以在项目根目录通过 npm link 的方式在本地验证
$ npm link$ sly init
发布到 npm
测试没问题了就可以把工具发布到 npm 了
- 在 npm 官网注册一个账户
- 在命令行通过
npm login登录 - 在项目根目录执行
npm publish发布
接下来就可以和使用 vue-cli 一样在全局安装后使用了
$ npm i -g sly-cli # 这个包名被 demo 项目占用了,需要自己用一个新的名称$ sly init
package 更新
如果 package 有了代码的更新,需要修改版本号后重新发布到 npm,版本号由 x.y.z 三位组成,修改要遵守语义化版本号规则
- x:break change
- y:add feature
- z:bug fix
npm 也提供了命令辅助升级
$ npm version major # x 位 +1$ npm version minor # y 位 +1$ npm version patch # z 位 +1
为了防止包的发布造成问题,可以先发不 beta 版本,实际测试一段时间后再发布正式版本
$ npm publish --tag=beta
这时候用户安装的还是原来的版本,内测用户可以通过指定 beta tag 的方式安装测试版本
$ npm i -g sly-cli@beta
当测试完成后可以把内容更新到正式版本
$ npm dist-tag add sly-cli@x.y.z latest
x.y.z 表示实际的版本号
使用 yeoman
个人工具开发使用 commander 就足够了,标准的命令行交互都可以轻松开发,如果是团队工程需要多种脚手架管理可以使用专门做脚手架 & 生态的工具 yeoman

若有收获,就点个赞吧
0 人点赞
