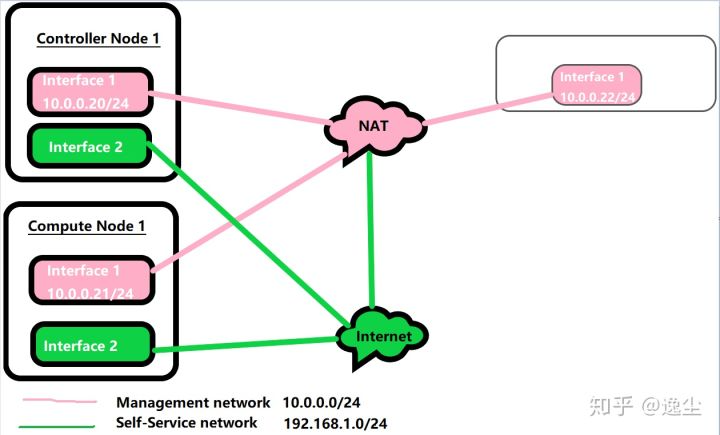
1.拓扑图
2.实验环境
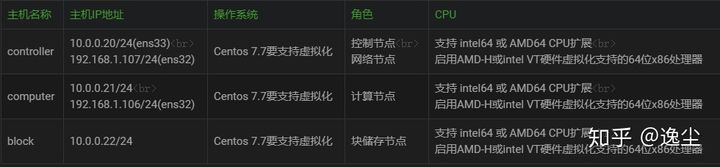
2.1.IP规划
- VM8网卡物理名称为ens33
- VM0网卡物理名称为ens32
- 将仅虚拟机的VM0网卡桥接到可以当前主机的外网网卡(无线网卡)
- 将仅虚拟机的VM8网卡设置为NAT模式
- 域名解析文件
各个节点都要配置域名解析文件[root@controller ~]# cat /etc/hosts# controller10.0.0.20 controller# computer10.0.0.21 computer# block10.0.0.22 block
2.2.防火墙和seLinux
``` [root@controller ~]# systemctl stop firewalld.service [root@controller ~]# systemctl disable firewalld.service
[root@computer ~]# systemctl stop firewalld.service [root@computer ~]# systemctl disable firewalld.service
[root@block ~]# systemctl stop firewalld.service [root@block ~]# systemctl disable firewalld.service
[root@controller ~]# getenforce Disabled [root@computer ~]# getenforce Disabled [root@block ~]# getenforce Disabled
<a name="rmqgz"></a>### 2.3.测试网络的连通性
[root@controller ~]# ping docs.openstack.org -c 5 PING static01.opendev.org (23.253.245.150) 56(84) bytes of data. 64 bytes from static01.opendev.org (23.253.245.150): icmp_seq=2 ttl=46 time=249 ms 64 bytes from static01.opendev.org (23.253.245.150): icmp_seq=3 ttl=46 time=251 ms 64 bytes from static01.opendev.org (23.253.245.150): icmp_seq=4 ttl=46 time=240 ms
—- static01.opendev.org ping statistics —- 5 packets transmitted, 3 received, 40% packet loss, time 4003ms rtt min/avg/max/mdev = 240.051/246.863/251.421/4.924 ms [root@controller ~]# ping computer -c 5 PING computer (10.0.0.21) 56(84) bytes of data. 64 bytes from computer (10.0.0.21): icmp_seq=1 ttl=64 time=0.407 ms 64 bytes from computer (10.0.0.21): icmp_seq=2 ttl=64 time=0.444 ms 64 bytes from computer (10.0.0.21): icmp_seq=3 ttl=64 time=1.39 ms 64 bytes from computer (10.0.0.21): icmp_seq=4 ttl=64 time=0.357 ms 64 bytes from computer (10.0.0.21): icmp_seq=5 ttl=64 time=1.73 ms
—- computer ping statistics —- 5 packets transmitted, 5 received, 0% packet loss, time 4002ms rtt min/avg/max/mdev = 0.357/0.868/1.736/0.580 ms [root@controller ~]# ping block -c 5 PING block (10.0.0.22) 56(84) bytes of data. 64 bytes from block (10.0.0.22): icmp_seq=1 ttl=64 time=0.520 ms 64 bytes from block (10.0.0.22): icmp_seq=2 ttl=64 time=0.399 ms 64 bytes from block (10.0.0.22): icmp_seq=3 ttl=64 time=0.222 ms 64 bytes from block (10.0.0.22): icmp_seq=4 ttl=64 time=0.431 ms 64 bytes from block (10.0.0.22): icmp_seq=5 ttl=64 time=0.227 ms
—- block ping statistics —- 5 packets transmitted, 5 received, 0% packet loss, time 4001ms rtt min/avg/max/mdev = 0.222/0.359/0.520/0.119 ms
<a name="fr03O"></a>
### 2.4.配置免秘钥登录
[root@controller ~]# ssh-keygen Generating public/private rsa key pair. Enter file in which to save the key (/root/.ssh/id_rsa): Created directory ‘/root/.ssh’. Enter passphrase (empty for no passphrase): Enter same passphrase again: Your identification has been saved in /root/.ssh/id_rsa. Your public key has been saved in /root/.ssh/id_rsa.pub. The key fingerprint is: SHA256:dU29hJJedeQei2CFtixvI4QP22PEziwS5zj3BZ9Je/4 root@controller The key’s randomart image is: +—-[RSA 2048]——+ | o.++o| | =.= oo| | o =o= o.o| | . + B.. .oo| | = S +. ..| | + = X X . | | + + = + | | . . | | .E | +——[SHA256]——-+ [root@controller ~]# ssh-copy-id -i /root/.ssh/id_rsa.pub root@10.0.0.21 [root@controller ~]# ssh-copy-id -i /root/.ssh/id_rsa.pub root@10.0.0.22
[root@controller ~]# ssh computer Last login: Wed May 13 17:23:59 2020 from controller [root@controller ~]# ssh block Last login: Wed May 13 17:24:17 2020 from controller
<a name="olSDj"></a>
### 2.5.安装网络时间协议chrony

- **controller节点**
[root@controller ~]# yum install chrony -y [root@controller ~]# vim /etc/chrony.conf [root@controller ~]# grep -v ‘^$’ /etc/chrony.conf |grep -v ‘^#’
这里的server后面是你安装的时间主服务器的名称
server controller iburst
driftfile /var/lib/chrony/drift
makestep 1.0 3
rtcsync
allow 10.0.0.0/24
logdir /var/log/chrony
[root@controller ~]# systemctl enable chronyd.service
[root@controller ~]# systemctl start chronyd.service
- **computer**
[root@computer ~]# yum install chrony -y [root@computer ~]# vim /etc/chrony.conf [root@computer ~]# grep -v ‘^$’ /etc/chrony.conf |grep -v ‘^#’ server controller iburst driftfile /var/lib/chrony/drift makestep 1.0 3 rtcsync logdir /var/log/chrony [root@computer ~]# systemctl enable chronyd.service [root@computer ~]# systemctl start chronyd.service
- **block**
[root@block ~]# yum install chrony -y [root@block ~]# vim /etc/chrony.conf [root@block ~]# grep -v ‘^$’ /etc/chrony.conf |grep -v ‘^#’ server controller iburst driftfile /var/lib/chrony/drift makestep 1.0 3 rtcsync logdir /var/log/chrony [root@block ~]# systemctl enable chronyd.service [root@block ~]# systemctl start chronyd.service
- **测试时间是否同步**
[root@controller ~]# chronyc sources 210 Number of sources = 4
MS Name/IP address Stratum Poll Reach LastRx Last sample
^* 203.107.6.88 2 6 377 53 +2137us[+3095us] +/- 30ms ^? ntp5.flashdance.cx 0 8 0 - +0ns[ +0ns] +/- 0ns ^- ntp1.ams1.nl.leaseweb.net 2 6 377 122 -4766us[-3671us] +/- 164ms ^- de-user.deepinid.deepin.> 3 6 173 56 -7528us[-6578us] +/- 100ms
[root@computer ~]# chronyc sources 210 Number of sources = 4
MS Name/IP address Stratum Poll Reach LastRx Last sample
^? tick.ntp.infomaniak.ch 0 8 0 - +0ns[ +0ns] +/- 0ns ^* 203.107.6.88 2 6 377 53 +457us[+1159us] +/- 24ms ^? ntp.wdc1.us.leaseweb.net 2 7 30 306 -5166us[-7018us] +/- 252ms ^? sv1.ggsrv.de 0 8 0 - +0ns[ +0ns] +/- 0ns
<a name="PqrCz"></a>
### 2.6.OpenStack packages

- **在所有节点安装**
安装train源
yum install centos-release-openstack-train -y
更新源
yum upgrade -y
安装openstark客户端
yum install python-openstackclient -y
安装openstark-selinux包用来自动管理selinux安全策略
yum install openstack-selinux -y
<a name="RGlB8"></a>
### 2.7.SQL数据库

- **大多数OpenStack服务使用SQL数据库存储信息。数据库通常在控制器节点上运行。本指南中使用 MariaDB或MySQL。OpenStack服务还支持其他SQL数据库包括PostgreSQL。**
- 安装软件包
- 创建和编辑**/etc/my.cnf.d/openstack.cnf**文件
- 启动数据库并设置开机启动
- 运行安全初始化脚本,设置数据库管理员root密码
- **password=com.123**
[root@controller ~]# yum install mariadb mariadb-server python2-PyMySQL -y [root@controller ~]# vim /etc/my.cnf.d/openstack.cnf [root@controller ~]# cat /etc/my.cnf.d/openstack.cnf [mysqld] bind-address = 10.0.0.20 default-storage-engine = innodb innodb_file_per_table = on max_connections = 4096 collation-server = utf8_general_ci character-set-server = utf8 [root@controller ~]# systemctl enable mariadb.service [root@controller ~]# systemctl start mariadb.service [root@controller ~]# mysql_secure_installation
NOTE: RUNNING ALL PARTS OF THIS SCRIPT IS RECOMMENDED FOR ALL MariaDB SERVERS IN PRODUCTION USE! PLEASE READ EACH STEP CAREFULLY!
In order to log into MariaDB to secure it, we’ll need the current password for the root user. If you’ve just installed MariaDB, and you haven’t set the root password yet, the password will be blank, so you should just press enter here.
Enter current password for root (enter for none): OK, successfully used password, moving on…
Setting the root password ensures that nobody can log into the MariaDB root user without the proper authorisation.
Set root password? [Y/n] y New password: ############输入com.123 Re-enter new password: ############输入com.123 Password updated successfully! Reloading privilege tables.. … Success! By default, a MariaDB installation has an anonymous user, allowing anyone to log into MariaDB without having to have a user account created for them. This is intended only for testing, and to make the installation go a bit smoother. You should remove them before moving into a production environment.
Remove anonymous users? [Y/n] y … Success!
Normally, root should only be allowed to connect from ‘localhost’. This ensures that someone cannot guess at the root password from the network.
Disallow root login remotely? [Y/n] y … Success!
By default, MariaDB comes with a database named ‘test’ that anyone can access. This is also intended only for testing, and should be removed before moving into a production environment.
Remove test database and access to it? [Y/n] y
- Dropping test database… … Success!
- Removing privileges on test database… … Success!
Reloading the privilege tables will ensure that all changes made so far will take effect immediately.
Reload privilege tables now? [Y/n] Y … Success!
Cleaning up…
All done! If you’ve completed all of the above steps, your MariaDB installation should now be secure.
Thanks for using MariaDB!
<a name="aC6EG"></a>
### 2.8.Message queue消息队列

- **OpenStack使用消息队列来协调服务之间的操作和状态信息。消息队列服务通常在控制器节点上运行。 OpenStack支持多种消息队列服务,包括RabbitMQ, Qpid和ZeroMQ. 但是,大多数打包的 OpenStack发行版都支持特定的消息队列服务。本指南使用RabbitMQ消息队列服务,因为大多数发行版都支持它。**
- 安装软件包
- 启动消息队列服务,并将其配置为在系统引导时启动
- 添加openstack用户password=com.123
- 允许openstack用户配置,写入和读取访问权限
- 查看rebbitmq的监听端口:5672
[root@controller ~]# yum install rabbitmq-server -y
[root@controller ~]# systemctl enable rabbitmq-server.service
[root@controller ~]# systemctl start rabbitmq-server.service
[root@controller ~]# rabbitmqctl add_user openstack com.123
Creating user “openstack”
Error: user_already_exists: openstack
[root@controller ~]# rabbitmqctl set_permissions openstack “.“ “.“ “.“
Setting permissions for user “openstack” in vhost “/“
[root@controller ~]# systemctl restart rabbitmq-server.service
[root@controller ~]# systemctl enable rabbitmq-server.service
[root@controller ~]# netstat -antp | grep 5672
tcp 0 0 0.0.0.0:25672 0.0.0.0: LISTEN 3702/beam.smp
tcp 0 0 10.0.0.20:41669 10.0.0.20:25672 TIME_WAIT -
tcp 0 0 10.0.0.20:50717 10.0.0.20:25672 TIME_WAIT -
tcp 0 0 10.0.0.20:54393 10.0.0.20:25672 TIME_WAIT -
tcp6 0 0 :::5672 :::* LISTEN 3702/beam.smp
<a name="Ter9k"></a>
### 2.9.Memcached

- **身份认证服务认证机制使用memcached缓存令牌。memcached服务通常运行在控制器节点。生产环境部署,建议启用防火墙,身份验证和加密的组合以保护其安全。**
- 安装软件包
- 编辑配置文件 **/etc/sysconfig/memcached**
- 启动服务并设置开机启动
[root@controller ~]# yum install memcached python-memcached -y [root@controller ~]# vim /etc/sysconfig/memcached [root@controller ~]# cat /etc/sysconfig/memcached PORT=”11211” USER=”memcached” MAXCONN=”1024” CACHESIZE=”64” OPTIONS=”-l 127.0.0.1,::1,controller” [root@controller ~]# systemctl enable memcached.service [root@controller ~]# systemctl start memcached.service
<a name="NRale"></a>
### 2.10.Etcd

- **OpenStack服务可以使用Etcd, Etcd是一 种分布式可靠的键值存储, 用于分布式锁、存储配置、跟踪服 务实时性和其他场景。etcd运行在控制节点。**
- 安装软件包
- 编辑配置文件**/etc/etcd/etcd.conf**
[root@controller ~]# yum install etcd -y [root@controller ~]# vim /etc/etcd/etcd.conf [root@controller ~]# grep -v ‘^$’ /etc/etcd/etcd.conf | grep -v ‘^#’ ETCD_DATA_DIR=”/var/lib/etcd/default.etcd” ETCD_LISTEN_PEER_URLS=”http://10.0.0.20:2380“ ETCD_LISTEN_CLIENT_URLS=”http://10.0.0.20:2379,http://127.0.0.1:2379“ ETCD_NAME=”controller”
ETCD_INITIAL_ADVERTISE_PEER_URLS=”http://10.0.0.20:2380“ ETCD_ADVERTISE_CLIENT_URLS=”http://10.0.0.20:2379“ ETCD_INITIAL_CLUSTER=”controller=http://10.0.0.20:2380“ ETCD_INITIAL_CLUSTER_TOKEN=”etcd-cluster-1” ETCD_INITIAL_CLUSTER_STATE=”new” [root@controller ~]# systemctl enable etcd.service [root@controller ~]# systemctl start etcd.service [root@controller ~]# etcdctl cluster-health member bbb38c62ba3f7b46 is healthy: got healthy result from http://10.0.0.20:2379 cluster is healthy ```
3.安装组件
3.1.安装keystone-身份认证服务
https://www.yuque.com/shishi0212/openstack/di5pvl
3.2.安装glance-镜像服务
https://www.yuque.com/shishi0212/openstack/rlea8k
3.3.安装placement-计算服务
https://www.yuque.com/shishi0212/openstack/opsmxg
3.4.安装nova-管理服务
https://www.yuque.com/shishi0212/openstack/ickmmi
3.5.安装neutron-网络服务
https://www.yuque.com/shishi0212/openstack/pfr80g
3.6.安装horizond-WEB管理界面服务
https://www.yuque.com/shishi0212/openstack/kpignl
3.7.安装cinder-存储服务
https://www.yuque.com/shishi0212/openstack/if1edx
4.报错解决
5.简单使用openstack
5.1.创建实例

若有收获,就点个赞吧
0 人点赞
