小封feng微信

vue-simple-uploader介绍
vue-simple-uploader是基于 simple-uploader.js 封装的vue上传插件。它的优点包括且不限于以下几种:
- 支持文件、多文件、文件夹上传;支持拖拽文件、文件夹上传
- 可暂停、继续上传
- 错误处理
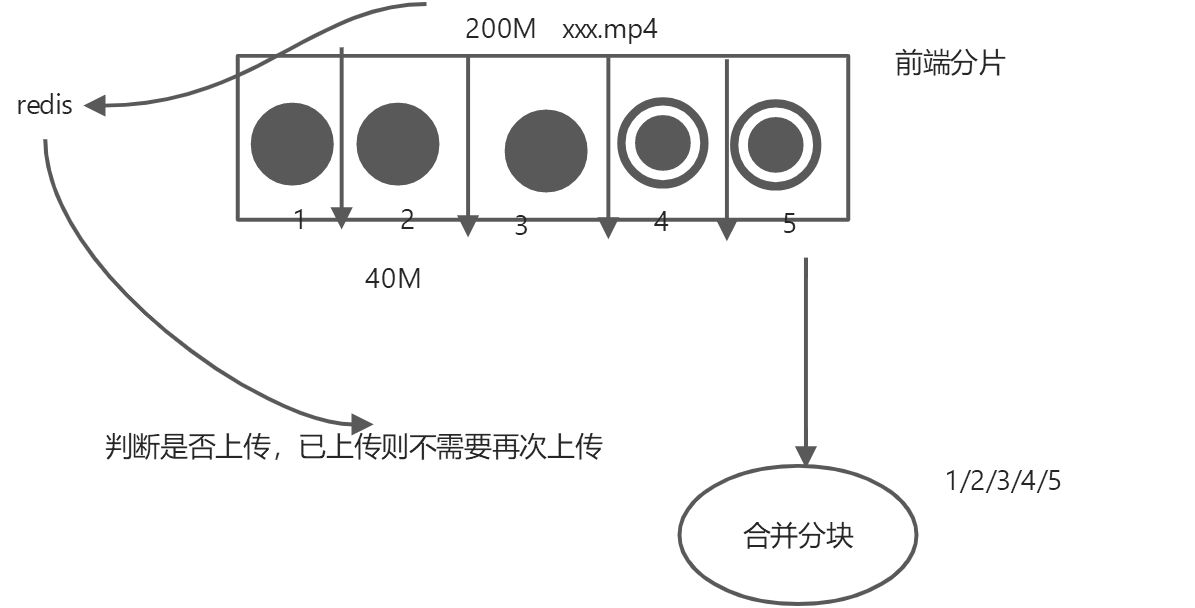
- 支持“秒传”,通过文件判断服务端是否已存在从而实现“秒传”
- 分片上传
- 支持进度、预估剩余时间、出错自动重试、重传等操作
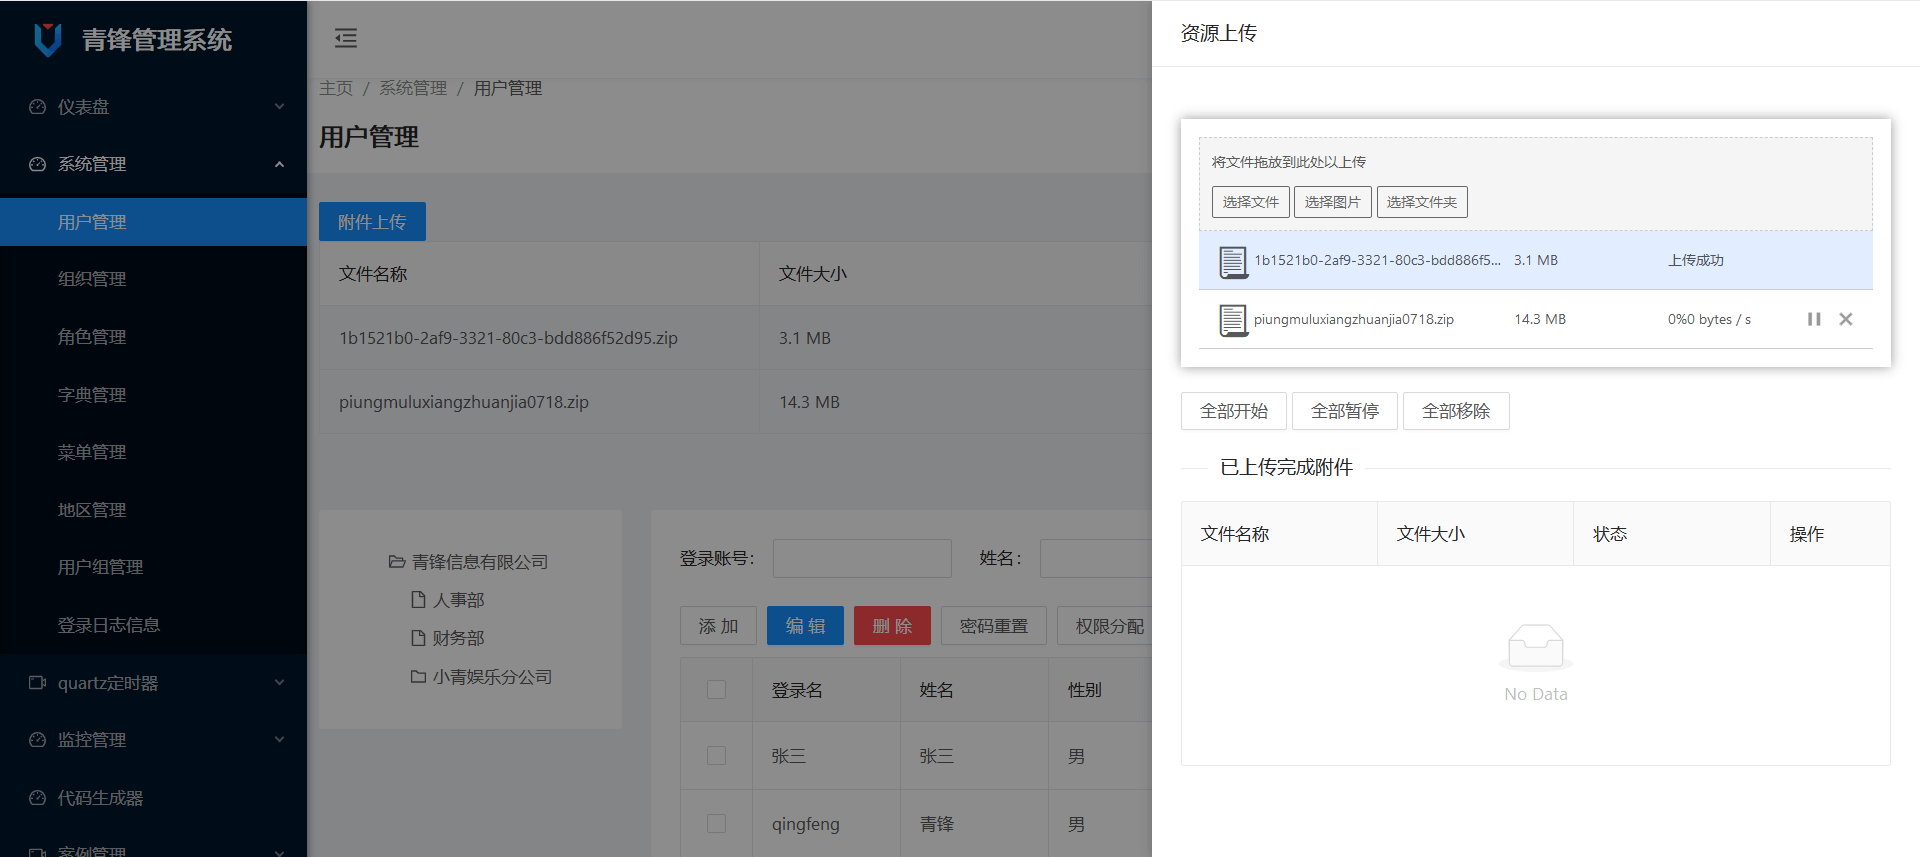
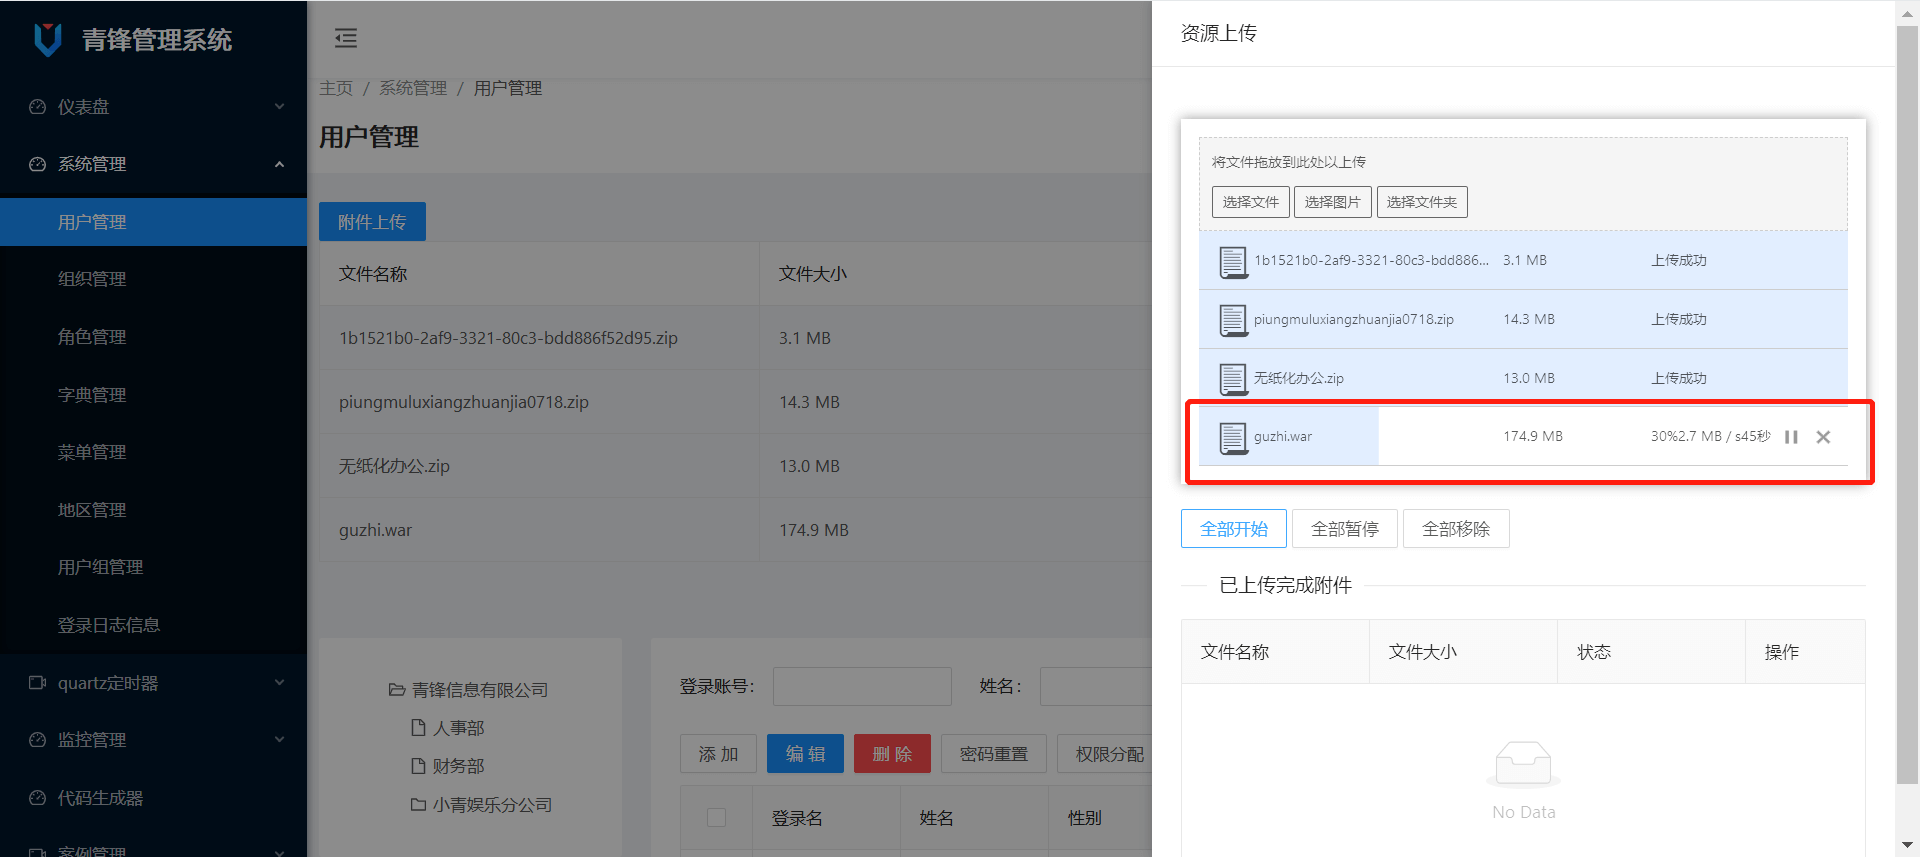
效果预览
完成服务端的创建
创建UploaderController类
UploaderController用于接口的对接,接口为三个方法:
checkChunkExist - 检查分片是否存在,如果分片存在则返回true,否则返回false并返回已上传的分片。
uploadChunk - 上传文件分片,上传的核心方法。
mergeChunks - 合并文件分片,当分片全部上传完成,进行分片的合并。
package com.qingfeng.uploader.controller;import com.qingfeng.uploader.dto.FileChunkDTO;import com.qingfeng.uploader.dto.FileChunkResultDTO;import com.qingfeng.uploader.response.RestApiResponse;import com.qingfeng.uploader.service.IUploadService;import org.springframework.beans.factory.annotation.Autowired;import org.springframework.web.bind.annotation.*;/*** @ProjectName UploaderController* @author Administrator* @version 1.0.0* @Description 附件分片上传* @createTime 2022/4/13 0013 15:58*/@RestController@RequestMapping("upload")public class UploaderController {@Autowiredprivate IUploadService uploadService;/*** 检查分片是否存在** @return*/@GetMapping("chunk")public RestApiResponse<Object> checkChunkExist(FileChunkDTO chunkDTO) {FileChunkResultDTO fileChunkCheckDTO;try {fileChunkCheckDTO = uploadService.checkChunkExist(chunkDTO);return RestApiResponse.success(fileChunkCheckDTO);} catch (Exception e) {return RestApiResponse.error(e.getMessage());}}/*** 上传文件分片** @param chunkDTO* @return*/@PostMapping("chunk")public RestApiResponse<Object> uploadChunk(FileChunkDTO chunkDTO) {try {uploadService.uploadChunk(chunkDTO);return RestApiResponse.success(chunkDTO.getIdentifier());} catch (Exception e) {return RestApiResponse.error(e.getMessage());}}/*** 请求合并文件分片** @param chunkDTO* @return*/@PostMapping("merge")public RestApiResponse<Object> mergeChunks(@RequestBody FileChunkDTO chunkDTO) {try {boolean success = uploadService.mergeChunk(chunkDTO.getIdentifier(), chunkDTO.getFilename(), chunkDTO.getTotalChunks());return RestApiResponse.flag(success);} catch (Exception e) {return RestApiResponse.error(e.getMessage());}}}
创建IUploadService接口类
package com.qingfeng.uploader.service;import com.qingfeng.framework.exception.GlobalExceptionHandler;import com.qingfeng.uploader.dto.FileChunkDTO;import com.qingfeng.uploader.dto.FileChunkResultDTO;import java.io.IOException;/*** @ProjectName IUploadService* @author Administrator* @version 1.0.0* @Description 附件分片上传* @createTime 2022/4/13 0013 15:59*/public interface IUploadService {/*** 检查文件是否存在,如果存在则跳过该文件的上传,如果不存在,返回需要上传的分片集合* @param chunkDTO* @return*/FileChunkResultDTO checkChunkExist(FileChunkDTO chunkDTO);/*** 上传文件分片* @param chunkDTO*/void uploadChunk(FileChunkDTO chunkDTO) throws IOException;/*** 合并文件分片* @param identifier* @param fileName* @param totalChunks* @return* @throws IOException*/boolean mergeChunk(String identifier,String fileName,Integer totalChunks)throws IOException;}
创建UploadServiceImpl接口实现类
UploadServiceImpl是整个附件分片上传的核心实现类,在UploadServiceImpl中实现了分片的存储,合并,判断等一系列操作。
package com.qingfeng.uploader.service.impl;import com.qingfeng.uploader.dto.FileChunkDTO;import com.qingfeng.uploader.dto.FileChunkResultDTO;import com.qingfeng.uploader.service.IUploadService;import org.apache.tomcat.util.http.fileupload.IOUtils;import org.slf4j.Logger;import org.slf4j.LoggerFactory;import org.springframework.beans.factory.annotation.Autowired;import org.springframework.beans.factory.annotation.Value;import org.springframework.data.redis.core.RedisTemplate;import org.springframework.stereotype.Service;import java.io.*;import java.util.*;/*** @ProjectName UploadServiceImpl* @author Administrator* @version 1.0.0* @Description 附件分片上传* @createTime 2022/4/13 0013 15:59*/@Service@SuppressWarnings("all")public class UploadServiceImpl implements IUploadService {private Logger logger = LoggerFactory.getLogger(UploadServiceImpl.class);@Autowiredprivate RedisTemplate<String, Object> redisTemplate;@Value("${uploadFolder}")private String uploadFolder;/*** 检查文件是否存在,如果存在则跳过该文件的上传,如果不存在,返回需要上传的分片集合** @param chunkDTO* @return*/@Overridepublic FileChunkResultDTO checkChunkExist(FileChunkDTO chunkDTO) {//1.检查文件是否已上传过//1.1)检查在磁盘中是否存在String fileFolderPath = getFileFolderPath(chunkDTO.getIdentifier());logger.info("fileFolderPath-->{}", fileFolderPath);String filePath = getFilePath(chunkDTO.getIdentifier(), chunkDTO.getFilename());File file = new File(filePath);boolean exists = file.exists();//1.2)检查Redis中是否存在,并且所有分片已经上传完成。Set<Integer> uploaded = (Set<Integer>) redisTemplate.opsForHash().get(chunkDTO.getIdentifier(), "uploaded");if (uploaded != null && uploaded.size() == chunkDTO.getTotalChunks() && exists) {return new FileChunkResultDTO(true);}File fileFolder = new File(fileFolderPath);if (!fileFolder.exists()) {boolean mkdirs = fileFolder.mkdirs();logger.info("准备工作,创建文件夹,fileFolderPath:{},mkdirs:{}", fileFolderPath, mkdirs);}// 断点续传,返回已上传的分片return new FileChunkResultDTO(false, uploaded);}/*** 上传分片** @param chunkDTO*/@Overridepublic void uploadChunk(FileChunkDTO chunkDTO) {//分块的目录String chunkFileFolderPath = getChunkFileFolderPath(chunkDTO.getIdentifier());logger.info("分块的目录 -> {}", chunkFileFolderPath);File chunkFileFolder = new File(chunkFileFolderPath);if (!chunkFileFolder.exists()) {boolean mkdirs = chunkFileFolder.mkdirs();logger.info("创建分片文件夹:{}", mkdirs);}//写入分片try (InputStream inputStream = chunkDTO.getFile().getInputStream();FileOutputStream outputStream = new FileOutputStream(new File(chunkFileFolderPath + chunkDTO.getChunkNumber()))) {IOUtils.copy(inputStream, outputStream);logger.info("文件标识:{},chunkNumber:{}", chunkDTO.getIdentifier(), chunkDTO.getChunkNumber());//将该分片写入redislong size = saveToRedis(chunkDTO);} catch (Exception e) {e.printStackTrace();}}@Overridepublic boolean mergeChunk(String identifier, String fileName, Integer totalChunks) throws IOException {return mergeChunks(identifier, fileName, totalChunks);}/*** 合并分片** @param identifier* @param filename*/private boolean mergeChunks(String identifier, String filename, Integer totalChunks) {String chunkFileFolderPath = getChunkFileFolderPath(identifier);String filePath = getFilePath(identifier, filename);// 检查分片是否都存在if (checkChunks(chunkFileFolderPath, totalChunks)) {File chunkFileFolder = new File(chunkFileFolderPath);File mergeFile = new File(filePath);File[] chunks = chunkFileFolder.listFiles();//排序List fileList = Arrays.asList(chunks);Collections.sort(fileList, (Comparator<File>) (o1, o2) -> {return Integer.parseInt(o1.getName()) - (Integer.parseInt(o2.getName()));});try {RandomAccessFile randomAccessFileWriter = new RandomAccessFile(mergeFile, "rw");byte[] bytes = new byte[1024];for (File chunk : chunks) {RandomAccessFile randomAccessFileReader = new RandomAccessFile(chunk, "r");int len;while ((len = randomAccessFileReader.read(bytes)) != -1) {randomAccessFileWriter.write(bytes, 0, len);}randomAccessFileReader.close();}randomAccessFileWriter.close();} catch (Exception e) {return false;}return true;}return false;}/*** 检查分片是否都存在* @param chunkFileFolderPath* @param totalChunks* @return*/private boolean checkChunks(String chunkFileFolderPath, Integer totalChunks) {try {for (int i = 1; i <= totalChunks + 1; i++) {File file = new File(chunkFileFolderPath + File.separator + i);if (file.exists()) {continue;} else {return false;}}} catch (Exception e) {return false;}return true;}/*** 分片写入Redis** @param chunkDTO*/private synchronized long saveToRedis(FileChunkDTO chunkDTO) {Set<Integer> uploaded = (Set<Integer>) redisTemplate.opsForHash().get(chunkDTO.getIdentifier(), "uploaded");if (uploaded == null) {uploaded = new HashSet<>(Arrays.asList(chunkDTO.getChunkNumber()));HashMap<String, Object> objectObjectHashMap = new HashMap<>();objectObjectHashMap.put("uploaded", uploaded);objectObjectHashMap.put("totalChunks", chunkDTO.getTotalChunks());objectObjectHashMap.put("totalSize", chunkDTO.getTotalSize());// objectObjectHashMap.put("path", getFileRelativelyPath(chunkDTO.getIdentifier(), chunkDTO.getFilename()));objectObjectHashMap.put("path", chunkDTO.getFilename());redisTemplate.opsForHash().putAll(chunkDTO.getIdentifier(), objectObjectHashMap);} else {uploaded.add(chunkDTO.getChunkNumber());redisTemplate.opsForHash().put(chunkDTO.getIdentifier(), "uploaded", uploaded);}return uploaded.size();}/*** 得到文件的绝对路径** @param identifier* @param filename* @return*/private String getFilePath(String identifier, String filename) {String ext = filename.substring(filename.lastIndexOf("."));// return getFileFolderPath(identifier) + identifier + ext;return uploadFolder + filename;}/*** 得到文件的相对路径** @param identifier* @param filename* @return*/private String getFileRelativelyPath(String identifier, String filename) {String ext = filename.substring(filename.lastIndexOf("."));return "/" + identifier.substring(0, 1) + "/" +identifier.substring(1, 2) + "/" +identifier + "/" + identifier+ ext;}/*** 得到分块文件所属的目录** @param identifier* @return*/private String getChunkFileFolderPath(String identifier) {return getFileFolderPath(identifier) + "chunks" + File.separator;}/*** 得到文件所属的目录** @param identifier* @return*/private String getFileFolderPath(String identifier) {return uploadFolder + identifier.substring(0, 1) + File.separator +identifier.substring(1, 2) + File.separator +identifier + File.separator;// return uploadFolder;}}
创建相关辅助类
创建FileChunkDTO
package com.qingfeng.uploader.dto;import org.springframework.web.multipart.MultipartFile;/*** @ProjectName FileChunkDTO* @author Administrator* @version 1.0.0* @Description 附件分片上传* @createTime 2022/4/13 0013 15:59*/public class FileChunkDTO {/*** 文件md5*/private String identifier;/*** 分块文件*/MultipartFile file;/*** 当前分块序号*/private Integer chunkNumber;/*** 分块大小*/private Long chunkSize;/*** 当前分块大小*/private Long currentChunkSize;/*** 文件总大小*/private Long totalSize;/*** 分块总数*/private Integer totalChunks;/*** 文件名*/private String filename;public String getIdentifier() {return identifier;}public void setIdentifier(String identifier) {this.identifier = identifier;}public MultipartFile getFile() {return file;}public void setFile(MultipartFile file) {this.file = file;}public Integer getChunkNumber() {return chunkNumber;}public void setChunkNumber(Integer chunkNumber) {this.chunkNumber = chunkNumber;}public Long getChunkSize() {return chunkSize;}public void setChunkSize(Long chunkSize) {this.chunkSize = chunkSize;}public Long getCurrentChunkSize() {return currentChunkSize;}public void setCurrentChunkSize(Long currentChunkSize) {this.currentChunkSize = currentChunkSize;}public Long getTotalSize() {return totalSize;}public void setTotalSize(Long totalSize) {this.totalSize = totalSize;}public Integer getTotalChunks() {return totalChunks;}public void setTotalChunks(Integer totalChunks) {this.totalChunks = totalChunks;}public String getFilename() {return filename;}public void setFilename(String filename) {this.filename = filename;}@Overridepublic String toString() {return "FileChunkDTO{" +"identifier='" + identifier + '\'' +", file=" + file +", chunkNumber=" + chunkNumber +", chunkSize=" + chunkSize +", currentChunkSize=" + currentChunkSize +", totalSize=" + totalSize +", totalChunks=" + totalChunks +", filename='" + filename + '\'' +'}';}}
创建FileChunkResultDTO
package com.qingfeng.uploader.dto;import java.util.Set;/*** @ProjectName FileChunkResultDTO* @author Administrator* @version 1.0.0* @Description 附件分片上传* @createTime 2022/4/13 0013 15:59*/public class FileChunkResultDTO {/*** 是否跳过上传*/private Boolean skipUpload;/*** 已上传分片的集合*/private Set<Integer> uploaded;public Boolean getSkipUpload() {return skipUpload;}public void setSkipUpload(Boolean skipUpload) {this.skipUpload = skipUpload;}public Set<Integer> getUploaded() {return uploaded;}public void setUploaded(Set<Integer> uploaded) {this.uploaded = uploaded;}public FileChunkResultDTO(Boolean skipUpload, Set<Integer> uploaded) {this.skipUpload = skipUpload;this.uploaded = uploaded;}public FileChunkResultDTO(Boolean skipUpload) {this.skipUpload = skipUpload;}}
创建RestApiResponse
package com.qingfeng.uploader.response;/*** @ProjectName RestApiResponse* @author Administrator* @version 1.0.0* @Description 附件分片上传* @createTime 2022/4/13 0013 15:59*/public class RestApiResponse<T> {/*** 是否成功*/private boolean success;/*** 响应数据*/private T data;public boolean isSuccess() {return success;}public void setSuccess(boolean success) {this.success = success;}public T getData() {return data;}public void setData(T data) {this.data = data;}public static <T> RestApiResponse<T> success(T data) {RestApiResponse<T> result = new RestApiResponse<>();result.success = true;result.data = data;return result;}public static <T> RestApiResponse<T> success() {RestApiResponse<T> result = new RestApiResponse<>();result.success = true;return result;}public static <T> RestApiResponse<T> error(T data) {RestApiResponse<T> result = new RestApiResponse<>();result.success = false;result.data = data;return result;}public static <T> RestApiResponse<T> flag(boolean data) {RestApiResponse<T> result = new RestApiResponse<>();result.success = data;return result;}}
核心方法分析
1、检查分片是否存在
- 检查目录下的文件是否存在。
- 检查redis存储的分片是否存在。
- 判断分片数量和总分片数量是否一致。
如果文件存在并且分片上传完毕,标识已经完成附件的上传,可以进行秒传操作。
如果文件不存在或者分片为上传完毕,则返回false并返回已经上传的分片信息。
/*** 检查文件是否存在,如果存在则跳过该文件的上传,如果不存在,返回需要上传的分片集合* @param chunkDTO* @return*/@Overridepublic FileChunkResultDTO checkChunkExist(FileChunkDTO chunkDTO) {//1.检查文件是否已上传过//1.1)检查在磁盘中是否存在String fileFolderPath = getFileFolderPath(chunkDTO.getIdentifier());logger.info("fileFolderPath-->{}", fileFolderPath);String filePath = getFilePath(chunkDTO.getIdentifier(), chunkDTO.getFilename());File file = new File(filePath);boolean exists = file.exists();//1.2)检查Redis中是否存在,并且所有分片已经上传完成。Set<Integer> uploaded = (Set<Integer>) redisTemplate.opsForHash().get(chunkDTO.getIdentifier(), "uploaded");if (uploaded != null && uploaded.size() == chunkDTO.getTotalChunks() && exists) {return new FileChunkResultDTO(true);}File fileFolder = new File(fileFolderPath);if (!fileFolder.exists()) {boolean mkdirs = fileFolder.mkdirs();logger.info("准备工作,创建文件夹,fileFolderPath:{},mkdirs:{}", fileFolderPath, mkdirs);}// 断点续传,返回已上传的分片return new FileChunkResultDTO(false, uploaded);}
2、上传附件分片
- 判断目录是否存在,如果不存在则创建目录。
- 进行切片的拷贝,将切片拷贝到指定的目录。
将该分片写入redis
/*** 上传分片* @param chunkDTO*/@Overridepublic void uploadChunk(FileChunkDTO chunkDTO) {//分块的目录String chunkFileFolderPath = getChunkFileFolderPath(chunkDTO.getIdentifier());logger.info("分块的目录 -> {}", chunkFileFolderPath);File chunkFileFolder = new File(chunkFileFolderPath);if (!chunkFileFolder.exists()) {boolean mkdirs = chunkFileFolder.mkdirs();logger.info("创建分片文件夹:{}", mkdirs);}//写入分片try (InputStream inputStream = chunkDTO.getFile().getInputStream();FileOutputStream outputStream = new FileOutputStream(new File(chunkFileFolderPath + chunkDTO.getChunkNumber()))) {IOUtils.copy(inputStream, outputStream);logger.info("文件标识:{},chunkNumber:{}", chunkDTO.getIdentifier(), chunkDTO.getChunkNumber());//将该分片写入redislong size = saveToRedis(chunkDTO);} catch (Exception e) {e.printStackTrace();}}
3、合并分片-生成文件
@Overridepublic boolean mergeChunk(String identifier, String fileName, Integer totalChunks) throws IOException {return mergeChunks(identifier, fileName, totalChunks);}/*** 合并分片* @param identifier* @param filename*/private boolean mergeChunks(String identifier, String filename, Integer totalChunks) {String chunkFileFolderPath = getChunkFileFolderPath(identifier);String filePath = getFilePath(identifier, filename);// 检查分片是否都存在if (checkChunks(chunkFileFolderPath, totalChunks)) {File chunkFileFolder = new File(chunkFileFolderPath);File mergeFile = new File(filePath);File[] chunks = chunkFileFolder.listFiles();//排序List fileList = Arrays.asList(chunks);Collections.sort(fileList, (Comparator<File>) (o1, o2) -> {return Integer.parseInt(o1.getName()) - (Integer.parseInt(o2.getName()));});try {RandomAccessFile randomAccessFileWriter = new RandomAccessFile(mergeFile, "rw");byte[] bytes = new byte[1024];for (File chunk : chunks) {RandomAccessFile randomAccessFileReader = new RandomAccessFile(chunk, "r");int len;while ((len = randomAccessFileReader.read(bytes)) != -1) {randomAccessFileWriter.write(bytes, 0, len);}randomAccessFileReader.close();}randomAccessFileWriter.close();} catch (Exception e) {return false;}return true;}return false;}
检查分片是否全部存在
private boolean checkChunks(String chunkFileFolderPath, Integer totalChunks) {try {for (int i = 1; i <= totalChunks + 1; i++) {File file = new File(chunkFileFolderPath + File.separator + i);if (file.exists()) {continue;} else {return false;}}} catch (Exception e) {return false;}return true;}
读取分片列表
File[] chunks = chunkFileFolder.listFiles();
切片排序1、2/3、—-
List fileList = Arrays.asList(chunks);Collections.sort(fileList, (Comparator<File>) (o1, o2) -> {return Integer.parseInt(o1.getName()) - (Integer.parseInt(o2.getName()));});
切片合并,生成文件
RandomAccessFile randomAccessFileWriter = new RandomAccessFile(mergeFile, "rw");byte[] bytes = new byte[1024];for (File chunk : chunks) {RandomAccessFile randomAccessFileReader = new RandomAccessFile(chunk, "r");int len;while ((len = randomAccessFileReader.read(bytes)) != -1) {randomAccessFileWriter.write(bytes, 0, len);}randomAccessFileReader.close();}randomAccessFileWriter.close();
4、分片写入redis
判断切片是否已存在,如果未存在,则创建基础信息,并保存。
/*** 分片写入Redis* @param chunkDTO*/private synchronized long saveToRedis(FileChunkDTO chunkDTO) {Set<Integer> uploaded = (Set<Integer>) redisTemplate.opsForHash().get(chunkDTO.getIdentifier(), "uploaded");if (uploaded == null) {uploaded = new HashSet<>(Arrays.asList(chunkDTO.getChunkNumber()));HashMap<String, Object> objectObjectHashMap = new HashMap<>();objectObjectHashMap.put("uploaded", uploaded);objectObjectHashMap.put("totalChunks", chunkDTO.getTotalChunks());objectObjectHashMap.put("totalSize", chunkDTO.getTotalSize());// objectObjectHashMap.put("path", getFileRelativelyPath(chunkDTO.getIdentifier(), chunkDTO.getFilename()));objectObjectHashMap.put("path", chunkDTO.getFilename());redisTemplate.opsForHash().putAll(chunkDTO.getIdentifier(), objectObjectHashMap);} else {uploaded.add(chunkDTO.getChunkNumber());redisTemplate.opsForHash().put(chunkDTO.getIdentifier(), "uploaded", uploaded);}return uploaded.size();}
完成vue2前端的创建
安装uploader和spark-md5的依赖
npm install --save vue-simple-uploadernpm install --save spark-md5
mainjs导入uploader
import uploader from 'vue-simple-uploader'Vue.use(uploader)
创建uploader组件
<template><div><uploader:autoStart="false":options="options":file-status-text="statusText"class="uploader-example"@file-complete="fileComplete"@complete="complete"@file-success="fileSuccess"@files-added="filesAdded"><uploader-unsupport></uploader-unsupport><uploader-drop><p>将文件拖放到此处以上传</p><uploader-btn>选择文件</uploader-btn><uploader-btn :attrs="attrs">选择图片</uploader-btn><uploader-btn :directory="true">选择文件夹</uploader-btn></uploader-drop><!-- <uploader-list></uploader-list> --><uploader-files> </uploader-files></uploader><br /><a-button @click="allStart()" :disabled="disabled">全部开始</a-button><a-button @click="allStop()" style="margin-left: 4px">全部暂停</a-button><a-button @click="allRemove()" style="margin-left: 4px">全部移除</a-button></div></template><script>import axios from "axios";import SparkMD5 from "spark-md5";import storage from "store";import { ACCESS_TOKEN } from '@/store/mutation-types'export default {data() {return {skip: false,options: {target: "//localhost:8888/upload/chunk",// 开启服务端分片校验功能testChunks: true,parseTimeRemaining: function (timeRemaining, parsedTimeRemaining) {return parsedTimeRemaining.replace(/\syears?/, "年").replace(/\days?/, "天").replace(/\shours?/, "小时").replace(/\sminutes?/, "分钟").replace(/\sseconds?/, "秒");},// 服务器分片校验函数checkChunkUploadedByResponse: (chunk, message) => {const result = JSON.parse(message);if (result.data.skipUpload) {this.skip = true;return true;}return (result.data.uploaded || []).indexOf(chunk.offset + 1) >= 0;},headers: {// 在header中添加的验证,请根据实际业务来"Access-Token": storage.get(ACCESS_TOKEN),},},attrs: {accept: "image/*",},statusText: {success: "上传成功",error: "上传出错了",uploading: "上传中...",paused: "暂停中...",waiting: "等待中...",cmd5: "计算文件MD5中...",},fileList: [],disabled: true,};},watch: {fileList(o, n) {this.disabled = false;},},methods: {fileSuccess(rootFile, file, response, chunk) {// console.log(rootFile);// console.log(file);// console.log(message);// console.log(chunk);const result = JSON.parse(response);console.log(result.success, this.skip);if (result.success && !this.skip) {axios.post("http://127.0.0.1:8888/upload/merge",{identifier: file.uniqueIdentifier,filename: file.name,totalChunks: chunk.offset,},{headers: { "Access-Token": storage.get(ACCESS_TOKEN) }}).then((res) => {if (res.data.success) {console.log("上传成功");} else {console.log(res);}}).catch(function (error) {console.log(error);});} else {console.log("上传成功,不需要合并");}if (this.skip) {this.skip = false;}},fileComplete(rootFile) {// 一个根文件(文件夹)成功上传完成。// console.log("fileComplete", rootFile);// console.log("一个根文件(文件夹)成功上传完成。");},complete() {// 上传完毕。// console.log("complete");},filesAdded(file, fileList, event) {// console.log(file);file.forEach((e) => {this.fileList.push(e);this.computeMD5(e);});},computeMD5(file) {let fileReader = new FileReader();let time = new Date().getTime();let blobSlice =File.prototype.slice ||File.prototype.mozSlice ||File.prototype.webkitSlice;let currentChunk = 0;const chunkSize = 1024 * 1024;let chunks = Math.ceil(file.size / chunkSize);let spark = new SparkMD5.ArrayBuffer();// 文件状态设为"计算MD5"file.cmd5 = true; //文件状态为“计算md5...”file.pause();loadNext();fileReader.onload = (e) => {spark.append(e.target.result);if (currentChunk < chunks) {currentChunk++;loadNext();// 实时展示MD5的计算进度console.log(`第${currentChunk}分片解析完成, 开始第${currentChunk + 1} / ${chunks}分片解析`);} else {let md5 = spark.end();console.log(`MD5计算完毕:${file.name} \nMD5:${md5} \n分片:${chunks} 大小:${file.size} 用时:${new Date().getTime() - time} ms`);spark.destroy(); //释放缓存file.uniqueIdentifier = md5; //将文件md5赋值给文件唯一标识file.cmd5 = false; //取消计算md5状态file.resume(); //开始上传}};fileReader.onerror = function () {this.error(`文件${file.name}读取出错,请检查该文件`);file.cancel();};function loadNext() {let start = currentChunk * chunkSize;let end =start + chunkSize >= file.size ? file.size : start + chunkSize;fileReader.readAsArrayBuffer(blobSlice.call(file.file, start, end));}},allStart() {console.log(this.fileList);this.fileList.map((e) => {if (e.paused) {e.resume();}});},allStop() {console.log(this.fileList);this.fileList.map((e) => {if (!e.paused) {e.pause();}});},allRemove() {this.fileList.map((e) => {e.cancel();});this.fileList = [];},},};</script><style>.uploader-example {width: 100%;padding: 15px;margin: 0px auto 0;font-size: 12px;box-shadow: 0 0 10px rgba(0, 0, 0, 0.4);}.uploader-example .uploader-btn {margin-right: 4px;}.uploader-example .uploader-list {max-height: 440px;overflow: auto;overflow-x: hidden;overflow-y: auto;}</style>
Uploader组件使用
<template><div><a-button @click="uploadFile"> 资源上传 </a-button><a-drawertitle="资源上传"placement="right"width="640":closable="false":visible="visible"@close="onClose"><upload></upload></a-drawer></div></template><script>import Upload from "@/components/Upload/Index";export default {name: "WelcomePage",data() {return {visible: true,};},components: {Upload,},methods: {uploadFile() {this.visible = true;},onClose() {this.visible = false;}},};</script><style lang="less" scoped></style>
核心方法分析
<uploader:autoStart="false":options="options":file-status-text="statusText"class="uploader-example"@file-complete="fileComplete"@complete="complete"@file-success="fileSuccess"@files-added="filesAdded"><uploader-unsupport></uploader-unsupport><uploader-drop><p>将文件拖放到此处以上传</p><uploader-btn>选择文件</uploader-btn><uploader-btn :attrs="attrs">选择图片</uploader-btn><uploader-btn :directory="true">选择文件夹</uploader-btn></uploader-drop><!-- <uploader-list></uploader-list> --><uploader-files> </uploader-files></uploader><br /><a-button @click="allStart()" :disabled="disabled">全部开始</a-button><a-button @click="allStop()" style="margin-left: 4px">全部暂停</a-button><a-button @click="allRemove()" style="margin-left: 4px">全部移除</a-button>
options参数分析
参考 simple-uploader.js 配置。此外,你可以有如下配置项可选:
parseTimeRemaining(timeRemaining, parsedTimeRemaining) {Function}用于格式化你想要剩余时间,一般可以用来做多语言。参数:
- timeRemaining{Number}, 剩余时间,秒为单位
parsedTimeRemaining{String}, 默认展示的剩余时间内容,你也可以这样做替换使用:
parseTimeRemaining: function (timeRemaining, parsedTimeRemaining) {return parsedTimeRemaining.replace(/\syears?/, '年').replace(/\days?/, '天').replace(/\shours?/, '小时').replace(/\sminutes?/, '分钟').replace(/\sseconds?/, '秒')}
categoryMap {Object}
文件类型 map,默认:{image: ['gif', 'jpg', 'jpeg', 'png', 'bmp', 'webp'],video: ['mp4', 'm3u8', 'rmvb', 'avi', 'swf', '3gp', 'mkv', 'flv'],audio: ['mp3', 'wav', 'wma', 'ogg', 'aac', 'flac'],document: ['doc', 'txt', 'docx', 'pages', 'epub', 'pdf', 'numbers', 'csv', 'xls', 'xlsx', 'keynote', 'ppt', 'pptx']}
autoStart {Boolean}默认 true, 是否选择文件后自动开始上传。
fileStatusText {Object}默认:{success: 'success',error: 'error',uploading: 'uploading',paused: 'paused',waiting: 'waiting'}
用于转换文件上传状态文本映射对象。
0.6.0 版本之后,fileStatusText 可以设置为一个函数,参数为 (status, response = null), 第一个 status 为状态,第二个为响应内容,默认 null,示例:fileStatusText(status, response) {const statusTextMap = {uploading: 'uploading',paused: 'paused',waiting: 'waiting'}if (status === 'success' || status === 'error') {// 只有status为success或者error的时候可以使用 response// eg:// return response data ?return response.data} else {return statusTextMap[status]}}
fileComplete方法
fileComplete(rootFile) {// 一个根文件(文件夹)成功上传完成。// console.log("fileComplete", rootFile);// console.log("一个根文件(文件夹)成功上传完成。");},
complete方法
complete() {// 上传完毕。// console.log("complete");},
fileSuccess方法
文件上传成功,进行合并。
fileSuccess(rootFile, file, response, chunk) {// console.log(rootFile);// console.log(file);// console.log(message);// console.log(chunk);const result = JSON.parse(response);console.log(result.success, this.skip);if (result.success && !this.skip) {axios.post("http://127.0.0.1:8888/upload/merge",{identifier: file.uniqueIdentifier,filename: file.name,totalChunks: chunk.offset,},{headers: { "Access-Token": storage.get(ACCESS_TOKEN) }}).then((res) => {if (res.data.success) {console.log("上传成功");} else {console.log(res);}}).catch(function (error) {console.log(error);});} else {console.log("上传成功,不需要合并");}if (this.skip) {this.skip = false;}},
filesAdded方法
文件选择完成,进行文件分片处理。
filesAdded(file, fileList, event) {// console.log(file);file.forEach((e) => {this.fileList.push(e);this.computeMD5(e);});},computeMD5(file) {let fileReader = new FileReader();let time = new Date().getTime();let blobSlice =File.prototype.slice ||File.prototype.mozSlice ||File.prototype.webkitSlice;let currentChunk = 0;const chunkSize = 1024 * 1024;let chunks = Math.ceil(file.size / chunkSize);let spark = new SparkMD5.ArrayBuffer();// 文件状态设为"计算MD5"file.cmd5 = true; //文件状态为“计算md5...”file.pause();loadNext();fileReader.onload = (e) => {spark.append(e.target.result);if (currentChunk < chunks) {currentChunk++;loadNext();// 实时展示MD5的计算进度console.log(`第${currentChunk}分片解析完成, 开始第${currentChunk + 1} / ${chunks}分片解析`);} else {let md5 = spark.end();console.log(`MD5计算完毕:${file.name} \nMD5:${md5} \n分片:${chunks} 大小:${file.size} 用时:${new Date().getTime() - time} ms`);spark.destroy(); //释放缓存file.uniqueIdentifier = md5; //将文件md5赋值给文件唯一标识file.cmd5 = false; //取消计算md5状态file.resume(); //开始上传}};fileReader.onerror = function () {this.error(`文件${file.name}读取出错,请检查该文件`);file.cancel();};function loadNext() {let start = currentChunk * chunkSize;let end =start + chunkSize >= file.size ? file.size : start + chunkSize;fileReader.readAsArrayBuffer(blobSlice.call(file.file, start, end));}},
allStart全部开始
allStart() {console.log(this.fileList);this.fileList.map((e) => {if (e.paused) {e.resume();}});},
allStop全部停止
allStop() {console.log(this.fileList);this.fileList.map((e) => {if (!e.paused) {e.pause();}});},
allRemove全部移除
allRemove() {this.fileList.map((e) => {e.cancel();});this.fileList = [];},
文件分片
vue-simple-uploader自动将文件进行分片,在options的chunkSize中可以设置每个分片的大小。
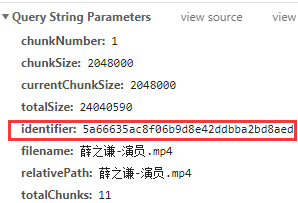
如图:对于大文件来说,会发送多个请求,在设置testChunks为true后(在插件中默认就是true),会发送与服务器进行分片校验的请求,下面的第一个get请求就是该请求;后面的每一个post请求都是上传分片的请求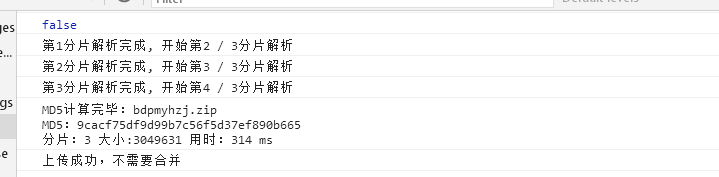
看一下发送给服务端的参数,其中chunkNumber表示当前是第几个分片,totalChunks代表所有的分片数,这两个参数都是都是插件根据你设置的chunkSize来计算的。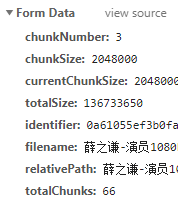
需要注意的就是在最后文件上传成功的事件中,通过后台返回的字段,来判断是否要再给后台发送一个文件合并的请求。MD5的计算过程
断点续传及秒传的基础是要计算文件的MD5,这是文件的唯一标识,然后服务器根据MD5进行判断,是进行秒传还是断点续传。
在file-added事件之后,就计算MD5,我们最终的目的是将计算出来的MD5加到参数里传给后台,然后继续文件上传的操作,详细的思路步骤是:
- 把uploader组件的autoStart设为false,即选择文件后不会自动开始上传
- 先通过 file.pause()暂停文件,然后通过H5的FileReader接口读取文件
- 将异步读取文件的结果进行MD5,这里我用的加密工具是spark-md5,你可以通过npm install spark-md5 —save来安装,也可以使用其他MD5加密工具。
- file有个属性是uniqueIdentifier,代表文件唯一标示,我们把计算出来的MD5赋值给这个属性 file.uniqueIdentifier = md5,这就实现了我们最终的目的。
- 通过file.resume()开始/继续文件上传。
给file的uniqueIdentifier 属性赋值后,请求中的identifier即是我们计算出来的MD5computeMD5(file) {let fileReader = new FileReader();let time = new Date().getTime();let blobSlice =File.prototype.slice ||File.prototype.mozSlice ||File.prototype.webkitSlice;let currentChunk = 0;const chunkSize = 1024 * 1024;let chunks = Math.ceil(file.size / chunkSize);let spark = new SparkMD5.ArrayBuffer();// 文件状态设为"计算MD5"file.cmd5 = true; //文件状态为“计算md5...”file.pause();loadNext();fileReader.onload = (e) => {spark.append(e.target.result);if (currentChunk < chunks) {currentChunk++;loadNext();// 实时展示MD5的计算进度console.log(`第${currentChunk}分片解析完成, 开始第${currentChunk + 1} / ${chunks}分片解析`);} else {let md5 = spark.end();console.log(`MD5计算完毕:${file.name} \nMD5:${md5} \n分片:${chunks} 大小:${file.size} 用时:${new Date().getTime() - time} ms`);spark.destroy(); //释放缓存file.uniqueIdentifier = md5; //将文件md5赋值给文件唯一标识file.cmd5 = false; //取消计算md5状态file.resume(); //开始上传}};fileReader.onerror = function () {this.error(`文件${file.name}读取出错,请检查该文件`);file.cancel();};function loadNext() {let start = currentChunk * chunkSize;let end =start + chunkSize >= file.size ? file.size : start + chunkSize;fileReader.readAsArrayBuffer(blobSlice.call(file.file, start, end));}},
秒传及断点续传
在计算完MD5后,我们就能谈断点续传及秒传的概念了。
服务器根据前端传过来的MD5去判断是否可以进行秒传或断点续传:
- a. 服务器发现文件已经完全上传成功,则直接返回秒传的标识。
- b. 服务器发现文件上传过分片信息,则返回这些分片信息,告诉前端继续上传,即断点续传。
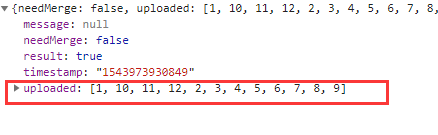
在每次上传过程的最开始,vue-simple-uploader会发送一个get请求,来问服务器我哪些分片已经上传过了,这个请求返回的结果也有几种可能:
- a. 如果是秒传,在请求结果中会有相应的标识,比如我这里是skipUpload为true,且返回了url,代表服务器告诉我们这个文件已经有了,我直接把url给你,你不用再传了,这就是秒传。
- b. 如果后台返回了分片信息,这是断点续传。如图,返回的数据中有个uploaded的字段,代表这些分片是已经上传过的了,插件会自动跳过这些分片的上传。
前端做分片检验:checkChunkUploadedByResponse
插件自己是不会判断哪个需要跳过的,在代码中由options中的checkChunkUploadedByResponse控制,它会根据 XHR 响应内容检测每个块是否上传成功了,成功的分片直接跳过上传
你要在这个函数中进行处理,可以跳过的情况下返回true即可。
checkChunkUploadedByResponse: function (chunk, message) {let objMessage = JSON.parse(message);if (objMessage.skipUpload) {return true;}return (objMessage.uploaded || []).indexOf(chunk.offset + 1) >= 0},
注:skipUpload 和 uploaded 是我和后台商议的字段,你要按照后台实际返回的字段名来。
优化MD5计算
原uploader中计算MD5的方式为对整个文件直接计算MD5,很吃内存,容易导致浏览器崩溃
我改成了通过分片读取文件的方式计算MD5,防止直接读取大文件时因内存占用过大导致的网页卡顿、崩溃。
自定义的状态
(之前我就封装了几种自定义状态,最近总有小伙伴问怎么没有“校验MD5”,“合并中”这些状态,我就把我的方法写出来了,方式很笨,但是能实现效果)
插件原本只支持了success、error、uploading、paused、waiting这几种状态,
由于业务需求,我额外增加了“校验MD5”、“合并中”、“转码中”、“上传失败”这几种自定义的状态
由于前几种状态是插件已经封装好的,我不能改源码,只能用比较hack的方式:
当自定义状态开始时,要手动调一下statusSet方法,生成一个p标签盖在原本的状态上面;当自定义状态结束时,还要手动调用statusRemove移除该标签。
this.statusSet(file.id, 'merging');this.statusRemove(file.id);

若有收获,就点个赞吧
0 人点赞
