1.今日内容
- 初识 Spring Cloud
- Spring Cloud 服务治理
2.初识Spring Cloud
2.1-微服架构

微服务架构:
“微服务”一词源于 Martin Fowler的名为 Microservices的博文,可以在他的官方博客上找到
http://martinfowler.com/articles/microservices.html
- 微服务是系统架构上的一种设计风格,它的主旨是将一个原本独立的系统拆分成多个小型服务,这些小型服务都在各自独立的进程中运行,服务之间一般通过 HTTP 的 RESTfuLAPI 进行通信协作。
- 被拆分成的每一个小型服务都围绕着系统中的某一项或些耦合度较高的业务功能进行构建,并且每个服务都维护着自身的数据存储、业务开发自动化测试案例以及独立部署机制。(将不同的功能模块拆分成多个独立的小模块,从而对代码进行了解耦的作用,而被拆分的多个模块直接通过HTTP中的rest fu lapi进行通信调用)
- 由于有了轻量级的通信协作基础,所以这些微服务可以使用
不同的语言来编写。
2.2-初识Spring Cloud
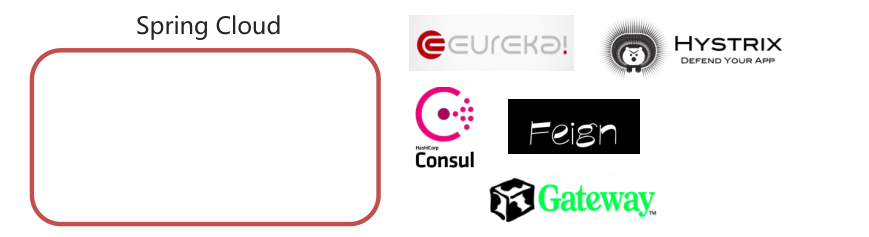
- Spring Cloud的概念: Spring Cloud 是一系列框架的有序集合。Spring Cloud 并没有重复制造轮子,它只是将目前各家公司开发的比较成熟、经得起实际考验的服务框架组合起来。
- Spring Cloud的技术依赖及优点:通过 Spring Boot 风格进行再封装屏蔽掉了复杂的配置和实现原理,最终给开发者留出了一套简单易懂、易部署和易维护的分布式系统开发工具包。它利用Spring Boot的开发便利性巧妙地简化了分布式系统基础设施的开发,如服务发现注册、配置中心、消息总线、负载均衡、 断路器、数据监控等,都可以用Spring Boot的开发风格做到一键启动和部署。
- Spring Cloud的缺点:但是在拆分后,服务会更加多,部署维护相对单体的架构更加复杂,微服务分布式部署的问题也会伴随而来,比如说:分布式事务、分布式锁、分布式日志的收集等等。
- Spring Cloud项目官方网址:https://spring.io/projects/spring-cloud
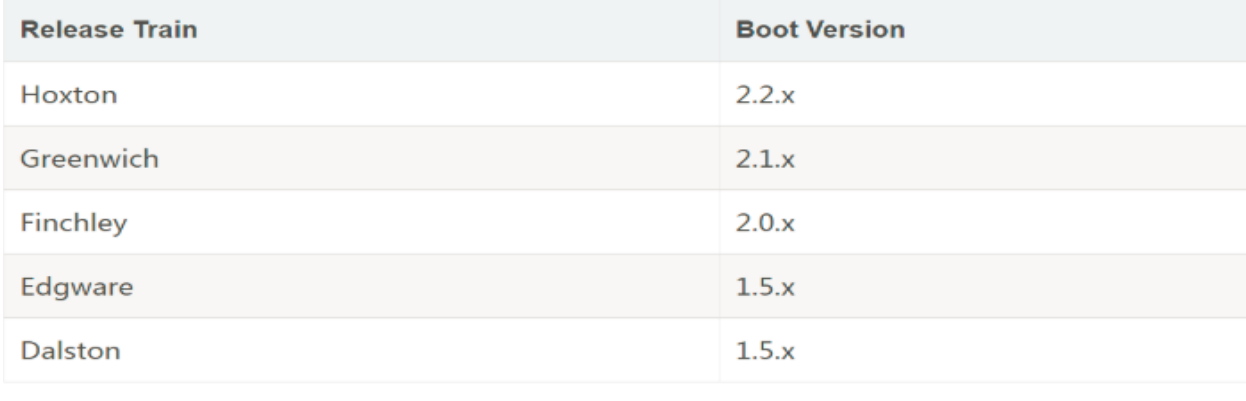
- Spring Cloud 版本命名方式采用了伦敦地铁站的名称,同时根据字母表的顺序来对应版本时间顺序,比如:最早的Release版本:Angel,第二个Release版本:Brixton,然后是Camden、Dalston、Edgware,Finchley,Greenwich,Hoxton。
- 目前最新的是Hoxton版本。
2.3-Spring Cloud 和dubbo对比
Spring Cloud 和dubbo对比
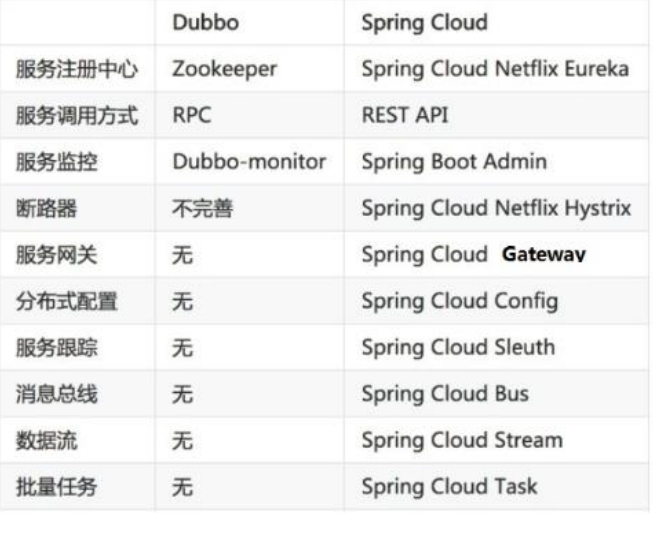
- 相同点:Spring Cloud 与 Dubbo 都是实现微服务有效的工具。
- 功能区别:Dubbo 只是实现了服务治理,注重的是服务间的远程调用 (RPC方案);而 Spring Cloud 子项目分别覆盖了微服务架构下的众多部件,整合了一些的技术,用于微服务开发的体系非常完善的,总之,springcloud技术全 ,开发便捷。
- 服务之间的调用区别:springcloud服务间远程调用的通信协议是采用HTTP协议,dubbo则是基于tcp协议结合的nio异步传输(支持多种协议),dubbo通信协议技术更底层效率相对更高。(通信协议的不同是最大的区别)
- Dubbo 使用 RPC 通讯协议,Spring Cloud 使用 RESTful 完成通信,Dubbo 效率略高于 Spring Cloud。
总结
- 微服务就是将项目的各个模块拆分为可独立运行、部署、测试的架构设计风格。
- Spring 公司将其他公司中微服务架构常用的组件整合起来,并使用 SpringBoot 简化其开发、配置。
称为 Spring Cloud
- Spring Cloud 与 Dubbo都是实现微服务有效的工具。Dubbo 性能更好,而 Spring Cloud 功能更全面。
3.Spring Cloud服务治理
3.1-Eureka介绍
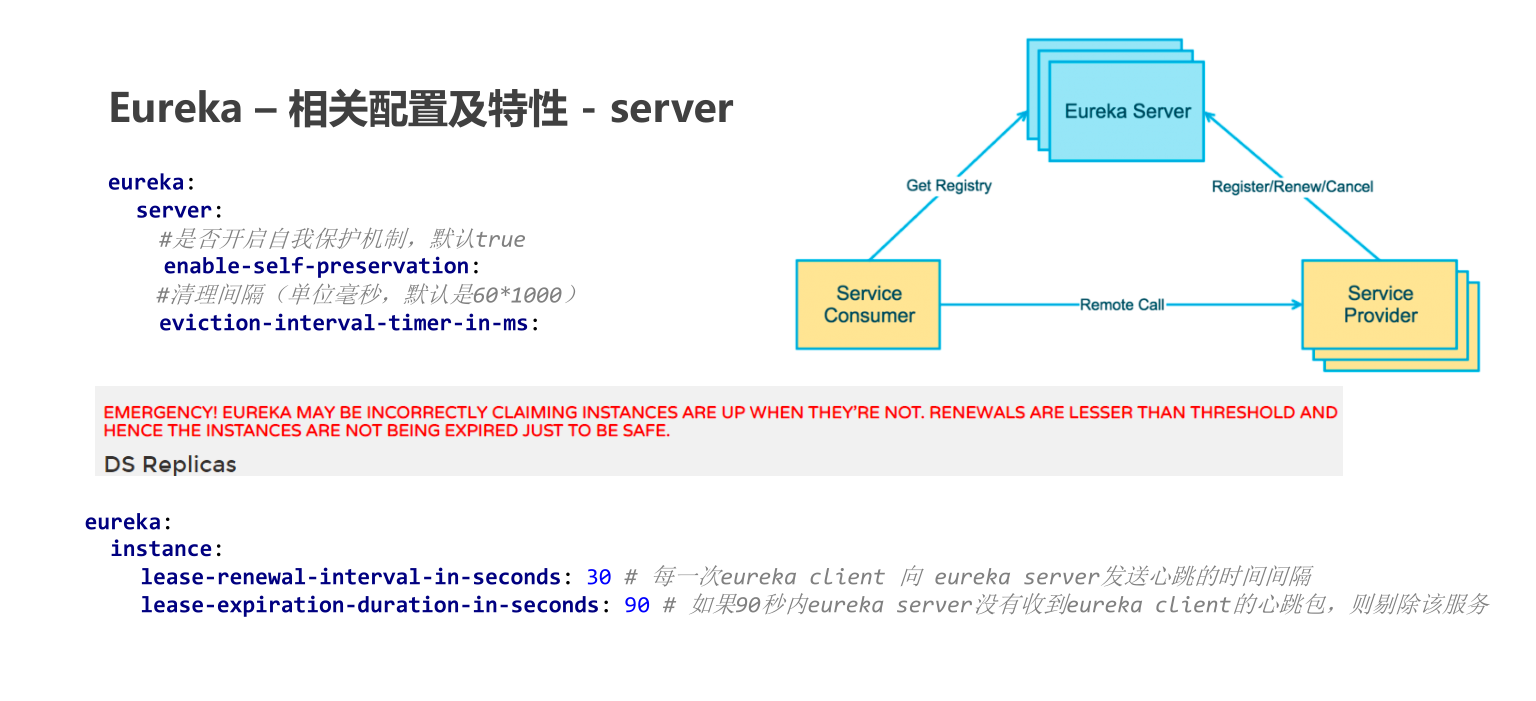
• Eureka 是 Netflix 公司开源的一个服务注册与发现的组件 。
• Eureka 和其他 Netflix 公司的服务组件(例如负载均衡、熔断器、网关等) 一起,被 Spring Cloud 社区整合为
Spring-Cloud-Netflix 模块。
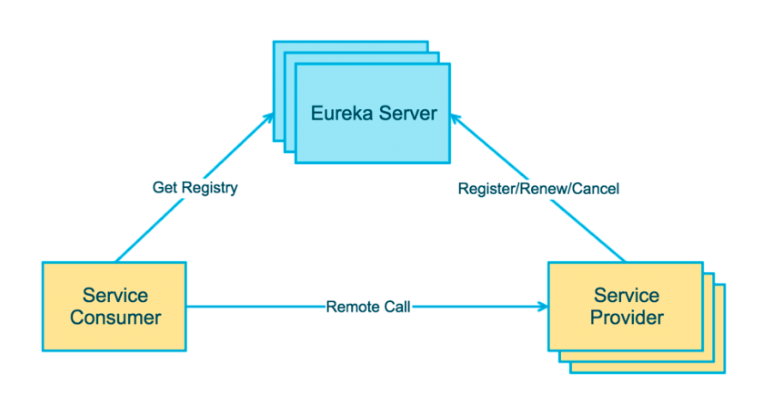
• Eureka 包含两个组件:Eureka Server (注册中心) 和 Eureka Client (服务提供者、服务消费者)。
Eureka学习步骤
- 搭建 Provider 和 Consumer 服务。
- 使用 RestTemplate 完成远程调用。
- 搭建 Eureka Server 服务。
- 改造 Provider 和 Consumer 称为 Eureka Client。
- Consumer 服务 通过从 Eureka Server 中抓取 Provider
地址 完成 远程调用
3.2-Eureka快速入门
3.2.1-环境搭建
3.2.1.1-创建父工程
创建module -父工程 Spring-cloud-paren
Spring-cloud-parent pom.xml
<!--spring boot 环境 --><parent><groupId>org.springframework.boot</groupId><artifactId>spring-boot-starter-parent</artifactId><version>2.1.0.RELEASE</version><relativePath/></parent><properties><project.build.sourceEncoding>UTF-8</project.build.sourceEncoding><project.reporting.outputEncoding>UTF-8</project.reporting.outputEncoding><java.version>1.8</java.version></properties>
3.2.1.2-创建服务提供者
- 创建服务提供者eureka-provider
eureka-provider pom.xml
<dependencies><!--spring boot web--><dependency><groupId>org.springframework.boot</groupId><artifactId>spring-boot-starter-web</artifactId></dependency></dependencies>
GoodsController
package com.itheima.provider.controller;import com.itheima.provider.domain.Goods;import com.itheima.provider.service.GoodsService;import org.springframework.beans.factory.annotation.Autowired;import org.springframework.web.bind.annotation.GetMapping;import org.springframework.web.bind.annotation.PathVariable;import org.springframework.web.bind.annotation.RequestMapping;import org.springframework.web.bind.annotation.RestController;/*** Goods Controller 服务提供方*/@RestController@RequestMapping("/goods")public class GoodsController {@Autowiredprivate GoodsService goodsService;@GetMapping("/findOne/{id}")public Goods findOne(@PathVariable("id") int id){Goods goods = goodsService.findOne(id);return goods;}}
GoodsService
package com.itheima.provider.service;import com.itheima.provider.dao.GoodsDao;import com.itheima.provider.domain.Goods;import org.springframework.beans.factory.annotation.Autowired;import org.springframework.stereotype.Service;/*** Goods 业务层*/@Servicepublic class GoodsService {@Autowiredprivate GoodsDao goodsDao;/*** 根据id查询* @param id* @return*/public Goods findOne(int id){return goodsDao.findOne(id);}}
Goods
package com.itheima.provider.domain;/*** 商品实体类*/public class Goods {private int id;private String title;//商品标题private double price;//商品价格private int count;//商品库存public Goods() {}public Goods(int id, String title, double price, int count) {this.id = id;this.title = title;this.price = price;this.count = count;}public int getId() {return id;}public void setId(int id) {this.id = id;}public String getTitle() {return title;}public void setTitle(String title) {this.title = title;}public double getPrice() {return price;}public void setPrice(double price) {this.price = price;}public int getCount() {return count;}public void setCount(int count) {this.count = count;}}
GoodsDao
package com.itheima.provider.dao;import com.itheima.provider.domain.Goods;import org.springframework.stereotype.Repository;import javax.validation.ReportAsSingleViolation;/*** 商品Dao*/@Repositorypublic class GoodsDao {public Goods findOne(int id){return new Goods(1,"华为手机",3999,10000);}}
ProviderApp
package com.itheima.provider;import org.springframework.boot.SpringApplication;import org.springframework.boot.autoconfigure.SpringBootApplication;/*** 启动类*/@SpringBootApplicationpublic class ProviderApp {public static void main(String[] args) {SpringApplication.run(ProviderApp.class,args);}}
application.yml
server:port: 8000
3.2.1.2-创建服务消费者
- 创建服务消费者eureka-consumer
OrderController
package com.itheima.consumer.controller;import com.itheima.consumer.domain.Goods;import org.springframework.beans.factory.annotation.Autowired;import org.springframework.web.bind.annotation.GetMapping;import org.springframework.web.bind.annotation.PathVariable;import org.springframework.web.bind.annotation.RequestMapping;import org.springframework.web.bind.annotation.RestController;/*** 服务的调用方*/@RestController@RequestMapping("/order")public class OrderController {@GetMapping("/goods/{id}")public Goods findGoodsById(@PathVariable("id") int id){System.out.println("findGoodsById..."+id);//远程调用Goods服务中的findOne接口return null;}}
Goods
package com.itheima.consumer.domain;/*** 商品实体类*/public class Goods {private int id;private String title;//商品标题private double price;//商品价格private int count;//商品库存public Goods() {}public Goods(int id, String title, double price, int count) {this.id = id;this.title = title;this.price = price;this.count = count;}public int getId() {return id;}public void setId(int id) {this.id = id;}public String getTitle() {return title;}public void setTitle(String title) {this.title = title;}public double getPrice() {return price;}public void setPrice(double price) {this.price = price;}public int getCount() {return count;}public void setCount(int count) {this.count = count;}}
ConsumerApp
package com.itheima.consumer;import org.springframework.boot.SpringApplication;import org.springframework.boot.autoconfigure.SpringBootApplication;@SpringBootApplicationpublic class ConsumerApp {public static void main(String[] args) {SpringApplication.run(ConsumerApp.class,args);}}
application.yml
server:port: 9000
3.2.2-RestTemplate远程调用
• Spring提供的一种简单便捷的模板类,用于在 java 代码里访问 restful 服务。
• 其功能与 HttpClient 类似,但是 RestTemplate 实现更优雅,使用更方便。
修改消费方代码
RestTemplateConfig
package com.itheima.consumer.config;import org.springframework.context.annotation.Bean;import org.springframework.context.annotation.Configuration;import org.springframework.web.client.RestTemplate;@Configuration //配置类的注解public class RestTemplateConfig {@Beanpublic RestTemplate restTemplate(){return new RestTemplate();}}
OrderController
package com.itheima.consumer.controller;import com.itheima.consumer.domain.Goods;import org.springframework.beans.factory.annotation.Autowired;import org.springframework.web.bind.annotation.GetMapping;import org.springframework.web.bind.annotation.PathVariable;import org.springframework.web.bind.annotation.RequestMapping;import org.springframework.web.bind.annotation.RestController;import org.springframework.web.client.RestTemplate;/*** 服务的调用方*/@RestController@RequestMapping("/order")public class OrderController {@Autowiredprivate RestTemplate restTemplate;@GetMapping("/goods/{id}")public Goods findGoodsById(@PathVariable("id") int id){System.out.println("findGoodsById..."+id);/*//远程调用Goods服务中的findOne接口使用RestTemplate1. 定义Bean restTemplate2. 注入Bean3. 调用方法*/String url = "http://localhost:8000/goods/findOne/"+id;// 3. 调用方法Goods goods = restTemplate.getForObject(url, Goods.class);return goods;}}
3.2.3- Eureka Server搭建
① 创建 eureka-server 模块
② 引入 SpringCloud 和 euraka-server 相关依赖
Spring-cloud-parent pom.xml
<properties><project.build.sourceEncoding>UTF-8</project.build.sourceEncoding><project.reporting.outputEncoding>UTF-8</project.reporting.outputEncoding><java.version>1.8</java.version><!--spring cloud 版本--><spring-cloud.version>Greenwich.RELEASE</spring-cloud.version></properties><!--引入Spring Cloud 依赖--><dependencyManagement><dependencies><dependency><groupId>org.springframework.cloud</groupId><artifactId>spring-cloud-dependencies</artifactId><version>${spring-cloud.version}</version><type>pom</type><scope>import</scope></dependency></dependencies></dependencyManagement>
eureka-server pom.xml
<dependencies><dependency><groupId>org.springframework.boot</groupId><artifactId>spring-boot-starter-web</artifactId></dependency><!-- eureka-server --><dependency><groupId>org.springframework.cloud</groupId><artifactId>spring-cloud-starter-netflix-eureka-server</artifactId></dependency></dependencies>
EurekaApp
package com.itheima.eureka;import org.springframework.boot.SpringApplication;import org.springframework.boot.autoconfigure.SpringBootApplication;import org.springframework.cloud.netflix.eureka.server.EnableEurekaServer;@SpringBootApplication// 启用EurekaServer@EnableEurekaServerpublic class EurekaApp {public static void main(String[] args) {SpringApplication.run(EurekaApp.class,args);}}
③ 完成 Eureka Server 相关配置
application.yml
server:port: 8761# eureka 配置# eureka 一共有4部分 配置# 1. dashboard:eureka的web控制台配置# 2. server:eureka的服务端配置# 3. client:eureka的客户端配置# 4. instance:eureka的实例配置eureka:instance:hostname: localhost # 主机名client:service-url:defaultZone: http://${eureka.instance.hostname}:${server.port}/eureka # eureka服务端地址,将来客户端使用该地址和eureka进行通信register-with-eureka: false # 是否将自己的路径 注册到eureka上。eureka server 不需要的,eureka provider client 需要fetch-registry: false # 是否需要从eureka中抓取路径。eureka server 不需要的,eureka consumer client 需要
④ 启动该模块
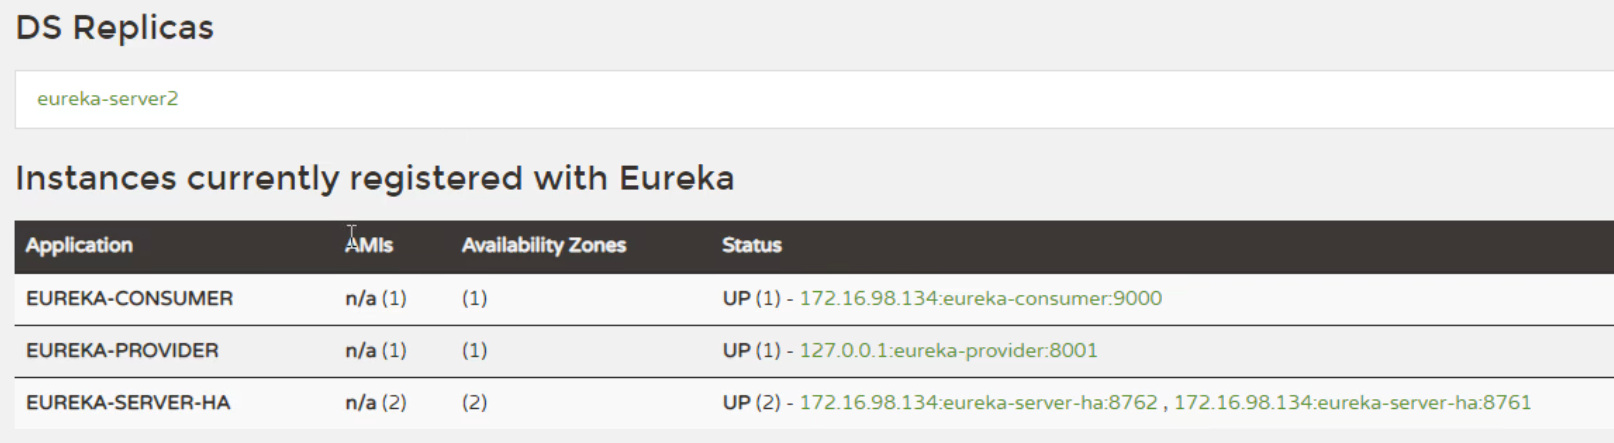
3.2.4-Eureka控制台介绍
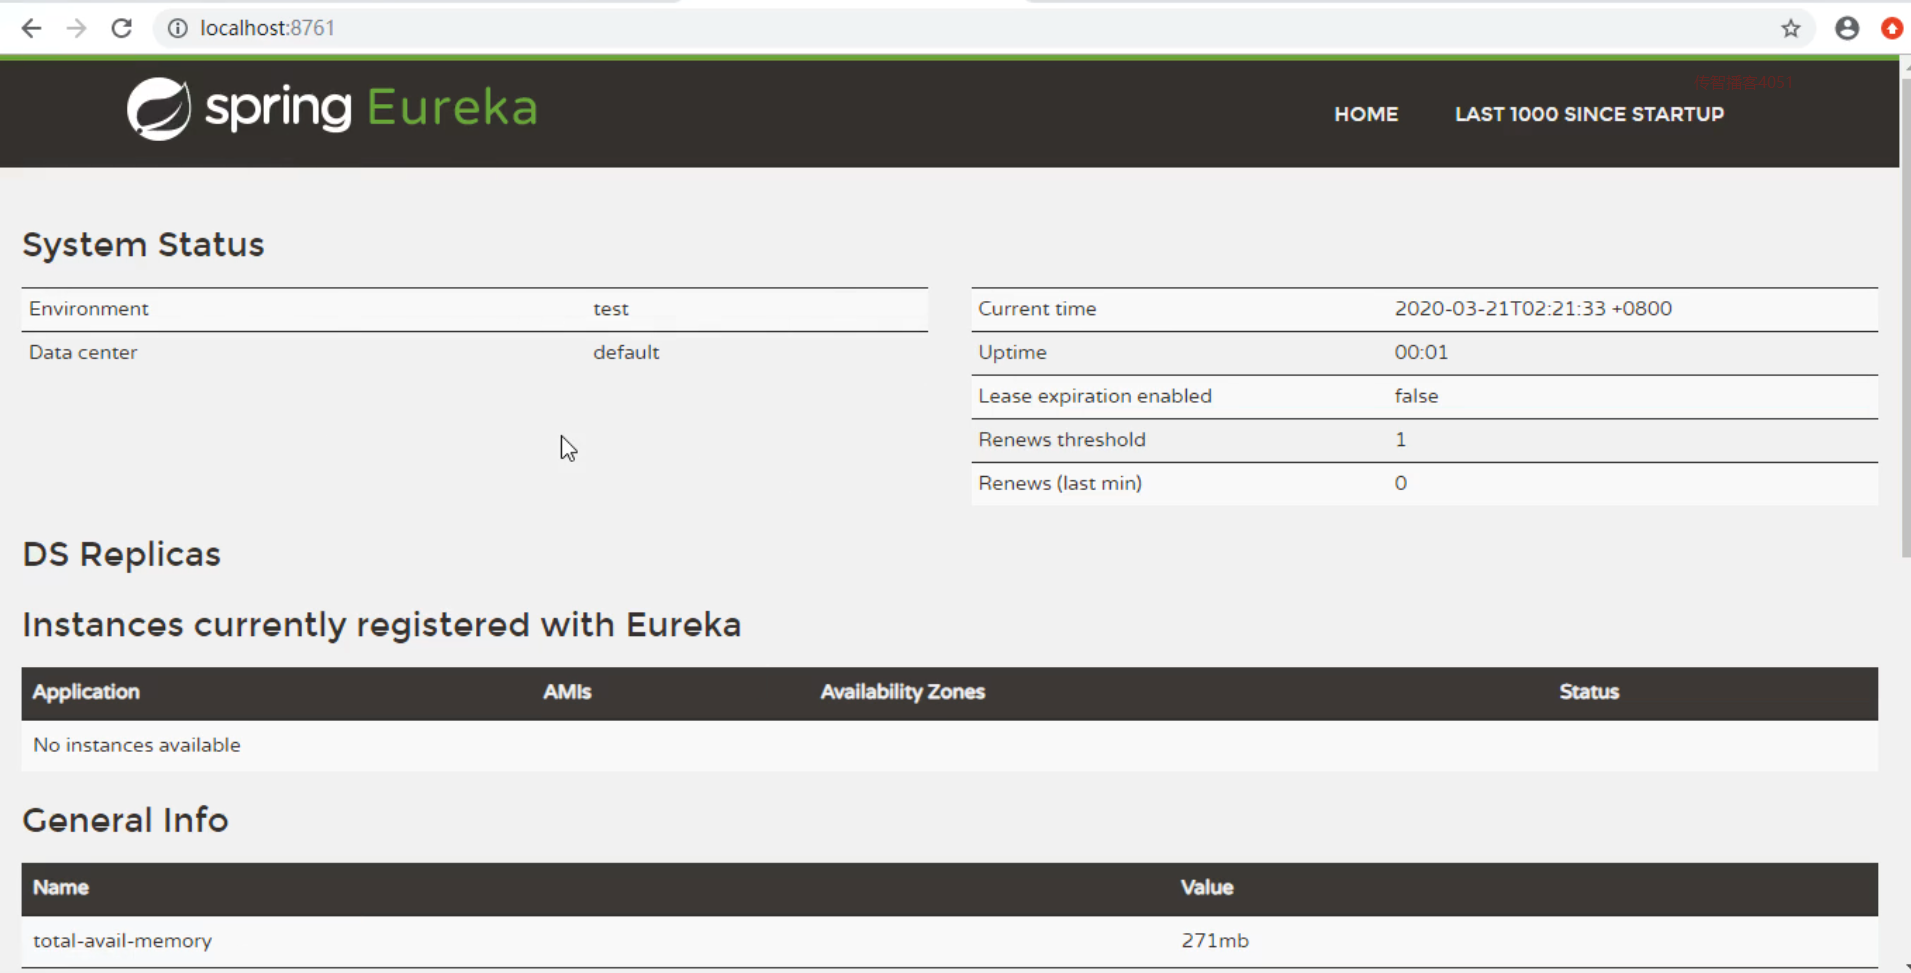
System status:系统状态信息
DS Replicas:集群信息
tance currently registered with Eureka: 实例注册信息
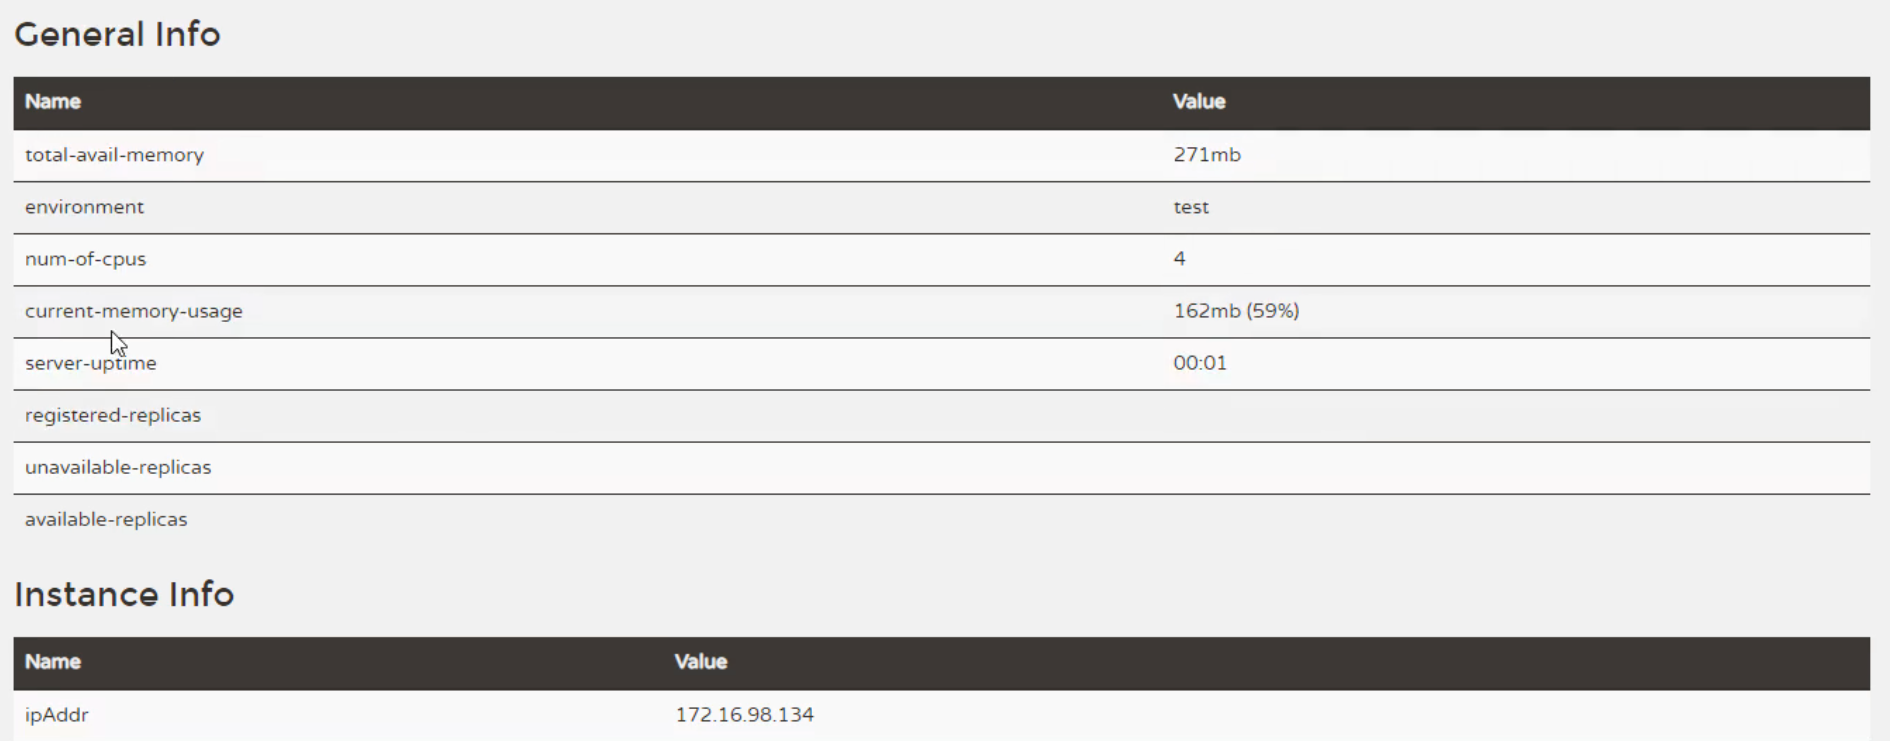
General Info :通用信息
Instance Info :实例信息
3.2.5-Eureka Client
① 引 eureka-client 相关依赖
eureka-provider pom.xml
<dependencies><!--spring boot web--><dependency><groupId>org.springframework.boot</groupId><artifactId>spring-boot-starter-web</artifactId></dependency><!-- eureka-client --><dependency><groupId>org.springframework.cloud</groupId><artifactId>spring-cloud-starter-netflix-eureka-client</artifactId></dependency></dependencies>
ProviderApp
package com.itheima.provider;import org.springframework.boot.SpringApplication;import org.springframework.boot.autoconfigure.SpringBootApplication;import org.springframework.cloud.netflix.eureka.EnableEurekaClient;/*** 启动类*/@EnableEurekaClient //该注解 在新版本中可以省略@SpringBootApplicationpublic class ProviderApp {public static void main(String[] args) {SpringApplication.run(ProviderApp.class,args);}}
② 完成 eureka client 相关配置
application.yml
server:port: 8001eureka:instance:hostname: localhost # 主机名client:service-url:defaultZone: http://localhost:8761/eureka # eureka服务端地址,将来客户端使用该地址和eureka进行通信spring:application:name: eureka-provider # 设置当前应用的名称。将来会在eureka中Application显示。将来需要使用该名称来获取路径
③ 启动测试
服务消费者eureka-consumer通过修改,也可以展示在控制台
eureka-consumer在这里仅仅是我们人为定义为消费者,作为一个服务,其实既可以作为服务提供方,同时也可以作为服务消费方
ConsumerApp添加@EnableEurekaClient
package com.itheima.consumer;import org.springframework.boot.SpringApplication;import org.springframework.boot.autoconfigure.SpringBootApplication;import org.springframework.cloud.client.discovery.EnableDiscoveryClient;import org.springframework.cloud.netflix.eureka.EnableEurekaClient;@EnableEurekaClient@SpringBootApplicationpublic class ConsumerApp {public static void main(String[] args) {SpringApplication.run(ConsumerApp.class,args);}}
application.yml
server:port: 9000eureka:instance:hostname: localhost # 主机名client:service-url:defaultZone: http://localhost:8761/eureka # eureka服务端地址,将来客户端使用该地址和eureka进行通信spring:application:name: eureka-consumer # 设置当前应用的名称。将来会在eureka中Application显示。将来需要使用该名称来获取路径

3.2.6- 动态获取路径
ConsumerApp添加@EnableDiscoveryClient
package com.itheima.consumer;import org.springframework.boot.SpringApplication;import org.springframework.boot.autoconfigure.SpringBootApplication;import org.springframework.cloud.client.discovery.EnableDiscoveryClient;import org.springframework.cloud.netflix.eureka.EnableEurekaClient;@EnableDiscoveryClient // 激活DiscoveryClient@EnableEurekaClient@SpringBootApplicationpublic class ConsumerApp {public static void main(String[] args) {SpringApplication.run(ConsumerApp.class,args);}}
OrderController修改代码动态获取路径
package com.itheima.consumer.controller;import com.itheima.consumer.domain.Goods;import org.springframework.beans.factory.annotation.Autowired;import org.springframework.cloud.client.ServiceInstance;import org.springframework.cloud.client.discovery.DiscoveryClient;import org.springframework.web.bind.annotation.GetMapping;import org.springframework.web.bind.annotation.PathVariable;import org.springframework.web.bind.annotation.RequestMapping;import org.springframework.web.bind.annotation.RestController;import org.springframework.web.client.RestTemplate;import java.util.List;/*** 服务的调用方*/@RestController@RequestMapping("/order")public class OrderController {@Autowiredprivate RestTemplate restTemplate;@Autowiredprivate DiscoveryClient discoveryClient;@GetMapping("/goods/{id}")public Goods findGoodsById(@PathVariable("id") int id){System.out.println("findGoodsById..."+id);/*//远程调用Goods服务中的findOne接口使用RestTemplate1. 定义Bean restTemplate2. 注入Bean3. 调用方法*//*动态从Eureka Server 中获取 provider 的 ip 和端口1. 注入 DiscoveryClient 对象.激活2. 调用方法*///演示discoveryClient 使用List<ServiceInstance> instances = discoveryClient.getInstances("EUREKA-PROVIDER");//判断集合是否有数据if(instances == null || instances.size() == 0){//集合没有数据return null;}ServiceInstance instance = instances.get(0);String host = instance.getHost();//获取ipint port = instance.getPort();//获取端口System.out.println(host);System.out.println(port);String url = "http://"+host+":"+port+"/goods/findOne/"+id;// 3. 调用方法Goods goods = restTemplate.getForObject(url, Goods.class);return goods;}}
3.3-Eureka属性
3.3.1-instance相关属性
Eureka Instance的配置信息全部保存在org.springframework.cloud.netflix.eureka.EurekaInstanceConfigBean配置类里,实际上它是com.netflix.appinfo.EurekaInstanceConfig(接口)的实现类,替代了netflix的com.netflix.appinfo.CloudInstanceConfig的默认实现。
Eureka Instance的配置信息全部以eureka.instance.xxx的格式配置。
配置列表(取值为默认值)
appname = unknown
- 应用名,首先获取spring.application.name的值,如果取值为空,则取默认unknown。
appGroupName = null
- 应用组名
instanceEnabledOnit = false
- 实例注册到Eureka上是,是否立刻开启通讯。有时候应用在准备好服务之前需要一些预处理。
nonSecurePort = 80
- 非安全的端口
securePort = 443
- 安全端口
nonSecurePortEnabled = true
- 是否开启非安全端口通讯
securePortEnabled = false
- 是否开启安全端口通讯
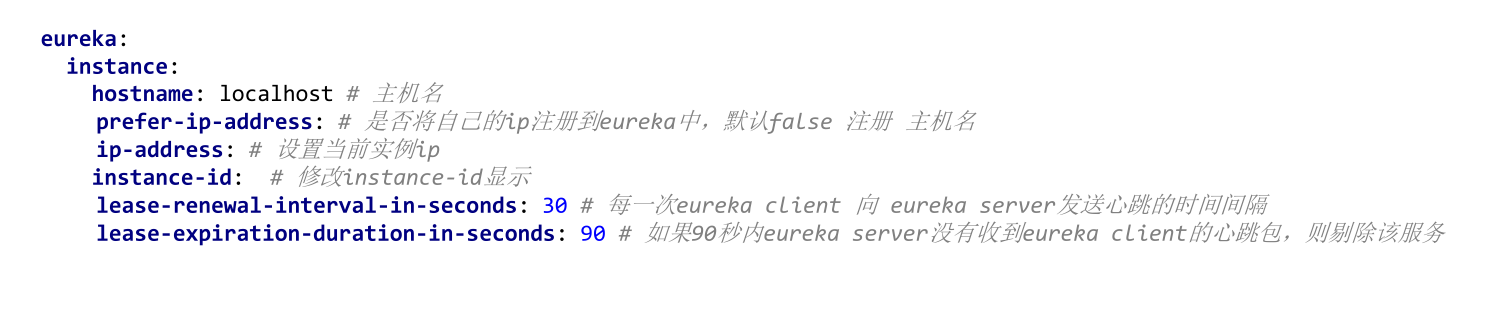
leaseRenewalIntervalInSeconds = 30
- 实例续约间隔时间(发送心跳包的间隔时间)
leaseExpirationDurationInSeconds = 90
- 实例超时时间,表示最大leaseExpirationDurationInSeconds秒后没有续约,Server就认为他不可用了,随之就会将其剔除。
virtualHostName = unknown
- 虚拟主机名,首先获取spring.application.name的值,如果取值为空,则取默认unknown。
instanceId
- 注册到eureka上的唯一实例ID,不能与相同appname的其他实例重复。
secureVirtualHostName = unknown
- 安全虚拟主机名,首先获取spring.application.name的值,如果取值为空,则取默认unknown。
metadataMap = new HashMap();
- 实例元数据,可以供其他实例使用。比如spring-boot-admin在监控时,获取实例的上下文和端口。
dataCenterInfo = new MyDataCenterInfo(DataCenterInfo.Name.MyOwn);
- 实例部署的数据中心。如AWS、MyOwn。
ipAddress=null
- 实例的IP地址
statusPageUrlPath = “/actuator/info”
- 实例状态页相对url
statusPageUrl = null
- 实例状态页绝对URL
homePageUrlPath = “/“
- 实例主页相对URL
homePageUrl = null
- 实例主页绝对URL
healthCheckUrlUrlPath = “/actuator/health”
- 实例健康检查相对URL
healthCheckUrl = null
- 实例健康检查绝对URL
secureHealthCheckUrl = null
- 实例安全的健康检查绝对URL
namespace = “eureka”
- 配置属性的命名空间(Spring Cloud中被忽略)
hostname = null
- 主机名,不配置的时候讲根据操作系统的主机名来获取
preferIpAddress = false
- 是否优先使用IP地址作为主机名的标识
3.3.1-server相关属性
Eureka Server注册中心端的配置是对注册中心的特性配置。Eureka Server的配置全部在org.springframework.cloud.netflix.eureka.server.EurekaServerConfigBean里,实际上它是com.netflix.eureka.EurekaServerConfig的实现类,替代了netflix的默认实现。
Eureka Server的配置全部以eureka.server.xxx的格式进行配置。
配置列表(取值为默认值)
enableSelfPreservation=true
- 是否开启自我保护
renewalPercentThreshold = 0.85
- 自我保护续约百分比阀值因子。如果实际续约数小于续约数阀值,则开启自我保护
renewalThresholdUpdateIntervalMs = 15 60 1000
- 续约数阀值更新频率。
peerEurekaNodesUpdateIntervalMs = 10 60 1000
- Eureka Server节点更新频率。
enableReplicatedRequestCompression = false
- 是否启用复制请求压缩。
waitTimeInMsWhenSyncEmpty=5 60 1000
- 当从其他节点同步实例信息为空时等待的时间。
peerNodeConnectTimeoutMs=200
- 节点间连接的超时时间。
peerNodeReadTimeoutMs=200
- 节点间读取信息的超时时间。
peerNodeTotalConnections=1000
- 节点间连接总数。
peerNodeTotalConnectionsPerHost = 500;
- 单个节点间连接总数。
peerNodeConnectionIdleTimeoutSeconds = 30;
- 节点间连接空闲超时时间。
retentionTimeInMSInDeltaQueue = 3 * MINUTES;
- 增量队列的缓存时间。
deltaRetentionTimerIntervalInMs = 30 * 1000;
- 清理增量队列中过期的频率。
evictionIntervalTimerInMs = 60 * 1000;
- 剔除任务频率。
responseCacheAutoExpirationInSeconds = 180;
- 注册列表缓存超时时间(当注册列表没有变化时)
responseCacheUpdateIntervalMs = 30 * 1000;
- 注册列表缓存更新频率。
useReadOnlyResponseCache = true;
- 是否开启注册列表的二级缓存。
disableDelta=false。
- 是否为client提供增量信息。
maxThreadsForStatusReplication = 1;
- 状态同步的最大线程数。
maxElementsInStatusReplicationPool = 10000;
- 状态同步队列的最大容量。
syncWhenTimestampDiffers = true;
- 当时间有差异时是否同步。
registrySyncRetries = 0;
- 注册信息同步重试次数。
registrySyncRetryWaitMs = 30 * 1000;
- 注册信息同步重试期间的时间间隔。
maxElementsInPeerReplicationPool = 10000;
- 节点间同步事件的最大容量。
minThreadsForPeerReplication = 5;
- 节点间同步的最小线程数。
maxThreadsForPeerReplication = 20;
- 节点间同步的最大线程数。
maxTimeForReplication = 30000;
- 节点间同步的最大时间,单位为毫秒。
disableDeltaForRemoteRegions = false;
- 是否启用远程区域增量。
remoteRegionConnectTimeoutMs = 1000;
- 远程区域连接超时时间。
remoteRegionReadTimeoutMs = 1000;
- 远程区域读取超时时间。
remoteRegionTotalConnections = 1000;
- 远程区域最大连接数
remoteRegionTotalConnectionsPerHost = 500;
- 远程区域单机连接数
remoteRegionConnectionIdleTimeoutSeconds = 30;
- 远程区域连接空闲超时时间。
remoteRegionRegistryFetchInterval = 30;
- 远程区域注册信息拉取频率。
remoteRegionFetchThreadPoolSize = 20;
- 远程区域注册信息线程数。
3.4-Eureka高可用
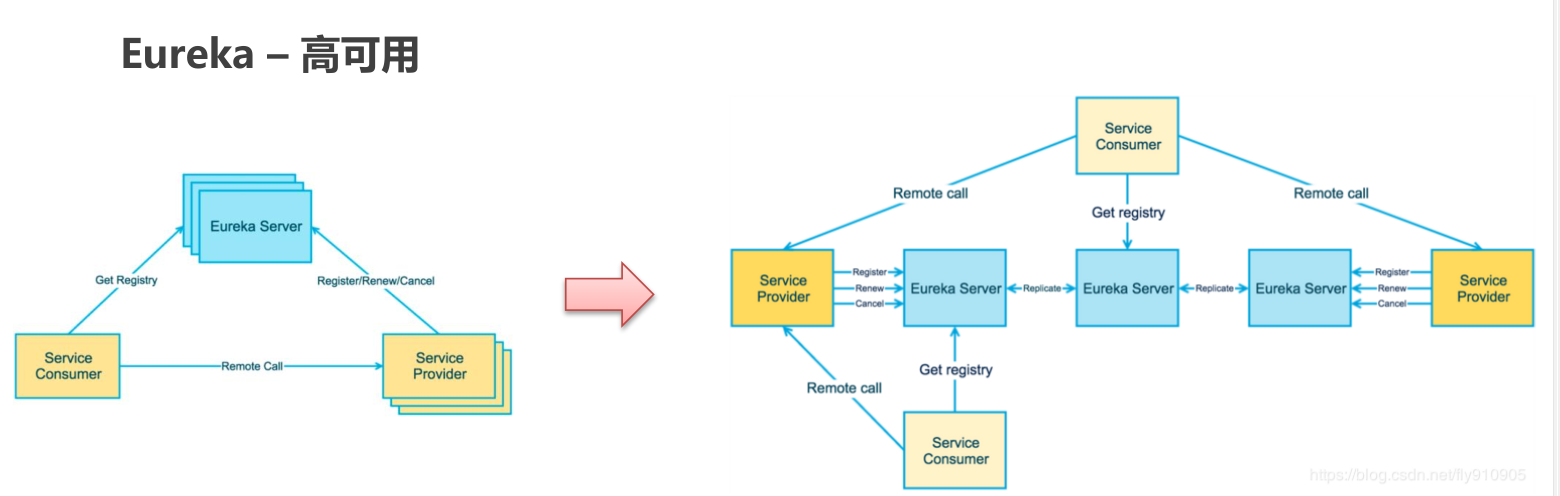
- 准备两个Eureka Server
- 分别进行配置,相互注册
- Eureka Client 分别注册到这两个 Eureka Server中
3.4.1-搭建
创建eureka-server-1
pom.xml
<dependencies><dependency><groupId>org.springframework.boot</groupId><artifactId>spring-boot-starter-web</artifactId></dependency><!-- eureka-server --><dependency><groupId>org.springframework.cloud</groupId><artifactId>spring-cloud-starter-netflix-eureka-server</artifactId></dependency></dependencies>
application.yml
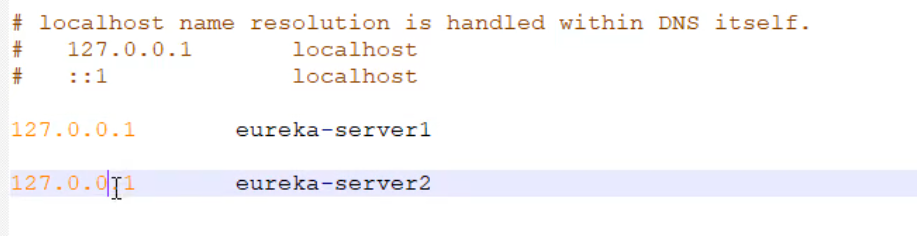
server:port: 8761eureka:instance:hostname: eureka-server1 # 主机名client:service-url:defaultZone: http://eureka-server2:8762/eurekaregister-with-eureka: true # 是否将自己的路径 注册到eureka上。(默认为true)fetch-registry: true # 是否需要从eureka中抓取路径。(默认为true)spring:application:name: eureka-server-ha
Eureka1App
package eureka;import org.springframework.boot.SpringApplication;import org.springframework.boot.autoconfigure.SpringBootApplication;import org.springframework.cloud.netflix.eureka.server.EnableEurekaServer;@SpringBootApplication// 启用EurekaServer@EnableEurekaServerpublic class Eureka1App {public static void main(String[] args) {SpringApplication.run(Eureka1App.class,args);}}
创建eureka-server-2
pom.xml
<dependencies><dependency><groupId>org.springframework.boot</groupId><artifactId>spring-boot-starter-web</artifactId></dependency><!-- eureka-server --><dependency><groupId>org.springframework.cloud</groupId><artifactId>spring-cloud-starter-netflix-eureka-server</artifactId></dependency></dependencies>
application.yml
server:port: 8762eureka:instance:hostname: eureka-server2 # 主机名client:service-url:defaultZone: http://eureka-server1:8761/eurekaregister-with-eureka: true # 是否将自己的路径 注册到eureka上。(默认为true)fetch-registry: true # 是否需要从eureka中抓取路径。(默认为true)spring:application:name: eureka-server-ha
Eureka2App
package eureka;import org.springframework.boot.SpringApplication;import org.springframework.boot.autoconfigure.SpringBootApplication;import org.springframework.cloud.netflix.eureka.server.EnableEurekaServer;@SpringBootApplication// 启用EurekaServer@EnableEurekaServerpublic class Eureka2App {public static void main(String[] args) {SpringApplication.run(Eureka2App.class,args);}}
修改本地host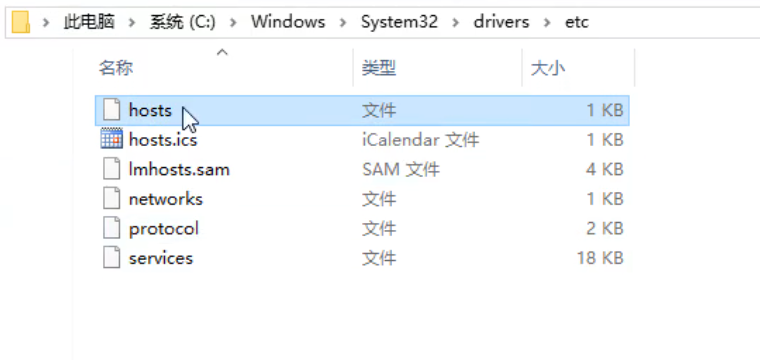
关于hosts文件:
- 内容:包含了IP地址和Host name(主机名)的映射关系,是一个映射IP地址和Host name(主机名)的规定;具体工作方式:在网络上访问网站,要先通过DNS服务器把网址域名解析成IP地址后,我们的计算机才能访问,要是对于每个域名请求我们都要等待域名服务器解析后返回IP信息,这样访问网络的效率就会降低,而Hosts文件就能提高解析的效率,根据Windows系统规定,Hosts的请求级别高于DNS,在进行DNS请求以前,Windows系统会先检查自己的Hosts文件中是否有这个地址的映射关系,如果有则调用这个IP地址映射,如果没有再向已知的DNS服务器提出域名解析。作用:1、加快域名的解析;2、方便局域网用户——访问局域网内服务器时,只需要输入这个服务器的名字;3、屏蔽网站——通过把不想访问的网站域名映射到错误的IP上;4、开发测试联调过程中实现多环境轻松切换;
- 用户在浏览器输入一个网址时,若浏览器为缓存地址,系统会首先自动从Hosts文件中寻找对应的IP地址,一旦找到,系统会立即打开网页,如果没找到,则系统会再将网址提交到,进行DNS域名解析,再获取相对应的IP地址。
3.4.2-客户端测试
修改服务提供者和服务消费者配置文件中的注册服务地址
eureka-provider application.yml
server:port: 8001eureka:instance:hostname: localhost # 主机名prefer-ip-address: true # 将当前实例的ip注册到eureka server 中。默认是false 注册主机名ip-address: 127.0.0.1 # 设置当前实例的ipinstance-id: ${eureka.instance.ip-address}:${spring.application.name}:${server.port} # 设置web控制台显示的 实例idlease-renewal-interval-in-seconds: 3 # 每隔3 秒发一次心跳包lease-expiration-duration-in-seconds: 9 # 如果9秒没有发心跳包,服务器呀,你把我干掉吧~client:service-url:defaultZone: http://eureka-server1:8761/eureka,http://eureka-server2:8762/eureka # eureka服务端地址,将来客户端使用该地址和eureka进行通信spring:application:name: eureka-provider # 设置当前应用的名称。将来会在eureka中Application显示。将来需要使用该名称来获取路径
eureka-consumer application.yml
server:port: 9000eureka:instance:hostname: localhost # 主机名client:service-url:defaultZone: http://eureka-server1:8761/eureka,http://eureka-server2:8762/eureka # eureka服务端地址,将来客户端使用该地址和eureka进行通信spring:application:name: eureka-consumer # 设置当前应用的名称。将来会在eureka中Application显示。将来需要使用该名称来获取路径
测试结果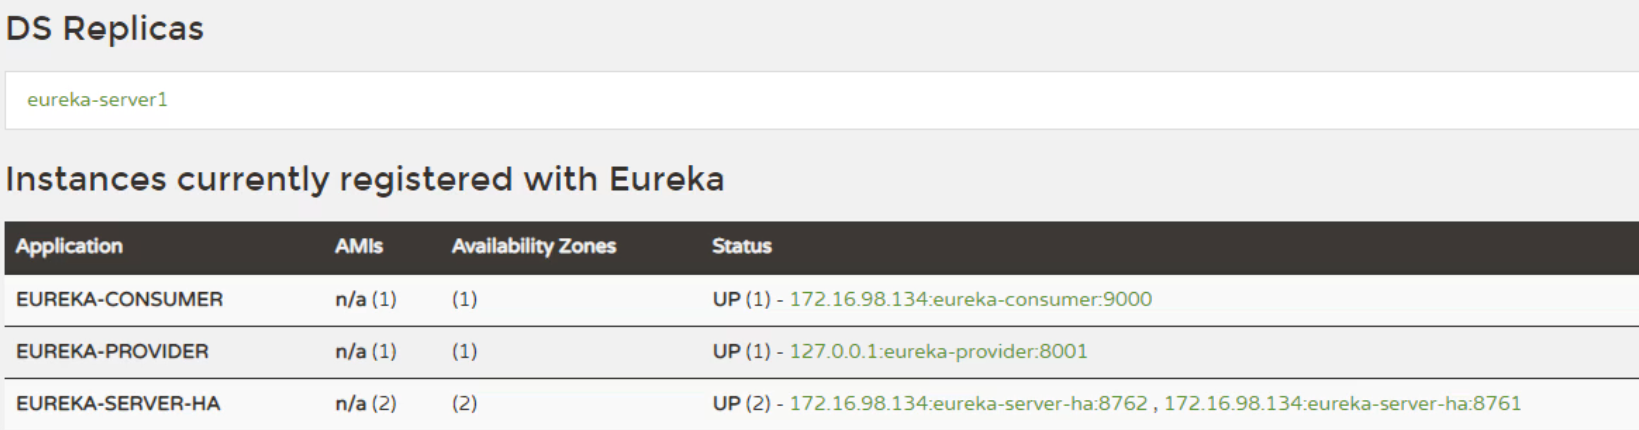
3.5-Consul
3.5.1-Consul 概述
Consul 是由 HashiCorp 基于 Go 语言开发的,支持多数据中心,分布式高可用的服务发布和注册服务软件。
• 用于实现分布式系统的服务发现与配置。
• 使用起来也较 为简单。具有天然可移植性(支持Linux、windows和Mac OS X);安装包仅包含一个可执行文件,
方便部署 。
• 官网地址: https://www.consul.io
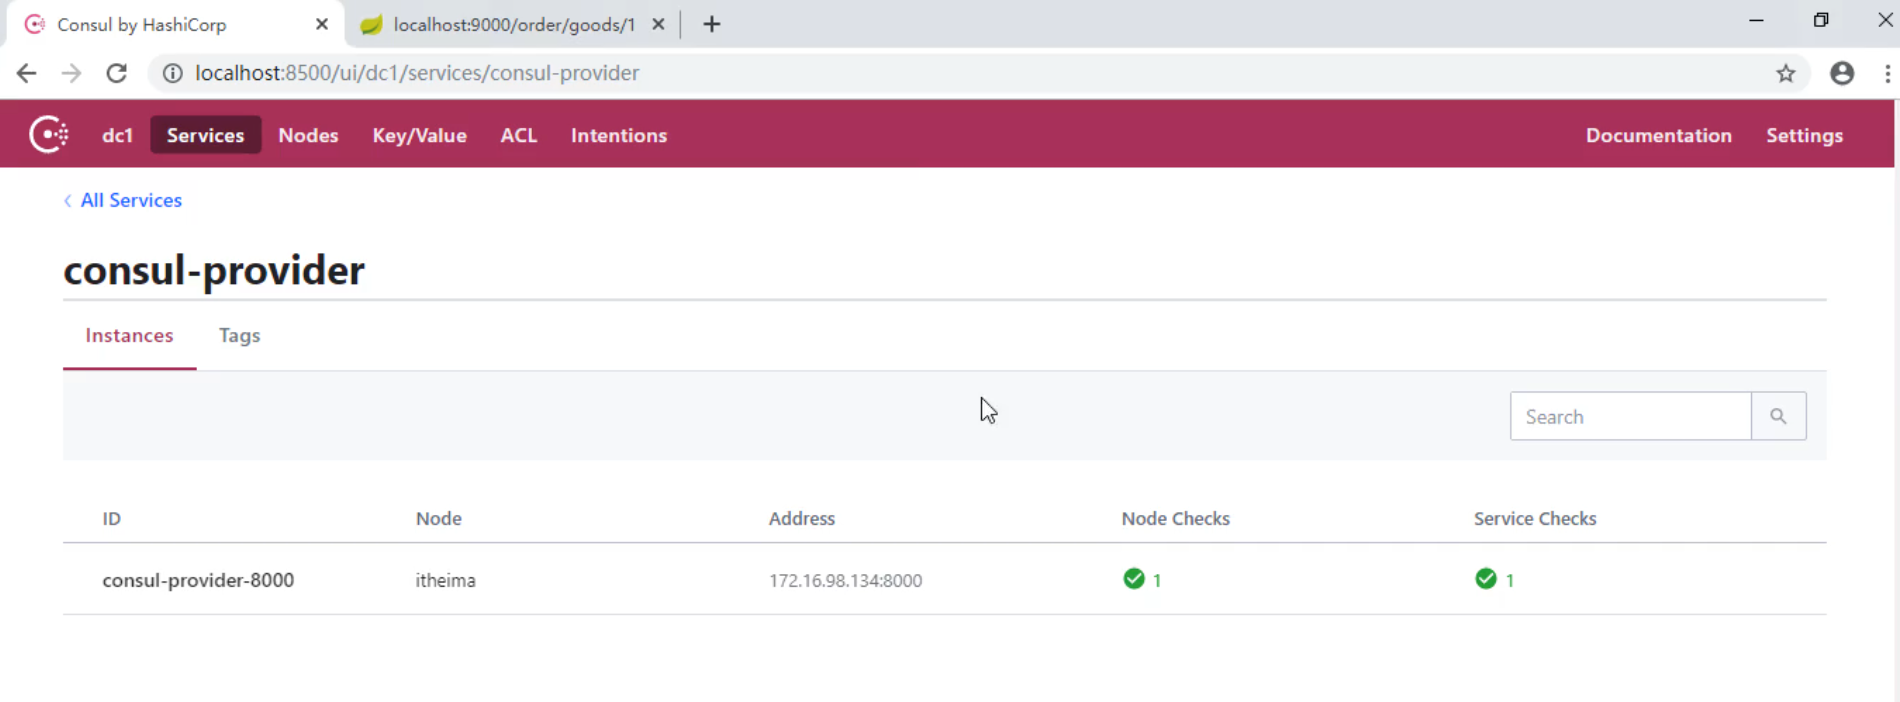
启动consul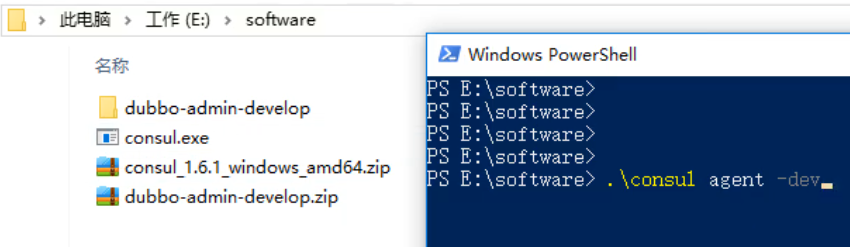
dev模式:不会持久化数据
启动成功
控制台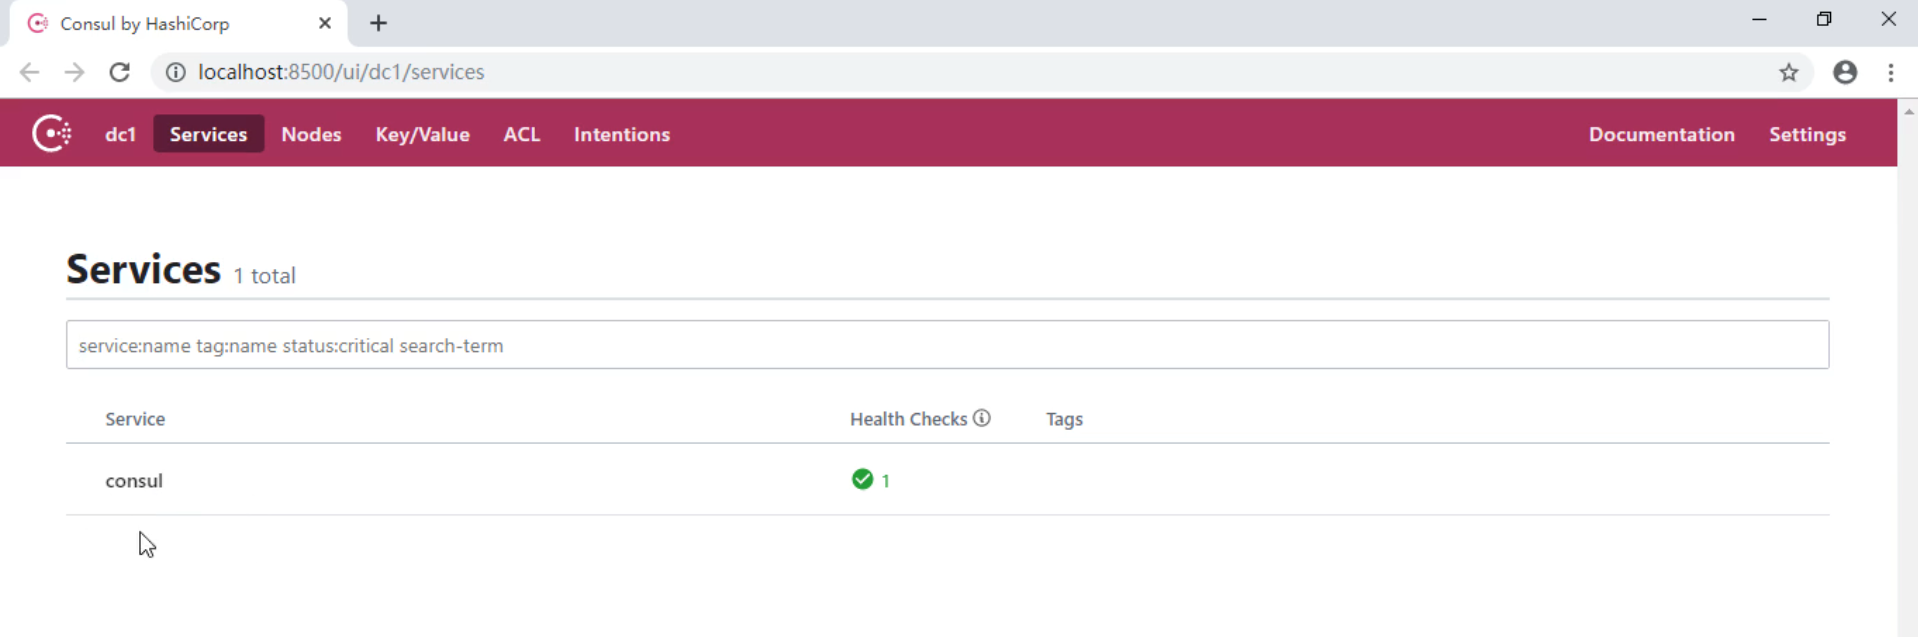
3.5.2-Consul 快速入门
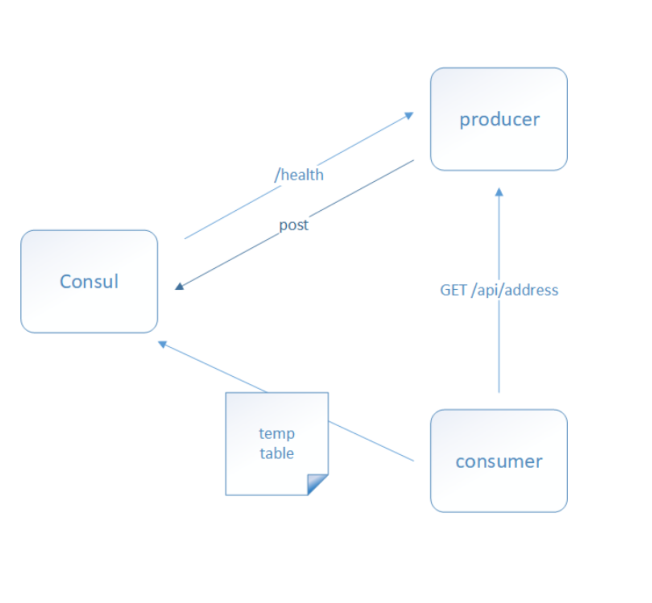
- 搭建 Provider 和 Consumer 服务。
- 使用 RestTemplate 完成远程调用。
- 将Provider服务注册到Consul中。
- Consumer 服务 通过从 Consul 中抓取 Provider 地
址 完成 远程调用
Provider pom.xml
<dependencies><!--consul 客户端--><dependency><groupId>org.springframework.cloud</groupId><artifactId>spring-cloud-starter-consul-discovery</artifactId></dependency><dependency><groupId>org.springframework.boot</groupId><artifactId>spring-boot-starter-web</artifactId></dependency><dependency><groupId>org.springframework.boot</groupId><artifactId>spring-boot-starter-test</artifactId><scope>test</scope></dependency><dependency><groupId>org.springframework.boot</groupId><artifactId>spring-boot-starter-actuator</artifactId></dependency></dependencies>
application.yml
server:port: 8000spring:cloud:consul:host: localhost # consul 服务端的 ipport: 8500 # consul 服务端的端口 默认8500discovery:service-name: ${spring.application.name} # 当前应用注册到consul的名称prefer-ip-address: true # 注册ipapplication:name: consul-provider # 应用名称
consumer pom.xml
<dependencies><!--consul 客户端--><dependency><groupId>org.springframework.cloud</groupId><artifactId>spring-cloud-starter-consul-discovery</artifactId></dependency><dependency><groupId>org.springframework.boot</groupId><artifactId>spring-boot-starter-web</artifactId></dependency><dependency><groupId>org.springframework.boot</groupId><artifactId>spring-boot-starter-test</artifactId><scope>test</scope></dependency><dependency><groupId>org.springframework.boot</groupId><artifactId>spring-boot-starter-actuator</artifactId></dependency></dependencies>
application.yml
server:port: 9000spring:cloud:consul:host: localhost # consul 服务端的 ipport: 8500 # consul 服务端的端口 默认8500discovery:service-name: ${spring.application.name} # 当前应用注册到consul的名称prefer-ip-address: true # 注册ipapplication:name: consul-consumer # 应用名称
OrderController
package com.itheima.consul.controller;import com.itheima.consul.domain.Goods;import org.springframework.beans.factory.annotation.Autowired;import org.springframework.cloud.client.ServiceInstance;import org.springframework.cloud.client.discovery.DiscoveryClient;import org.springframework.web.bind.annotation.GetMapping;import org.springframework.web.bind.annotation.PathVariable;import org.springframework.web.bind.annotation.RequestMapping;import org.springframework.web.bind.annotation.RestController;import org.springframework.web.client.RestTemplate;import java.util.List;/*** 服务的调用方*/@RestController@RequestMapping("/order")public class OrderController {@Autowiredprivate RestTemplate restTemplate;@Autowiredprivate DiscoveryClient discoveryClient;@GetMapping("/goods/{id}")public Goods findGoodsById(@PathVariable("id") int id){//演示discoveryClient 使用List<ServiceInstance> instances = discoveryClient.getInstances("consul-PROVIDER");//判断集合是否有数据if(instances == null || instances.size() == 0){//集合没有数据return null;}ServiceInstance instance = instances.get(0);String host = instance.getHost();//获取ipint port = instance.getPort();//获取端口System.out.println(host);System.out.println(port);String url = "http://"+host+":"+port+"/goods/findOne/"+id;// 3. 调用方法Goods goods = restTemplate.getForObject(url, Goods.class);return goods;}}
3.6-Nacos
3.6.1-Nacos 概述
Nacos(Dynamic Naming and Configuration Service) 是阿里巴巴2018年7月开源的项目。
• 它专注于服务发现和配置管理领域 致力于帮助您发现、配置和管理微服务。Nacos 支持几乎所有主流类型的“服务”的发现、配置和管理。详细见nacos的认识与应用.md文件
• 一句话概括就是Nacos = Spring Cloud注册中心 + Spring Cloud配置中心。
• 官网:https://nacos.io/
• 下载地址: https://github.com/alibaba/nacos/releases
启动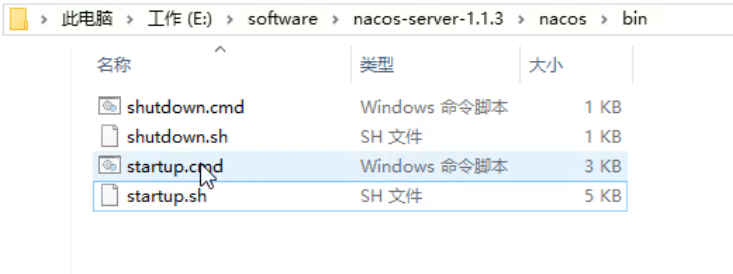
启动成功效果: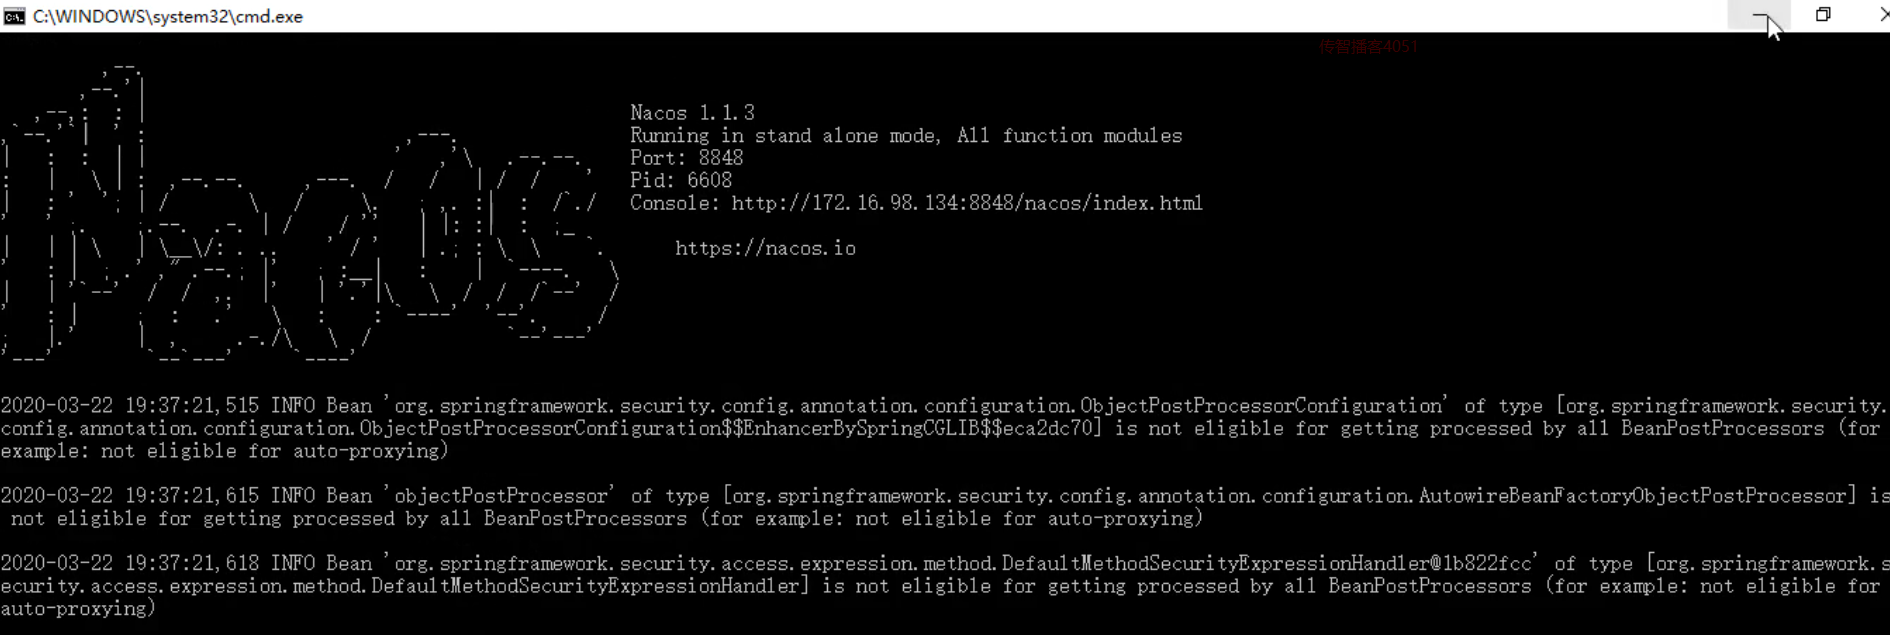
控制台登录:访问地址:http://localhost:8848/nacos/#/login
账号,密码:nacos
控制台页面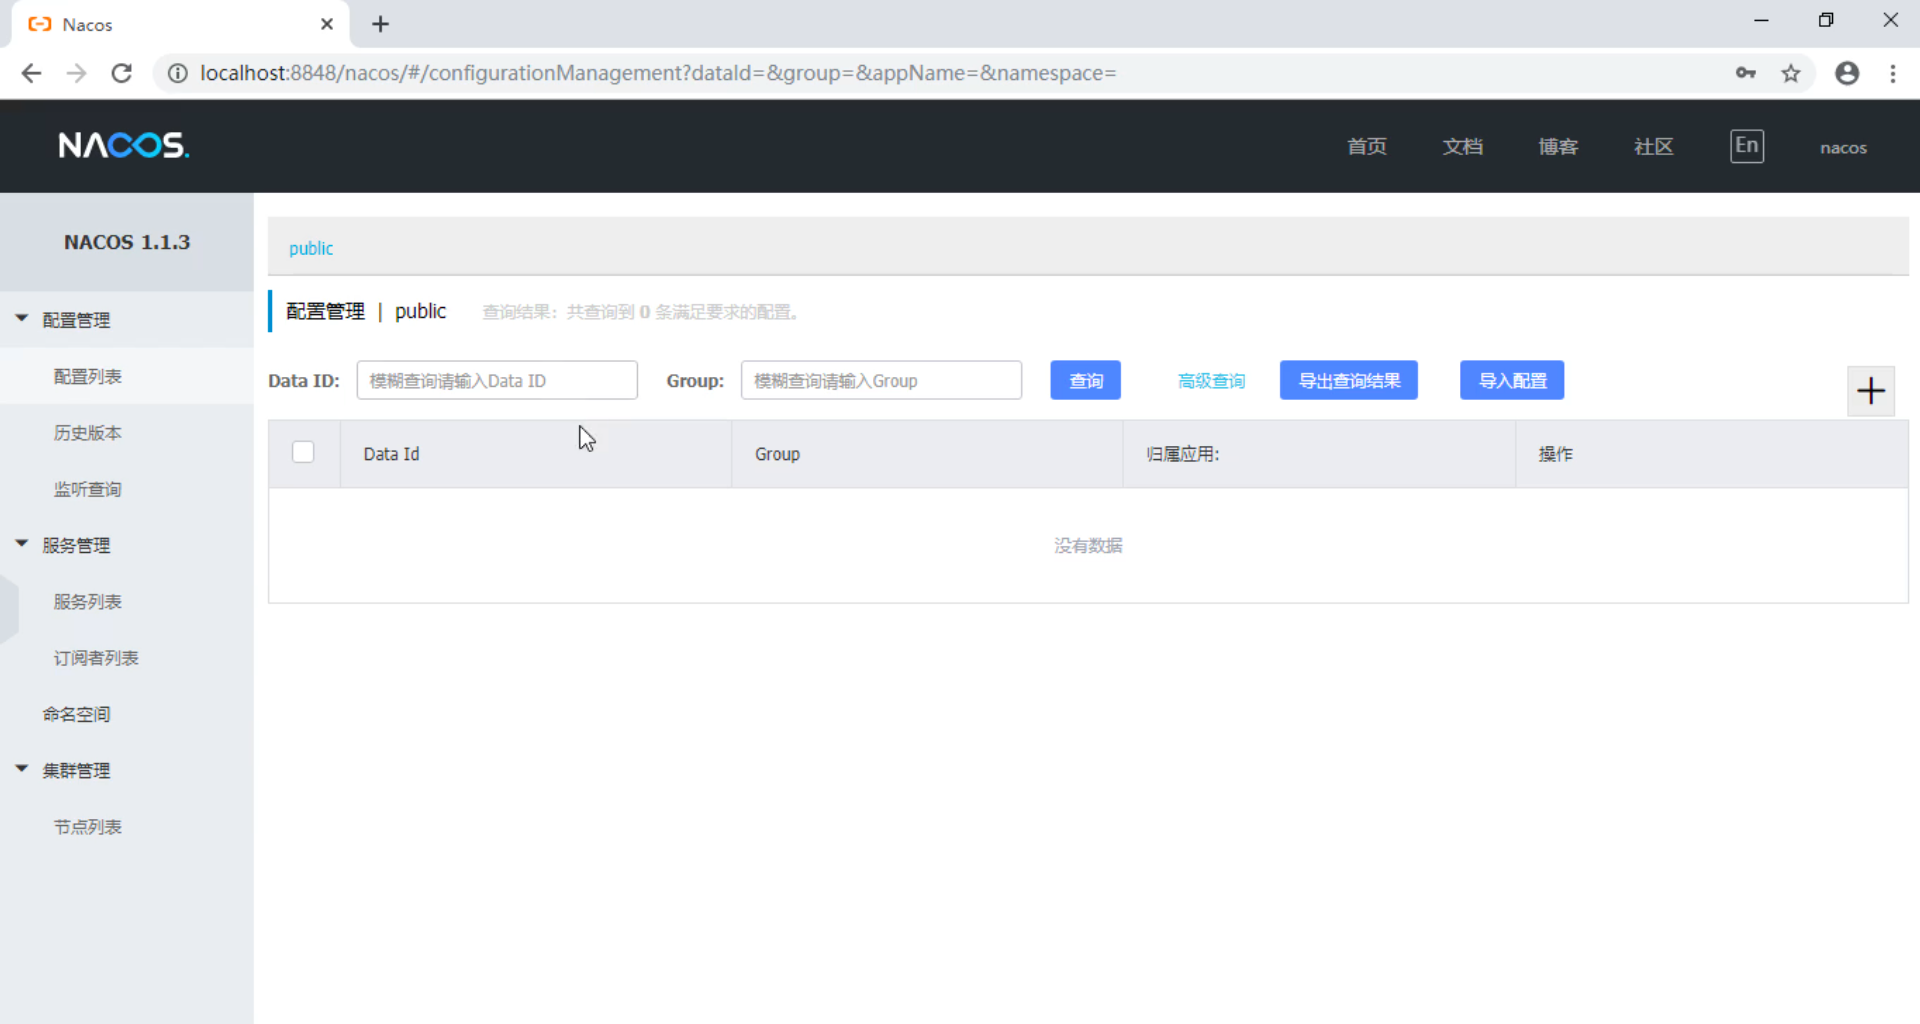
Spring cloud Alibaba 组件
3.6.2-Nacos 快速入门
nacos-provider pom.xml
<dependencies><!--nacos--><dependency><groupId>org.springframework.cloud</groupId><artifactId>spring-cloud-starter-alibaba-nacos-discovery</artifactId><version>0.2.2.RELEASE</version></dependency><dependency><groupId>com.alibaba.nacos</groupId><artifactId>nacos-client</artifactId><version>1.1.0</version></dependency><dependency><groupId>org.springframework.boot</groupId><artifactId>spring-boot-starter-web</artifactId></dependency><dependency><groupId>org.springframework.boot</groupId><artifactId>spring-boot-starter-test</artifactId><scope>test</scope></dependency><dependency><groupId>org.springframework.boot</groupId><artifactId>spring-boot-starter-actuator</artifactId></dependency></dependencies>
application.yml
server:port: 8000spring:cloud:nacos:discovery:server-addr: 127.0.0.1:8848 # 配置nacos 服务端地址application:name: nacos-provider # 服务名称
nacos consumer pom.xml
<dependencies><!--nacos--><dependency><groupId>org.springframework.cloud</groupId><artifactId>spring-cloud-starter-alibaba-nacos-discovery</artifactId><version>0.2.2.RELEASE</version></dependency><dependency><groupId>com.alibaba.nacos</groupId><artifactId>nacos-client</artifactId><version>1.1.0</version></dependency><dependency><groupId>org.springframework.boot</groupId><artifactId>spring-boot-starter-web</artifactId></dependency><dependency><groupId>org.springframework.boot</groupId><artifactId>spring-boot-starter-test</artifactId><scope>test</scope></dependency><dependency><groupId>org.springframework.boot</groupId><artifactId>spring-boot-starter-actuator</artifactId></dependency></dependencies>
application.yml
server:port: 9000spring:cloud:nacos:discovery:server-addr: 127.0.0.1:8848 # 配置nacos 服务端地址application:name: nacos-consumer # 服务名称
控制台显示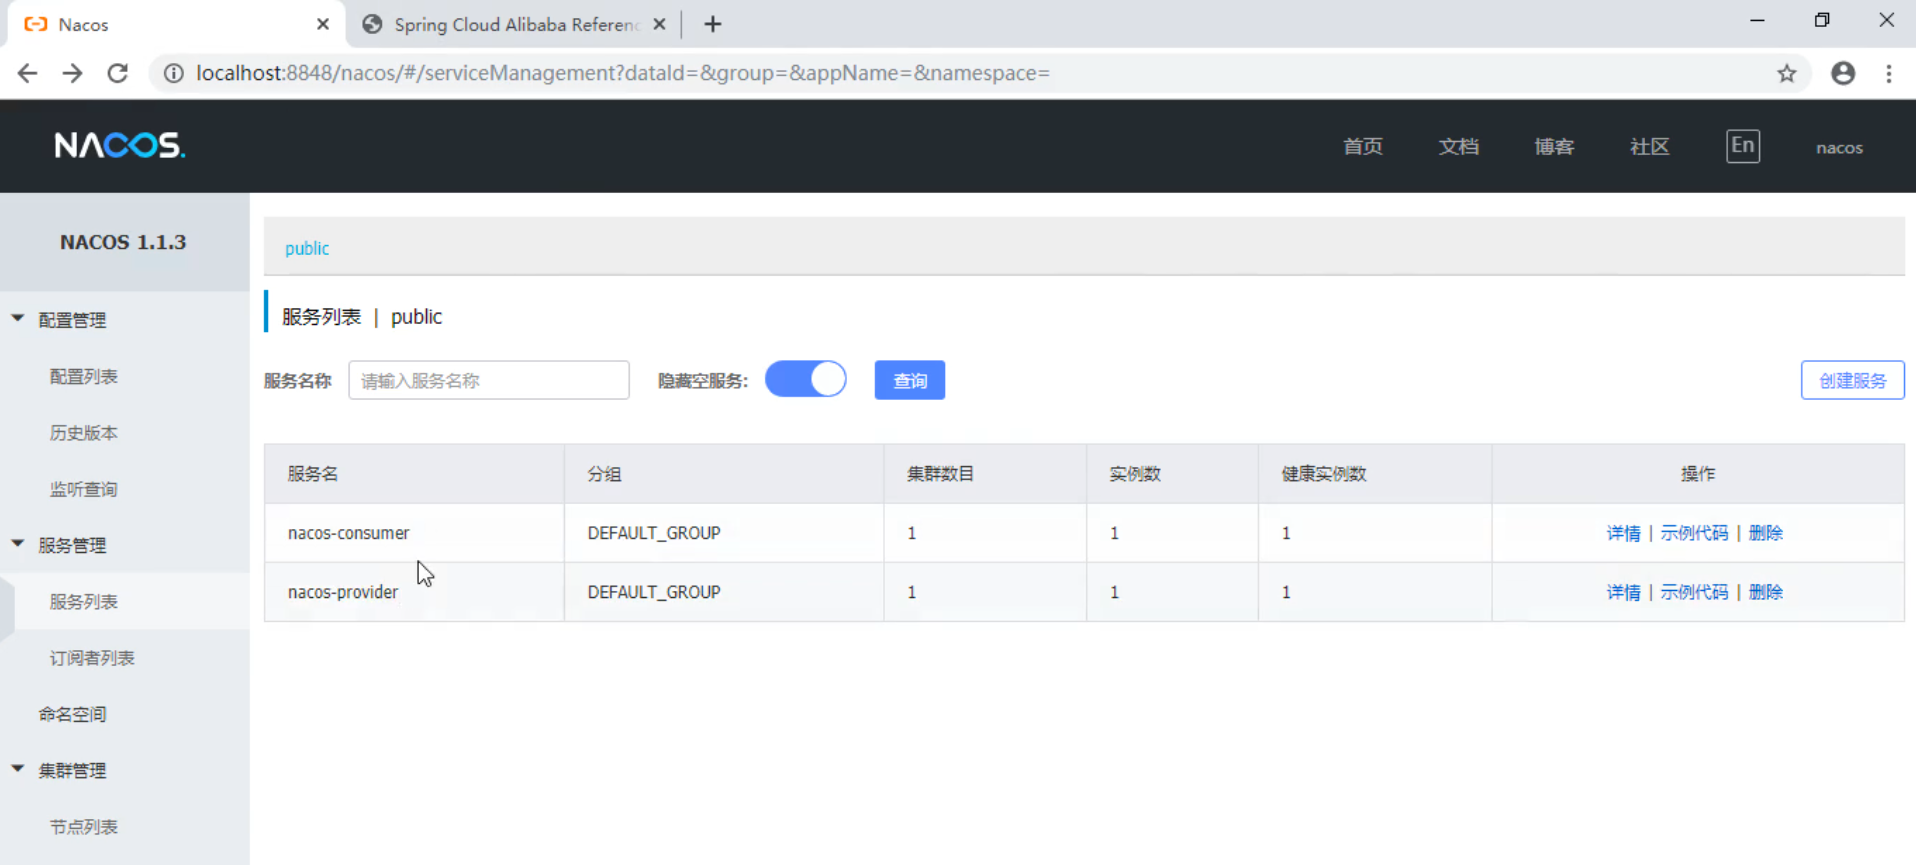
详情页面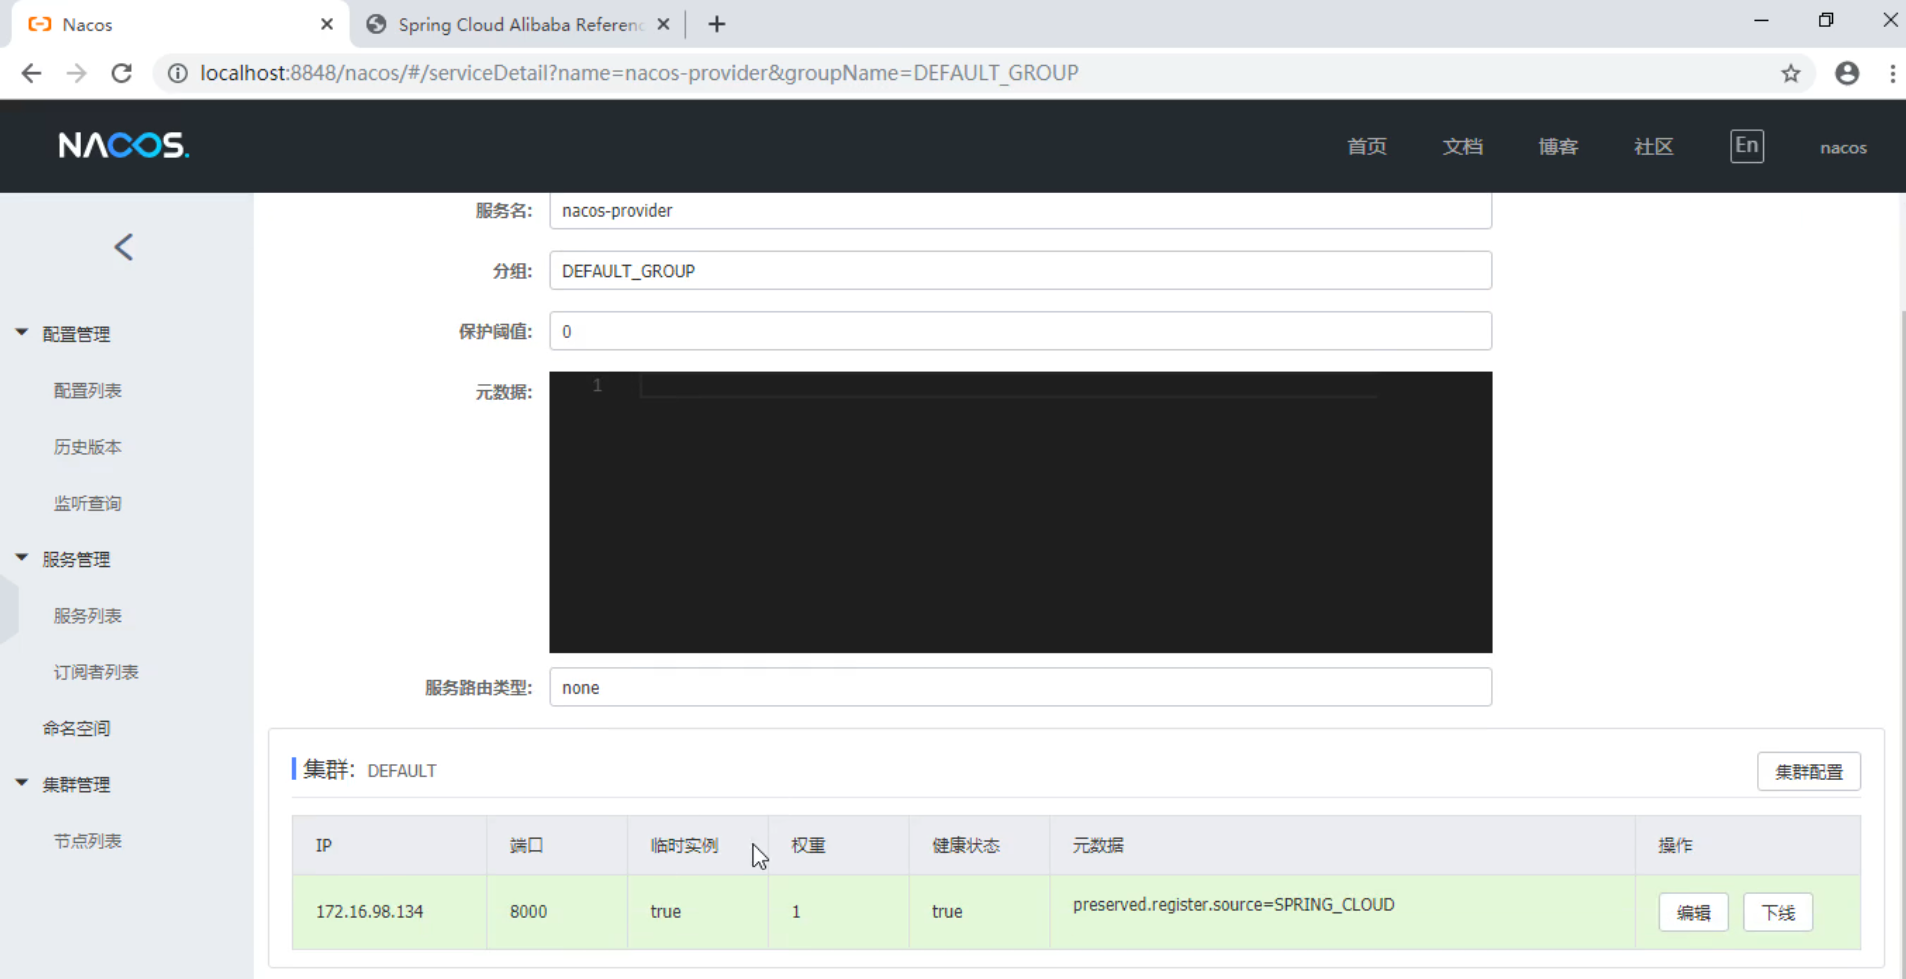
示例代码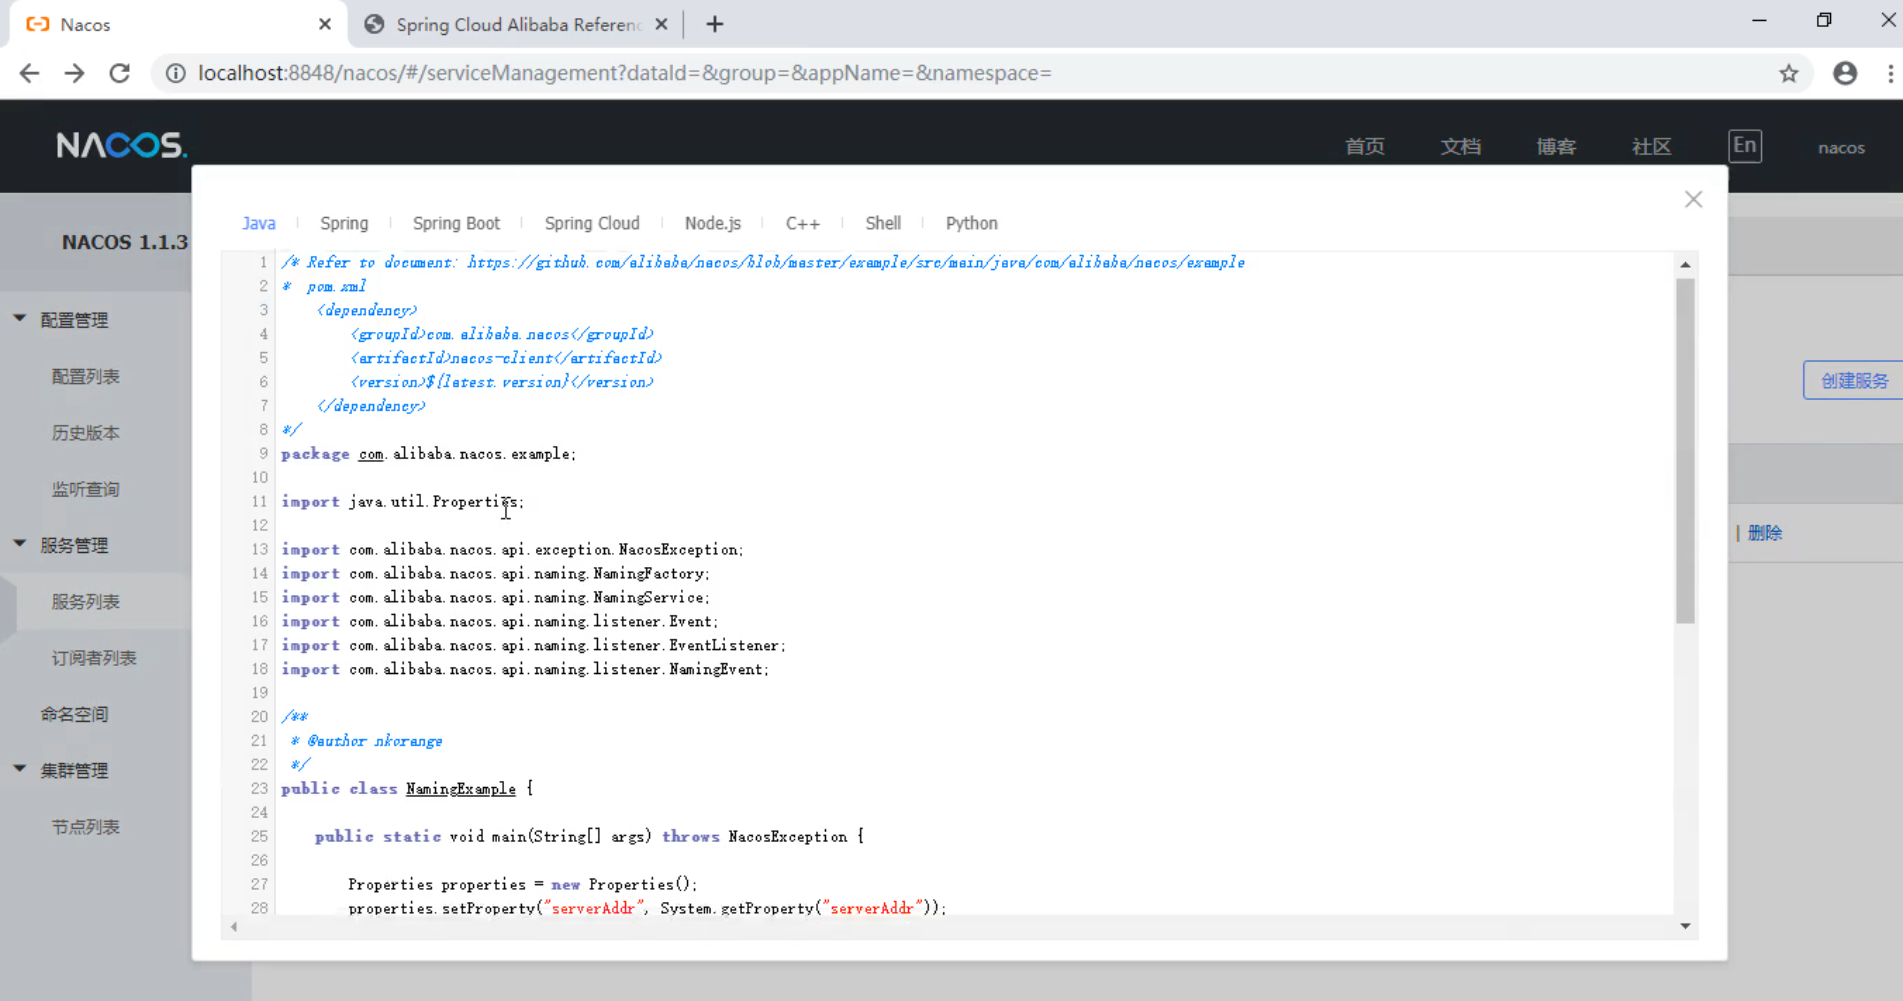
3.7 Ribbon客户端负载均衡
3.7.1 Ribbon的概述
(1)服务端负载均衡与客户端负载均衡
- 服务端负载均衡: 负载均衡算法在服务器中,由负载均衡器维护服务地址列表
- 客户端负载均衡:负载均衡算法在客户端,客户端维护服务地址列表
(2)认识Ribbon
- Ribbon是Netflix提供的一个基于HTTP和TCP的客户端负载均衡的工具。(因此导入了eureka的相关的依赖之后其实不用再次导入Ribbon的依赖了)
- Ribbon的主要功能有两个:
- 简化远程调用(RestTemplate)
- 负载均衡
(3)Ribbon的入门案例
步骤:
在声明restTemplate的ben时(配置restTemplate对象的配置类中),在声明方法上面添加一个注解:@LoadBalanced
@LoadBalanced@Beanpublic RestTemplate restTemplate(){return new RestTemplate();}
在使用restTemplate发起请求时,需要重新定义服务提供方的url,将host:port可以替换为服务提供方的应用名称。
(4)Ribbon负载均衡策略:
- 随机:RandomRule
- 轮询:RoundRobinRule(默认)
- 最小并发:BestAvailableRule
- 过滤:AvaiablilityFilterRule
- 响应时间:WeightedResponseTimeRule
- 轮询重试:RetryRule
- 性能可用性:ZoneAvoidanceRule
3.7.2 Ribbon负载均衡的配置案例
(1)编写代码进行配置
- 编写配置类配置负载均衡策略
```java
/
配置类
/
@Configuration
public class MyRule{
@Bean
public IRule rule(){
} }return new RandomRule();
/ 服务消费者启动类要添加RibbonClient注解进行激活配置 name:设置服务提供方的应用名称 configuration:设置负载均衡配置类的类名.class字节码对象 / @RibbonClient(name=”EUREKA-PROVIDER”, configuration=MyRule.class) public class ConsumerApp{ public static void main(String[]args){ SpringApplication .run(ConsumerApp.class,args) } }
- 编写配置文件的方式配置负载均衡策略```yaml#配置的方式设置Ribbon的负载均衡策略EUREKA-PROVIDER: #设置的服务提供方法的应用名称ribbon:NFloadBalancerRuleClassName:com.netflix.loadbalancer.RandomRule #策略类

若有收获,就点个赞吧
0 人点赞
