Vue Router
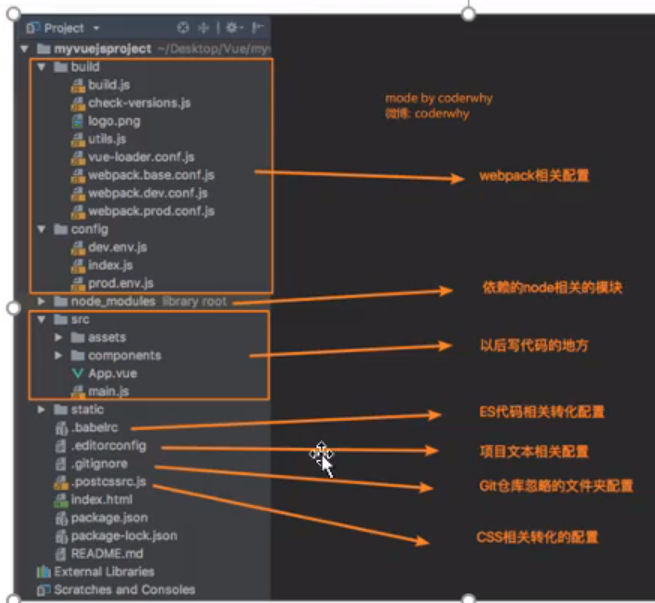
webpack目录结构
runtime-compiler和runtime-only的区别
1.runtime-compiler:
- 过程:template -> ast(抽象语法树) -> render -> vdom(虚拟dom) ->UI
2.runtime-only:
- 过程:render -> vdom -> UI
- 特点:性能更高,代码更少更轻便
一、Vue-cil
二、Vue-Router
history
history类似于一个栈结构
history.back等价于history.go(-1)
history.forward等价于history.go(1)
history.replaceState(),用参数中的路由属性替换当前的url
history.pushState(),push路由属性值history栈中
1.Vue-Router框架的搭建
//1.配置路由相关信息import VueRouter from 'vue-router'import Vue from 'vue'//2.通过Vue.use(插件),安装插件Vue.use()//3.创建VueRouter对象const router = new VueRouter({//配置路由与组件的关系routes: []})//4.导出VueRouter对象export default router
2.VueRouter的使用
//创建路由组件:Home.vue、About.vue//配置映射关系:组件和路径的关系import Vue from 'vue'import VueRouter from 'vue-router'import Home from '../components/Home'Vue.use(VueRouter)const routes = [{path: '/',name: 'Home',component: Home},{path: '/about',name: 'About',// route level code-splitting// this generates a separate chunk (about.[hash].js) for this route// which is lazy-loaded when the route is visited.component: () => import(/* webpackChunkName: "about" */ '../components/About')}]const router = new VueRouter({routes})export default router//使用路由:<router-link>和<router-view>,view相当于一个占位,表示页面应该展示的位置<template><div id="app"><h2>嘿嘿</h2><router-link to="/">首页</router-link><router-link to="/about">关于</router-link><router-view></router-view></div></template>
3.路由使用的一些细节
- redirect:重定向
{path: '/',redirect: '/home'},{path: '/home',name: 'Home',component: Home},

- tag属性:默认为a标签,而可以使用tag属性来指定标签的样式
- replace属性:不会留下history记录,该情况下不能通过后退按钮返回到上一个页面中
- active-class:当路由匹配成功时,会自动给当前元素设置一个router-link-active的class
4.动态路由
作用:拿到url拼接的参数
//App.vue,使用vbind绑定data中的数据到属性中<router-link :to="'/user/'+userId" tag="button">用户</router-link><script>export default {name: 'App',data(){return {userId: 'zhangsan'}}}</script>//./router/index.js{path: '/user/:userId',name: 'User',component: () => import('../components/User')}//获取值<template><div><h2>这是用户组件啊</h2><p>{{userId}}</p></div></template><script>export default {name: "User",computed: {userId(){return this.$route.params.userId}}}</script>
5.懒加载
- 路由懒加载的效果
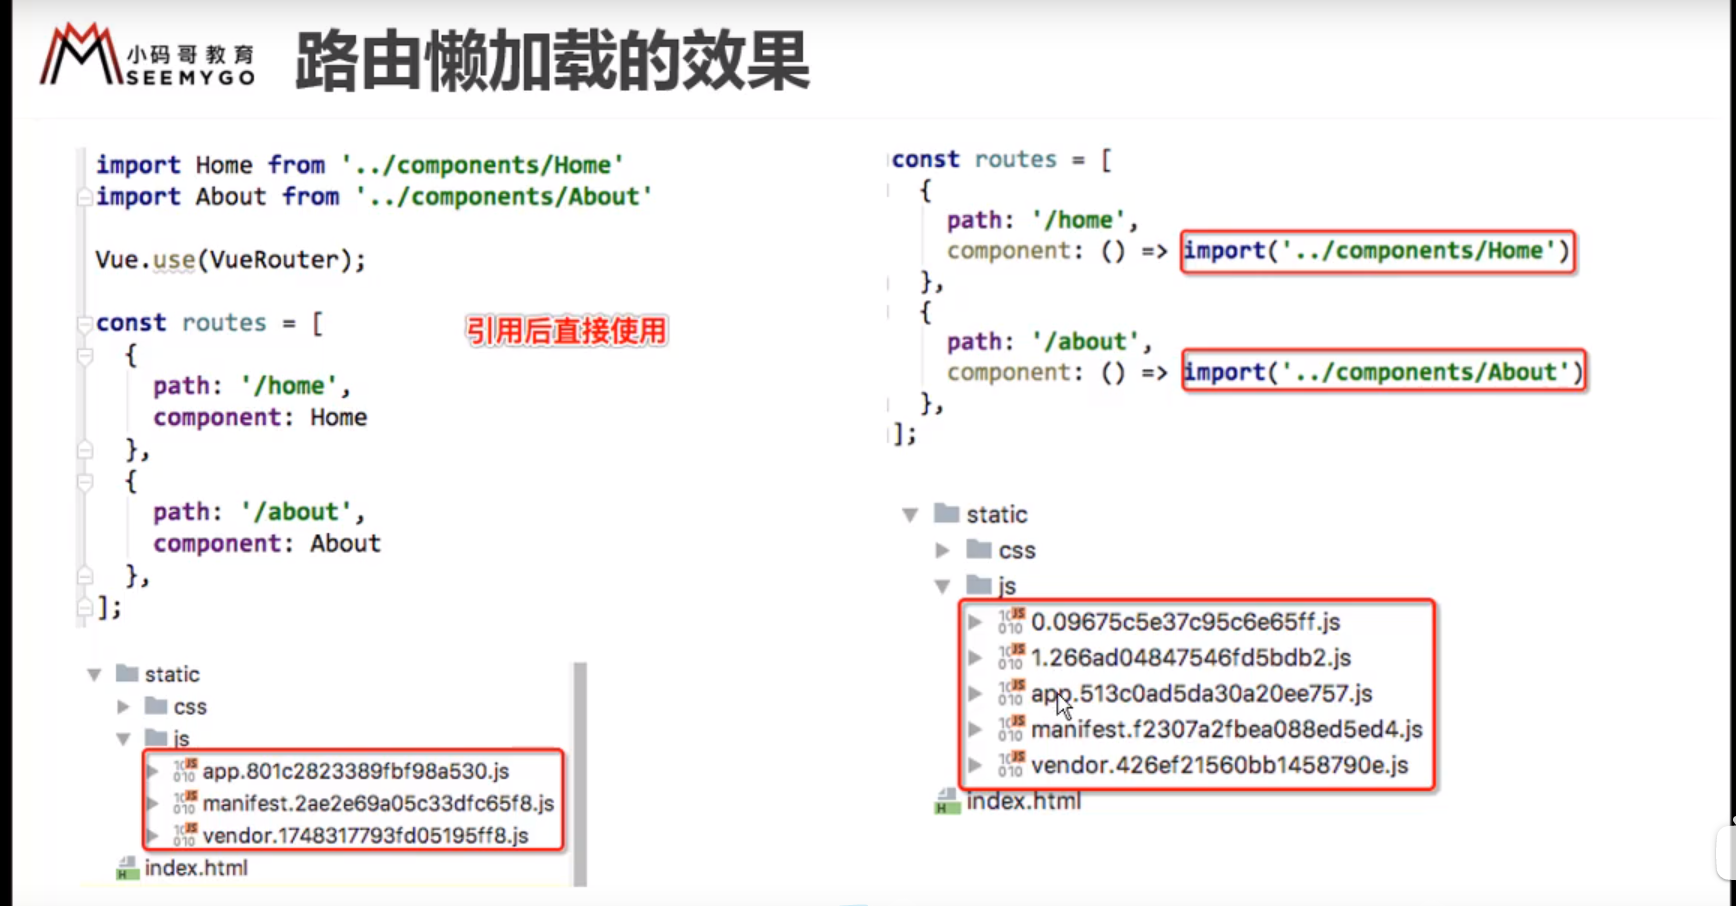
- 路由懒加载的使用
component: () => import('../components/User')
5.路由嵌套
//增加路由的子路由{path: '/home',name: 'Home',component: Home,children: [{path: 'news',component: () => import('../components/HomeNews')},{path: 'message',component: () => import('../components/HomeMessage')}]}//2.在父路由中的模板添加router—view和router-link<template><div><h2>我是首页</h2><p>我是首页内容</p><router-link to="/home/news">新闻呀</router-link><router-link to="/home/message">消息呀</router-link><router-view></router-view></div></template>
6.路由间参数的传递
去参数的两种方式:
1.params类型:
- 配置路由映射的path格式:’routerName/:id’
- 将值放在路径后面
- 在跳转后通过$route.params.id来获取参数
2.query类型:
- 配置path格式:
<router-link :to="{path: '/profile', query: {name: 'LewisLiu',age: 21}}" tag="button">档案</router-link> - 写好后,该参数值为作为路径后面的query参数进行传递
- 通过$route.query来获取参数
7.导航守卫
使用组件的生命周期函数来实现自定义代码
<script>export default {name: "Home",created() {document.title = '首页'},mounted() {},updated() {}}</script>
8.vue-router-keepalive
在路由切换时,使组件状态保留,避免重新渲染,有两个重要的属性
- include-字符串或正则表达式,只有匹配的组件会被缓存
- exclude-任何匹配的组件都不会被保存
三、Vuex
响应式状态管理
1.state
用于存储数据
2.mutations
跟新store状态的更新唯一方式:提交Mutation
- 当更新一些数据时,可以携带参数,作为mutation的载荷
- 如果参数不为一个时,可以将参数封装成一个对象进行参数传递
// 1.组件中的methodaddStudent(){const stu = {id: 114, name: 'joker'}this.$store.commit('addStudent',stu)}// 2. /vuex/index.js中的方法addStudent(state,stu){state.student.push(stu)}
3.getters
同计算属性computed,可以将一些数据进行处理
4.actions
mutations中的方法要求为同步方法,对于异步方法,mutations不能很好的对devtools进行支持
故使用actions来进行异步操作
actions: {aUpdateInfo(context,payload) {setTimeout(() =>{context.commit('updateInfo')//调用本身的mutations方法})}}
5.moudles
将store分模块

若有收获,就点个赞吧
0 人点赞
