—栈—
概念
栈是一个线性结构,在计算机中是一个相当常见的数据结构。
栈的特点是只能在某一端添加或删除数据,遵循先进后出的原则
实现
每种数据结构都可以用很多种方式来实现,其实可以把栈看成是数组的一个子集,所以这里使用数组来实现
class Stack {constructor() {this.stack = []}push(item) {this.stack.push(item)}pop() {this.stack.pop()}peek() {return this.stack[this.getCount() - 1]}getCount() {return this.stack.length}isEmpty() {return this.getCount() === 0}}
应用
选取了 LeetCode 上序号为 20 的题目
题意是匹配括号,可以通过栈的特性来完成这道题目
"([)]"var isValid = function (s) {let map = {'(': -1,')': 1,'[': -2,']': 2,'{': -3,'}': 3}let stack = []for (let i = 0; i < s.length; i++) {if (map[s[i]] < 0) {stack.push(s[i])} else {let last = stack.pop()if (map[last] + map[s[i]] != 0) return false}}if (stack.length > 0) return falsereturn true};
—队列—
概念
队列是一个线性结构,特点是在某一端添加数据,在另一端删除数据,遵循先进先出的原则。
实现
这里会讲解两种实现队列的方式,分别是单链队列和循环队列。
单链队列
class Queue {constructor() {this.queue = []}enQueue(item) {this.queue.push(item)}deQueue() {return this.queue.shift()}getHeader() {return this.queue[0]}getLength() {return this.queue.length}isEmpty() {return this.getLength() === 0}}
因为单链队列在出队操作的时候需要 O(n) 的时间复杂度,所以引入了循环队列。循环队列的出队操作平均是 O(1) 的时间复杂度。
优先队列
function PriorityQueue() {var items = [];function QueueElement(element, priority) { // {1}this.element = element;this.priority = priority;}this.enqueue = function (element, priority) {var queueElement = new QueueElement(element, priority);if (this.isEmpty()) {items.push(queueElement); // {2}} else {var added = false;for (var i = 0; i < items.length; i++) {if (queueElement.priority <items[i].priority) {items.splice(i, 0, queueElement); // {3}added = true;break; // {4}}}if (!added) { //{5}items.push(queueElement);}}};//其他方法和默认的Queue实现相同}
默认的Queue类和PriorityQueue类实现上的区别是,要向PriorityQueue添加元素,需
要创建一个特殊的元素(行{1})。这个元素包含了要添加到队列的元素(它可以是任意类型)
及其在队列中的优先级。
如果队列为空,可以直接将元素入列(行{2})。否则,就需要比较该元素与其他元素的优
先级。当找到一个比要添加的元素的priority值更大(优先级更低)的项时,就把新元素插入
到它之前(根据这个逻辑,对于其他优先级相同,但是先添加到队列的元素,我们同样遵循先进
先出的原则)。要做到这一点,我们可以用第2章学习过的JavaScript的array类的splice方法。
一旦找到priority值更大的元素,就插入新元素(行{3})并终止队列循环(行{4})。这样,
队列也就根据优先级排序了。
如果要添加元素的priority值大于任何已有的元素,把它添加到队列的末尾就行了(行
{5}):
var priorityQueue = new PriorityQueue();
priorityQueue.enqueue(“John”, 2);
priorityQueue.enqueue(“Jack”, 1);
priorityQueue.enqueue(“Camila”, 1);
priorityQueue.print();
以上代码是一个使用PriorityQueue类的示例。在下图中可以看到每条命令的结果(以上
代码的结果):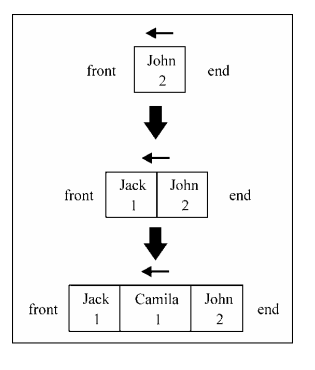
?循环队列(622. Design Circular Queue,自己题解中没有设置扩容)
class SqQueue {constructor(length) {this.queue = new Array(length + 1)// 队头this.first = 0// 队尾this.last = 0// 当前队列大小this.size = 0}enQueue(item) {// 判断队尾 + 1 是否为队头// 如果是就代表需要扩容数组// % this.queue.length 是为了防止数组越界if (this.first === (this.last + 1) % this.queue.length) {this.resize(this.getLength() * 2 + 1)}this.queue[this.last] = itemthis.size++this.last = (this.last + 1) % this.queue.length}deQueue() {if (this.isEmpty()) {throw Error('Queue is empty')}let r = this.queue[this.first]this.queue[this.first] = nullthis.first = (this.first + 1) % this.queue.lengththis.size--// 判断当前队列大小是否过小// 为了保证不浪费空间,在队列空间等于总长度四分之一时// 且不为 2 时缩小总长度为当前的一半if (this.size === this.getLength() / 4 && this.getLength() / 2 !== 0) {this.resize(this.getLength() / 2)}return r}getHeader() {if (this.isEmpty()) {throw Error('Queue is empty')}return this.queue[this.first]}getLength() {return this.queue.length - 1}isEmpty() {return this.first === this.last}resize(length) {let q = new Array(length)for (let i = 0; i < length; i++) {q[i] = this.queue[(i + this.first) % this.queue.length]}this.queue = qthis.first = 0this.last = this.size}}
循环队列——击鼓传花
还有另一个修改版的队列实现,就是循环队列。循环队列的一个例子就是击鼓传花游戏( Hot
Potato)。在这个游戏中,孩子们围成一个圆圈,把花尽快地传递给旁边的人。某一时刻传花停止,
这个时候花在谁手里,谁就退出圆圈结束游戏。重复这个过程,直到只剩一个孩子(胜者)。
在下面这个示例中,我们要实现一个模拟的击鼓传花游戏:
function hotPotato(nameList, num) {var queue = new Queue(); // {1}for (var i = 0; i < nameList.length; i++) {queue.enqueue(nameList[i]); // {2}}var eliminated = '';while (queue.size() > 1) {for (var i = 0; i < num; i++) {queue.enqueue(queue.dequeue()); // {3}}eliminated = queue.dequeue();// {4}console.log(eliminated + '在击鼓传花游戏中被淘汰。 ');}return queue.dequeue();// {5}}var names = ['John', 'Jack', 'Camila', 'Ingrid', 'Carl'];var winner = hotPotato(names, 7);console.log('胜利者: ' + winner);
—链表—
概念
链表是一个线性结构,同时也是一个天然的递归结构。链表结构可以充分利用计算机内存空间,实现灵活的内存动态管理。但是链表失去了数组随机读取的优点,同时链表由于增加了结点的指针域,空间开销比较大。
实现
单向链表
class ListNode {constructor(key) {this.next = null;this.key = key;}}class List {constructor() {this.head = null;this.length = 0;}static createNode(key) {return new ListNode(key);}// 往头部插入数据insert(node) {// 如果head后面有指向的节点if (this.head) {node.next = this.head;} else {node.next = null;}this.head = node;this.length++;}find(key) {let node = this.head;while (node !== null && node.key !== key) {node = node.next;}return node;}delete(node) {if (this.length === 0) {throw 'node is undefined';}if (node === this.head) {this.head = node.next;this.length--;return;}let prevNode = this.head;while (prevNode.next !== node) {prevNode = prevNode.next;}if (node.next === null) {prevNode.next = null;}if (node.next) {prevNode.next = node.next;}this.length--;}}
双向链表
//封装双向链表function DoublyLinkedList() {//内部类function Node(data) {this.data = datathis.prev = nullthis.next = null}//属性this.head = nullthis.tail = nullthis.length = 0//1.append方法DoublyLinkedList.prototype.append = function (data) {//1.创建新的节点var newNode = new Node(data)//2.判断是否为第一个节点if (this.length == 0) {this.head = newNodethis.tail = newNode} else {newNode.prev = this.tailthis.tail.next = newNodethis.tail = newNode}//3.length+1this.length += 1}//2.将链表转变为字符串形式//2.1 toString方法DoublyLinkedList.prototype.toString = function () {return this.backwardString()}//2.2 forwardString方法DoublyLinkedList.prototype.forwardString = function () {//1.定义变量var current = this.tailvar resultString = ''//2.依次向后遍历,获取每一个节点while (current) {resultString += current.data + ''current = current.prev}return resultString}//2.3 backwardString方法DoublyLinkedList.prototype.backwardString = function () {//1.定义变量var current = this.headvar resultString = ''//2.依次向后遍历,获取每一个节点while (current) {resultString += current.data + ' 'current = current.next}return resultString}//3.insert方法DoublyLinkedList.prototype.insert = function (position, data) {//1.越界判断if (position < 0 || position > this.length) return false//2.创建新的节点var newNode = new Node(data)//3.判断原来列表是否为空if (this.length == 0) {this.head = newNodethis.tail = newNode} else {if (position == 0) {//3.1 判断插入位置是否为0this.head.prev = newNode //原来的第一个节点.prev = newNodenewNode.next = this.head// newNode.next= 原来的第一个节点this.head = newNode} else if (position == this.length) {//3.2判断插入位置是否为最后一位newNode.prev = this.tailthis.tail.next = newNodethis.tail = newNode} else {var current = this.headvar index = 0while (index++ < position) {current = current.next//current为要插入点的后一个节点}newNode.next = currentnewNode.prev = current.prevcurrent.prev.next = newNodecurrent.prev = newNode}}//4.length+1this.length += 1console.log(this.length)return true}//4.get方法DoublyLinkedList.prototype.get = function (position) {//1.越界判断if (position < 0 || position >= this.length) return false//this.length/2 > position :从头向后遍历//this.length/2 < position :从后往前遍历 index-->position//2.获取元素var current = this.headvar index = 0while (index++ < position) {current = current.next}console.log(current.data)return current.data}//5.indexOf方法DoublyLinkedList.prototype.indexOf = function (data) {//1.定义变量var current = this.headvar index = 0//2.找到与data相同的节点while (current) {if (current.data == data) {return index}current = current.nextindex += 1}console.log(index)return -1}//6.update方法DoublyLinkedList.prototype.update = function (position, newData) {//1.越界判断if (position < 0 || position >= this.length) return false//2.查找节点var current = this.headvar index = 0while (index++ < position) {current = current.next}current.data = newDatareturn true}//7.removeAt方法DoublyLinkedList.prototype.removeAt = function (position) {//1.越界判断if (position < 0 || position >= this.length) return null//2.判断是否只有一个节点var current = this.headif (this.length == 1) {this.head = nullthis.tail = null} else {if (position == 0) {//判断是否是删除第一个节点this.head.next.prev = nullthis.head = this.head.next} else if (position == this.length - 1) {//是最后一个节点current = this.tailthis.tail.prev.next = nullthis.tail = this.tail.prev} else {var index = 0while (index++ < position) {current = current.next}current.prev.next = current.nextcurrent.next.prev = current.prev}}//3.length-1this.length -= 1return current.data}//8.remove方法DoublyLinkedList.prototype.remove = function (data) {var index = this.indexOf(data)return this.removeAt(index)}DoublyLinkedList.prototype.isEmpty = function (data) {return this.length == 0}DoublyLinkedList.prototype.size = function (data) {return this.length}DoublyLinkedList.prototype.getHead = function (data) {return this.head.data}DoublyLinkedList.prototype.getTail = function (data) {return this.tail.data}}var doubly = new DoublyLinkedList()doubly.append('abc')doubly.append('def')doubly.append('hjk')console.log(doubly)doubly.insert(0, '123')doubly.insert(2, '456')doubly.insert(5, '789')console.log(doubly)console.log(doubly.get(5))console.log(doubly.indexOf('789'))doubly.update(5, '012')console.log(doubly)console.log(doubly.removeAt(0))console.log(doubly.removeAt(1))console.log(doubly)console.log(doubly.removeAt(3))console.log(doubly)
集合
我们要实现的类就是以ECMAScript 6中Set类的实现为基础的
function Set() {var items = {};this.has = function (value) {return value in items;};this.add = function (value) {if (!this.has(value)) {items[value] = value; //{1}return true;}return false;};this.remove = function (value) {if (this.has(value)) {delete items[value]; //{2}return true;}return false;};this.clear = function () {items = {}; // {3}};this.size = function () {return Object.keys(items).length; //{4}};this.sizeLegacy = function () {var count = 0;for (var prop in items) { //{5}if (items.hasOwnProperty(prop)) //{6}++count; //{7}}return count;};this.values = function () {return Object.keys(items);};//并集this.union = function (otherSet) {var unionSet = new Set(); //{1}var values = this.values(); //{2}for (var i = 0; i < values.length; i++) {unionSet.add(values[i]);}values = otherSet.values(); //{3}for (var i = 0; i < values.length; i++) {unionSet.add(values[i]);}return unionSet;};//交集this.intersection = function (otherSet) {var intersectionSet = new Set(); //{1}var values = this.values();for (var i = 0; i < values.length; i++) { //{2}if (otherSet.has(values[i])) { //{3}intersectionSet.add(values[i]); //{4}}}return intersectionSet;}//差集this.difference = function (otherSet) {var differenceSet = new Set(); //{1}var values = this.values();for (var i = 0; i < values.length; i++) { //{2}if (!otherSet.has(values[i])) { //{3}differenceSet.add(values[i]); //{4}}}return differenceSet;};//子集this.subset = function (otherSet) {if (this.size() > otherSet.size()) { //{1}return false;} else {var values = this.values();for (var i = 0; i < values.length; i++) { //{2}if (!otherSet.has(values[i])) { //{3}return false; //{4}}}return true; //{5}}};}
字典
集合以[值,值]的形式存储元素,字 典则是以[键,值]的形式来存储元素。字典也称作映射。
//字典数据结构function Dictionary(){this.items = {};//检查是否有某一个键this.has = function(key){return this.items.hasOwnProperty(key);}//为字典添加某一个值this.set = function(key,val){this.items[key] = val;}//删除某一个键this.delete = function(key){if(this.has(key)){delete this.items[key];return true;}return false;}//查找某一特定项this.get = function(key){return this.has(key) ? this.items[key] : undefined;}//返回字典中的所有值this.values = function(){var res = [];for(var prop in this.items){if(this.has(prop)){res.push(this.items[prop]);}}return res;}//清空字典this.clear = function(){this.items = {};}//获取字典的长度this.size = function(){return Object.keys(this.items).length;}//获取字典所有的键this.keys = function(){return Object.keys(this.items);}//返回字典本身this.getItems = function(){return this.items;}}
ES6中的Set和Map
Set
上面代码通过add()方法向 Set 结构加入成员,结果表明 Set 结构不会添加重复的值。Set函数可以接受一个数组(或者具有 iterable 接口的其他数据结构)作为参数,用来初始化。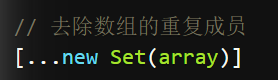
向 Set 加入值的时候,不会发生类型转换,所以5和"5"是两个不同的值。
WeakSet
WeakSet 结构与 Set 类似,也是不重复的值的集合。但是,它与 Set 有两个区别。
首先,WeakSet 的成员只能是对象,而不能是其他类型的值。
其次,WeakSet 中的对象都是弱引用,即垃圾回收机制不考虑 WeakSet 对该对象的引用,也就是说,如果其他对象都不再引用该对象,那么垃圾回收机制会自动回收该对象所占用的内存,不考虑该对象还存在于 WeakSet 之中。
Map
它类似于对象,也是键值对的集合,但是“键”的范围不限于字符串,各种类型的值(包括对象)都可以当作键。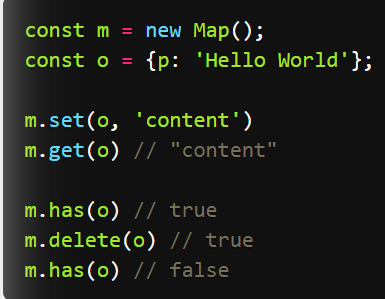
—两种添加元素的方式
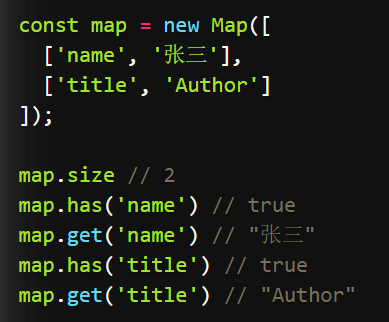
事实上,不仅仅是数组,任何具有 Iterator 接口、且每个成员都是一个双元素的数组的数据结构(详见《Iterator》一章)都可以当作Map构造函数的参数。这就是说,Set和Map都可以用来生成新的 Map。
只有对同一个对象的引用,Map 结构才将其视为同一个键。这一点要非常小心。
const map = new Map();map.set(['a'], 555);map.get(['a']) // undefined
如果 Map 的键是一个简单类型的值(数字、字符串、布尔值),则只要两个值严格相等(===),Map 将其视为一个键,比如0和-0就是一个键,布尔值true和字符串true则是两个不同的键。另外,undefined和null也是两个不同的键。虽然NaN不严格相等于自身,但 Map 将其视为同一个键。
WeakMap
WeakMap与Map的区别有两点。
首先,WeakMap只接受对象作为键名(null除外),不接受其他类型的值作为键名。
其次,WeakMap的键名所指向的对象,不计入垃圾回收机制。WeakMap 弱引用的只是键名,而不是键值。键值依然是正常引用。
const e1 = document.getElementById('foo');const e2 = document.getElementById('bar');const arr = [[e1, 'foo 元素'],[e2, 'bar 元素'],];
上面代码中,e1和e2是两个对象,我们通过arr数组对这两个对象添加一些文字说明。这就形成了arr对e1和e2的引用。
一旦不再需要这两个对象,我们就必须手动删除这个引用,否则垃圾回收机制就不会释放e1和e2占用的内存。
// 不需要 e1 和 e2 的时候// 必须手动删除引用arr [0] = null;arr [1] = null;
上面这样的写法显然很不方便。一旦忘了写,就会造成内存泄露。
WeakMap 就是为了解决这个问题而诞生的,它的键名所引用的对象都是弱引用,即垃圾回收机制不将该引用考虑在内。因此,只要所引用的对象的其他引用都被清除,垃圾回收机制就会释放该对象所占用的内存。也就是说,一旦不再需要,WeakMap 里面的键名对象和所对应的键值对会自动消失,不用手动删除引用。
散列表HashTable
给定一个key参数,我们就能根据组成key的每个字符的ASCII码值的和得到一个数字。所以, 首先需要一个变量来存储这个总和(行{1})。然后,遍历key(行{2})并将从ASCII表中查到 的每个字符对应的ASCII值加到hash变量中(可以使用JavaScript的String类中的charCodeAt 方法——行{3})。后,返回hash值。为了得到比较小的数值,我们会使用hash值和一个任意 数做除法的余数(mod)。
function HashTable() {var table = [];}var loseloseHashCode = function (key) { var hash = 0; //{1} for (var i = 0; i < key.length; i++) { //{2} hash += key.charCodeAt(i); //{3} } return hash % 37; //{4} };
Jonathan、Jamie和Sue有相同的散列值,也就是5。由于Sue是后一个被添加的,Sue 将是在HashTable实例中占据位置5的元素。首先,Jonathan会占据这个位置,然后Jamie会覆 盖它,然后Sue会再次覆盖。这对于其他发生冲突的元素来说也是一样的。
使用一个数据结构来保存数据的目的显然不是去丢失这些数据,而是通过某种方法将它们全部保存起来。因此,当这种情况发生的时候就要去解决它。处理冲突有几种方法:分离链接、线 性探查和双散列法。在本书中,我们会介绍前两种方法
分离链接
为了实现一个使用了分离链接的HashTable实例,我们需要一个新的辅助类来表示将要加入 LinkedList实例的元素。我们管它叫ValuePair类(在HashTable类内部定义):
var ValuePair = function(key, value){ this.key = key; this.value = value;
this.toString = function() { return ‘[‘ + this.key + ‘ - ‘ + this.value + ‘]’; } };
这个类只会将key和value存储在一个Object实例中。我们也重写了toString方法,以便 之后在浏览器控制台中输出结果。
图
(1) put方法
我们来实现第一个方法,put方法,代码如下:
this.put = function(key, value){ var position = loseloseHashCode(key);
if (table[position] == undefined) { //{1} table[position] = new LinkedList(); } table[position].append(new ValuePair(key, value)); //{2} }; 在这个方法中,将验证要加入新元素的位置是否已经被占据(行{1})。如果这个位置是第 一次被加入元素,我们会在这个位置上初始化一个LinkedList类的实例(你已经在第5章中学 习过)。然后,使用第5章中实现的append方法向LinkedList实例中添加一个ValuePair实例 (键和值)(行{2})。
(2) get方法
然后,我们实现用来获取特定值的get方法:
this.get = function(key) { var position = loseloseHashCode(key);
if (table[position] !== undefined){ //{3}
//遍历链表来寻找键/值 var current = table[position].getHead(); //{4}
while(current.next){ //{5} if (current.element.key === key){ //{6} return current.element.value; //{7} } current = current.next; //{8} }
//检查元素在链表第一个或最后一个节点的情况 if (current.element.key === key){ //{9} return current.element.value; } } return undefined; //{10} }; 我们要做的第一个验证,是确定在特定的位置上是否有元素存在(行{3})。如果没有,则 返回一个undefined表示在HashTable实例中没有找到这个值(行{10})。如果在这个位置上有 值存在,我们知道这是一个LinkedList实例。现在要做的是遍历这个链表来寻找我们需要的元 素。在遍历之前先要获取链表表头的引用(行{4}),然后就可以从链表的头部遍历到尾部(行 {5},current.next将会是null)
(3) remove方法
使用分离链接法从HashTable实例中移除一个元素和之前在本章实现的remove方法有一些 不同。现在使用的是链表,我们需要从链表中移除一个元素。来看看remove方法的实现:
this.remove = function(key){ var position = loseloseHashCode(key);
if (table[position] !== undefined){
var current = table[position].getHead(); while(current.next){ if (current.element.key === key){ //{11} table[position].remove(current.element); //{12} if (table[position].isEmpty()){ //{13} table[position] = undefined; //{14} } return true; //{15} } current = current.next; }
// 检查是否为第一个或最后一个元素 if (current.element.key === key){ //{16} table[position].remove(current.element); if (table[position].isEmpty()){ table[position] = undefined; } return true; } }
return false; //{17} }; 在remove方法中,我们使用和get方法一样的步骤找到要找的元素。遍历LinkedList实例 时,如果链表中的current元素就是要找的元素(行{11}),使用remove方法将其从链表中移 除。然后进行一步额外的验证:如果链表为空了(行{13}——链表中不再有任何元素了),就将 散列表这个位置的值设为undefined(行{14}),
线性探查
另一种解决冲突的方法是线性探查。当想向表中某个位置加入一个新元素的时候,如果索引 为index的位置已经被占据了,就尝试index+1的位置。如果index+1的位置也被占据了,就尝试 index+2的位置,以此类推。
(1) put方法
让我们继续实现需要重写的三个方法。第一个是put方法:
this.put = function(key, value){ var position = loseloseHashCode(key); // {1}
if (table[position] == undefined) { // {2} table[position] = new ValuePair(key, value); // {3} } else { var index = ++position; // {4} while (table[index] != undefined){ // {5} index++; // {6} } table[index] = new ValuePair(key, value); // {7} } };
和之前一样,先获得由散列函数生成的位置(行{1}),然后验证这个位置是否有元素存在 (如果这个位置被占据了,将会通过行{2}的验证)。如果没有元素存在,就在这个位置加入新元 素(行{3}——一个ValuePair的实例)。
如果这个位置已经被占据了,需要找到下一个没有被占据的位置(position的值是 undefined),因此我们声明一个index变量并赋值为position+1(行{4}——在变量名前使用 自增运算符++会先递增变量值然后再将其赋值给index)。然后验证这个位置是否被占据(行 {5}),如果被占据了,继续将index递增(行{6}),直到找到一个没有被占据的位置。然后要 做的,就是将值分配到这个位置(行{7})。
(2) get方法 现在插入了所有的元素,让我们实现get方法来获取它们的值吧:
this.get = function(key) { var position = loseloseHashCode(key);
if (table[position] !== undefined){ //{8} if (table[position].key === key) { //{9} return table[position].value; //{10} } else { var index = ++position; while (table[index] === undefined || table[index].key !== key){ //{11} index++; } if (table[index].key === key) { //{12} return table[index].value; //{13} } } } return undefined; //{14} }; 要获得一个键对应的值,先要确定这个键存在(行{8})。如果这个键不存在,说明要查找 的值不在散列表中,因此可以返回undefined(行{14})。如果这个键存在,需要检查我们要找 的值是否就是这个位置上的值(行{9})。如果是,就返回这个值(行{10})。
如果不是,就在散列表中的下一个位置继续查找,直到找到一个键值与我们要找的键值相同 的元素(行{11})。然后,验证一下当前项就是我们要找的项(行{12}——只是为了确认一下) 并且将它的值返回(行{13})。
我们无法确定要找的元素实际上在哪个位置,这就是使用ValuePair来表示HashTable元 素的原因。 (3) remove方法
remove方法和get方法基本相同,不同之处在于行{10}和{13},它们将会由下面的代码代替:
table[index] = undefined; 要移除一个元素,只需要给其赋值为undefined,来表示这个位置不再被占据并且可以在必 要时接受一个新元素。
—树—
二叉树
树拥有很多种结构,二叉树是树中最常用的结构,同时也是一个天然的递归结构。
二叉树拥有一个根节点,每个节点至多拥有两个子节点,分别为:左节点和右节点。树的最底部节点称之为叶节点,当一颗树的叶数量数量为满时,该树可以称之为满二叉树。
二分搜索树(BST)
二分搜索树也是二叉树,拥有二叉树的特性。但是区别在于二分搜索树每个节点的值都比他的左子树的值大,比右子树的值小。
这种存储方式很适合于数据搜索。如下图所示,当需要查找 6 的时候,因为需要查找的值比根节点的值大,所以只需要在根节点的右子树上寻找,大大提高了搜索效率。
实现
class Node {constructor(value) {this.value = valuethis.left = nullthis.right = null}}class BST {constructor() {this.root = nullthis.size = 0}getSize() {return this.size}isEmpty() {return this.size === 0}addNode(v) {this.root = this._addChild(this.root, v)}// 添加节点时,需要比较添加的节点值和当前// 节点值的大小_addChild(node, v) {if (!node) {this.size++return new Node(v)}if (node.value > v) {node.left = this._addChild(node.left, v)} else if (node.value < v) {node.right = this._addChild(node.right, v)}return node}}
以上是最基本的二分搜索树实现。
树的遍历
对于树的遍历来说,有三种遍历方法,分别是先序遍历、中序遍历、后序遍历。三种遍历的区别在于何时访问节点。在遍历树的过程中,每个节点都会遍历三次,分别是遍历到自己,遍历左子树和遍历右子树。如果需要实现先序遍历,那么只需要第一次遍历到节点时进行操作即可。
// 先序遍历可用于打印树的结构// 先序遍历先访问根节点,然后访问左节点,最后访问右节点。preTraversal() {this._pre(this.root)}_pre(node) {if (node) {console.log(node.value)this._pre(node.left)this._pre(node.right)}}// 中序遍历可用于排序// 对于 BST 来说,中序遍历可以实现一次遍历就// 得到有序的值// 中序遍历表示先访问左节点,然后访问根节点,最后访问右节点。midTraversal() {this._mid(this.root)}_mid(node) {if (node) {this._mid(node.left)console.log(node.value)this._mid(node.right)}}// 后序遍历可用于先操作子节点// 再操作父节点的场景// 后序遍历表示先访问左节点,然后访问右节点,最后访问根节点。backTraversal() {this._back(this.root)}_back(node) {if (node) {this._back(node.left)this._back(node.right)console.log(node.value)}}
以上的这几种遍历都可以称之为深度遍历,对应的还有种遍历叫做广度遍历,也就是一层层地遍历树。
对于广度遍历来说,我们需要利用之前讲过的队列结构来完成。
breadthTraversal() {if (!this.root) return nulllet q = new Queue()// 将根节点入队q.enQueue(this.root)// 循环判断队列是否为空,为空// 代表树遍历完毕while (!q.isEmpty()) {// 将队首出队,判断是否有左右子树// 有的话,就先左后右入队let n = q.deQueue()console.log(n.value)if (n.left) q.enQueue(n.left)if (n.right) q.enQueue(n.right)}}
接下来先介绍如何在树中寻找最小值或最大数。因为二分搜索树的特性,所以最小值一定在根节点的最左边,最大值相反
getMin() {return this._getMin(this.root).value}_getMin(node) {if (!node.left) return nodereturn this._getMin(node.left)}getMax() {return this._getMax(this.root).value}_getMax(node) {if (!node.right) return nodereturn this._getMin(node.right)}
向上取整和向下取整
**排名
**删除节点
—AVL 树—
概念
二分搜索树实际在业务中是受到限制的,因为并不是严格的 O(logN),在极端情况下会退化成链表,比如加入一组升序的数字就会造成这种情况。
AVL 树改进了二分搜索树,在 AVL 树中任意节点的左右子树的高度差都不大于 1,这样保证了时间复杂度是严格的 O(logN)。基于此,对 AVL 树增加或删除节点时可能需要旋转树来达到高度的平衡。
实现
因为 AVL 树是改进了二分搜索树,所以部分代码是于二分搜索树重复的,对于重复内容不作再次解析。
对于 AVL 树来说,添加节点会有四种情况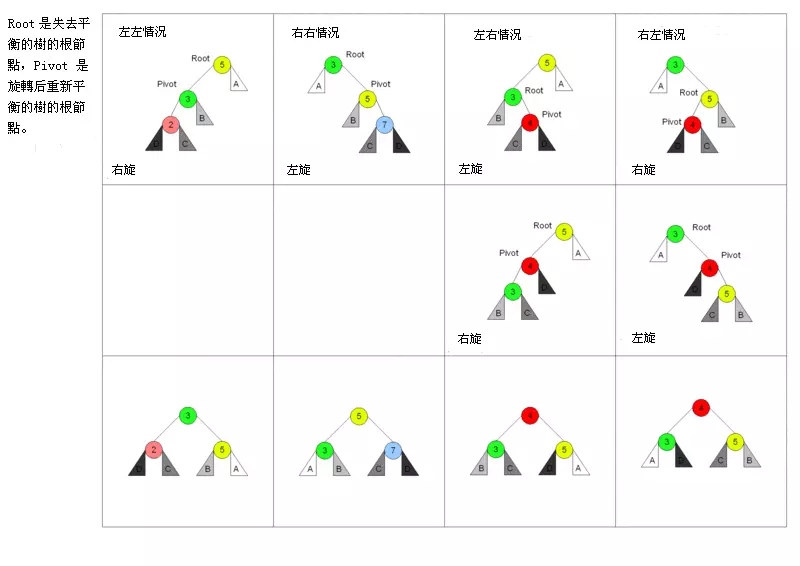
对于左左情况来说,新增加的节点位于节点 2 的左侧,这时树已经不平衡,需要旋转。因为搜索树的特性,节点比左节点大,比右节点小,所以旋转以后也要实现这个特性。
旋转之前:new < 2 < C < 3 < B < 5 < A,右旋之后节点 3 为根节点,这时候需要将节点 3 的右节点加到节点 5 的左边,最后还需要更新节点的高度。
对于右右情况来说,相反于左左情况,所以不再赘述。
对于左右情况来说,新增加的节点位于节点 4 的右侧。对于这种情况,需要通过两次旋转来达到目的。
首先对节点的左节点左旋,这时树满足左左的情况,再对节点进行一次右旋就可以达到目的。
class Node {constructor(value) {this.value = valuethis.left = nullthis.right = nullthis.height = 1}}class AVL {constructor() {this.root = null}addNode(v) {this.root = this._addChild(this.root, v)}_addChild(node, v) {if (!node) {return new Node(v)}if (node.value > v) {node.left = this._addChild(node.left, v)} else if (node.value < v) {node.right = this._addChild(node.right, v)} else {node.value = v}node.height =1 + Math.max(this._getHeight(node.left), this._getHeight(node.right))let factor = this._getBalanceFactor(node)// 当需要右旋时,根节点的左树一定比右树高度高if (factor > 1 && this._getBalanceFactor(node.left) >= 0) {return this._rightRotate(node)}// 当需要左旋时,根节点的左树一定比右树高度矮if (factor < -1 && this._getBalanceFactor(node.right) <= 0) {return this._leftRotate(node)}// 左右情况// 节点的左树比右树高,且节点的左树的右树比节点的左树的左树高if (factor > 1 && this._getBalanceFactor(node.left) < 0) {node.left = this._leftRotate(node.left)return this._rightRotate(node)}// 右左情况// 节点的左树比右树矮,且节点的右树的右树比节点的右树的左树矮if (factor < -1 && this._getBalanceFactor(node.right) > 0) {node.right = this._rightRotate(node.right)return this._leftRotate(node)}return node}_getHeight(node) {if (!node) return 0return node.height}_getBalanceFactor(node) {return this._getHeight(node.left) - this._getHeight(node.right)}// 节点右旋// 5 2// / \ / \// 2 6 ==> 1 5// / \ / / \// 1 3 new 3 6// /// new_rightRotate(node) {// 旋转后新根节点let newRoot = node.left// 需要移动的节点let moveNode = newRoot.right// 节点 2 的右节点改为节点 5newRoot.right = node// 节点 5 左节点改为节点 3node.left = moveNode// 更新树的高度node.height =1 + Math.max(this._getHeight(node.left), this._getHeight(node.right))newRoot.height =1 +Math.max(this._getHeight(newRoot.left), this._getHeight(newRoot.right))return newRoot}// 节点左旋// 4 6// / \ / \// 2 6 ==> 4 7// / \ / \ \// 5 7 2 5 new// \// new_leftRotate(node) {// 旋转后新根节点let newRoot = node.right// 需要移动的节点let moveNode = newRoot.left// 节点 6 的左节点改为节点 4newRoot.left = node// 节点 4 右节点改为节点 5node.right = moveNode// 更新树的高度node.height =1 + Math.max(this._getHeight(node.left), this._getHeight(node.right))newRoot.height =1 +Math.max(this._getHeight(newRoot.left), this._getHeight(newRoot.right))return newRoot}}
—Trie—
概念
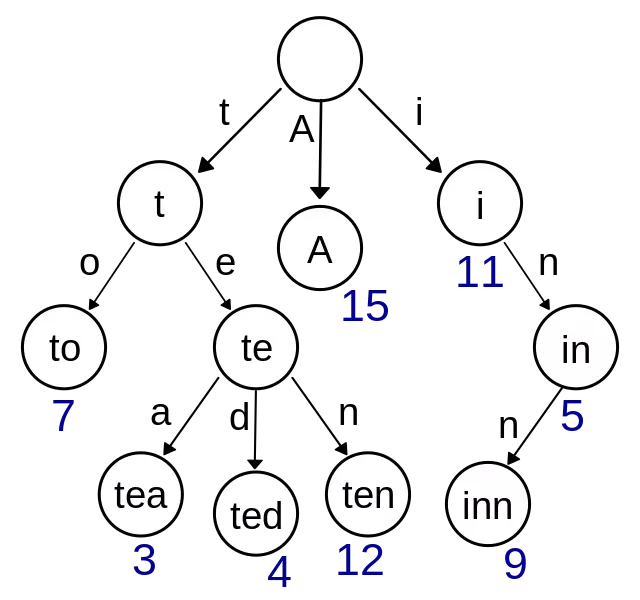
在计算机科学,trie,又称前缀树或字典树,是一种有序树,用于保存关联数组,其中的键通常是字符串。
简单点来说,这个结构的作用大多是为了方便搜索字符串,该树有以下几个特点
- 根节点代表空字符串,每个节点都有 N(假如搜索英文字符,就有 26 条) 条链接,每条链接代表一个字符
- 节点不存储字符,只有路径才存储,这点和其他的树结构不同
- 从根节点开始到任意一个节点,将沿途经过的字符连接起来就是该节点对应的字符串
 、
、
实现
总得来说 Trie 的实现相比别的树结构来说简单的很多,实现就以搜索英文字符为例。
class TrieNode {constructor() {// 代表每个字符经过节点的次数this.path = 0// 代表到该节点的字符串有几个this.end = 0// 链接this.next = new Array(26).fill(null)}}class Trie {constructor() {// 根节点,代表空字符this.root = new TrieNode()}// 插入字符串insert(str) {if (!str) returnlet node = this.rootfor (let i = 0; i < str.length; i++) {// 获得字符先对应的索引let index = str[i].charCodeAt() - 'a'.charCodeAt()// 如果索引对应没有值,就创建if (!node.next[index]) {node.next[index] = new TrieNode()}node.path += 1node = node.next[index]}node.end += 1}// 搜索字符串出现的次数search(str) {if (!str) returnlet node = this.rootfor (let i = 0; i < str.length; i++) {let index = str[i].charCodeAt() - 'a'.charCodeAt()// 如果索引对应没有值,代表没有需要搜素的字符串if (!node.next[index]) {return 0}node = node.next[index]}return node.end}// 删除字符串delete(str) {if (!this.search(str)) returnlet node = this.rootfor (let i = 0; i < str.length; i++) {let index = str[i].charCodeAt() - 'a'.charCodeAt()// 如果索引对应的节点的 Path 为 0,代表经过该节点的字符串// 已经一个,直接删除即可if (--node.next[index].path == 0) {node.next[index] = nullreturn}node = node.next[index]}node.end -= 1}}
—并查集—
概念
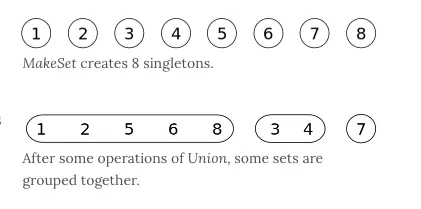
并查集是一种特殊的树结构,用于处理一些不交集的合并及查询问题。该结构中每个节点都有一个父节点,如果只有当前一个节点,那么该节点的父节点指向自己。
这个结构中有两个重要的操作,分别是:
- Find:确定元素属于哪一个子集。它可以被用来确定两个元素是否属于同一子集。
- Union:将两个子集合并成同一个集合。
实现
class DisjointSet {// 初始化样本constructor(count) {// 初始化时,每个节点的父节点都是自己this.parent = new Array(count)// 用于记录树的深度,优化搜索复杂度this.rank = new Array(count)for (let i = 0; i < count; i++) {this.parent[i] = ithis.rank[i] = 1}}find(p) {// 寻找当前节点的父节点是否为自己,不是的话表示还没找到// 开始进行路径压缩优化// 假设当前节点父节点为 A// 将当前节点挂载到 A 节点的父节点上,达到压缩深度的目的while (p != this.parent[p]) {this.parent[p] = this.parent[this.parent[p]]p = this.parent[p]}return p}isConnected(p, q) {return this.find(p) === this.find(q)}// 合并union(p, q) {// 找到两个数字的父节点let i = this.find(p)let j = this.find(q)if (i === j) return// 判断两棵树的深度,深度小的加到深度大的树下面// 如果两棵树深度相等,那就无所谓怎么加if (this.rank[i] < this.rank[j]) {this.parent[i] = j} else if (this.rank[i] > this.rank[j]) {this.parent[j] = i} else {this.parent[i] = jthis.rank[j] += 1}}}
—堆—
概念
堆通常是一个可以被看做一棵树的数组对象。
堆的实现通过构造二叉堆,实为二叉树的一种。这种数据结构具有以下性质。
- 任意节点小于(或大于)它的所有子节点
- 堆总是一棵完全树。即除了最底层,其他层的节点都被元素填满,且最底层从左到右填入。
将根节点最大的堆叫做最大堆或大根堆,根节点最小的堆叫做最小堆或小根堆。
优先队列也完全可以用堆来实现,操作是一模一样的。
实现大根堆
堆的每个节点的左边子节点索引是 i * 2 + 1,右边是 i * 2 + 2,父节点是 (i - 1) /2。
堆有两个核心的操作,分别是 shiftUp 和 shiftDown 。前者用于添加元素,后者用于删除根节点。shiftUp 的核心思路是一路将节点与父节点对比大小,如果比父节点大,就和父节点交换位置。shiftDown 的核心思路是先将根节点和末尾交换位置,然后移除末尾元素。接下来循环判断父节点和两个子节点的大小,如果子节点大,就把最大的子节点和父节点交换。
class MaxHeap {constructor() {this.heap = []}size() {return this.heap.length}empty() {return this.size() == 0}add(item) {this.heap.push(item)this._shiftUp(this.size() - 1)}removeMax() {this._shiftDown(0)}getParentIndex(k) {return parseInt((k - 1) / 2)}getLeftIndex(k) {return k * 2 + 1}_shiftUp(k) {// 如果当前节点比父节点大,就交换while (this.heap[k] > this.heap[this.getParentIndex(k)]) {this._swap(k, this.getParentIndex(k))// 将索引变成父节点k = this.getParentIndex(k)}}_shiftDown(k) {// 交换首位并删除末尾this._swap(k, this.size() - 1)this.heap.splice(this.size() - 1, 1)// 判断节点是否有左孩子,因为二叉堆的特性,有右必有左while (this.getLeftIndex(k) < this.size()) {let j = this.getLeftIndex(k)// 判断是否有右孩子,并且右孩子是否大于左孩子if (j + 1 < this.size() && this.heap[j + 1] > this.heap[j]) j++// 判断父节点是否已经比子节点都大if (this.heap[k] >= this.heap[j]) breakthis._swap(k, j)k = j}}_swap(left, right) {let rightValue = this.heap[right]this.heap[right] = this.heap[left]this.heap[left] = rightValue}}
图

若有收获,就点个赞吧
0 人点赞
