1.创建项目
1.创建项目
创建spring initializar项目,引入spring web模块
2.在pom.xml文件中引入依赖
引入spring boot、热部署、MySQL、mybatis、log4j
<?xml version="1.0" encoding="UTF-8"?><project xmlns="http://maven.apache.org/POM/4.0.0" xmlns:xsi="http://www.w3.org/2001/XMLSchema-instance"xsi:schemaLocation="http://maven.apache.org/POM/4.0.0 https://maven.apache.org/xsd/maven-4.0.0.xsd"><modelVersion>4.0.0</modelVersion><parent><groupId>org.springframework.boot</groupId><artifactId>spring-boot-starter-parent</artifactId><version>2.2.5.RELEASE</version><relativePath/> <!-- lookup parent from repository --></parent><groupId>com.huang</groupId><artifactId>parking-lot-server</artifactId><version>0.0.1-SNAPSHOT</version><name>parking-lot-server</name><description>Demo project for Spring Boot</description><properties><project.build.sourceEncoding>UTF-8</project.build.sourceEncoding><project.reporting.outputEncoding>UTF-8</project.reporting.outputEncoding><java.version>1.8</java.version></properties><dependencies><!--spring boot--><dependency><groupId>org.springframework.boot</groupId><artifactId>spring-boot-starter-web</artifactId></dependency><!--热部署--><dependency><groupId>org.springframework.boot</groupId><artifactId>spring-boot-devtools</artifactId><optional>true</optional></dependency><!--test--><dependency><groupId>org.springframework.boot</groupId><artifactId>spring-boot-starter-test</artifactId><scope>test</scope><exclusions><exclusion><groupId>org.junit.vintage</groupId><artifactId>junit-vintage-engine</artifactId></exclusion></exclusions></dependency><!--mysql--><dependency><groupId>mysql</groupId><artifactId>mysql-connector-java</artifactId></dependency><!--mybatisPlus--><dependency><groupId>com.baomidou</groupId><artifactId>mybatis-plus-boot-starter</artifactId><version>3.5.1</version></dependency><!--druid 数据库连接池--><dependency><groupId>com.alibaba</groupId><artifactId>druid</artifactId><version>1.1.16</version></dependency></dependencies><build><plugins><plugin><groupId>org.springframework.boot</groupId><artifactId>spring-boot-maven-plugin</artifactId></plugin></plugins></build></project>
3.application.yml配置方式
3.1 静态指定,就是运行项目前指定使用的环境
server:port: 9988spring:profiles:active: dev---server:port: 9981spring:profiles: prod
注意每个环境之间使用—-分隔(注意是三个—-分隔),默认第一个是主环境。可以在默认环境指定使用其他环境。
3.2 动态切换
通过运行参数指定环境
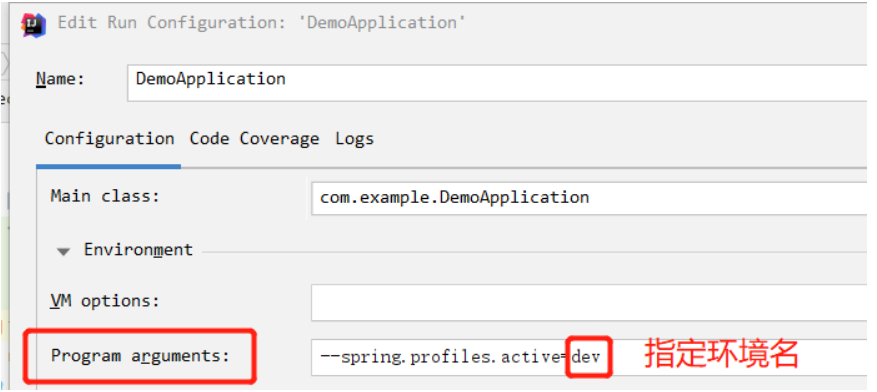
- Idea : 在application主运行类鼠标右键 -》 Edit 项目名application -》Program arguments -》输入 —spring.profiles.active=环境名,如下图
- 通过maven的打jar包形式把项目打包,然后cmd运行,输入 java -jar 项目名.jar spring.profiles.active=环境名
通过vm参数指定环境
vm参数也在上图中,就是上图的VM options ,然后输入:-Dspring.profiles.active=环境名,注意开头是-D。
4..在application-dev.yml下添加配置
spring:datasource:driver-class-name: com.mysql.cj.jdbc.Driverurl: "jdbc:mysql://127.0.0.1:3306/parkingLot?serverTimezone=UTC"username: "root"password: "root"
2.配置MybatisPlus
1.添加依赖
<!--mybatisPlus--><dependency><groupId>com.baomidou</groupId><artifactId>mybatis-plus-boot-starter</artifactId><version>3.5.1</version></dependency>
2.在application-dev.yml下添加配置
mybatis-plus:# 如果是放在src/main/java目录下 classpath:/com/yourpackage/*/mapper/*Mapper.xml# 如果是放在resource目录 classpath:/mapper/*Mapper.xmlmapper-locations: classpath:mybatis/mappers/*Mapper.xml#实体扫描,多个package用逗号或者分号分隔typeAliasesPackage: cn.saytime.modelglobal-config:#主键类型 0:"数据库ID自增", 1:"用户输入ID",2:"全局唯一ID (数字类型唯一ID)", 3:"全局唯一ID UUID";id-type: 0#字段策略 0:"忽略判断",1:"非 NULL 判断"),2:"非空判断"field-strategy: 1#驼峰下划线转换#db-column-underline: true#刷新mapper 调试神器#refresh-mapper: true#数据库大写下划线转换#capital-mode: true# Sequence序列接口实现类配置#key-generator: com.baomidou.mybatisplus.incrementer.OracleKeyGenerator#逻辑删除配置(下面3个配置)#logic-delete-value: 1#logic-not-delete-value: 0#sql-injector: com.baomidou.mybatisplus.mapper.LogicSqlInjector#自定义填充策略接口实现#meta-object-handler: com.baomidou.springboot.MyMetaObjectHandlerconfiguration:map-underscore-to-camel-case: truecache-enabled: false#配置JdbcTypeForNulljdbc-type-for-null: 'null'
3.配置Druid数据源
1.添加依赖
<!--druid 数据库连接池--><dependency><groupId>com.alibaba</groupId><artifactId>druid</artifactId><version>1.1.16</version></dependency>
2.在application-dev.yml下添加配置
spring:datasource:driver-class-name: com.mysql.cj.jdbc.Driverurl: "jdbc:mysql://127.0.0.1:3306/parkingLot?serverTimezone=UTC"username: "root"password: "root"#指定数据源,不用默认的数据源type: com.alibaba.druid.pool.DruidDataSource# 数据源其他配置initialSize: 5minIdle: 5maxActive: 20maxWait: 60000timeBetweenEvictionRunsMillis: 60000minEvictableIdleTimeMillis: 300000validationQuery: SELECT 1 FROM DUALtestWhileIdle: truetestOnBorrow: falsetestOnReturn: falsepoolPreparedStatements: true# 配置监控统计拦截的filters,去掉后监控界面sql无法统计,'wall'用于防火墙filters: stat,wall,log4jmaxPoolPreparedStatementPerConnectionSize: 20useGlobalDataSourceStat: trueconnectionProperties: druid.stat.mergeSql=true;druid.stat.slowSqlMillis=500
多数据源配置
spring:datasource:master:jdbc-url: jdbc:mysql://192.168.102.31:3306/testusername: rootpassword: 123456driver-class-name: com.mysql.jdbc.Driverslave1:jdbc-url: jdbc:mysql://192.168.102.56:3306/testusername: pig # 只读账户password: 123456driver-class-name: com.mysql.jdbc.Driverslave2:jdbc-url: jdbc:mysql://192.168.102.36:3306/testusername: pig # 只读账户password: 123456driver-class-name: com.mysql.jdbc.Driver
3.配置Druid配置文件
package com.example.config;import com.alibaba.druid.pool.DruidDataSource;import com.alibaba.druid.support.http.StatViewServlet;import com.alibaba.druid.support.http.WebStatFilter;import org.springframework.boot.context.properties.ConfigurationProperties;import org.springframework.boot.web.servlet.FilterRegistrationBean;import org.springframework.boot.web.servlet.ServletRegistrationBean;import org.springframework.context.annotation.Bean;import org.springframework.context.annotation.Configuration;import javax.sql.DataSource;import java.util.Arrays;import java.util.HashMap;import java.util.Map;@Configurationpublic class DruidConfig {@ConfigurationProperties(prefix = "spring.datasource")@Beanpublic DataSource druid(){return new DruidDataSource();}/*** 配置Druid的监控* 1.配置一个管理后台的Servlet* @return*/@Beanpublic ServletRegistrationBean statViewServlet(){ServletRegistrationBean bean = new ServletRegistrationBean(new StatViewServlet(), "/druid/*");Map<String,String> initParams = new HashMap<>();initParams.put("loginUsername","admin");initParams.put("loginPassword","123456");//默认就是允许所有访问initParams.put("allow","");initParams.put("deny","192.168.15.21");bean.setInitParameters(initParams);return bean;}/*** 2、配置一个web监控的filter* @return*/@Beanpublic FilterRegistrationBean webStatFilter(){FilterRegistrationBean bean = new FilterRegistrationBean();bean.setFilter(new WebStatFilter());Map<String,String> initParams = new HashMap<>();initParams.put("exclusions","*.js,*.css,/druid/*");bean.setInitParameters(initParams);bean.setUrlPatterns(Arrays.asList("/*"));return bean;}}
多数据源配置
import com.alibaba.druid.pool.DruidDataSource;import org.apache.ibatis.session.SqlSessionFactory;import org.mybatis.spring.SqlSessionFactoryBean;import org.mybatis.spring.annotation.MapperScan;import org.springframework.beans.factory.annotation.Qualifier;import org.springframework.beans.factory.annotation.Value;import org.springframework.boot.context.properties.ConfigurationProperties;import org.springframework.context.annotation.Bean;import org.springframework.context.annotation.Configuration;import org.springframework.context.annotation.Primary;import org.springframework.core.io.support.PathMatchingResourcePatternResolver;import org.springframework.jdbc.datasource.DataSourceTransactionManager;import javax.sql.DataSource;@Configuration// 扫描 Mapper 接口并容器管理@MapperScan(basePackages = MasterDataSourceConfig.PACKAGE, sqlSessionFactoryRef = "masterSqlSessionFactory")public class MasterDataSourceConfig {// 精确到 master 目录,以便跟其他数据源隔离static final String PACKAGE = "org.spring.springboot.dao.master";static final String MAPPER_LOCATION = "classpath:mapper/master/*.xml";@Value("${master.datasource.url}")private String url;@Value("${master.datasource.username}")private String user;@Value("${master.datasource.password}")private String password;@Value("${master.datasource.driverClassName}")private String driverClass;@Bean(name = "masterDataSource")@Primarypublic DataSource masterDataSource() {DruidDataSource dataSource = new DruidDataSource();dataSource.setDriverClassName(driverClass);dataSource.setUrl(url);dataSource.setUsername(user);dataSource.setPassword(password);return dataSource;}@Bean(name = "masterTransactionManager")@Primarypublic DataSourceTransactionManager masterTransactionManager() {return new DataSourceTransactionManager(masterDataSource());}@Bean(name = "masterSqlSessionFactory")@Primarypublic SqlSessionFactory masterSqlSessionFactory(@Qualifier("masterDataSource") DataSource masterDataSource)throws Exception {final SqlSessionFactoryBean sessionFactory = new SqlSessionFactoryBean();sessionFactory.setDataSource(masterDataSource);sessionFactory.setMapperLocations(new PathMatchingResourcePatternResolver().getResources(MasterDataSourceConfig.MAPPER_LOCATION));return sessionFactory.getObject();}}
import com.alibaba.druid.pool.DruidDataSource;import org.apache.ibatis.session.SqlSessionFactory;import org.mybatis.spring.SqlSessionFactoryBean;import org.mybatis.spring.annotation.MapperScan;import org.springframework.beans.factory.annotation.Qualifier;import org.springframework.beans.factory.annotation.Value;import org.springframework.context.annotation.Bean;import org.springframework.context.annotation.Configuration;import org.springframework.context.annotation.Primary;import org.springframework.core.io.support.PathMatchingResourcePatternResolver;import org.springframework.jdbc.datasource.DataSourceTransactionManager;import javax.sql.DataSource;@Configuration// 扫描 Mapper 接口并容器管理@MapperScan(basePackages = ClusterDataSourceConfig.PACKAGE, sqlSessionFactoryRef = "clusterSqlSessionFactory")public class ClusterDataSourceConfig {// 精确到 cluster 目录,以便跟其他数据源隔离static final String PACKAGE = "org.spring.springboot.dao.cluster";static final String MAPPER_LOCATION = "classpath:mapper/cluster/*.xml";@Value("${cluster.datasource.url}")private String url;@Value("${cluster.datasource.username}")private String user;@Value("${cluster.datasource.password}")private String password;@Value("${cluster.datasource.driverClassName}")private String driverClass;@Bean(name = "clusterDataSource")public DataSource clusterDataSource() {DruidDataSource dataSource = new DruidDataSource();dataSource.setDriverClassName(driverClass);dataSource.setUrl(url);dataSource.setUsername(user);dataSource.setPassword(password);return dataSource;}@Bean(name = "clusterTransactionManager")public DataSourceTransactionManager clusterTransactionManager() {return new DataSourceTransactionManager(clusterDataSource());}@Bean(name = "clusterSqlSessionFactory")public SqlSessionFactory clusterSqlSessionFactory(@Qualifier("clusterDataSource") DataSource clusterDataSource)throws Exception {final SqlSessionFactoryBean sessionFactory = new SqlSessionFactoryBean();sessionFactory.setDataSource(clusterDataSource);sessionFactory.setMapperLocations(new PathMatchingResourcePatternResolver().getResources(ClusterDataSourceConfig.MAPPER_LOCATION));return sessionFactory.getObject();}}
4.测试获得的数据源类型
@SpringBootTestclass SpringBoot06DataJdbcApplicationTests {@AutowiredDataSource dataSource;@Testvoid contextLoads() throws SQLException {System.out.println("获取的数据源===="+dataSource.getClass());Connection connection = dataSource.getConnection();System.out.println("获取的连接==="+connection);connection.close();}}
5.登录
可登录localhost:9988/druid/login.html
可能遇到的问题
在启动时报错
***************************APPLICATION FAILED TO START***************************Description:Failed to bind properties under 'spring.datasource' to javax.sql.DataSource:Property: spring.datasource.filtersValue: stat,wall,log4jOrigin: class path resource [application.yml]:24:14Reason: org.apache.log4j.LoggerAction:Update your application's configuration
根据报错提示在配置文件的24行,查看配置文件,该行代码是 filters: stat,wall,log4j
看报错原因Reason: org.apache.log4j.Logger,于是猜想少了log4j的相关依赖,在pom中引入相关依赖
<!-- https://mvnrepository.com/artifact/log4j/log4j --><dependency><groupId>log4j</groupId><artifactId>log4j</artifactId><version>1.2.17</version></dependency>
4.构建三层架构
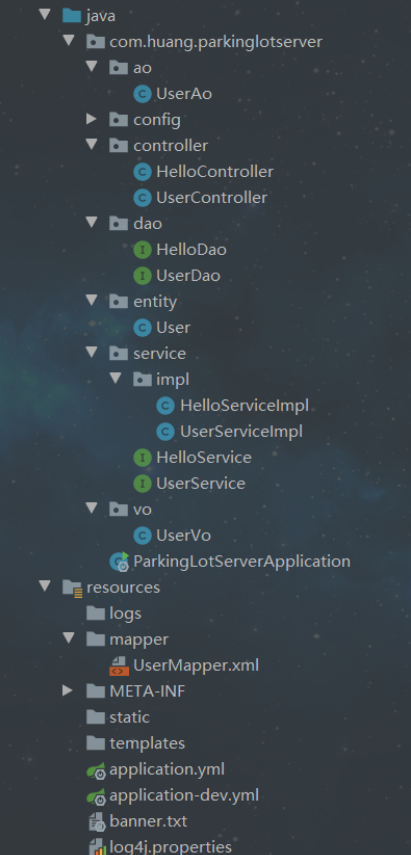
1.实体类
entity类
package com.huang.parkinglotserver.entity;import com.baomidou.mybatisplus.annotation.TableField;import com.baomidou.mybatisplus.annotation.TableId;import com.baomidou.mybatisplus.annotation.TableName;@TableName(value = "user")public class User {@TableId(value = "id")private String id;@TableField(value = "user_name")private String userName;@TableField(value = "user_password")private String userPassword;@TableField(value = "user_authority")private String userAuthority;//get、set方法}
前端传输数据,AO接收
package com.huang.parkinglotserver.ao;public class UserAo {private String userName;private String userPassword;//get、set方法}
后端数据传送,VO传递
package com.huang.parkinglotserver.vo;public class UserVo {private String userName;private String userPassword;private String userAuthority;//get、set方法}
2.controller层
package com.huang.parkinglotserver.controller;import com.huang.parkinglotserver.ao.UserAo;import com.huang.parkinglotserver.service.UserService;import org.springframework.beans.factory.annotation.Autowired;import org.springframework.web.bind.annotation.PostMapping;import org.springframework.web.bind.annotation.RequestBody;import org.springframework.web.bind.annotation.RequestMapping;import org.springframework.web.bind.annotation.RestController;@RestController@RequestMapping("/user")public class UserController {@Autowiredprivate UserService userService;@PostMapping("/login")public boolean login(@RequestBody UserAo userAo) {userService.login(userAo);return true;}@POST@Path("/login")@Consumes({MediaType.TEXT_PLAIN})public Response test(@QueryParam("a") Integer a) {return Response.ok(true).build();}}
3.业务逻辑层
service层接口
package com.huang.parkinglotserver.service;import com.baomidou.mybatisplus.extension.service.IService;import com.huang.parkinglotserver.ao.UserAo;import com.huang.parkinglotserver.entity.User;public interface UserService extends IService<User> {/*** 登录验证** @param userAo 账号、密码* @return true成功、false失败*/boolean login(UserAo userAo);}
service层接口实现类
package com.huang.parkinglotserver.service.impl;import com.baomidou.mybatisplus.extension.service.impl.ServiceImpl;import com.huang.parkinglotserver.ao.UserAo;import com.huang.parkinglotserver.dao.UserDao;import com.huang.parkinglotserver.entity.User;import com.huang.parkinglotserver.service.UserService;import org.springframework.beans.factory.annotation.Autowired;import org.springframework.stereotype.Service;@Servicepublic class UserServiceImpl extends ServiceImpl<UserDao,User> implements UserService {@Autowiredprivate UserDao userDao;@Overridepublic boolean login(UserAo userAo) {User user = userDao.login(userAo.getUserName());if(user.getUserPassword().equals(userAo.getUserPassword())){return true;}else{return false;}}}
4.dao层
package com.huang.parkinglotserver.dao;import com.baomidou.mybatisplus.core.mapper.BaseMapper;import com.huang.parkinglotserver.entity.User;import org.apache.ibatis.annotations.Mapper;import org.apache.ibatis.annotations.Select;@Mapperpublic interface UserDao extends BaseMapper<User> {/*** 登录验证* @param userName 账号* @return user账号密码信息*/@Select("select * from user where user_name = '${value}'")User login(String userName);}
mybatisPlus的映射,一般在resource下的mapper
<?xml version="1.0" encoding="UTF-8" ?><!DOCTYPE mapper PUBLIC "-//mybatis.org//DTD Mapper 3.0//EN" "http://mybatis.org/dtd/mybatis-3-mapper.dtd" ><mapper namespace="com.huang.parkinglotserver.dao.UserDao"><select id="login" resultType="com.huang.parkinglotserver.entity.User">select u.id,u.user_name,u.user_password,u.user_authorityfrom user u where user_name = "${value}"</select></mapper>
XML形式实现多表查询
public interface PriClassMapper extends BaseMapper<PriClass> {ClassDetail getDetailById(Serializable id);}
在XML文件中写SQL和映射
<?xml version="1.0" encoding="UTF-8"?><!DOCTYPE mapper PUBLIC "-//mybatis.org//DTD Mapper 3.0//EN" "http://mybatis.org/dtd/mybatis-3-mapper.dtd"><mapper namespace="com.example.primarySchool.mapper.PriClassMapper"><select id="getDetailById" resultMap="detailedClassResultMap">SELECTp.class_id AS class_id,p.nickname AS cname,s.student_id AS student_id,s.nickname AS snameFROM pri_class p JOIN student sON p.class_id = s.class_idWHERE p.class_id = #{id}</select><resultMap id="detailedClassResultMap" type="com.example.primarySchool.entity.ClassDetail"><result property="classId" column="class_id"/><result property="nickname" column="cname"/><collection property="students" ofType="com.example.primarySchool.entity.Student"><id property="studentId" column="student_id"/><result property="nickname" column="sname"/><result property="classId" column="class_id"/></collection></resultMap></mapper>
再在service层中调用mapper中自定义的方法,通过getBaseMapper()来获取mapper的实例
public interface IPriClassService extends IService<PriClass> {ClassDetail getDetailById(Serializable id);}
@Servicepublic class PriClassServiceImpl extends ServiceImpl<PriClassMapper, PriClass> implements IPriClassService {@Overridepublic ClassDetail getDetailById(Serializable id) {return getBaseMapper().getDetailById(id);}}

若有收获,就点个赞吧
0 人点赞
