flutter 的崩溃日志收集主要有两个方面:
- flutter dart 代码的异常(包含app和framework代码两种情况,一般不会引起闪退,你猜为什么)
- flutter engine 的崩溃日志(一般会闪退)
Flutter App 代码异常捕获
人写的代码是无数异常交织起来的偶然产物,代码发生异常才是正常情况。
除了在关键的地方加上try-catch让它们变成已知异常之外,抓到未知异常才是真本事。
比如下面的一段代码中的try-catch是无效的:
好在,Dart 有一个try {Future.error("asynchronous surprise");} catch (e){print(e)}
Zone的概念,有点类似sandbox的意思。不同的 Zone 代码上下文是不同的互不影响,Zone 还可以创建新的子Zone。Zone 可以重新定义自己的print、timers、microtasks还有最关键的how uncaught errors are handled未捕获异常的处理
在runZoned(() {Future.error("asynchronous error");}, onError: (dynamic e, StackTrace stack) {reportError(e, stack);});
reportError里即可以进行上报处理(详见后面介绍)。Flutter framework 异常捕获
注册FlutterError.onError回调,用于收集 Flutter framework 外抛的异常。
该 error 一般是由FlutterError.onError = (FlutterErrorDetails details) {reportError(details.exception, details.stack);};
Widget在build的时候抛出,如下:
该代码有删减,具体请参看framework.dart源码。其中的@overridevoid performRebuild() {Widget built;try {built = build();} catch (e, stack) {built = ErrorWidget.builder(_debugReportException(ErrorDescription("building $this"), e, stack));} finally {_dirty = false;}try {_child = updateChild(_child, built, slot);} catch (e, stack) {built = ErrorWidget.builder(_debugReportException(ErrorDescription("building $this"), e, stack));_child = updateChild(null, built, slot);}}
_debugReportException就是 FlutterError 的调用点:FlutterErrorDetails _debugReportException(DiagnosticsNode context,dynamic exception,StackTrace stack, {InformationCollector informationCollector,}) {final FlutterErrorDetails details = FlutterErrorDetails(exception: exception,stack: stack,library: 'widgets library',context: context,informationCollector: informationCollector,);FlutterError.reportError(details);return details;}
Flutter engine 异常捕获
flutter engine 部分的异常,以Android 为例,主要为libfutter.so发生的错误。
这部份可以直接交给native崩溃收集sdk来处理,比如 firebase crashlytics、 bugly、xCrash 等等reportError 堆栈上报
线上app 出现异常虽然捕获了,但只是打印出来是没办法解决问题,还需要把他上报到开发者能看到的地方。
上面提到了许多崩溃收集的sdk,以 bugly 为例,它支持自定义异常上报,我们只需将 dart 异常及堆栈通过MethodChannel传递给 bugly sdk 即可。
Dart:
var channel = new MethodChannel("crash_handler");Future<void> reportError(dynamic exception, StackTrace stack) async {try {return await channel.invokeMethod("report_error", <String, dynamic>{"type": exception.runtimeType.toString(), // exception type"message": exception.toString(), // message"stack": stack.toString(), // stacktrace});} catch(ignored) {}}
Android Java代码如下:
public class CrashHandler implements MethodCallHandler {@Overridepublic void onMethodCall(MethodCall call, Result result) {switch (call.method) {case "report_error":postFlutterExcetion(call.argument("type"), call.argument("message"), call.argument("stack"))result.success(true);break;default:result.notImplemented();}}static void postFlutterExcetion(String excpetionType, String excpetionMessage, String stack) {if (!CrashModule.hasInitialized()) return;CrashReport.postException(4, excpetionType, excpetionMessage, stack, null);}}// ...MethodChannel(flutterView, "crash_handler").setMethodCallHandler(new CrashHandler())
iOS 类似的注册一个MethodChannel并在handleMethodCall中调用 Bugly 的reportExceptionWithCategory即可。
其它的sdk类似处理,此处略过不表。
堆栈还原
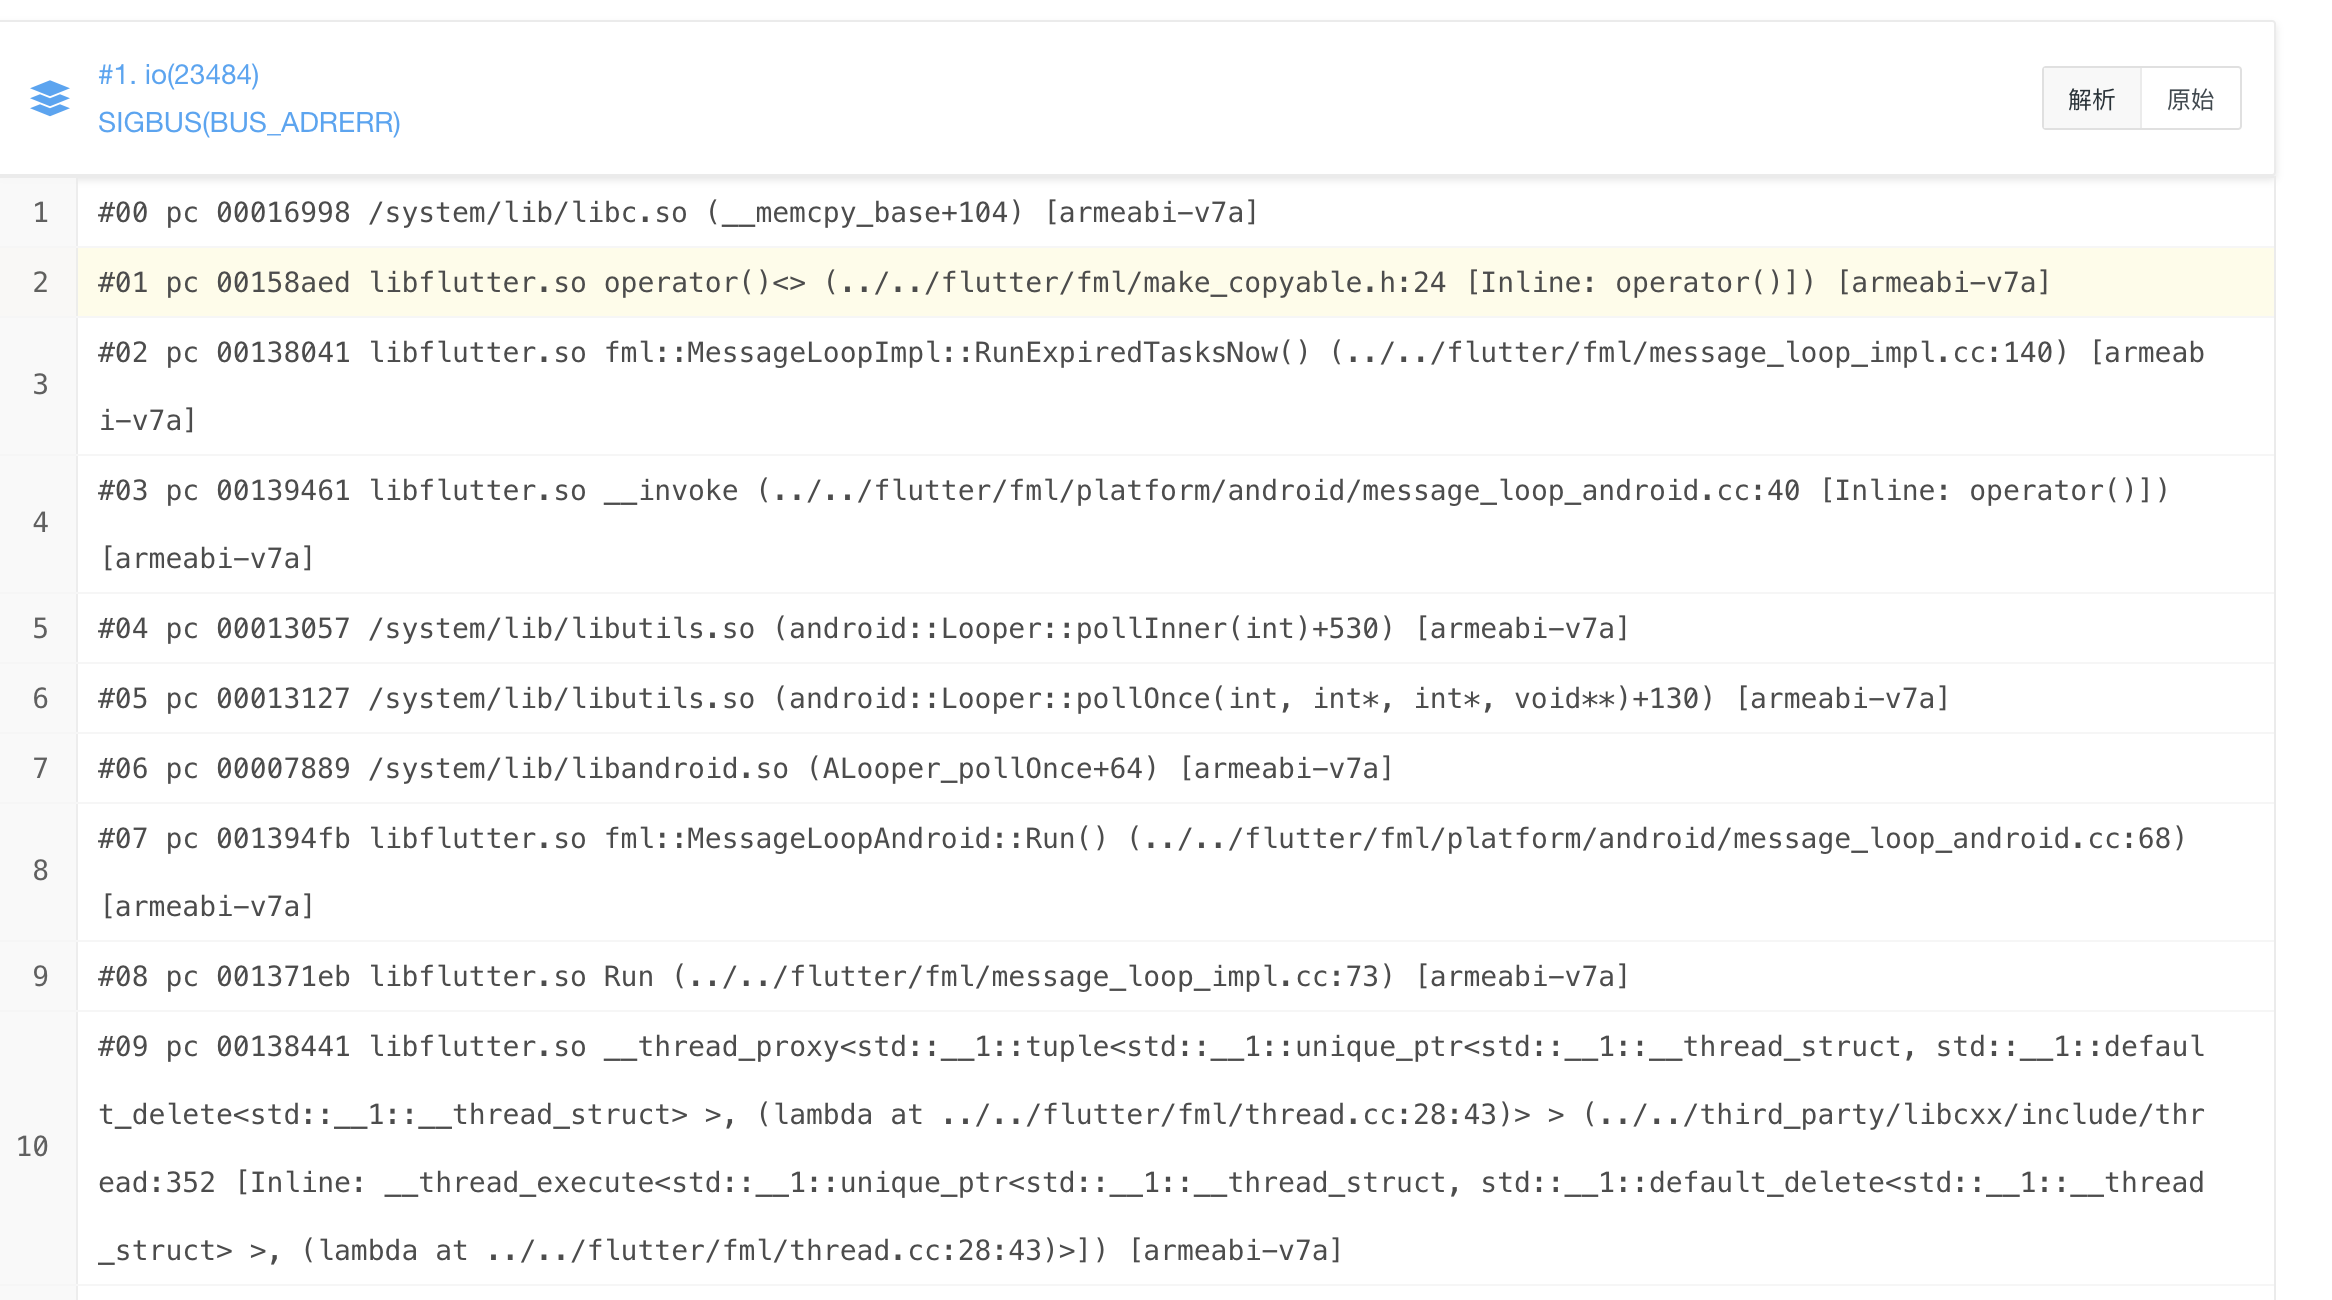
收集到异常之后,需要查符号表(symbols)还原堆栈。下面以Android 端 bugly 收集到堆栈为一例:
1 #00 pc 00016998 /system/lib/libc.so (__memcpy_base+104) [armeabi-v7a::2b2dac1c583b68da2f7c58e7ed352851]2 #01 pc 00158aed /data/app/com.netease.cartoonreader-1/lib/arm/libflutter.so [armeabi-v7a::2c9d8634bdb07ea641970181b0b00b84]3 #02 pc 00138041 /data/app/com.netease.cartoonreader-1/lib/arm/libflutter.so [armeabi-v7a::2c9d8634bdb07ea641970181b0b00b84]4 #03 pc 00139461 /data/app/com.netease.cartoonreader-1/lib/arm/libflutter.so [armeabi-v7a::2c9d8634bdb07ea641970181b0b00b84]5 #04 pc 00013057 /system/lib/libutils.so (_ZN7android6Looper9pollInnerEi+530) [armeabi-v7a::ac423f49f579c99cfababb65014363e9]6 #05 pc 00013127 /system/lib/libutils.so (_ZN7android6Looper8pollOnceEiPiS1_PPv+130) [armeabi-v7a::ac423f49f579c99cfababb65014363e9]7 #06 pc 00007889 /system/lib/libandroid.so (ALooper_pollOnce+64) [armeabi-v7a::954c216fdf1faa9aa08f41bc27503a87]8 #07 pc 001394fb /data/app/com.netease.cartoonreader-1/lib/arm/libflutter.so [armeabi-v7a::2c9d8634bdb07ea641970181b0b00b84]9 #08 pc 001371eb /data/app/com.netease.cartoonreader-1/lib/arm/libflutter.so [armeabi-v7a::2c9d8634bdb07ea641970181b0b00b84]10 #09 pc 00138441 /data/app/com.netease.cartoonreader-1/lib/arm/libflutter.so [armeabi-v7a::2c9d8634bdb07ea641970181b0b00b84]11 #10 pc 0004185b /system/lib/libc.so (_ZL15__pthread_startPv+30) [armeabi-v7a::2b2dac1c583b68da2f7c58e7ed352851]12 #11 pc 000192a5 /system/lib/libc.so (__start_thread+6) [armeabi-v7a::2b2dac1c583b68da2f7c58e7ed352851]13 java:14 [Failed to get Java stack]
首先需要确认该 flutter engine 所属版本号,在命令行执行:
flutter --version
输出如下:
Flutter 1.5.4-hotfix.2 • channel stable • https://github.com/flutter/flutter.gitFramework • revision 7a4c33425d (9 weeks ago) • 2019-04-29 11:05:24 -0700Engine • revision 52c7a1e849Tools • Dart 2.3.0 (build 2.3.0-dev.0.5 a1668566e5)
可以看到 Engine 的 revision 为 52c7a1e849。
其次,在 flutter infra 上找到对应cpu abi 的 symbols.zip 并下载 :https://console.cloud.google.com/storage/browser/flutter_infra/flutter/52c7a1e849a170be4b2b2fe34142ca2c0a6fea1f/android-arm-release
解压后,可以得到带有符号信息的 debug so 文件—— libflutter.so,并将其放到文件夹 armeabi-v7a 下。如需要x86等的符号信息,类似操作。
mkdir -p ~/Downloads/flutter-52c7a1e849/armeabi-v7aunzip symbols.zip -d ~/Downloads/flutter-52c7a1e849/armeabi-v7a
使用 ndk-stack
Android 上手动还原 libflutter.so 堆栈,可以使用 NDK 提供的工具 ndk-stack
- 将原始堆栈保存到 stack.txt 中,注意第一行要以
*** *** *** *** *** *** *** *** *** *** *** *** *** *** *** ***开头 ```bash
1 #00 pc 00016998 /system/lib/libc.so (__memcpy_base+104) [armeabi-v7a::2b2dac1c583b68da2f7c58e7ed352851] 2 #01 pc 00158aed /data/app/com.netease.cartoonreader-1/lib/arm/libflutter.so [armeabi-v7a::2c9d8634bdb07ea641970181b0b00b84] 3 #02 pc 00138041 /data/app/com.netease.cartoonreader-1/lib/arm/libflutter.so [armeabi-v7a::2c9d8634bdb07ea641970181b0b00b84] 4 #03 pc 00139461 /data/app/com.netease.cartoonreader-1/lib/arm/libflutter.so [armeabi-v7a::2c9d8634bdb07ea641970181b0b00b84] 5 #04 pc 00013057 /system/lib/libutils.so (_ZN7android6Looper9pollInnerEi+530) [armeabi-v7a::ac423f49f579c99cfababb65014363e9] …
2. 执行ndk-stack命令```bash$ANDROID_NDK/ndk-stack -sym ~/Downloads/flutter-52c7a1e849/armeabi-v7a -dump stack.txt > re-stack.txt
打开文件 re-stack.txt 即可看到还原后的堆栈:
********** Crash dump: **********#00 0x00016998 /system/lib/libc.so (__memcpy_base+104) [armeabi-v7a::2b2dac1c583b68da2f7c58e7ed352851]#01 0x00158aed /data/app/com.netease.cartoonreader-1/lib/arm/libflutter.so [armeabi-v7a::2c9d8634bdb07ea641970181b0b00b84]fml::WriteAtomically(fml::UniqueObject<int, fml::internal::os_unix::UniqueFDTraits> const&, char const*, fml::Mapping const&)/b/s/w/ir/k/src/out/android_release/../../flutter/fml/platform/posix/file_posix.cc:203:3flutter::PersistentCacheStore(fml::RefPtr<fml::TaskRunner>, std::__1::shared_ptr<fml::UniqueObject<int, fml::internal::os_unix::UniqueFDTraits> >, std::__1::basic_string<char, std::__1::char_traits<char>, std::__1::allocator<char> >, std::__1::unique_ptr<fml::Mapping, std::__1::default_delete<fml::Mapping> >)::$_0::operator()()/b/s/w/ir/k/src/out/android_release/../../flutter/shell/common/persistent_cache.cc:114:0auto fml::internal::CopyableLambda<flutter::PersistentCacheStore(fml::RefPtr<fml::TaskRunner>, std::__1::shared_ptr<fml::UniqueObject<int, fml::internal::os_unix::UniqueFDTraits> >, std::__1::basic_string<char, std::__1::char_traits<char>, std::__1::allocator<char> >, std::__1::unique_ptr<fml::Mapping, std::__1::default_delete<fml::Mapping> >)::$_0>::operator()<>() const/b/s/w/ir/k/src/out/android_release/../../flutter/fml/make_copyable.h:24:0#02 0x00138041 /data/app/com.netease.cartoonreader-1/lib/arm/libflutter.so [armeabi-v7a::2c9d8634bdb07ea641970181b0b00b84]fml::MessageLoopImpl::FlushTasks(fml::MessageLoopImpl::FlushType)/b/s/w/ir/k/src/out/android_release/../../flutter/fml/message_loop_impl.cc:140:5fml::MessageLoopImpl::RunExpiredTasksNow()/b/s/w/ir/k/src/out/android_release/../../flutter/fml/message_loop_impl.cc:148:0#03 0x00139461 /data/app/com.netease.cartoonreader-1/lib/arm/libflutter.so [armeabi-v7a::2c9d8634bdb07ea641970181b0b00b84]fml::MessageLoopAndroid::OnEventFired()/b/s/w/ir/k/src/out/android_release/../../flutter/fml/platform/android/message_loop_android.cc:92:5fml::MessageLoopAndroid::MessageLoopAndroid()::$_0::operator()(int, int, void*) const/b/s/w/ir/k/src/out/android_release/../../flutter/fml/platform/android/message_loop_android.cc:42:0fml::MessageLoopAndroid::MessageLoopAndroid()::$_0::__invoke(int, int, void*)/b/s/w/ir/k/src/out/android_release/../../flutter/fml/platform/android/message_loop_android.cc:40:0#04 0x00013057 /system/lib/libutils.so (_ZN7android6Looper9pollInnerEi+530) [armeabi-v7a::ac423f49f579c99cfababb65014363e9]...
bugly 自动还原堆栈
一个个崩溃堆栈手动还原多麻烦(噫 你怎么这么多崩溃),下载好 debug so 之后你也可以使用 bugly给的符号表上传工具上传到bugly上,文档见:https://bugly.qq.com/docs/user-guide/symbol-configuration-android/?v=20181014122344#_4
输出符号表:
java -jar buglySymbolAndroid.jar -i ~/Downloads/flutter-52c7a1e849/armeabi-v7a
使用 atos
iOS上的 Flutter 引擎崩溃堆栈还原步骤和 Android 类似,先下载对应的符号表(Flutter.dSYM.zip),然后通过 atos 还原,如:
atos -arch arm64 -o ~/Downloads/flutter_e1e6ced81d029258d449bdec2ba3cddca9c2ca0c_ios-release_Flutter.dSYM/Flutter.dSYM/Contents/Resources/DWARF/Flutter -l 0x000000010277c000 0x00000001027b91dc
输出:
fml::MessageLoopDarwin::OnTimerFire(__CFRunLoopTimer*, fml::MessageLoopDarwin*) (in Flutter) (message_loop_darwin.mm:76)
_
如果你不想使用第三方的错误收集平台,可以用 https://github.com/flutter/sentry 和 https://sentry.io的开源版 配合使用搭建自己的后台。另外我fork的版本 https://github.com/yrom/sentry/tree/2.2.0-patch 使用幸福感更高~。

若有收获,就点个赞吧
0 人点赞
