线性布局。两种选择:
从左往右(水平排列);
从上往下(垂直排列)。
水平排列布局
场景一:默认水平排列
默认情况下,LinearLayout 容器内的子控件是水平排列的,由左往右。
<LinearLayoutandroid:layout_height="match_parent"android:layout_width="match_parent"xmlns:android="http://schemas.android.com/apk/res/android"><Button android:text="按钮1"android:layout_width="wrap_content"android:layout_height="wrap_content"/><Button android:text="按钮2"android:layout_width="wrap_content"android:layout_height="wrap_content"/><Button android:text="按钮3"android:layout_width="wrap_content"android:layout_height="wrap_content"/></LinearLayout>
页面有三个按钮,默认从左往右排列。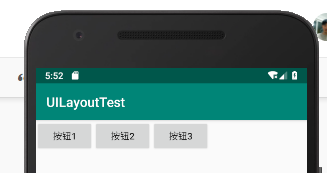
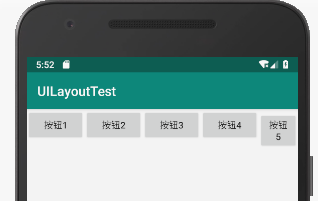
上面只有三个子控件,一切看起来是那么的正常。如果子控件元素过多,多余的子控件不显示。LinearLayout 并不会自动的将多余的子控件换行,如下所示:
场景二:不会自动换行
<LinearLayoutandroid:layout_height="match_parent"android:layout_width="match_parent"xmlns:android="http://schemas.android.com/apk/res/android"><Button android:text="按钮1"android:layout_width="wrap_content"android:layout_height="wrap_content"/><Button android:text="按钮2"android:layout_width="wrap_content"android:layout_height="wrap_content"/><Button android:text="按钮3"android:layout_width="wrap_content"android:layout_height="wrap_content"/><Button android:text="按钮4"android:layout_width="wrap_content"android:layout_height="wrap_content"/><Button android:text="按钮5"android:layout_width="wrap_content"android:layout_height="wrap_content"/><Button android:text="按钮6"android:layout_width="wrap_content"android:layout_height="wrap_content"/></LinearLayout>
上面 xml 中定义了 6 个按钮,但只显示了 5 个,还有 1 个直接隐藏不见了,LinearLayout 不会将多余的子控件换行的。
场景三:match_parent
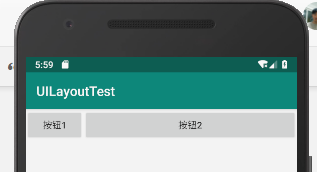
上面定义的按钮宽度和高度都是根据内容自适应的。如果其中一个按钮的宽度设置为 match_parent 会怎样呢?
<LinearLayoutandroid:layout_height="match_parent"android:layout_width="match_parent"xmlns:android="http://schemas.android.com/apk/res/android"><Button android:text="按钮1"android:layout_width="wrap_content"android:layout_height="wrap_content"/><Button android:text="按钮2"android:layout_width="match_parent"android:layout_height="wrap_content"/><Button android:text="按钮3"android:layout_width="wrap_content"android:layout_height="wrap_content"/></LinearLayout>
上面 xml 中第二个按钮的宽度设置为 match_parent,可以看到按钮3 直接被覆盖了,按钮2 占去了除去按钮1 剩余所有宽度。
�
垂直排列布局
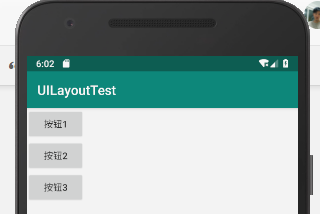
要想要 LinearLayout 内的子控件垂直排列,只需为 LinearLayout 控件添加 android:orientation 属性,设置值为 vertical。
<LinearLayoutandroid:layout_height="match_parent"android:layout_width="match_parent"android:orientation="vertical"xmlns:android="http://schemas.android.com/apk/res/android"><Button android:text="按钮1"android:layout_width="wrap_content"android:layout_height="wrap_content"/><Button android:text="按钮2"android:layout_width="wrap_content"android:layout_height="wrap_content"/><Button android:text="按钮3"android:layout_width="wrap_content"android:layout_height="wrap_content"/></LinearLayout>
实际应用
应用一:登录表单
layout_weight 讲解
<LinearLayoutandroid:layout_height="wrap_content"android:layout_width="match_parent"android:paddingLeft="20dp"android:paddingRight="20dp"><TextViewandroid:layout_width="0dp"android:layout_height="wrap_content"android:layout_weight="1"android:text="用户名" /><EditTextandroid:layout_width="0dp"android:layout_height="wrap_content"android:layout_weight="4"/></LinearLayout>
上面 xml 可以看到 LinearLayout 的两个子控件 TextView 和 EditText 的宽度 layout_width 属性都设置为 0dp,即没有宽度。它们的宽度通过 layout_weight 属性控制,可以看到 TextView 的 layout_weight = 1,而 EditText 的 layout_weight = 4,即:TextView 的宽度占这一行的 1/5,而 EditText 的宽度占一行的 4/5。
完整示例代码
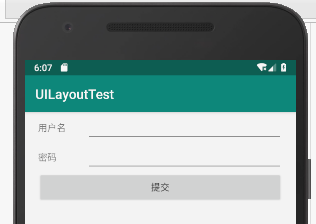
LinearLayout 可以嵌套。下面示例中最外层 LinearLayout 控件垂直布局,内部又有三个子 LinearLayout 控制每一行内的布局。
<LinearLayoutandroid:layout_height="match_parent"android:layout_width="match_parent"android:orientation="vertical"xmlns:android="http://schemas.android.com/apk/res/android"><LinearLayoutandroid:layout_height="wrap_content"android:layout_width="match_parent"android:paddingLeft="20dp"android:paddingRight="20dp"><TextViewandroid:layout_width="0dp"android:layout_height="wrap_content"android:layout_weight="1"android:text="用户名" /><EditTextandroid:layout_width="0dp"android:layout_height="wrap_content"android:layout_weight="4"/></LinearLayout><LinearLayoutandroid:layout_height="wrap_content"android:layout_width="match_parent"android:paddingLeft="20dp"android:paddingRight="20dp"><TextView android:layout_width="0dp"android:layout_height="wrap_content"android:layout_weight="1"android:text="密码" /><EditTextandroid:layout_width="0dp"android:layout_height="wrap_content"android:layout_weight="4"/></LinearLayout><LinearLayoutandroid:layout_height="wrap_content"android:layout_width="match_parent"android:paddingLeft="20dp"android:paddingRight="20dp"><Buttonandroid:layout_height="wrap_content"android:layout_width="match_parent"android:text="提交"/></LinearLayout></LinearLayout>
