线程创建
Java中有三种线程创建方式,分别为:
1实现Runnable接口的run方法,
2继承Thread类并重写run的方法,
3使用FutureTask方式。
继承Thread类
Java中通过继承java.lang.Thread类来创建并启动多线程的步骤如下:
- 定义Thread类的子类,并重写该类的run()方法,该run()方法的方法体就代表了线程需要完成的任务,因此把run()方法称为线程执行体。
- 创建Thread子类的实例,即创建了线程对象
- 调用线程对象的start()方法来启动该线程
Thread的构造函数如下:
Thread()Thread(Runnable target)Thread(ThreadGroup group, Runnable target)
eg:
package threadcore.createthread;public class ThreadType extends Thread {@Overridepublic void run() {System.out.println("用thread类实现线程");}public static void main(String[] args) {ThreadType t = new ThreadType();t.start();}}
如果没有为线程显式地指定一个名字,那么线程将会以“ Thread-”作为前缀与一个自 增数字进行组合,这个自增数字在 整个 JVM 进程中将会不断自增:
public Thread() {init(null, null, "Thread-" + nextThreadNum(), 0);}
用无参的构造函数创建了 5 个线程,并且分别输出线程的名字
class MyThread extends Thread{@Overridepublic void run() {System.out.println(Thread.currentThread().getName());}}public class CreateThread {public static void main(String[] args) {for(int i = 0;i<5;i++){MyThread myThread = new MyThread();myThread.start();}}}
打印结果
Thread-0Thread-1Thread-2Thread-3Thread-4
线程初始化函数Thread 的所有构造函数,最终都会去调用一个 init方法
private void init(ThreadGroup g, Runnable target, String name,long stackSize, AccessControlContext acc) {if (name == null) {throw new NullPointerException("name cannot be null");}this.name = name;Thread parent = currentThread();SecurityManager security = System.getSecurityManager();if (g == null) {/* Determine if it's an applet or not *//* If there is a security manager, ask the security managerwhat to do. */if (security != null) {g = security.getThreadGroup();}/* If the security doesn't have a strong opinion of the matteruse the parent thread group. */if (g == null) {g = parent.getThreadGroup();}}/* checkAccess regardless of whether or not threadgroup isexplicitly passed in. */g.checkAccess();/** Do we have the required permissions?*/if (security != null) {if (isCCLOverridden(getClass())) {security.checkPermission(SUBCLASS_IMPLEMENTATION_PERMISSION);}}g.addUnstarted();this.group = g;this.daemon = parent.isDaemon();this.priority = parent.getPriority();if (security == null || isCCLOverridden(parent.getClass()))this.contextClassLoader = parent.getContextClassLoader();elsethis.contextClassLoader = parent.contextClassLoader;this.inheritedAccessControlContext =acc != null ? acc : AccessController.getContext();this.target = target;setPriority(priority);if (parent.inheritableThreadLocals != null)this.inheritableThreadLocals =ThreadLocal.createInheritedMap(parent.inheritableThreadLocals);/* Stash the specified stack size in case the VM cares */this.stackSize = stackSize;/* Set thread ID */tid = nextThreadID();}
Thread没有执行 start方法之前,它只能算是一个 Thread 的实例,并不意味着一个新的线程被创建,因此 currentThread()代表的将会是创建它的那个线程,因此我们可以得出以下结论 :
1.一个线程的创建肯定是由另一个线程完成的 。被创建线程的父线程是创建它的线程 。
2 如果在构造 Thread 的时候没有显示地指定 一个 ThreadGroup,那么子线程将会被加入父线程所在的线程组
实现Runable接口
一个类仅需实现一个run()的简单方法,该方法声明如下:
public void run( )
eg:
package threadcore.createthread;public class RunnableType implements Runnable {@Overridepublic void run() {Thread thread = new Thread(new RunnableType());thread.start();}public static void main(String[] args) {System.out.println("实现Runnable接口创建thread");}}
在run()中可以定义代码来构建新的线程。run()方法能够像主线程那样调用其他方法,引用其他类,声明变量。仅有的不同是run()在程序中确立另一个并发的线程执行入口。当run()返回时,该线程结束。
public static class ThreadRunner implements Runnable{@Overridepublic void run() {for (int i =0;i<10;i++){System.out.printf("%s start %d run\n", Thread.currentThread().getName(),i);try {long sleepTime = (long) Math.random()*1000;Thread.sleep(sleepTime);}catch (InterruptedException e){}}System.out.println("current thread finish "+Thread.currentThread().getName());}}public static void main(String[] args) {Thread t1 = new Thread(new ThreadRunner(),"Thread-0");t1.start();Thread t2 = new Thread(new ThreadRunner(),"Thread-1");t2.start();}
public synchronized void start() {//判断是否首次启动if (threadStatus != 0)throw new IllegalThreadStateException();group.add(this);boolean started = false;try {//启动线程start0();started = true;} finally {try {if (!started) {group.threadStartFailed(this);}} catch (Throwable ignore) {/* do nothing. If start0 threw a Throwable thenit will be passed up the call stack */}}}private native void start0();
FutureTask的方式
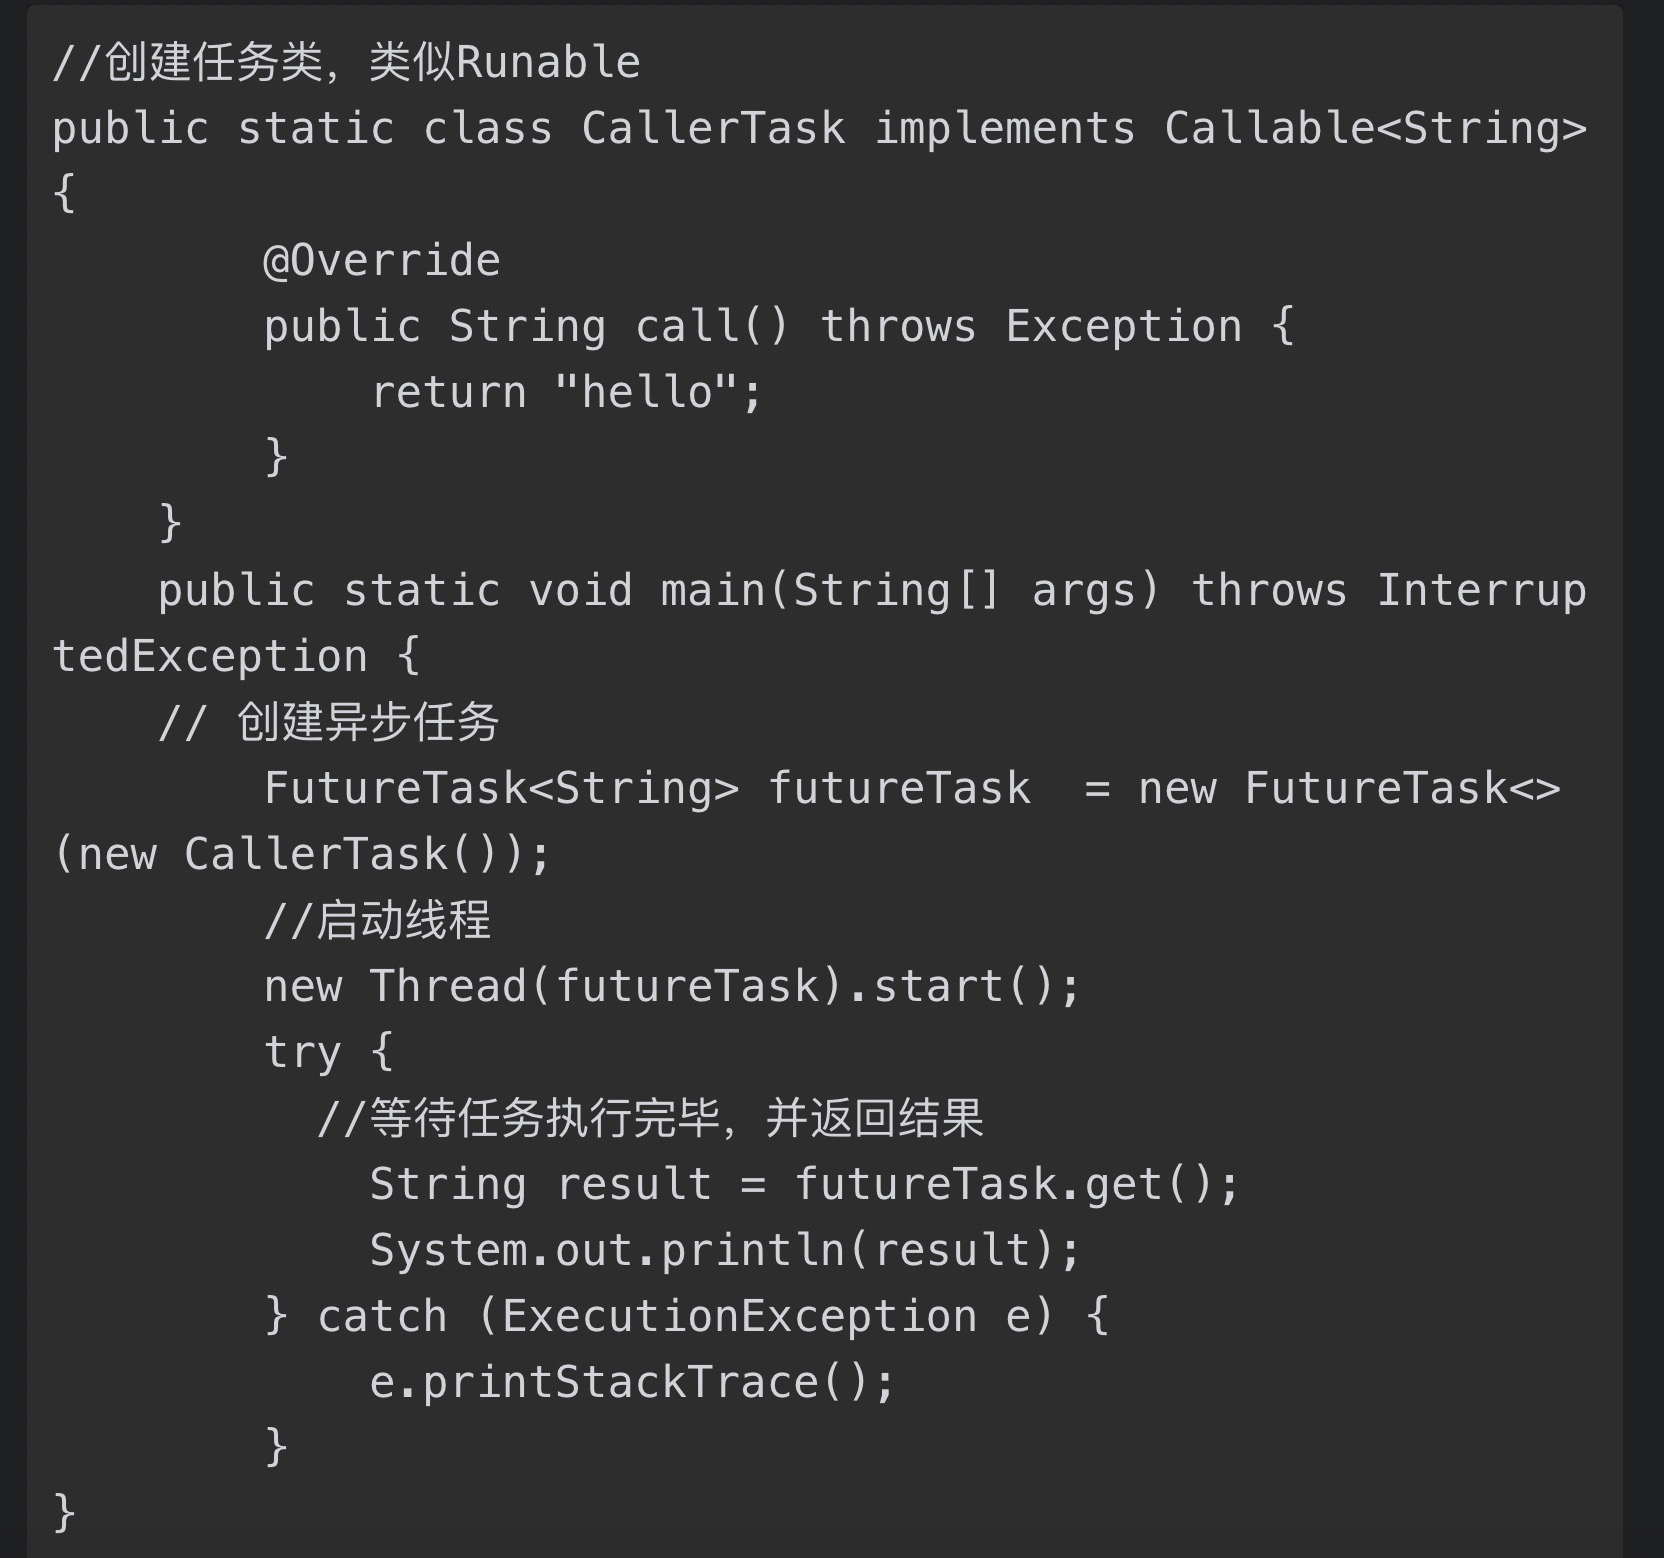 在main函数内首先创建了一个FutrueTask对象(构造函数为CallerTask的实例),然后使用创建的FutrueTask对象作为任务创建了一个线程并且启动它,最后通过futureTask.get()等待任务执行完毕并返回结果。
Lambda匿名内部类
public class AnonymousInnerThread {public static void main(String[] args) {new Thread(){@Overridepublic void run() {System.out.println(Thread.currentThread().getName());}}.start();new Thread(new Runnable() {@Overridepublic void run() {System.out.println(Thread.currentThread().getName());}}).start();}}
Lambda表达式
public class LambdaThread {public static void main(String[] args) {new Thread(()-> System.out.println(Thread.currentThread().getName())).start();}}
Thread方法
| 方法声明 | 功能描述 |
|---|---|
| sleep(long millis) | 线程休眠,让当前线程暂停,进入休眠等待状态 |
| join() | 线程加入,等待目标线程执行完之后再继续执行,调用该方法的线程会插入优先先执行 |
| yield() | 线程礼让,暂停当前正在执行的线程对象,并执行其他线程。 |
| setDaemon(boolean on) | 将该线程标记为守护线程(后台线程)或用户线程。当正在运行的线程都是守护线程时,Java 虚拟机退出。 该方法必须在启动线程前调用。 |
| stop(),suspend(),resume() | 让线程停止,已经废弃方法,建议不要使用 |
| interrupt() | 中断线程。 把线程的状态终止,并抛出一个InterruptedException。 |
| setPriority(int newPriority) | 更改线程的优先级 |
| isInterrupted() | 线程是否被中断 |
currentThread
�获取当前执行的线程
public class CurrentThread implements Runnable{@Overridepublic void run() {System.out.println(Thread.currentThread().getName());}public static void main(String[] args) {new CurrentThread().run();new Thread(new CurrentThread()).start();new Thread(new CurrentThread()).start();}}
获取当前线程的id
public class Id {public static void main(String[] args) {System.out.println("主线程的ID:"+Thread.currentThread().getId());Thread one = new Thread();System.out.println("子线程的ID:"+one.getId());Thread two = new Thread();System.out.println("子线程的ID:"+two.getId());}}
线程执行
start
启动新线程
下面是start方法的源码
public synchronized void start() {if (threadStatus != 0)throw new IllegalThreadStateException();group.add(this);boolean started = false;try {start0();started = true;} finally {try {if (!started) {group.threadStartFailed(this);}} catch (Throwable ignore) {}}}private native void start0();
启动新线程检查线程状态,如果多次调用会出现错误
加入线程组
调用start0()
run
run 方法源码
public void run() {if (target != null) {target.run();}}
start方法和run 方法对比:
- 执行start方法,是用来启动线程的,此时线程处于就绪状态,获得调度后运行run方法。run方法执行结束,线程就结束。
执行run方法,相对于普通方法调用,在主线程调用。程序是顺序执行的,执行完才会执行下面的程序。 ```java public class StartThread extends Thread{ public static void main(String[] args) {
StartThread thread = new StartThread();thread.run();thread.start();
}
@Override public void run() {
System.out.println(Thread.currentThread().getName());
} }
打印结果```javamainThread-0
线程中断
sleep
sleep是一个静态方法,其有两个重载方法 , 其中一个需要传入毫秒数 , 另外一个既需要毫秒数也需要纳秒数 。
public static void sleep(long millis) throws InterruptedExceptionpublic static void sleep(long millis, int nanos) throws InterruptedException
sleep 方法会使当前线程进入指定毫秒数的休眠,暂停执行,Thread.sleep只会导致当前线程进入指定时间的休眠,但是其不会放弃 monitor锁的所有权,如果当前线程持有对某个对象的锁,则即使调用sleep方法,其他线程也无法访问这个对象。
public class CreateThread {public static void main(String[] args) {new Thread(() -> {long startTime = System.currentTimeMillis();sleep(2000);long endTime = System.currentTimeMillis();System.out.println(String.format("total time: %d", endTime - startTime));}).start();long startTime = System.currentTimeMillis();sleep(1000);long endTime = System.currentTimeMillis();System.out.println(String.format("main total time: %d", endTime - startTime));}private static void sleep(long ms) {try {Thread.sleep(ms);} catch (InterruptedException e) {e.printStackTrace();}}}
在 JDKl.5 以后,引入了一个枚举 TimeUnit,其对 sleep方法提供了很好的封装, 使用它可以省去时间单位的换算步
private static void sleep(long ms) {try {TimeUnit.SECONDS.sleep(ms);} catch (InterruptedException e) {e.printStackTrace();}}
sleep方法响应中断:
1 抛出InterruptedException
2 清除中断状态
总结:sleep 方法可以让线程进入Waiting状态,并且不占用CPU资源,但是不释放锁,直到规定时间后在执行,休眠期间如果被中断,会抛出异常并清除中断状态
interrupt
此操作会将线程的中断标志位置位,至于线程作何动作那要看线程了。
- 如果线程sleep()、wait()、join()等处于阻塞状态,那么线程会定时检查中断状态位如果发现中断状态位为true,则会在这些阻塞方法调用处抛出InterruptedException异常,并且在抛出异常后立即将线程的中断状态位清除,即重新设置为false。抛出异常是为了线程从阻塞状态醒过来,并在结束线程前让程序员有足够的时间来处理中断请求。
- 如果线程正在运行、争用synchronized、lock()等,那么是不可中断的,他们会忽略。
可以通过以下三种方式来判断中断:
1)isInterrupted()
此方法只会读取线程的中断标志位,并不会重置。
2)interrupted()
此方法读取线程的中断标志位,并会重置。
3)throw InterruptException
抛出该异常的同时,会重置中断标志位。
线程中断并不会使线程立即退出,而是给线程发送一个通知,告知目标线程,有人希望你退出了!至于目标线程接收到通知之后如何处理,则完全由目标线程自己决定,这点很重要,如果中断后,线程立即无条件退出,我们又会到stop方法的老问题。
Thread提供了3个与线程中断有关的方法,这3个方法容易混淆,大家注意下:
public void interrupt() //中断线程public boolean isInterrupted() //判断线程是否被中断public static boolean interrupted() //判断线程是否被中断,并清除当前中断状态
public static void main(String[] args) throws InterruptedException {Thread thread = new Thread(){@Overridepublic void run() {System.out.println("start");while (true){if (this.isInterrupted()){System.out.println("interrupt");break;}}}};thread.start();TimeUnit.SECONDS.sleep(1);thread.interrupt();System.out.println(thread.getState());//当前线程休眠1秒TimeUnit.SECONDS.sleep(1);//输出线程thread1的状态System.out.println(thread.getState());}
sleep方法由于中断而抛出异常之后,线程的中断标志会被清除(置为false)
public static void main(String[] args) throws InterruptedException {Thread thread = new Thread(){@Overridepublic void run() {System.out.println("start");while (true){try {TimeUnit.SECONDS.sleep(100);} catch (InterruptedException e) {e.printStackTrace();}if (this.isInterrupted()) {System.out.println("end");break;}}}};thread.start();TimeUnit.SECONDS.sleep(1);thread.interrupt();}
异常中需要执行this.interrupt()方法,将中断标志位置为true,下面程序会在一毫秒时发送中断异常
import java.util.concurrent.TimeUnit;public class StopThreadWithoutSleep implements Runnable {@Overridepublic void run() {int i = 0;while (i<=10000){if (!Thread.currentThread().isInterrupted()&&i%3==0){System.out.println(i+"是3的倍数");}i++;}}public static void main(String[] args) throws InterruptedException {Thread thread = new Thread(new StopThreadWithoutSleep());thread.start();TimeUnit.MILLISECONDS.sleep(1);thread.interrupt();}}
eg
public class JoinInterrupt {public static void main(String[] args) {Thread mainThread = Thread.currentThread();Thread oneThread = new Thread(new Runnable() {@Overridepublic void run() {try {mainThread.interrupt();Thread.sleep(5000);System.out.println("Thread-1 finished.");} catch (InterruptedException e) {System.out.println("子线程中断");}}});oneThread.start();System.out.println("等待子线程运行完毕");try {oneThread.join();} catch (InterruptedException e) {System.out.println(Thread.currentThread().getName()+"主线程中断了");oneThread.interrupt();}System.out.println("子线程已运行完毕");}}
执行结果
等待子线程运行完毕main主线程中断了子线程已运行完毕子线程中断
yield
yield是谦让的意思
public static native void yield();
线程通信
Object中有几个用于线程同步的方法:wait、notify、notifyAll。
public class Object {public final native void wait(long timeout) throws InterruptedException;public final native void notify();public final native void notifyAll();}
| 方法 | 说明 |
|---|---|
| wait | wait会释放当前锁 直到以下4种情况之一发生的时候才会被唤醒: 1. 另外一个线程调用这个对象的notify()方法且刚好被唤醒的是本线程; 1. 另外一个线程调用这个对象的notifyAll()方法; 1. 过了wait(long timeout)规定的超时时间,如果参数是0永久等待 1. 线程自身调用了interrupt() |
| notify | 任意选择一个(无法控制选哪个)正在这个对象上等待的线程把它唤醒,其它线程依然在等待被唤醒 |
| notifyAll | 唤醒所有线程,让它们去竞争,不过也只有一个能抢到锁 |
wait
wait 演示代码如下
import java.util.concurrent.TimeUnit;public class Wait {public static void main(String[] args)throws InterruptedException {final Object object = new Object();Thread waitThread = new Thread(){@Overridepublic void run() {synchronized (object) {System.out.println(Thread.currentThread().getName()+"开始执行");try {System.out.println(Thread.currentThread().getName()+"准备释放锁");object.wait();System.out.println(Thread.currentThread().getName()+"再次获取到锁");} catch (InterruptedException e) {e.printStackTrace();}System.out.println(Thread.currentThread().getName()+"结束执行");}}};Thread notifyThread = new Thread(){@Overridepublic void run() {synchronized (object) {System.out.println(Thread.currentThread().getName()+"开始执行");object.notify();System.out.println(Thread.currentThread().getName()+"结束执行");}}};waitThread.start();TimeUnit.MILLISECONDS.sleep(100);notifyThread.start();}}
最终执行结果
Thread-0开始执行Thread-0准备释放锁Thread-1开始执行Thread-1结束执行Thread-0再次获取到锁Thread-0结束执行
sleep() wait()两者主要的区别:
- 所属类不同,sleep()方法是Thread类的静态方法,而wait是Object类实例方法
- 同步方法处理,wait()方法必须要在同步方法或者同步块中调用,也就是必须已经获得对象锁。而sleep()方法没有这个限制可以在任何地方种使用。另外,wait()方法会释放占有的对象锁,使得该线程进入等待池中,等待下一次获取资源。而sleep()方法只是会让出CPU并不会释放掉对象锁;
- 是否释放锁和指定时间,sleep()方法在休眠时间达到后如果再次获得CPU时间片就会继续执行,而wait()方法必须等待Object.notift/Object.notifyAll通知后,才会离开等待池,并且再次获得CPU时间片才会继续执行。
总结:Object.wait()方法和Thread.sleeep()方法都可以让现场等待若干时间。除wait()方法可以被唤醒外,另外一个主要的区别就是wait()方法会释放目标对象的锁,而Thread.sleep()方法不会释放锁。
notify
notify:唤醒一个线程,其他线程依然处于wait的等待唤醒状态,如果被唤醒的线程结束时没调用notify,其他线程就永远没人去唤醒,只能等待超时,或者被中断
import java.util.Date;import java.util.concurrent.TimeUnit;import java.util.concurrent.atomic.AtomicInteger;public class WaitNotify {private AtomicInteger count = new AtomicInteger();public static void main(String[] args) throws InterruptedException {WaitNotify instance = new WaitNotify();for (int i =0;i<10;i++){new Thread(instance::waitThread).start();}TimeUnit.MILLISECONDS.sleep(100);for(int i =0;i<5;i++){instance.notifyThread();}}private synchronized void notifyThread(){notify();}private synchronized void waitThread(){try{log("wait开始");wait();log("wait结束");}catch (InterruptedException e){e.printStackTrace();}}private void log(String s) {System.out.println(count.incrementAndGet() + " "+ new Date().toString().split(" ")[3]+ "\t" + Thread.currentThread().getName() + " " + s);}}
程序执行结果,例子中有10个线程在wait,但notify了5次,然后其它线程一直阻塞,这也就说明使用notify时如果不能准确控制和wait的线程数对应,可能会导致某些线程永远阻塞。
1 21:21:34 Thread-0 wait开始2 21:21:34 Thread-9 wait开始3 21:21:34 Thread-8 wait开始4 21:21:34 Thread-7 wait开始5 21:21:34 Thread-6 wait开始6 21:21:34 Thread-5 wait开始7 21:21:34 Thread-4 wait开始8 21:21:34 Thread-3 wait开始9 21:21:34 Thread-2 wait开始10 21:21:34 Thread-1 wait开始11 21:21:34 Thread-0 wait结束12 21:21:34 Thread-6 wait结束13 21:21:34 Thread-7 wait结束14 21:21:34 Thread-8 wait结束15 21:21:34 Thread-9 wait结束
eg:
public class Wait {public static Object object = new Object();public static void main(String[] args) throws InterruptedException {Thread zeroThread = new Thread(new Runnable() {@Overridepublic void run() {synchronized (object) {System.out.println(Thread.currentThread().getName() + "开始执行了");try {object.wait();} catch (InterruptedException e) {e.printStackTrace();}System.out.println("线程" + Thread.currentThread().getName() + "获取到了锁。");}}});Thread oneThread = new Thread(new Runnable() {@Overridepublic void run() {synchronized (object) {object.notify();System.out.println("线程" + Thread.currentThread().getName() + "调用了notify()");}}});zeroThread.start();Thread.sleep(200);oneThread.start();}}
执行结果
Thread-0开始执行了线程Thread-1调用了notify()线程Thread-0获取到了锁。
notifyAll
所有线程退出wait的状态,开始竞争锁,但只有一个线程能抢到,这个线程执行完后,其他线程又会有一个线程而出得到锁
import java.util.Date;import java.util.concurrent.TimeUnit;import java.util.concurrent.atomic.AtomicInteger;public class WaitNotifyAll {private AtomicInteger count = new AtomicInteger();public static void main(String[] args) throws InterruptedException {WaitNotifyAll instance = new WaitNotifyAll();for(int i =0;i<10;i++){new Thread(instance::waitThread).start();}TimeUnit.MILLISECONDS.sleep(100);instance.notifyThread();}private synchronized void notifyThread(){notifyAll();}private synchronized void waitThread(){try{log("wait开始");wait();log("wait结束");}catch (InterruptedException e){e.printStackTrace();}}private void log(String s) {System.out.println(count.incrementAndGet() + " "+ new Date().toString().split(" ")[3]+ "\t" + Thread.currentThread().getName() + " " + s);}}
程序执行结果
1 21:28:07 Thread-0 wait开始2 21:28:07 Thread-9 wait开始3 21:28:07 Thread-8 wait开始4 21:28:07 Thread-7 wait开始5 21:28:07 Thread-6 wait开始6 21:28:07 Thread-5 wait开始7 21:28:07 Thread-4 wait开始8 21:28:07 Thread-3 wait开始9 21:28:07 Thread-2 wait开始10 21:28:07 Thread-1 wait开始11 21:28:07 Thread-1 wait结束12 21:28:07 Thread-2 wait结束13 21:28:07 Thread-3 wait结束14 21:28:07 Thread-4 wait结束15 21:28:07 Thread-5 wait结束16 21:28:07 Thread-6 wait结束17 21:28:07 Thread-7 wait结束18 21:28:07 Thread-8 wait结束19 21:28:07 Thread-9 wait结束20 21:28:07 Thread-0 wait结束
总结
wait(),notify(),notifyAll()可以这么理解,obj对象上有2个队列,如图1,q1:等待队列,q2:准备获取锁的队列;两个队列都为空。
obj.wait()过程:
synchronize(obj){obj.wait();}
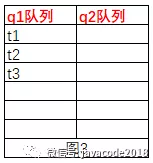
假如有3个线程,t1、t2、t3同时执行上面代码,t1、t2、t3会进入q2队列,如图2,进入q2的队列的这些线程才有资格去争抢obj的锁,假设t1争抢到了,那么t2、t3机型在q2中等待着获取锁,t1进入代码块执行wait()方法,此时t1会进入q1队列,然后系统会通知q2队列中的t2、t3去争抢obj的锁,抢到之后过程如t1的过程。最后t1、t2、t3都进入了q1队列,如图3。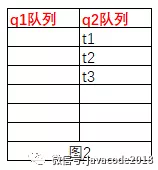
上面过程之后,又来了线程t4执行了notify()方法,如下:
synchronize(obj){obj.notify();}
t4会获取到obj的锁,然后执行notify()方法,系统会从q1队列中随机取一个线程,将其加入到q2队列,假如t2运气比较好,被随机到了,然后t2进入了q2队列,如图4,进入q2的队列的锁才有资格争抢obj的锁,t4线程执行完毕之后,会释放obj的锁,此时队列q2中的t2会获取到obj的锁,然后继续执行,执行完毕之后,q1中包含t1、t3,q2队列为空,如图5

接着又来了个t5队列,执行了notifyAll()方法,如下:
synchronize(obj){obj.notify();}
2.调用obj.wait()方法,当前线程会加入队列queue1,然后会释放obj对象的锁
t5会获取到obj的锁,然后执行notifyAll()方法,系统会将队列q1中的线程都移到q2中,如图6,t5线程执行完毕之后,会释放obj的锁,此时队列q2中的t1、t3会争抢obj的锁,争抢到的继续执行,未增强到的带锁释放之后,系统会通知q2中的线程继续争抢索,然后继续执行,最后两个队列中都为空了。
生产者消费者模式
package com.github.thread.objectthread;import java.util.LinkedList;import java.util.Random;class EventStorage {private Integer maxSize;private LinkedList<Integer> storage;private Random random;public EventStorage() {maxSize = 10;storage = new LinkedList<>();random = new Random();}public synchronized void put() {while (storage.size() == maxSize) {try {wait();} catch (InterruptedException e) {e.printStackTrace();}}Integer p = Integer.valueOf(random.nextInt(100) + 1);storage.add(p);System.out.println("生产:" + p + "\t 总共" + storage.size() + "个");notify();}public synchronized void take() {while (storage.size() == 0) {try {wait();} catch (InterruptedException e) {e.printStackTrace();}}System.out.println("消费:" + storage.poll() + "\t 剩下" + storage.size() + "个");notify();}}class Producer implements Runnable {private EventStorage storage;public Producer(EventStorage storage) {this.storage = storage;}@Overridepublic void run() {for (int i = 0; i < 100; i++) {storage.put();}}}class Consumer implements Runnable {private EventStorage storage;public Consumer(EventStorage storage) {this.storage = storage;}@Overridepublic void run() {for (int i = 0; i < 100; i++) {storage.take();}}}public class ProducerConsumerModel {public static void main(String[] args) {EventStorage storage = new EventStorage();Producer producer = new Producer(storage);Consumer consumer = new Consumer(storage);new Thread(producer).start();new Thread(consumer).start();}}
Thread.join
方法join的作用是使所属的线程对象正常执行 run() 方法中的任务, 而使当前线程进行无限期(或指定时间)的阻塞, 通俗的作用就是等待方法join所属线程执行完后再继续执行当前线程后续的代码; 实际上就是抢占。
join()join(long millis) //参数为毫秒join(long millis,int nanoseconds) //第一参数为毫秒,第二个参数为纳秒
join()实际是利用了wait(),只不过它不用等待notify()/notifyAll(),且不受其影响。它结束的条件是:
1)等待时间到;
2)目标线程已经run完(通过isAlive()来判断)。
import java.util.concurrent.TimeUnit;public class Join implements Runnable{@Overridepublic void run() {try {TimeUnit.SECONDS.sleep(1);} catch (InterruptedException e) {e.printStackTrace();}System.out.println(Thread.currentThread().getName()+"\tfinish");}public static void main(String[] args) throws InterruptedException {Join joinRunnable = new Join();Thread threadOne = new Thread(joinRunnable);Thread threadTwo = new Thread(joinRunnable);threadOne.start();threadTwo.start();threadTwo.join();threadOne.join();System.out.println(Thread.currentThread().getName()+"\tfinish");}}
执行结果
Thread-0 finishThread-1 finishmain finish
如果我们把线程的下面的join方法 语句去掉
threadTwo.join();threadOne.join();
执行可能结果如下,主线程一般会先执行
main finishThread-1 finishThread-0 finish
eg:
public class Join {public static void main(String[] args) throws InterruptedException {Thread one = new Thread(new Runnable() {@Overridepublic void run() {try {Thread.sleep(1000);} catch (InterruptedException e) {e.printStackTrace();}System.out.println(Thread.currentThread().getName() + "执行完毕");}});Thread two = new Thread(new Runnable() {@Overridepublic void run() {try {Thread.sleep(1000);} catch (InterruptedException e) {e.printStackTrace();}System.out.println(Thread.currentThread().getName() + "执行完毕");}});one.start();two.start();System.out.println("开始等待子线程运行完毕");one.join();two.join();System.out.println("所有子线程执行完毕");}}
最终执行结果可能是
开始等待子线程运行完毕Thread-0执行完毕Thread-1执行完毕所有子线程执行完毕
或者是
开始等待子线程运行完毕Thread-1执行完毕Thread-0执行完毕所有子线程执行完毕
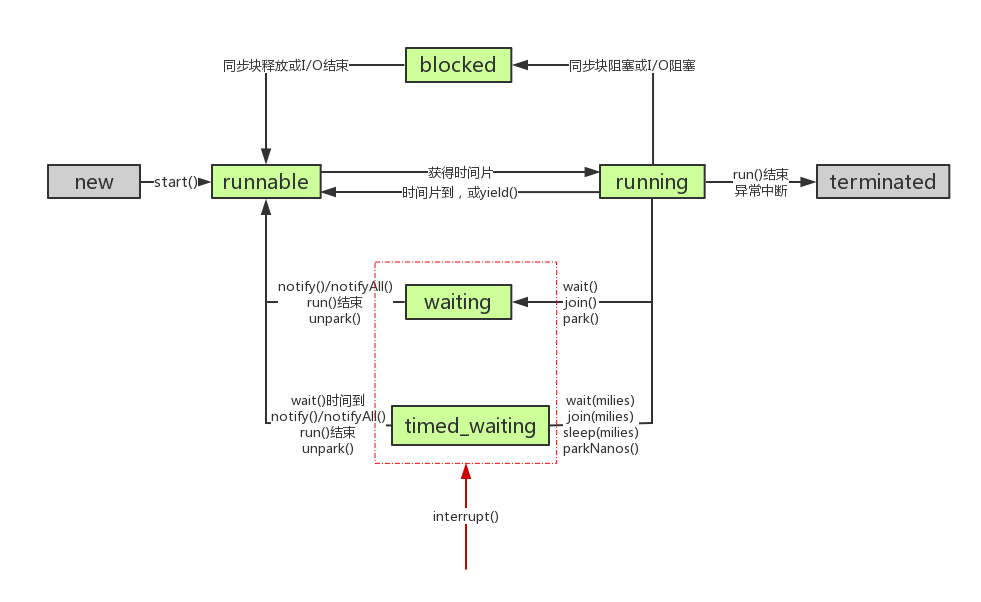
线程生命周期
| 线程状态 | 状态说明 |
|---|---|
| 新建状态 | 等待状态,调用start()方法启动 |
| 就绪状态 | 有执行资格,但是没有执行权 |
| 运行状态 | 具有执行资格和执行权 |
| 阻塞状态 | 遇到sleep()方法和wait()方法时,失去执行资格和执行权,sleep()方法时间到或者调用notify()方法时,获取执行资格,变为临时状态 |
| 死亡状态 | 中断线程,或者run()方法结束 |
NEW
关键字new 创建一个Thread 对象,此时它并不处于执行状态,因为在没有Start之前,该线程根本不存在,和使用关键字new 创建一个普通的Java对象没有什么区别。
RUNNABLE
线程被创建等待执行的状态称为可执行RUNNABLE,表示线程已经被创建,正在等待系统调度分配CPU使用权。线程对象进入RUNNABLE状态必须调用start方法,此时才真正在JVM进程中创建了一个线程,注意线程的启动并不代表理解开始执行,线程的运行与否和进程一样都要听命于CPU的调度。由于存在 Running状态,所以不会直接进入 BLOCKED 状态和 TERMINATED 状态,即使是在线程的执行逻辑中调用wait、 sleep或者其他block的IO操作等, 也必须先获得 CPU 的调度执行权才可以,严格来讲, RUNNABLE 的线程只能意外终止或者进入 RUNNING 状态 。
RUNNING
一旦 CPU 通过轮询或者其他方式从任务可执行队列中选中了线程,那么此时它才能真 正地执行自己的逻辑代码,需要说明的一点是一个正在 RUNNING 状态的线程事实上也是 RUNNABLE 的,但是反过来则不成立 。
在该状态中,线程的状态可以发生如下的状态转换 。
- 直接进入 TERMINATED 状态,比如调用 JDK 已 经不推荐使用 的 stop 方 法或者 判断 某个逻辑标识 。
- 进入 BLOCKED 状态,比如调用了 sleep,或者 wait方法而加入了 waitSet 中。
- 进行某个阻塞的 IO 操作, 比如 因网络数据的读写而进入了 BLOCKED 状态 。
- 获取某个锁资源,从而加入到该锁的阻塞队列中而进入了 BLOCKED 状态 。
- 由于 CPU 的调度器轮询使该线程放弃执行,进入 RUNNABLE 状态 。
线程主动调用 yield 方法,放弃 CPU 执行权,进入 RUNNABLE 状态 。
BLOCKED
线程在 BLOCKED 状态中可以切换至如下几个状态。
直接进入 TERMINATED 状态,比如调用 JDK 已经不推荐使用 stop 方法或者意外 死亡 (JVMCrash)。
- 线程阻塞的操作结束,比如读取了想要的数据字节进入到 RUNNABLE 状态。
- 线程完成了指定时间的休眠,进入到了 RUNNABLE 状态 。
- Wait 中的线程被其他线程 notify/notifyall 唤醒,进入 RUNNABLE 状态 。 口线程获取到了某个锁资源,进入 RUNNABLE 状态 。
- 线程在阻塞过程中被打断,比如其他线程调用了 interrupt方法,进入 RUNNABLE 状态。
从Object.wait()状态刚被唤醒时,通常不能立刻抢到monitor锁,那就会从Waiting先进入到Block状态,抢到锁后转换到Runnable状态。
TERMINATED
线程进入 TERMINATED 状态,意味着该线程的整个生命周期都结束了,在该状态中线程将不会切换到其他任何状态,下列这些情况将 会使线程进入TERMINATED 状态。
线程运行正常结束,结束生命周期 。
- 线程运行出错意外结束。
- JVM Crash导致所有的 线程都结束。
阻塞与等待的区别
阻塞:当一个线程试图获取对象锁(非java.util.concurrent库中的锁,即synchronized),而该锁被其他线程持有,则该线程进入阻塞状态。它的特点是使用简单,由JVM调度器来决定唤醒自己,而不需要由另一个线程来显式唤醒自己,不响应中断。
等待:当一个线程等待另一个线程通知调度器一个条件时,该线程进入等待状态。它的特点是需要等待另一个线程显式地唤醒自己,实现灵活,语义更丰富,可响应中断。例如调用:Object.wait()、Thread.join()以及等待Lock或Condition。
需要强调的是虽然synchronized和JUC里的Lock都实现锁的功能,但线程进入的状态是不一样的。synchronized会让线程进入阻塞态,而JUC里的Lock是用LockSupport.park()/unpark()来实现阻塞/唤醒的,会让线程进入等待态。但话又说回来,虽然等锁时进入的状态不一样,但被唤醒后又都进入runnable态,从行为效果来看又是一样的。
Callable 接口
创建过程
- 创建实现Callable接口的实现类
- 实现call方法,将此线程需要执行的操作声明在call()中
- 创建Callable接口实现类的对象
- 创建FutureTask的对象,将此Callable接口实现类的对象作为传递到FutureTask构造器中。
- 创建Thread对象,将FutureTask的对象作为参数传递到Thread类的构造器中
- 调用Thread对象的start()方法
package cn.bx.thread;import java.util.concurrent.Callable;import java.util.concurrent.ExecutionException;import java.util.concurrent.FutureTask;class Foo implements Callable {public Object call() throws Exception {int sum = 0;for (int i = 1; i <= 100; i++) {if ((i & 1) == 0) {sum += i;}}return sum;}}public class ThreadCall {public static void main(String[] args) {Foo foo = new Foo();FutureTask futureTask = new FutureTask(foo);new Thread(futureTask).start();try {Object sum = futureTask.get();System.out.println("1-100偶数和是:" + sum);} catch (InterruptedException e) {e.printStackTrace();} catch (ExecutionException e) {e.printStackTrace();}}}
线程池
corePoolSize:核心池的大小*
maximumPoolSize:最大线程数
keepAliveTime:线程没有任务时最多保持多长时间后会终止
创建过程
- 创建线程池对象。
- 创建Runnable接口子类对象。(task)
- 提交Runnable接口子类对象。
- 关闭线程池
创建线程池方法
newCachedThreadPool() 创建一个可缓存的线程池对象newFixedThreadPool(int) 创建一个固定大小的线程池对象newSingleThreadExecutor() 创建一个单线程的线程池对象newScheduledThreadPool() 创建一个大小无限的线程池。此线程池支持定时以及周期性执行任
import java.util.concurrent.ExecutorService;import java.util.concurrent.Executors;class FooThread implements Runnable{@Overridepublic void run() {for (int i = 0; i < 100; i++) {if ((i & 1) != 0) {try {Thread.sleep(1);} catch (InterruptedException e) {e.printStackTrace();}System.out.println(Thread.currentThread().getName() + ": " + i);}}}}class BarThread implements Runnable{@Overridepublic void run() {for (int i = 0; i < 100; i++) {if ((i & 1) == 0) {try {Thread.sleep(1);} catch (InterruptedException e) {e.printStackTrace();}System.out.println(Thread.currentThread().getName() + ": " + i);}}}}public class ThreadPool{public static void main(String[] args) {ExecutorService executorService = Executors.newFixedThreadPool(10);executorService.execute(new FooThread());executorService.execute(new BarThread());executorService.shutdown();}}
参考文章
https://docs.oracle.com/javase/8/docs/api/java/lang/Thread.html
https://www.cnblogs.com/waterystone/p/4920007.html
https://docs.qq.com/doc/DSVNyZ2FNWWFkeFpO

若有收获,就点个赞吧
0 人点赞
