一. 概述
组件(Component)是Vue的核心功能之一, 但是组件实例间的作用域是相互独立的,
这就导致不同组件间的数据无法直接相互引用, 但又通常用到不同组件间的数据, 也就产生了组件通信
二. 组件关系
组件与组件间的关系很多, 特别是组件层级比较复杂时, 组件间的关系也比较复杂
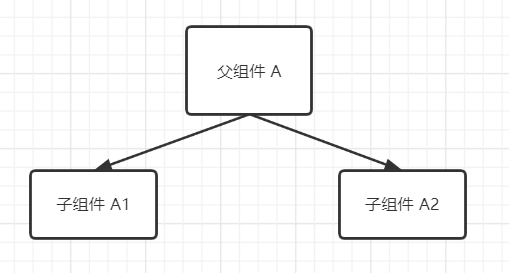
1 父子关系
示例 组件A与组件A1和A2则是父子组件关系
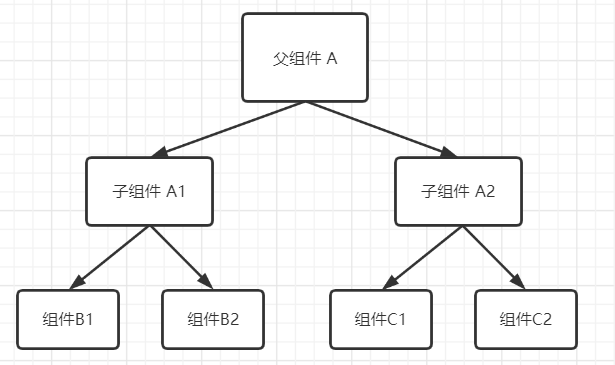
2 兄弟关系
1) 亲兄弟关系
示例 组件A1与组件A2则是亲兄弟关系

2) 表兄弟关系
示例 组件B1.B2与组件C1.C2则是表兄弟关系
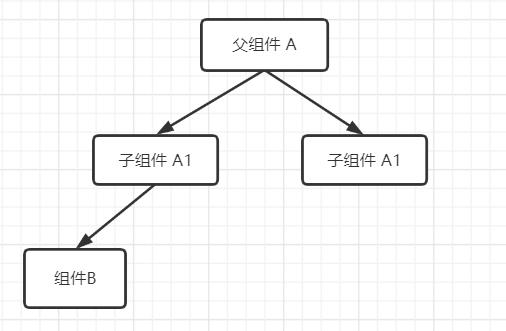
3 直系亲属关系
示例 组件A与组件B则是直系亲属关系
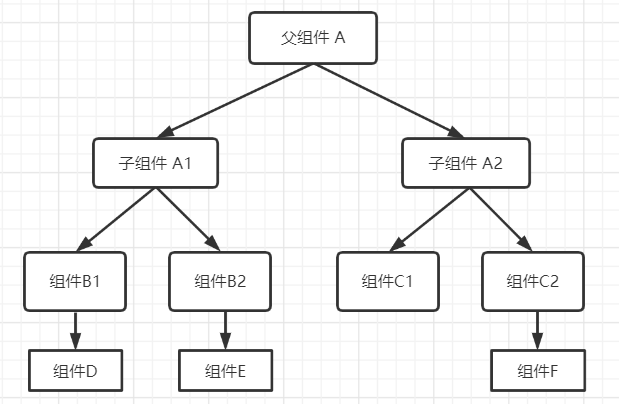
4 任意关系
示例 组件B1与组件F/ 组件D与组件A2.C1等等……
三. 实现组件通信
1 props和$emit
最常用的父子组件通讯方式
1) props
父组件向组件传递数据
父组件传入属性,子组件通过props接收,就可以在内部this.XXX的方式使用
<template><div id="app"><counter :ms="msg"></counter></div></template><script>import Counter from './components/Counter';export default {name: 'App',components: {Counter,},data() {return {msg: '父组件数据',};},};</script>
子组件的ms就是父组件传递过来的数据
<template><div>{{ms}}</div></template><script>export default {name: 'Counter',props: {ms: '',},};</script>
2) $emit
子组件向父组件传递数据
子组件$emit(事件名,传递的参数)向外弹出一个自定义事件, 在父组件中的属性监听事件,同时也能获取子组件传出来的参数
<template><div @click="handleClick"></div></template><script>export default {name: 'Counter',methods: {handleClick() {this.$emit('send', this.a);},},data() {return {a: '传给父组件的数据',};},};</script>
<template><div id="app"><counter @send="handleSend"></counter></div></template><script>import Counter from './components/Counter';export default {name: 'App',components: {Counter,},methods: {handleSend(value) {// 参数value即为传给父组件的数据console.log(value);},},};</script>
2 $attrs和$listeners
$attrs 非直接父子组件间传值 $listeners 监听原生事件
1) $attrs
适用于父组件->子组件传参
包含了父作用域中不作为 prop 被识别 (且获取) 的 attribute 绑定 (class 和 style 除外)。
当一个组件没有声明任何 prop 时,这里会包含所有父作用域的绑定 (class 和 style 除外),并且可以通过 v-bind=”$attrs” 传入内部组件
即父组件中通过v-bind传递, 子组件中没有使用prop接收时,可用$attrs得到传递的数据
示例
<template><Son :flag="flag" :id="id" :msg="msg"></Son></template><script>import Son from './components/Son.vue';export default {name: 'App',components: { Son },data() {return {id: 1,msg: "father's msg",flag: true,};},};</script>
<template><div><div>comp2的$attrs:{{ $attrs }}</div></div></template><script>export default {name: 'Son',props: {flag: Boolean,},mounted() {console.log(this.$attrs); // { "id": 1, "msg": "comp1's msg" }},};</script>
2) $listeners
适用于父组件->子组件传参
包含了父作用域中的 (不含 .native 修饰器的) v-on 事件监听器。
它可以通过 v-on=”$listeners” 传入内部组件
本质: 子组件可以使用父组件的监听事件(methods)
示例
<template><div><son-1 @click="handleClick"></son-1><son-2 @click="handleClick"></son-2></div></template><script>import Son1 from './components/Son1.vue';import Son2 from './components/Son2.vue';export default {name: 'App',components: {Son1,Son2,},methods: {handleClick() {console.log('hello');},},};</script>
子组件通过设置v-on="$listeners"的部分可以调用父组件的事件
<template><div><button v-on="$listeners">子组件1</button><button>这里没绑定,无法使用</button></div></template><script>export default {name: 'Son1',};</script>
<template><div><button v-on="$listeners">子组件2</button></div></template><script>export default {name: 'Son2',};</script>
3 $children/$parent/$root
一般用其他方式代替, 不方便维护, 不建议使用
1) $children
$children是当前实例的直接子组件,不保证顺序,数组顺序不一定是子组件在该父组件中的渲染顺序,也不是响应式的。
示例
<template><div><son>{{ $children[0].msg }}</son></div></template><script>import Son from './components/Son.vue';export default {name: 'App',components: {Son,},mounted() {console.log(this.$children[0].msg); // [VueComponent]},};</script>
<template><div></div></template><script>export default {name: 'Son',data() {return {msg: 'ABC',};},};</script>
2) $parent
如果当前实例有父组件的话,$parent则是当前实例的父实例。
示例
<template><div><son></son></div></template><script>import Son from './components/Son.vue';export default {name: 'App',components: {Son,},data() {return {msg: '123',};},};</script>
<template><div>{{ $parent.msg }}</div></template><script>export default {name: 'Grandson',mounted() {console.log(this.$parent.msg); // '123'},};</script>
3) $root
$root是当前组件树的根 Vue 实例。
如果当前实例没有父实例,此实例将会是其自己。通过this.$root来访问。
示例
<template><div></div></template><script>export default {name: 'App',mounted() {console.log(this.$root); // Vue},};</script>
4 ref
子组件向父组件传递数据
ref 被用来给元素或子组件注册引用信息。
引用信息将会注册在父组件的 $refs 对象上。
如果在普通的 DOM 元素上使用,引用指向的就是 DOM 元素;
如果用在子组件上,引用就指向组件实例
实质: 父组件获取子组件提供的数据和方法
示例
<template><div></div></template><script>export default {name: 'Son',data() {return {sonData: '我是子组件的数据',};},};</script>
<template><div><p>我是父组件获取的子组件的数据:{{ pData }}</p><son ref="user"></son></div></template><script>import Son from './components/Son.vue';export default {name: 'App',components: {Son,},data() {return {pData: '',};},mounted() {console.log(this.$refs.user.sonData); //我是子组件的数据this.pData = this.$refs.user.sonData;},};</script>
5 v-model
封装需要双向绑定的组件时用v-model进行传参
v-model在表单控件或者组件上创建双向绑定
本质: 通过**v-model**实现子组件可以接收和操作父组件的数据
示例 这里看原版有点看不懂, 可以把它拆分成后面的解析版
<template><div><h2>我是父组件</h2><p>我是父组件的数据:{{ pData }}</p><son v-model="pData"></son></div></template><script>import Son from './components/Son.vue';export default {name: 'App',components: {Son,},data() {return {pData: '我是父组件的数据',};},};</script>
这里把v-model进行解析分析
即v-model双向绑定原理拆分: :value="" + @input=""
<template><div><h2>我是父组件</h2><p>我是父组件的数据:{{ pData }}</p><son :value="pData" @input="handleInput"></son></div></template><script>import Son from './components/Son.vue';export default {name: 'App',components: {Son,},data() {return {pData: '我是父组件的数据',};},methods: {handleInput(value) {this.pData = value;},},};</script>
<template><div><h2>我是子组件</h2><p>我是子组件的数据:{{ cData }}</p><p>我是父组件传递过来的数据:{{ msg }}</p><button @click="handleClick">点击传递子组件数据给父组件</button></div></template><script>export default {name: 'Son',props: ['value'], //v-model会自动传递一个字段为value的propsdata() {return {msg: this.value,cData: '我是子组件的数据',};},methods: {handleClick() {this.$emit('input', this.cData);},},};</script>
6 Sync修饰符
用于父子组件间, 子组件需要改变父组件值时
.sync 修饰符相对来说比较特殊,因为其不是事件 event 原有的事件处理相关函数的演变,而是 Vue 自己定义的一个修饰符
在 Vue 的组件在接受外部数据 props 时,Vue 规定,子组件在通过 props 接受外部数据后只有使用该数据的权利,但没有修改该属性的权利。
因此 Vue 就规定组件只能有权使用 props 的属性,不得自己改变,那么若其想要改变,就必须通知该数据的真正拥有者改变,也就是使用该组件的父文件。
其使用的通知方式就是 eventBus 发布和订阅模式
本质: 子组件改变父组件的数据
- 子组件将修改后的值用事件传递,
- 父组件监听到该事件触发时,修改父组件的值
不使用 .sync
子组件触发事件,事件名格式必须是 update:myPropName ,用 $emit 函数触发
this.$emit('update:title', newTitle) //newTitle就是你想要修改props数据修改后的值
父组件可以监听那个事件并根据需要更新一个本地的数据属性
<myconponent :title="Ptitle" @update:title="Ptitle = $event" ></myconponent>//在父组件中监听该事件,该事件触发后传递的值以 $event 接收,//$event === newTitle ,Ptitle是父组件的数据
或者是定义的接受函数的参数
<myconponent :title="Ptitle" @update:title="val => Ptitle = val" ></myconponent>//这时接收的值作为函数的参数
使用 .sync
Vue 就将父组件的监听定义成了一个传值时的修饰符,为 .sync ,
上述代码使用 .sync 修饰符后为:
子组件(是一样的)
this.$emit('update:title', newTitle)
父组件
<myconponent :title.sync="Ptitle"></myconponent> //等同于上面的传值并监听
示例
<template><div><h2>我是父组件</h2><p>我是父组件的数据(单数据):{{ pData }}</p><son :abc.sync="pData"></son><!-- <son :abc="pData" @update:abc="(val) => (pData = val)"></son> --><!-- :abc="pData" @update:abc="val=>pData=val" 会自动扩展成这个形式--></div></template><script>import Son from './components/Son.vue';export default {name: 'App',components: {Son,},data() {return {pData: 'hi,我是父组件!', //这里后面会被修改成: 'hi,我是子组件!'};},};</script>
<template><div><h2>我是子组件</h2><p>我是子组件接收到的父组件单个属性:{{ abc }}</p><button @click="handleClick">点击传递子组件数据给父组件</button></div></template><script>export default {name: 'Son',props: ['abc'],data() {return {cData: 'hi,我是子组件!',};},methods: {handleClick() {this.$emit('update:abc', this.cData);},},};</script>
7 provide/inject
这对选项需要一起使用,以允许一个祖先组件向其所有子孙后代注入一个依赖,不论组件层次有多深,并在其上下游关系成立的时间里始终生效。
provide 选项应该是一个对象或返回一个对象的函数。该对象包含可注入其子孙的 property。
本质: 后代组件可以使用祖先组件的数据
示例
<template><son></son></template><script>import Son from './components/Son.vue';export default {name: 'App',components: {Son,},provide:{parentData: '我是父组件的数据'}};</script>
<template><div>{{ parentData }}</div></template><script>export default {name: 'Son',inject: ['parentData'], //inject选项可以是一个字符串数组或一个对象};</script>
8 中央事件总线(EventBus)
常用任意两个组件之间的通信 小型应用一般都可以用事件总线解决
又称事件总线(发布订阅模式), 也是一个Vue实例对象
对于层级复杂的情况, 每个组件都通过统一的**bus**进行数据传递 (bus作为传递桥梁)
使用
1 定义一个全局的时间总线对象bus
在src文件下创建bus文件夹, 新建index.js文件
// 导入vue包import Vue from 'vue';// 这是一个Vue实例对象const bus = new Vue();// 导出busexport default bus;
2 发送数据组件: 将数据提交给bus对象
<template><div><input type="text" v-model="msg" /><button @click="handleClick">发送</button></div></template><script>import bus from '../bus'export default {name: 'One',data() {return {msg: '',}},methods: {handleClick() {// 通过$emit提交, 向bus对象提交一个'send'事件bus.$emit('send', this.msg)},},}</script>
3 接收数据组件: 接收传递给bus对象的数据
<template><div>{{ msg }}</div></template><script>import bus from '../bus'export default {name: 'Two',data() {return {msg: '',}},created() {bus.$on('send', (aaa) => {console.log(aaa)// 使用箭头函数, this指向上一级作用域, 跟created中的this都指向Two组件对象this.msg = aaa})},}</script>
9 Vuex
Vuex是一个集中式的状态管理插件, 实现所有组件的状态(数据)共享, 推荐在中大型应用中使用 详见Vuex文档
主要思想:
把组件中的数据全部交由**store**仓库统一管理, 所有组件都可以读/写**store**中的数据
核心概念:
Actions: 动作,行为 (异步)
Mutation: 变化,转变 (同步)
State: 状态,数据
完整流程:
组件到Vuex的流程, 主要是写操作, 通过向Vuex发送通知, 让Vuex修改state中的数据
组件->actions->mutations->state->组件
使用
1 安装Vuex插件
npm i vuex
2 配置
在src目录下创建store/index.js文件
// 导入Vueimport Vue from 'vue'// 导入Vueximport Vuex from 'vuex'// 一. 使用(注册)Vuex插件Vue.use(Vuex)// 二. 定义store中3个对象 (state,mutations,actions)// 保存数据(状态)const state = {count: 0,}// 修改状态const mutations = {INCREMENT(state) {console.log('mutations中的方法被调用了...')state.count++},}// 动作const actions = {increment(ctx) {console.log('action中的方法被调用了...')// 需要在该方法commit到mutations// 第一个参数中, 保存store的大部分功能. 可以认为是一个简化版本的storeconsole.log(ctx)ctx.commit('INCREMENT')},}// 三. 导出Vuex对象export default new Vuex.Store({state,mutations,actions,})
3 配置
在main.js文件中导入store文件
import Vue from 'vue'import App from './App.vue'import store from './store'Vue.config.productionTip = falsenew Vue({store, // store: storerender: (h) => h(App),}).$mount('#app')
4 组件使用
使用:
所有的组件对象都可以通过$store访问到Vuex, 进而可以拿到state
组件中通过$store.state.'数据名'使用store中的数据
操作:
- 从组件->actions
通过dispatch分发一个action,对应调用名为increment的方法
从actions->mutations
定义对应的
mutations,在方法汇总可以拿到state,进而对state进行操作从Vuex->组件
组件中使用store中的数据
<template><div><h1>点击了{{ $store.state.count }}次</h1><button @click="increment">+1</button></div></template><script>export default {name: 'Counter',methods: {increment() {// 通过store.dispatch方法触发actions中的increment方法// 不带参数this.$store.dispatch('increment');},},};</script>

若有收获,就点个赞吧
0 人点赞
