处理突变
如果不同时读写数据,就没有数据竞争,最简单的方法是使用不可变值。除此之外,还有两种典型的策略。首先,用锁来保护临界区,例如:范围锁或策略锁。在面向对象设计中,关键部分的通常是对象(包括它的接口),线程安全的接口会保护整个对象。其次,修改线程只是在工作完成时发出信号,这就是保护性暂挂模式。
范围锁
范围锁是将RAII(资源获取即初始化)应用于互斥锁,这个用法的关键思想是将资源获取和释放绑定到对象的生存期。顾名思义,对象的生命周期范围是确定的。这里的范围意味着,C++运行时会负责调用对象的析构函数,从而释放资源。
ScopedLock类实现了范围锁。
// scopedLock.cpp#include <iostream>#include <mutex>#include <new>#include <string>#include <utility>class ScopedLock{private:std::mutex& mut;public:explicit ScopedLock(std::mutex& m) :mut(m) {mut.lock();std::cout << "Lock the mutex: " << &mut << std::endl;}~ScopedLock() {std::cout << "Release the mutex: " << &mut << std::endl;mut.unlock();}};int main() {std::cout << std::endl;std::mutex mutex1;ScopedLock scopedLock1{ mutex1 };std::cout << "\nBefore local scope" << std::endl;{std::mutex mutex2;ScopedLock scopedLock2{ mutex2 };}std::cout << "After local scope" << std::endl;std::cout << "\nBefore try-catch block" << std::endl;try {std::mutex mutex3;ScopedLock scopedLoack3{ mutex3 };throw std::bad_alloc();}catch (std::bad_alloc& e) {std::cout << e.what();}std::cout << "\nAfter try-catch block" << std::endl;std::cout << std::endl;}
ScopedLock通过引用的方式获取互斥对象(第13行)。互斥量在构造函数(第15行)中锁定,在析构函数(第19行)中进行解锁。由于RAII的使用习惯,对象在销毁时,会自动对互斥量进行解锁。
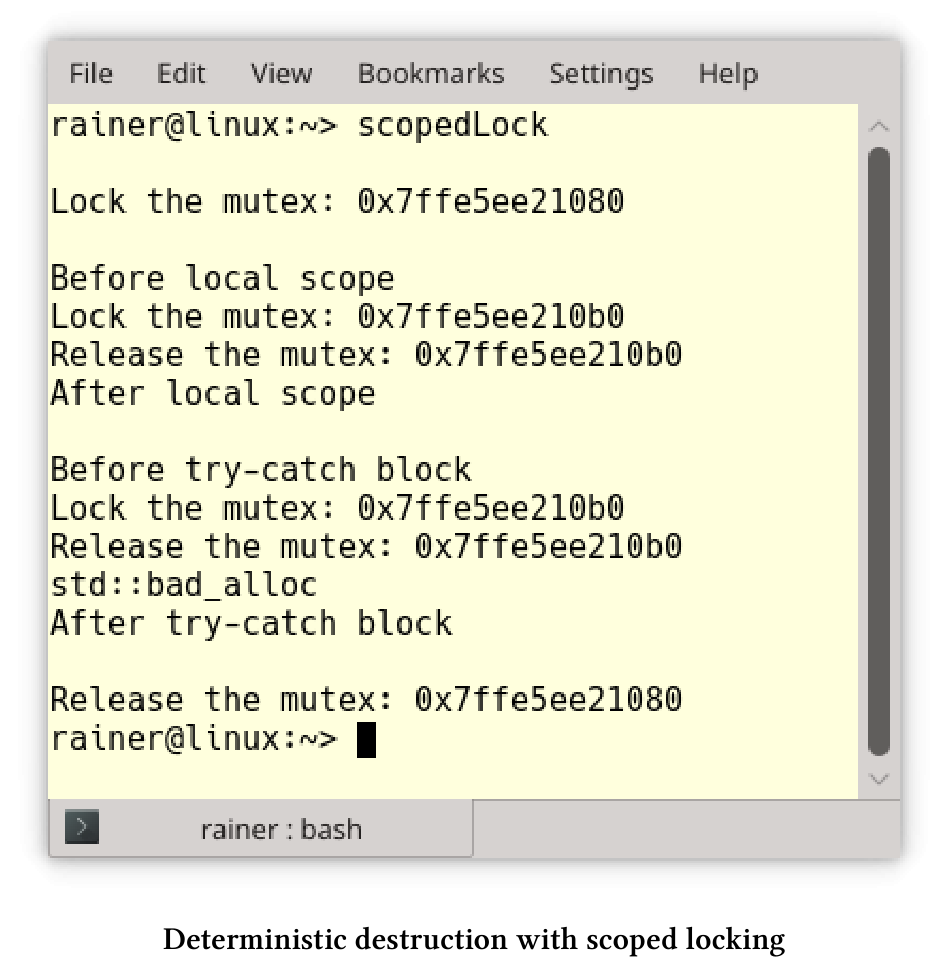
scopedLock1的作用域在主函数体中。因此,mutex1最后才解锁,mutex2(第34行)和mutex3(第42行)也是同理。对于mutex3而言,如果触发异常,也会调用scopedLock3的析构函数。有趣的是,mutex3重用了mutex2的内存,因为两者的地址相同。
C++17支持四种类型的锁:std::lock_guard/std::scoped_lock用于简单场景,std::unique_lock/std::shared_lock用于高级场景,可以在关于锁的章节中了解更多的细节。
拓展阅读
策略锁
编写代码库时,这个库可用于各种领域,包括并发。为了安全起见,要用锁来保护关键部分。倘若库在单线程环境中运行,因为实现使用了重量级同步机制,则会存在性能问题。那么,现在就轮到策略锁登场了。
策略锁是将策略模式的思想应用于锁。这意味着,会将锁定策略放到实例对象中,并使其成为一个可热插拔的组件。那么,什么是策略模式呢?
Strategy Pattern
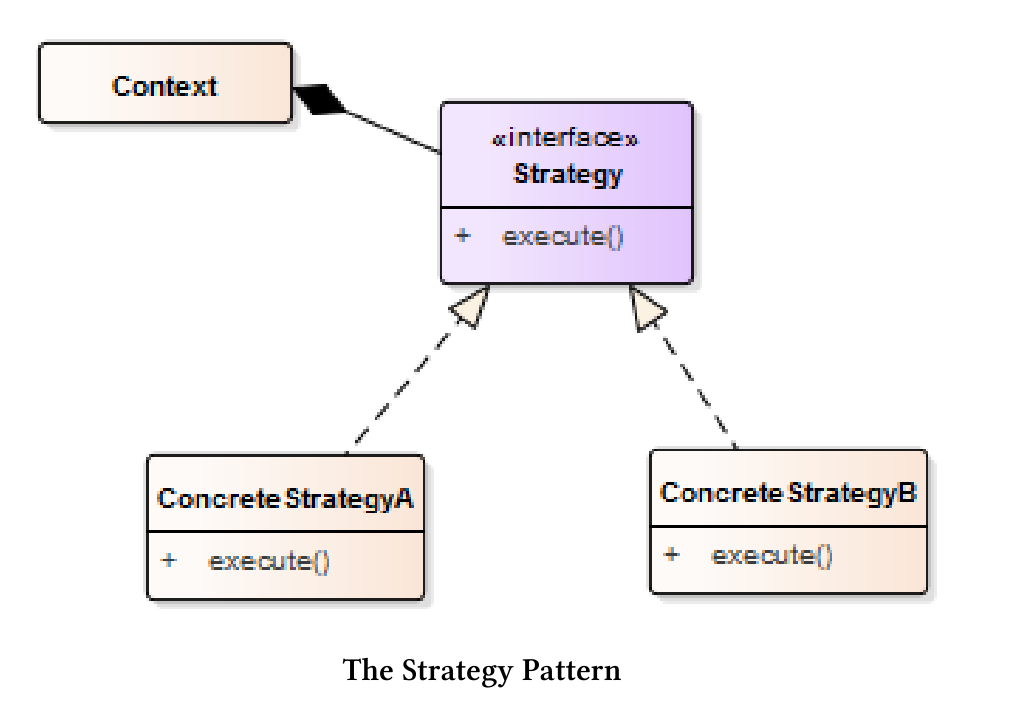
策略模式是《设计模式:可重用的面向对象软件元素》一书中经典的行为模式之一。其关键思想是定义一系列算法,将它们封装在一个对象中,从而使其成为可热插拔的组件。
策略模式
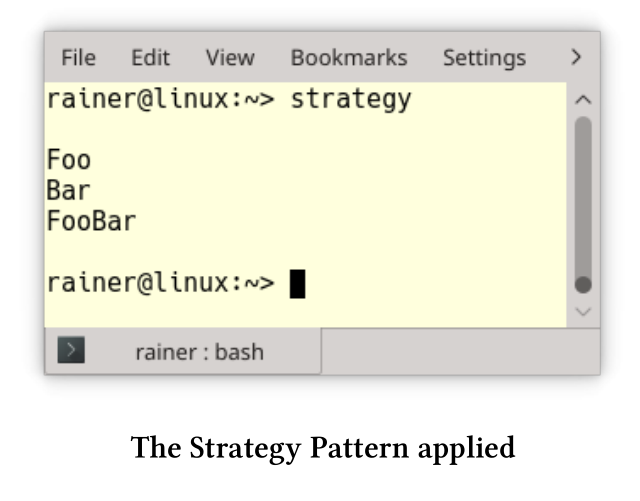
// strategy.cpp#include <iostream>#include <memory>class Strategy {public:virtual void operator()() = 0;virtual ~Strategy() = default;};class Context {std::shared_ptr<Strategy> _start;public:explicit Context() : _start(nullptr) {}void setStrategy(std::shared_ptr<Strategy> start) { _start = start; }void strategy() { if (_start)(*_start)(); }};class Strategy1 :public Strategy {void operator()() override {std::cout << "Foo" << std::endl;}};class Strategy2 : public Strategy {void operator()() override {std::cout << "Bar" << std::endl;}};class Strategy3 :public Strategy {void operator()() override {std::cout << "FooBar" << std::endl;}};int main() {std::cout << std::endl;Context con;con.setStrategy(std::shared_ptr<Strategy>(new Strategy1));con.strategy();con.setStrategy(std::shared_ptr<Strategy>(new Strategy2));con.strategy();con.setStrategy(std::shared_ptr<Strategy>(new Strategy3));con.strategy();std::cout << std::endl;}
第6至10行中的抽象类Strategy定义了策略。每个特定的策略,如Strategy1(第20行)、Strategy2(第26行)或Strategy3(第32行),都必须支持函数调用操作符(第8行)。使用者在Context中集合了各种策略,在第16行设置特定的策略,并在第17行执行它。因为Context通过一个指向Strategy类的指针来执行,所以Strategy1、Strategy2和Strategy3的执行方法是私有的。
具体实现
实现策略锁有两种经典的方法:运行时多态性(面向对象)和编译时多态性(模板)。两种方式各有利弊。
- 优点:
- 运行时多态
- 允许在运行时配置策略锁。
- 了解有面向对象的开发人员,更容易理解。
- 编译时多态
- 无抽象的惩罚。
- 扁平的层次结构。
- 运行时多态
- 缺点:
- 运行时多态
- 额外需要一个指针。
- 可能有很深的派生层次。
- 编译时多态
- 出错时会有非常详细的信息。
- 运行时多态
讨论了理论之后,我在两个程序中实现了策略锁。示例中,策略锁可支持无锁、独占锁和共享锁。简单起见,我在内部使用了互斥锁。此外,策略锁的模型也限定了其锁定的范围。
运行时多态
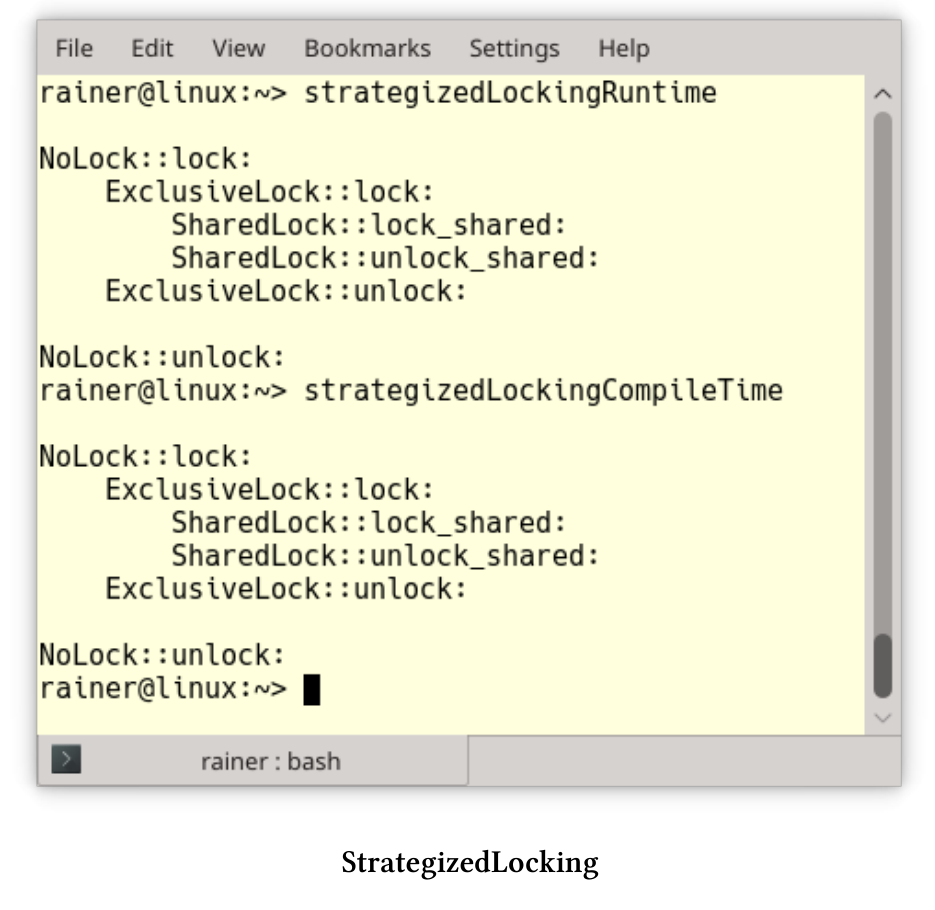
strategizedLockingRuntime.cpp程序中展示了三种互斥锁。
运行时的多态性策略锁
// strategizedLockingRuntime.cpp#include <iostream>#include <mutex>#include <shared_mutex>class Lock {public:virtual void lock() const = 0;virtual void unlock() const = 0;};class StrategizedLocking {Lock& lock;public:StrategizedLocking(Lock& l) :lock(l) {lock.lock();}~StrategizedLocking() {lock.unlock();}};struct NullObjectMutex {void lock() {};void unlock() {};};class NoLock :public Lock {void lock() const override {std::cout << "NoLock::lock: " << std::endl;nullObjectMutex.lock();}void unlock() const override {std::cout << "NoLock::unlock: " << std::endl;nullObjectMutex.unlock();}mutable NullObjectMutex nullObjectMutex;};class ExclusiveLock : public Lock {void lock() const override {std::cout << " ExclusiveLock::lock: " << std::endl;mutex.lock();}void unlock() const override {std::cout << " ExclusiveLock::unlock: " << std::endl;mutex.unlock();}mutable std::mutex mutex;};class SharedLock : public Lock {void lock() const override {std::cout << " SharedLock::lock_shared: " << std::endl;sharedMutex.lock_shared();}void unlock() const override {std::cout << " SharedLock::unlock_shared: " << std::endl;sharedMutex.unlock_shared();}mutable std::shared_mutex sharedMutex;};int main() {std::cout << std::endl;NoLock noLock;StrategizedLocking stratLock1{ noLock };{ExclusiveLock exLock;StrategizedLocking stratLock2{ exLock };{SharedLock sharLock;StrategizedLocking startLock3{ sharLock };}}std::cout << std::endl;}
StrategizedLocking类中有一把锁(第14行)。StrategizedLocking模型是范围锁,因此在构造函数(第16行)中进行锁定,在析构函数(第19行)中进行解锁。Lock(第7 - 11行)是一个抽象类,定义了所有接口。派生类分别是NoLock (第29行)、ExclusiveLock(第41行)和SharedLock(第53行)。SharedLock在std::shared_mutex上可使用lock_shared(第56行)和unlock_shared进行锁定和解锁。每个锁持有一个互斥对象NullObjectMutex(第38行)、std::mutex(第50行)或std::shared_mutex(第62行)。其实,NullObjectMutex就是一个无操作的占位符。互斥对象声明为可变,就意味着可以用在常量方法中使用,比如:lock和unlock中。
空对象
类NullObjectMutex是空对象模式的一个例子,由空方法组成,算是一个占位符,这样便于优化器可以将它完全删除。
编译时多态
基于模板的实现与基于面向对象的实现非常相似。
编译时多态性策略锁
// StrategizedLockingCompileTime.cpp#include <iostream>#include <mutex>#include <shared_mutex>template <typename LOCK>class StrategizedLocking {LOCK& lock;public:StrategizedLocking(LOCK& l) :lock(l) {lock.lock();}~StrategizedLocking() {lock.unlock();}};struct NullObjectMutex {void lock() {};void unlock() {};};class NoLock {public:void lock() const {std::cout << "NoLock::lock: " << std::endl;nullObjectMutex.lock();}void unlock() const {std::cout << "NoLock::unlock: " << std::endl;nullObjectMutex.unlock();}mutable NullObjectMutex nullObjectMutex;};class ExclusiveLock {public:void lock() const {std::cout << " ExclusiveLock::lock: " << std::endl;mutex.lock();}void unlock() const {std::cout << " ExclusiveLock::unlock: " << std::endl;mutex.unlock();}mutable std::mutex mutex;};class SharedLock {public:void lock() const {std::cout << " SharedLock::lock_shared: " << std::endl;sharedMutex.lock_shared();}void unlock() const {std::cout << " SharedLock::unlock_shared: " << std::endl;sharedMutex.unlock_shared();}mutable std::shared_mutex sharedMutex;};int main() {std::cout << std::endl;NoLock noLock;StrategizedLocking stratLock1{ noLock };{ExclusiveLock exLock;StrategizedLocking stratLock2{ exLock };{SharedLock sharLock;StrategizedLocking startLock3{ sharLock };}}std::cout << std::endl;}
这次NoLock(第25行)、ExclusiveLock(第38行)和SharedLock(第51行)没有抽象的基类了。结果StrategizedLocking可以用不支持相应接口的对象进行实例化,而这将导致编译时错误。C++20中,可以使用Lockable : template <Lockable Lock> class StrategizedLocking代替template <typename Lock> class StrategizedLocking。这意味着所有使用的锁必须支持Lockable概念。概念需要命名,并且Lockable已经在C++20中定义了。如果没有满足此要求,则编译将失败,并出现简单易懂的错误消息。
两个程序会生成相同的输出:
拓展阅读
- Design Patterns: Elements of Reusable Object-Oriented Software
- Strategy Pattern
- Null Object Pattern
- Pattern-Oriented Software Architecture: Patterns for Concurrent and Networked Objects
线程安全的接口
当程序的关键部分只是一个对象时,那么使用线程安全的接口就在合适不过了。用锁可能会导致性能问题,甚至会导致死锁。下面的伪代码可以清楚地阐明我的观点。
struct Critical{void method1(){lock(mut);method2();...}void method2(){lock(mut);...}mutex mut;};Critical crit;crit.method1();
使用crit.method1会使互斥锁锁定两次。为了简单起见,这个锁是一个范围锁。当然,这里还有两个问题:
- 当
lock是递归锁时,method2中的第二个lock(mut)是多余的。 - 当
lock不是递归锁时,method2中的第二个lock(mut)会导致未定义行为。大多数情况下,会出现死锁。
线程安全的接口可以避免这两个问题,因为:
- 所有(public)接口都应该使用锁。
- 所有(保护的和私有的)方法都不使用锁。
- 接口只能使用保护的方法或私有方法调用,而公共方法则不能调用。
threadSafeInterface.cpp程序显示了其用法。
// threadSafeInterface.cpp#include <iostream>#include <mutex>#include <shared_mutex>class Critical {public:void interface1() const {std::lock_guard<std::mutex> lockGuard(mut);implementation1();}void interface2() {std::lock_guard<std::mutex> lockGuard(mut);implementation2();implementation3();implementation1();}private:void implementation1() const {std::cout << "implementation1: "<< std::this_thread::get_id() << std::endl;}void implementation2() const {std::cout << " implementation2: "<< std::this_thread::get_id() << std::endl;}void implementation3() const {std::cout << " implementation3: "<< std::this_thread::get_id() << std::endl;}mutable std::mutex mut;};int main() {std::cout << std::endl;std::thread t1([] {const Critical crit;crit.interface1();});std::thread t2([] {Critical crit;crit.interface2();crit.interface1();});Critical crit;crit.interface1();crit.interface2();t1.join();t2.join();std::cout << std::endl;}
包括主线程在内的三个线程都使用了Critical实例。由于线程安全的接口,所有对公开API的调用都是同步的。第35行中的互斥对象是可变的,因此可以在const方法implementation1中使用。
线程安全的接口有三个好处:
- 互斥锁不可能递归调用。在C++中,对非递归互斥对象的递归调用会导致未定义行为,通常都会死锁。
- 该程序使用最小范围的锁定,因此同步的代价最小。仅在关键类的公共或私有方法中使用
std::recursive_mutex将产生重量级的同步,从而遭受性能惩罚。 - 从用户的角度来看,
Critical很容易使用,而同步只是实现的一个细节而已。
三个线程交错的输出:

尽管线程安全的接口看起来很容易实现,但是也需要留意两个风险点。
风险
类中使用静态成员和使用虚接口时,需要特别小心。
静态成员
当类有静态成员时,就必须同步该类实例上的所有成员函数。
class Critical {public:void interface1() const {std::lock_guard<std::mutex> lockGuard(mut);implementation1();}void interface2() {std::lock_guard<std::mutex> lockGuard(mut);implementation2();implementation3();implementation1();}private:void implementation1() const {std::cout << "implementation1: "<< std::this_thread::get_id() << std::endl;++called;}void implementation2() const {std::cout << " implementation2: "<< std::this_thread::get_id() << std::endl;++called;}void implementation3() const {std::cout << " implementation3: "<< std::this_thread::get_id() << std::endl;++called;}inline static int called{ 0 };inline static std::mutex mut;};
Critical类使用了静态成员(第32行)来计算调用成员函数的频率。Critical的所有实例,都使用同一个静态成员,因此必须同步。本例中,临界区为Critical的所有实例。
内联静态成员
C++17中,静态数据成员可以声明为内联。可以在类中定义,以及初始化内联静态数据成员。
struct X{inline static int n = 1;}
虚接口
当重写虚接口函数时,即使重写的函数是私有的,也应该有锁。
// threadSafeInterfaceVirtual.cpp#include <iostream>#include <mutex>#include <thread>class Base {public:virtual void interface() {std::lock_guard<std::mutex> lockGuard(mut);std::cout << "Base with lock" << std::endl;}private:std::mutex mut;};class Derived : public Base {void interface() override {std::cout << "Derived without lock" << std::endl;};};int main() {std::cout << std::endl;Base* base1 = new Derived;base1->interface();Derived der;Base& base2 = der;base2.interface();std::cout << std::endl;}
base1->interface和base2.interface中,base1和base2是静态类型是Base,因此interface是一个公开接口。由于接口方法是虚函数,因此在运行时使用派生的动态类型Derived进行。最后,调用派生类Derived的私有接口。
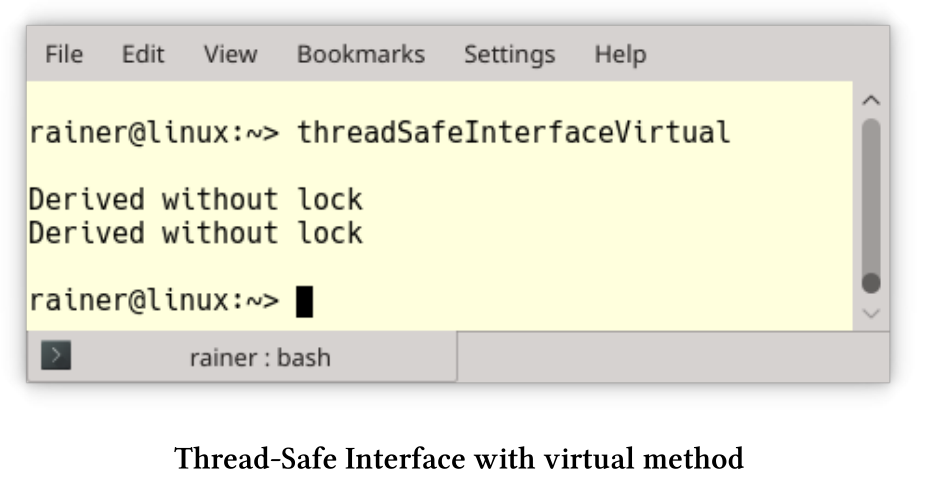
有两种方法可以避免风险:
- 使接口成为非虚接口,这种技术称为NVI(非虚拟接口)。
- 将接口声明为
final:virtual void interface() final;。
扩展阅读
保护性暂挂模式
锁和一些先决条件的组合,是构成保护性暂挂模式的基础件。如果未满足先决条件,则线程将自己置为休眠状态。为了避免数据竞争或死锁,检查线程时会使用锁。
现在,来看看各种情况:
- 处于等待状态的线程,会根据通知更改状态,也可以主动请求更改状态。我把这称为“推拉原则”。
- 等待可以有时限,也可以没有时限。
- 可以将通知发送给一个或所有正在等待的线程。
推拉原则
先来说说推原则。
推原则
大多数情况下,使用条件变量或future/promise来进行线程同步。条件变量或promise将通知发送到正在等待的线程。promise没有notify_one或notify_all方法,而空的set_value调用通常用于模拟通知。下面的程序段展示发送通知的线程和等待的线程。
- 条件变量
void waitingForWork(){std::cout << "Worker: Waiting for work." << std::endl;std::unique_lock<std::mutex> lck(mutex_);condVar.wait(lck, []{ return dataReady; });doTheWork();std::cout << "Work done." << std::endl;}void setDataReady(){{std::lock_guard<std::mutex> lck(mutex_);dataReady = true;}std::cout << "Sender: Data is ready." << std::endl;condVar.notify_one();}
- future/promise
void waitingForWork(std::future<void>&& fut){std::cout << "Worker: Waiting for work." << std::endl;fut.wait();doTheWork();std::cout << "Work done." << std::endl;}void setDataReady(std::promise<void>&& prom){std::cout << "Sender: Data is ready." << std::endl;prom.set_value();}
拉原则
线程也可以主动地要求改变状态,而不是被动地等待状态改变。C++中并不支持“拉原则”,但可以用原子变量来实现。
std::vector<int> mySharedWork;std::mutex mutex_;std::condition_variable condVar;bool dataReady{false};void waitingForWork(){std::cout << "Waiting " << std::endl;std::unique_lock<std::mutex> lck(mutex_);condVar.wait(lck, []{ return dataReady; });mySharedWork[1] = 2;std::cout << "Work done " << std::endl;}void setDataReady(){mySharedWork = {1, 0, 3};{std::lock_guard<std::mutex> lck(mutex_);dataReady = true;}std::cout << "Data prepared" << std::endl;condVar.notify_one();}
有或无时限的等待
条件变量和future有三个用于等待的方法:wait、wait_for和wait_until。wait_for需要一个时间段,wait_until需要一个时间点。
各种等待策略中,消费者线程等待时间为steady_clock::now() + dur。如果promise已经准备好了,就会获取值;如果没准备好,则只显示其id: this_thread::get_it()。
void producer(promise<int>&& prom){cout << "PRODUCING THE VALUE 2011\n\n";this_thread::sleep_for(seconds(5));prom.set_value(2011);}void consumer(shared_future<int> fut,steady_clock::duration dur){const auto start = steady_clock::now();future_status status= fut.wait_until(steady_clock::now() + dur);if ( status == future_status::ready ){lock_guard<mutex> lockCout(coutMutex);cout << this_thread::get_id() << " ready => Result: " << fut.get()<< endl;}else{lock_guard<mutex> lockCout(coutMutex);cout << this_thread::get_id() << " stopped waiting." << endl;}const auto end= steady_clock::now();lock_guard<mutex> lockCout(coutMutex);cout << this_thread::get_id() << " waiting time: "<< getDifference(start,end) << " ms" << endl;}
通知一个或所有等待线程
notify_one可以唤醒一个等待的线程,notify_all可以唤醒所有等待的线程。使用notify_one时,不能确定哪一个线程会被唤醒,而其他条件变量则保持在等待状态。因为future和promise之间存在关联性,所以这种情况在std::future中是不可能发生的。如果想模拟一对多的关系,那么应该使用std::shared_future而不是std::future,因为std::shared_future是可以复制的。
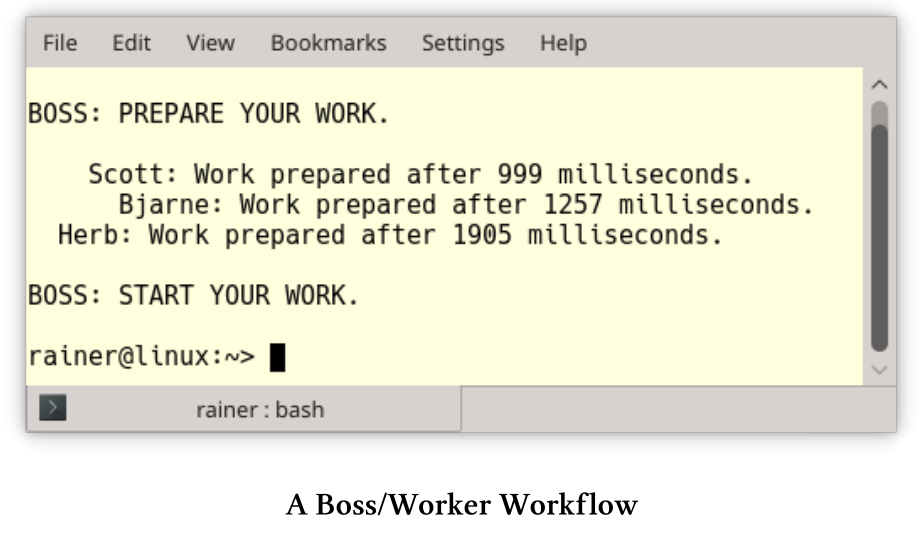
下面的程序显示了一个简单的工作流,promise和future之间是一对一/一对多的关系。
// bossWorker.cpp#include <future>#include <chrono>#include <iostream>#include <random>#include <string>#include <thread>#include <utility>int getRandomTime(int start, int end) {std::random_device seed;std::mt19937 engine(seed());std::uniform_int_distribution<int> dist(start, end);return dist(engine);}class Worker {public:explicit Worker(const std::string& n) :name(n) {}void operator()(std::promise<void>&& prepareWork,std::shared_future<void> boss2Worker) {// prepare the work and notify the bossint prepareTime = getRandomTime(500, 2000);std::this_thread::sleep_for(std::chrono::microseconds(prepareTime));prepareWork.set_value();std::cout << name << ": " << "Work prepared after "<< prepareTime << " milliseconds." << std::endl;// still waiting for the permission to start workingboss2Worker.wait();}private:std::string name;};int main() {std::cout << std::endl;// define the std::promise = > Instruction from the bossstd::promise<void> startWorkPromise;// get the std::shared_future's from the std::promisestd::shared_future<void> startWorkFuture = startWorkPromise.get_future();std::promise<void> herbPrepared;std::future<void> waitForHerb = herbPrepared.get_future();Worker herb(" Herb");std::thread herbWork(herb, std::move(herbPrepared), startWorkFuture);std::promise<void> scottPrepared;std::future<void> waitForScott = scottPrepared.get_future();Worker scott(" Scott");std::thread scottWork(scott, std::move(scottPrepared), startWorkFuture);std::promise<void> bjarnePrepared;std::future<void> waitForBjarne = bjarnePrepared.get_future();Worker bjarne(" Bjarne");std::thread bjarneWork(bjarne, std::move(bjarnePrepared), startWorkFuture);std::cout << "BOSS: PREPARE YOUR WORK.\n " << std::endl;// waiting for the workerwaitForHerb.wait(), waitForScott.wait(), waitForBjarne.wait();// notify the workers that they should begin to workstd::cout << "\nBOSS: START YOUR WORK. \n" << std::endl;startWorkPromise.set_value();herbWork.join();scottWork.join();bjarneWork.join();}
该程序的关键思想是boss(主线程)有三个员工:herb(第53行)、scott(第58行)和bjarne(第63行),每个worker由一个线程表示。老板在第64行等待,直到所有的员工完成工作。这意味着,每个员工在任务下发后的任意时间点,都可以向老板发送完成通知。因为会转到std::future,所以员工到老板的通知是一对一的(第30行)。而从老板到员工的工作指令,则是一对多的通知(第73行)。对于这个一对多的通知,需要使用std::shared_future。
扩展阅读

若有收获,就点个赞吧
0 人点赞
