- 对于从IOC容器中获取bean的研究:使用配置文件进行获取时,会有一个ClassPathXmlApplicationContext的getbean方法,加入断点调试看到的场景是这样的

这里会调用一个工厂的获取方法,这个根据参数来判断,这应该是一个简单工厂,然后继续往下走,Spring会再去调用一个DoGetBean方法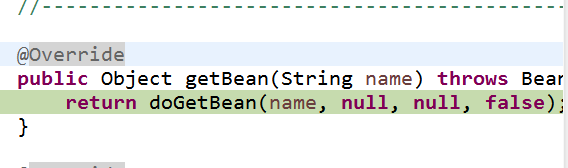
而在此处才是获取到对象的真实操作,这里的代码逻辑是
final String beanName = transformedBeanName(name);Object bean;// Eagerly check singleton cache for manually registered singletons.Object sharedInstance = getSingleton(beanName);if (sharedInstance != null && args == null) {if (logger.isDebugEnabled()) {if (isSingletonCurrentlyInCreation(beanName)) {logger.debug("Returning eagerly cached instance of singleton bean '" + beanName +"' that is not fully initialized yet - a consequence of a circular reference");}else {logger.debug("Returning cached instance of singleton bean '" + beanName + "'");}}bean = getObjectForBeanInstance(sharedInstance, name, beanName, null);}
很明显,真正的获取对象行为发生在getSingleton这个函数里,这里函数底层维护的是一个map,这个map也就要求我们的id是唯一
bean对象的单例讨论:bean对象并不一定是单例的,在配置文件中,存在着一个scope属性,这个属性一共有四组取值
<!-- bean的作用域1. sigleton:单例的2. prototype:多实例的3. request:web情况下,每次请求创建一个4. session:web情况下,每次会话创建一个--><bean id="Mastor02" class="com.fengyang.Beans.Mastor" parent="Mastor01" scope="sigleton"><property name="name" value="努尔哈赤"></property></bean>
如同注释所写,总共有四种类型,而且磨人的类型是sigleton,如果是sigleton实例会在IOC容器启动的时候创建出来,但是如果scope是prototype那么,对象的创建时期就会变化到getBean操作的发生
一个猜想:Autowried注解使用的方法应该是按类型获取getbean(),而且此时scope是Sigleton
- Spring中指定bean的生命周期函数,在配置文件中可以指定bean的生命周期函数
init-method=”create”
destroy-method=”destory”
可以用这个性质做一些自定的操作,但是初始化方法,发生在参数初始化以后
在IOC配置文件中存在的自动装配autowired,举个例子来说,如果存在一个对象,他的一个属性也是一个对象,那么这个属性加载的时候势必要依赖于另一个对象,Spring给我们提供了
标签的ref属性,指向另一个对象,同时在bean标签的内部也可以指定autowired属性,默认有四个取值 <!-- autowire的不同取值代表的含义byName:根据名称取值,根据属性名去容器中寻找对应的对象byType:根据类型取值,根据类型去容器中寻找对应的对象default, no:这两个取值,默认就不采用自动装配constructor:构造器装配--><bean id="Book01" class="com.fengyang.Beans.Book" autowire="byName"><property name="name" value="三侠五义"></property><property name="price" value="32.7"></property></bean><bean id="author" class="com.fengyang.Beans.User"><constructor-arg value="刘玄德"></constructor-arg><constructor-arg value="23"></constructor-arg><constructor-arg value="河南工业大学"></constructor-arg><constructor-arg value="3400"></constructor-arg></bean>
使用注解将类引入容器管理,在Spring中将类交付IOC容器管理的两种途径,一个是使用配置文件,另一个是使用注解,使用注解可以少做很多事情,基本的步骤是:
(1)加上注解
(2)在配置文件设置类的加载包
(3)开箱即用
@Autowired的内部原理,前面介绍过,如果一个已经加入到容器对象,它的某一个属性也是一个对象,那么在bean的细节上,实际上可以加上一个autowired属性,用来装配容器中已经存在的对象,而寻找这个对象的方式可以根据属性名,属性类型,构造器等方式获取,而在下面的代码中就很好的诠释了这一点 ```java @Controller public class UserController {
@Autowired private UserService service;
public void UserSave() {String msg = service.save();System.out.println("Msg: "+msg);}
}
不难看出,UserController正是我们要放入容器的类,它的一个属性也是一个对象,如果是采取之前的配置文件加载模式,我们为了让这个属性不为null,也会使用autowired属性加载容器中现存的类,而现在,我们使用上了Spring官方提供的注解装配bean,这个注入的行为被保留,也变成了注解@Autowired,加入注解以后的流程<br />(1)按照类型获取容器中的对象<br />(2)如果同一个类型有多个,会根据名称筛选<br />(3)如果两次匹配都失败了,则会抛出异常,有一个成功则会返回这个对象<br />另外也可以使用@Qualifier("userService")指定多个同类型bean时,我们要筛选的id而不使用变量名筛选

8. 关于自动装配的多个注解的讨论

(1)@Autowired 这个是Spring的注入注解,实现了将类加载到容器的效果<br />(2)@Resource 这个注解是Java开发者为jee定制的注解,应用更加广泛,但是效果不如第一个

9. 关于Spring自带的测试框架的使用

(1)导入相应的Spring-test依赖包(Junit版本要在4.12以上)
```java
<dependency>
        <groupId>org.springframework</groupId>
        <artifactId>spring-test</artifactId>
        <version>4.0.0.RELEASE</version>
</dependency>
(2)原先的话,在一个未加入容器的类中使用自动注入注解并不能有效地将对象注入进去,而现在是可以的,不过要加一个新的注解
@ContextConfiguration(locations="classpath:IOC.xml")
@RunWith(SpringJUnit4ClassRunner.class)
public class IOCTest {

    @Autowired
    private UserService userService;

    @Test
    public void test() {
        String msg = userService.save();
        System.out.println("Msg: "+msg);
    }
}
- IOC总结:IOC是一个帮助开发者管理对象的容器。他具备的特点是:
(1)依赖注入—DI
(2)控制反转
- 面向切面编程:AOP指的是在程序运行期间,动态的将一段代码切入到指定方法的指定位置执行的编程思想
- 对于AOP中代理模式的讨论
(1)静态代理:代理者和被代理对象均实现一个接口,而且代理者内部实现一个被代理对象的属性,实现接口的抽象方法时,调用被代理者的方法,实现代理
(2)动态代理:被代理对象需要实现一个接口,然后代理对象内部定义一个被代理对象,利用Java的反射机制生成一个代理对象,用接口接收代理对象,调用对应的方法即可
一些专业术语的图形化标识
- 使用AOP的具体操作
(1)导入相应的jar,这里发现了一个问题,AOP的代理实际上是代理的第三种模式Cglib代理,借助了第三方jar,下面是依赖
<!-- https://mvnrepository.com/artifact/org.springframework/spring-aop -->
    <dependency>
        <groupId>org.springframework</groupId>
        <artifactId>spring-aop</artifactId>
        <version>4.0.0.RELEASE</version>
    </dependency>
    <!-- https://mvnrepository.com/artifact/cglib/cglib -->
    <dependency>
        <groupId>cglib</groupId>
        <artifactId>cglib</artifactId>
        <version>2.2</version>
    </dependency>
    <!-- https://mvnrepository.com/artifact/org.aspectj/aspectjweaver -->
    <dependency>
        <groupId>org.aspectj</groupId>
        <artifactId>aspectjweaver</artifactId>
        <version>1.6.8</version>
    </dependency>
(2)开启AOP的配置,需要在配置文件中加入AOP命名空间和对应的XSD文件,然后开启AOP的自动代理
<?xml version="1.0" encoding="UTF-8"?>
<beans xmlns="http://www.springframework.org/schema/beans"
    xmlns:xsi="http://www.w3.org/2001/XMLSchema-instance"
    xmlns:context="http://www.springframework.org/schema/context"
    xmlns:aop="http://www.springframework.org/schema/aop"
    xsi:schemaLocation="http://www.springframework.org/schema/beans http://www.springframework.org/schema/beans/spring-beans.xsd
        http://www.springframework.org/schema/context http://www.springframework.org/schema/context/spring-context-4.0.xsd http://www.springframework.org/schema/aop
        http://www.springframework.org/schema/aop/spring-aop.xsd">

    <!-- 组件扫描,装配使用注解的类 -->
    <context:component-scan base-package="com.fengyang "></context:component-scan>

    <!-- 开启AOP自动代理 -->
    <aop:aspectj-autoproxy></aop:aspectj-autoproxy>
</beans>
(3)设置通知方法和横切关注点,这里首先要把通知类接入到IOC容器,然后指定其为切面类,然后为其方法指定切入点,暂时来说,这个工作均由注解完成
//指定当前类为切面类
@Aspect
@Component
public class LogUtils {

    /*
     * @Before:方法执行前运行
     * @AfterReturning:方法正常返回后执行
     * @AfterThrowing:方法抛出异常以后执行
     */
    //横切关注点--修饰符+返回值类型+方法的全类名
    @Before("execution(public String com.fengyang.Service.UserService.save())")
    public void addLog() {
        System.out.println("执行,增加一名用户");
    }
}
(4)运行测试
- 关于AOP测试一些结论
(1)AOP内部实现的代理并不是只有一种代理模式,如果被代理对象继承自某接口,则使用动态代理,而如果没有接口继承,那么就会使用cglib代理,生成一个子类进行业务的拓展
- 出现了一个神奇的错误,定义一个Service忌口的实现类,然后就没办法获取到这个实现类了,把接口删掉,又可以了
解决方案:当一个接口存在有实现类时,在其他地方需要自动注入时注入接口即可,系统会自动装实现类供我们使用,如果一个接口存在多个实现类,就需要指定这个类型的id就像下面这样
@Service("ADviseService1")
public class ADviseServiceImp implements ADviseService{

    @Override
    public void addAdVise() {
        // TODO Auto-generated method stub
        System.out.println("堂堂正正恰饭吗?");
    }

    @Override
    public void deleteAdVise(int no, String reason, LocalDateTime time) {
        System.out.println(time+"删除了一条记录!原因是:"+reason);
    }

}

//自动注入的写法
@Autowired
@Qualifier("ADviseService1")
private ADviseService service;
//此时容器中有多个同类型的对象,使用自定义ID的方式进行存取,避免冲突
- 在AOP的切点表达式中使用通配符
(1)使用,使用可以代替所有,例如com.fengyang.Service.User.(),这个表达式就会去切入Service中所有以User开头的类的所有无参方法,也可以用*代替多重目录
(2)使用..,使用这个主要是对于参数的省略,无论多少个参数都可以用..来代替,是不是很方便
(3)切入点表达式同样支持&&和||来将两个表达式的条件拼接到一起
在通知方法中可以使用JoinPoint进行代理方法的信息
@Aspect
@Component
public class LogUtils {

/*
 * @Before:方法执行前运行
 * @AfterReturning:方法正常返回后执行
 * @AfterThrowing:方法抛出异常以后执行
 */

@Before("execution(public String com.fengyang.Service.UserService.save())")
public void addLog(JoinPoint joinPoint) {
    System.out.println(joinPoint.getSignature().getName()+"执行,增加一名用户");
}
}
AOP中的环绕通知Around,它其实是之前说的几种通知的组合体具体的写法如下
@Component
@Aspect
public class LogUtils {

@Around("execution(public String com.fengyang.Spring.Bean.UserService.save())")
public void Surround(ProceedingJoinPoint joinPoint) throws Throwable {
    String result;
    try {
        //前通知
        //执行方法,这个就相当于动态代理中的invoke方法
        result = (String) joinPoint.proceed(joinPoint.getArgs());
        //后通知
    } catch (Throwable e) {
        // TODO Auto-generated catch block
        e.printStackTrace();
        //异常通知
    }
    System.out.println("环绕处理,运行结果:"+result);
}
}
环绕通知的实际原理就是将动态代理的invoke方法拿出来,让开发人员自己去执行,在这里就可以在合适的位置加上对应的代码块,实现指定的通知类型
PS:如果同时存在普通通知和环绕通知,环绕通知先执行,之后轮到普通通知环绕通知的更多分析
打上断点,开始分析,首先来说要执行代理方法吗,首先要去拿到代理方法的参数,所以能看到,AOP内部对代理方法的参数列表进行复制,然后把结果塞进一个Object数组,这就是参数获取的方式
@Override
    public Object[] getArgs() {
        if (this.defensiveCopyOfArgs == null) {
            Object[] argsSource = this.methodInvocation.getArguments();
            this.defensiveCopyOfArgs = new Object[argsSource.length];
            System.arraycopy(argsSource, 0, this.defensiveCopyOfArgs, 0, argsSource.length);
        }
        return this.defensiveCopyOfArgs;
    }
之后就是执行方法的过程,系统内会先产生一个代理对象,并且使用前面拿到的参数进行初始化,之后又进行了代理对象的克隆(Object自带的那个克隆方法),后面执行方法的也是克隆体
@Override
    public Object proceed(Object[] arguments) throws Throwable {
        Assert.notNull(arguments, "Argument array passed to proceed cannot be null");
        if (arguments.length != this.methodInvocation.getArguments().length) {
            throw new IllegalArgumentException("Expecting " +
                    this.methodInvocation.getArguments().length + " arguments to proceed, " +
                    "but was passed " + arguments.length + " arguments");
        }
        this.methodInvocation.setArguments(arguments);
        return this.methodInvocation.invocableClone(arguments).proceed();
    }
- AOP的应用
AOP可以再不侵入程序的情况下进行程序功能的拓展和方法的拦截
(1)日志的生成
(2)权限的管理
(3)拦截器的实现
- 事务相关的讨论
什么是事务:逻辑上紧密相关的一系列操作,要么都执行,要么都不执行
事务的几个特性:
(1)原子性:即不可再分的,事务涉及到的几个操作必须一起执行或者一起失败
(2)一致性:即数据的一致性,事务中的一条或者几条操作失败以后,数据要回滚到最开始的状态
(3)隔离性:多个事务并发执行,相互之间互不影响
(4)持久性:在事务执行完毕以后,对数据的影响要永久的保留下来
- 关于IOC中单例对象的创建流程的源码分析
首先来说,我使用的是ClassPathXmlApplicationContext进行容器的初始化,初始化会传入一个路径,指定IOC配置文件所在的位置,这里面实际上是调用了其自身的一个构造器,需要三个参数,第一个参数指定加载配置文件的位置,第二个参数指定是否更新容器,在这里默认true,最后一个参数是指定是否用父类的构造器进行创建
/**
     * Create a new ClassPathXmlApplicationContext, loading the definitions
     * from the given XML file and automatically refreshing the context.
     * @param configLocation resource location
     * @throws BeansException if context creation failed
     */
    public ClassPathXmlApplicationContext(String configLocation) throws BeansException {
        this(new String[] {configLocation}, true, null);
    }


    //上面的this指代的就是下面的构造器
    /**
     * Create a new ClassPathXmlApplicationContext with the given parent,
     * loading the definitions from the given XML files.
     * @param configLocations array of resource locations
     * @param refresh whether to automatically refresh the context,
     * loading all bean definitions and creating all singletons.
     * Alternatively, call refresh manually after further configuring the context.
     * @param parent the parent context
     * @throws BeansException if context creation failed
     * @see #refresh()
     */
    public ClassPathXmlApplicationContext(String[] configLocations, boolean refresh, ApplicationContext parent)
            throws BeansException {

        super(parent);
        setConfigLocations(configLocations);
        if (refresh) {
            refresh();
        }
    }
在接下来,系统会调用refresh(),进行容器的更新,Spring会在这个函数里面完成容器初始化所需要的各种准备工作,并且着手创建各种自定义对象,首先加上同步锁,保证多线程下的安全性
@Override
    public void refresh() throws BeansException, IllegalStateException {
        synchronized (this.startupShutdownMonitor) {
            //为更新bean做准备
            prepareRefresh();

            //创建一个bean工厂,这里会加载配置文件中的信息
            ConfigurableListableBeanFactory beanFactory = obtainFreshBeanFactory();

            // Prepare the bean factory for use in this context.
            prepareBeanFactory(beanFactory);

            try {
                // Allows post-processing of the bean factory in context subclasses.
                postProcessBeanFactory(beanFactory);

                // Invoke factory processors registered as beans in the context.
                invokeBeanFactoryPostProcessors(beanFactory);

                // Register bean processors that intercept bean creation.
                registerBeanPostProcessors(beanFactory);

                //初始化国际化相关的事件
                initMessageSource();

                // Initialize event multicaster for this context.
                initApplicationEventMulticaster();

                //对于自定义的子类,所创建的bean在这里创建
                onRefresh();

                // Check for listener beans and register them.
                registerListeners();

                //初始化所有的单例对象
                finishBeanFactoryInitialization(beanFactory);

                // Last step: publish corresponding event.
                finishRefresh();
            }

            catch (BeansException ex) {
                // Destroy already created singletons to avoid dangling resources.
                destroyBeans();

                // Reset 'active' flag.
                cancelRefresh(ex);

                // Propagate exception to caller.
                throw ex;
            }
        }
    }
如果继续进行跟踪,就会跟到一个接口,但是按照食品的做法,能进到一个实现类,但是在这里我决定记录一下视频中学到的bean创建方法,在这里:
(1)首先根据加载的配置文件的信息,得到一个list
(2)进入循环,根据name获取到bean的定义信息,对于单例非懒加载非抽象的bean进行创建
@Override
    public void preInstantiateSingletons() throws BeansException {
        if (this.logger.isDebugEnabled()) {
            this.logger.debug("Pre-instantiating singletons in " + this);
        }
        List<String> beanNames;
        synchronized (this.beanDefinitionMap) {
            // Iterate over a copy to allow for init methods which in turn register new bean definitions.
            // While this may not be part of the regular factory bootstrap, it does otherwise work fine.
            beanNames = new ArrayList<String>(this.beanDefinitionNames);
        }
        for (String beanName : beanNames) {
            RootBeanDefinition bd = getMergedLocalBeanDefinition(beanName);
            if (!bd.isAbstract() && bd.isSingleton() && !bd.isLazyInit()) {
                if (isFactoryBean(beanName)) {
                    final FactoryBean<?> factory = (FactoryBean<?>) getBean(FACTORY_BEAN_PREFIX + beanName);
                    boolean isEagerInit;
                    if (System.getSecurityManager() != null && factory instanceof SmartFactoryBean) {
                        isEagerInit = AccessController.doPrivileged(new PrivilegedAction<Boolean>() {
                            @Override
                            public Boolean run() {
                                return ((SmartFactoryBean<?>) factory).isEagerInit();
                            }
                        }, getAccessControlContext());
                    }
                    else {
                        isEagerInit = (factory instanceof SmartFactoryBean &&
                                ((SmartFactoryBean<?>) factory).isEagerInit());
                    }
                    if (isEagerInit) {
                        getBean(beanName);
                    }
                }
                else {
                    getBean(beanName);
                }
            }
        }
    }
这个getbean方法跟IOC讨论里面的方法是一个方法,这里就不再赘述了
- 关于声明式事务使用的步骤
(1)Spring内置了许多事务管理器,要想使用,需要先把他它们交给容器处理,在配置文件中加入它
(2)在配置文件中加入对应的配置,开启基于注解的事务
    <!-- 配置事务管理器 -->
    <bean id="dataSourceTransactionManager" class="org.springframework.jdbc.datasource.DataSourceTransactionManager">
        <property name="dataSource" ref="dataSource"></property>
    </bean>

    <!-- 开启注解 -->
    <tx:annotation-driven transaction-manager="dataSourceTransactionManager"/>
(3)在相应的逻辑代码上加上注解即可
@Service
public class BookService {

    @Autowired
    private BookDao bookDao;
    /*
     *  *可以加在注解中的参数
     *  1. timeout一个整数,指定秒数,超出以后事务自动回滚
     *  2. readOnly只读,只允许读操作
     *  3. noRollbackFor定义不用回滚的异常
     *  4. RollbackFor定义需要回滚的异常
     *  5. 传播行为propagation
     *      这里有两个取值1. Propagation.REQUIRED如果事务之中套事务则共用一个事务,要回滚一块回滚
     *              2. REQUIRES_NEW事务套失误的时候,各自开一个链接,尽量不互相影响
     */
    @Transactional
    public void checkout() {
        int book_id = 1;
        String user = "zhangfei";
        //更新库存
        bookDao.updateStock(book_id);

        if(book_id==1) {
            throw new RuntimeException("城管来了!");
        }
        //获取价格
        int price = bookDao.getPrice(book_id);

        //扣钱
        bookDao.updateBalance(price, user);
    }

}
可以推测的是,声明式事务使用了aop,aop底层实现就是动态代理,所以声明式事务本质上就是使用动态代理对原有程序功能进行的一种拓展
- 对于Springmvc项目的配置,
(1)在Maven项目的pom文件中加入相关依赖
(2)配置一个前端控制器,功能是拦截所有请求,并且进行请求的分派
<?xml version="1.0" encoding="UTF-8"?>
<web-app xmlns:xsi="http://www.w3.org/2001/XMLSchema-instance" xmlns="http://xmlns.jcp.org/xml/ns/javaee" xsi:schemaLocation="http://xmlns.jcp.org/xml/ns/javaee http://xmlns.jcp.org/xml/ns/javaee/web-app_4_0.xsd" id="WebApp_ID" version="4.0">
  <welcome-file-list>
    <welcome-file>index.jsp</welcome-file>
  </welcome-file-list>

  <display-name>SpringmvcDemo2</display-name>

  <servlet>
      <servlet-name>springDispatcherServlet</servlet-name>
      <servlet-class>org.springframework.web.servlet.DispatcherServlet</servlet-class>
      <init-param>
          <param-name>contextConfigLocation</param-name>
          <param-value>classpath:IOC.xml</param-value>
      </init-param>
      <load-on-startup>1</load-on-startup>
  </servlet>

  <servlet-mapping>
      <servlet-name>springDispatcherServlet</servlet-name>
      <url-pattern>/</url-pattern>
  </servlet-mapping>
</web-app>
(3)在页面中写一个a标签触发请求,并且编写控制器代码处理请求
@Controller
public class UserController {

    @RequestMapping("/hello")
    public String sayHello() {
        System.out.println("Hello");
        return "/page/success.jsp";
    }
}
此外,还可以配置一个视图处理器,微页面的跳转设置相应的前后缀,这样最后的跳转就只用写也免得名称,这个视图控制器也是一个bean,需要配置到我们的Spring配置文件中
<?xml version="1.0" encoding="UTF-8"?>
<beans xmlns="http://www.springframework.org/schema/beans"
    xmlns:xsi="http://www.w3.org/2001/XMLSchema-instance"
    xmlns:context="http://www.springframework.org/schema/context"
    xmlns:aop="http://www.springframework.org/schema/aop"
    xmlns:tx="http://www.springframework.org/schema/tx"
    xmlns:mvc="http://www.springframework.org/schema/mvc"
    xsi:schemaLocation="http://www.springframework.org/schema/beans http://www.springframework.org/schema/beans/spring-beans.xsd
        http://www.springframework.org/schema/tx http://www.springframework.org/schema/tx/spring-tx-2.5.xsd
        http://www.springframework.org/schema/context http://www.springframework.org/schema/context/spring-context-4.0.xsd http://www.springframework.org/schema/aop
        http://www.springframework.org/schema/aop/spring-aop.xsd http://www.springframework.org/schema/mvc http://www.springframework.org/schema/mvc/spring-mvc.xsd">

    <!-- 组件扫描,装配使用注解的类 -->
    <context:component-scan base-package="com.fengyang.Controller"></context:component-scan>

    <mvc:annotation-driven></mvc:annotation-driven>

    <bean class="org.springframework.web.servlet.view.InternalResourceViewResolver">
        <property name="prefix" value="/page/"></property>
        <property name="Suffix" value=".jsp"></property>
    </bean>
</beans>
- 源码分析
在前端控制器DispatcherServlet中存在着一些玄机,这个类继承自父类FrameworkServlet,FrameworkServle的父类继承了HttpServlet,也就是说这个前端控制器跟我们自己写的Servlet没有什么不同,在debug的时候点击超链接以后,Eclipse把我们带到了这个地方
/**
     * Exposes the DispatcherServlet-specific request attributes and delegates to {@link #doDispatch}
     * for the actual dispatching.
     */
    @Override
    protected void doService(HttpServletRequest request, HttpServletResponse response) throws Exception {
        if (logger.isDebugEnabled()) {
            String requestUri = urlPathHelper.getRequestUri(request);
            String resumed = WebAsyncUtils.getAsyncManager(request).hasConcurrentResult() ? " resumed" : "";
            logger.debug("DispatcherServlet with name '" + getServletName() + "'" + resumed +
                    " processing " + request.getMethod() + " request for [" + requestUri + "]");
        }

        // Keep a snapshot of the request attributes in case of an include,
        // to be able to restore the original attributes after the include.
        Map<String, Object> attributesSnapshot = null;
        if (WebUtils.isIncludeRequest(request)) {
            logger.debug("Taking snapshot of request attributes before include");
            attributesSnapshot = new HashMap<String, Object>();
            Enumeration<?> attrNames = request.getAttributeNames();
            while (attrNames.hasMoreElements()) {
                String attrName = (String) attrNames.nextElement();
                if (this.cleanupAfterInclude || attrName.startsWith("org.springframework.web.servlet")) {
                    attributesSnapshot.put(attrName, request.getAttribute(attrName));
                }
            }
        }

        // Make framework objects available to handlers and view objects.
        request.setAttribute(WEB_APPLICATION_CONTEXT_ATTRIBUTE, getWebApplicationContext());
        request.setAttribute(LOCALE_RESOLVER_ATTRIBUTE, this.localeResolver);
        request.setAttribute(THEME_RESOLVER_ATTRIBUTE, this.themeResolver);
        request.setAttribute(THEME_SOURCE_ATTRIBUTE, getThemeSource());

        FlashMap inputFlashMap = this.flashMapManager.retrieveAndUpdate(request, response);
        if (inputFlashMap != null) {
            request.setAttribute(INPUT_FLASH_MAP_ATTRIBUTE, Collections.unmodifiableMap(inputFlashMap));
        }
        request.setAttribute(OUTPUT_FLASH_MAP_ATTRIBUTE, new FlashMap());
        request.setAttribute(FLASH_MAP_MANAGER_ATTRIBUTE, this.flashMapManager);

        try {
            doDispatch(request, response);
        }
        finally {
            if (WebAsyncUtils.getAsyncManager(request).isConcurrentHandlingStarted()) {
                return;
            }
            // Restore the original attribute snapshot, in case of an include.
            if (attributesSnapshot != null) {
                restoreAttributesAfterInclude(request, attributesSnapshot);
            }
        }
    }
看起来很陌生,但是这个类是重写的是父类方法,我们去到父类查看信息,还是挺有收获的,这个doService就是原先JavaWeb中doGet和doPost方法的升级版,用来处理相关的请求,那么问题就变得明了,事实上对于请求来说,他们依旧会被doGet或者doPost处理,但是源码中的表现都无一例外地调用了doService
/**
     * 子类必须实现这个方法来实现对于请求的处理,
     * 接收集中的GET、POST、PUT和DELETE回调.
     * 本质上该方法和一般的重写方法效果一致(指的是HttpServlet中的doGet,doPost)
     * <p>This class intercepts calls to ensure that exception handling and
     * event publication takes place.
     * @param request current HTTP request
     * @param response current HTTP response
     * @throws Exception in case of any kind of processing failure
     * @see javax.servlet.http.HttpServlet#doGet
     * @see javax.servlet.http.HttpServlet#doPost
     */
    protected abstract void doService(HttpServletRequest request, HttpServletResponse response)
            throws Exception;
继续分析,在DispatcherServlet中会进行请求的判断,具体的实现在WebUtils中实现了,跟进源码,我们会看到,这个获取了请求的uri判定是否为null,返回的是一个布尔类型的结果
/**
     * Determine whether the given request is an include request,
     * that is, not a top-level HTTP request coming in from the outside.
     * <p>Checks the presence of the "javax.servlet.include.request_uri"
     * request attribute. Could check any request attribute that is only
     * present in an include request.
     * @param request current servlet request
     * @return whether the given request is an include request
     */
    public static boolean isIncludeRequest(ServletRequest request) {
        //INCLUDE_REQUEST_URI_ATTRIBUTE==javax.servlet.include.request_uri
        return (request.getAttribute(INCLUDE_REQUEST_URI_ATTRIBUTE) != null);
    }
很不幸的是,在这里我的猜测出现了一点偏差,我以为这个会返回一个true,结果这个返回以后直接跳出了if判断,也就是说这里的判断结果显示uri是null,接下来在doService发生的一切就比较容易理解,Springmvc利用系统的属性值给request的属性赋值,我能看出来的就是1. 项目的上下文路径,2.本地方法处理器,3. 主题处理器,之后又设置了一些和session相关的属性,这里我没怎么看懂
// Make framework objects available to handlers and view objects.
        request.setAttribute(WEB_APPLICATION_CONTEXT_ATTRIBUTE, getWebApplicationContext());
        request.setAttribute(LOCALE_RESOLVER_ATTRIBUTE, this.localeResolver);
        request.setAttribute(THEME_RESOLVER_ATTRIBUTE, this.themeResolver);
        request.setAttribute(THEME_SOURCE_ATTRIBUTE, getThemeSource());

        FlashMap inputFlashMap = this.flashMapManager.retrieveAndUpdate(request, response);
        if (inputFlashMap != null) {
            request.setAttribute(INPUT_FLASH_MAP_ATTRIBUTE, Collections.unmodifiableMap(inputFlashMap));
        }
        request.setAttribute(OUTPUT_FLASH_MAP_ATTRIBUTE, new FlashMap());
        request.setAttribute(FLASH_MAP_MANAGER_ATTRIBUTE, this.flashMapManager);
据说,真正的前端控制器分发请求的操作发生在方法:doDispatch()中,后面研究了一下这里的源码,有一些收获,这里会先进行判定请求的url是否是一个复合的url,但是我没明白,怎样才算是复合的请求,之后的时候代码会来到这一步
问题解决:根据雷的视频中的说法,这里检查的其实是携带文件上传的方法,如果是的话则会生成一个新的方法
protected void doDispatch(HttpServletRequest request, HttpServletResponse response) throws Exception {
        HttpServletRequest processedRequest = request;
        HandlerExecutionChain mappedHandler = null;
        boolean multipartRequestParsed = false;

        WebAsyncManager asyncManager = WebAsyncUtils.getAsyncManager(request);

        try {
            ModelAndView mv = null;
            Exception dispatchException = null;

            try {
                //检查是否是文件上传指令
                processedRequest = checkMultipart(request);
                multipartRequestParsed = processedRequest != request;

                // Determine handler for the current request.
                //寻找对应的处理器
                mappedHandler = getHandler(processedRequest);
                //如果没有就会报404
                if (mappedHandler == null || mappedHandler.getHandler() == null) {
                    noHandlerFound(processedRequest, response);
                    return;
                }
                ///...
            }
        }
}

method--getHandler
    /**
     * 对于当前传入的请求,返回处理器执行链.
     * <p>尝试所有的处理器请求映射.
     * @param request current HTTP request
     * @return the HandlerExecutionChain, or {@code null} if no handler could be found
     */
    protected HandlerExecutionChain getHandler(HttpServletRequest request) throws Exception {
        for (HandlerMapping hm : this.handlerMappings) {
            if (logger.isTraceEnabled()) {
                logger.trace(
                        "Testing handler map [" + hm + "] in DispatcherServlet with name '" + getServletName() + "'");
            }
            HandlerExecutionChain handler = hm.getHandler(request);
            if (handler != null) {
                return handler;
            }
        }
        return null;
    }
可以看到的是,这里获取到了一个控制器,使用的是getHandler,这个方法本质上会去检索当前servlet的所有url,但是这里我存在一个困扰,对于dispacherServlet,其本身并不存在自定义的请求映射,所以我又去看了一眼这个this.handlerMappings的一些引用,不出所料,我找到了他的初始化阶段的一些行为,具体的操作如下
/**
     * Initialize the HandlerMappings used by this class.
     * <p>If no HandlerMapping beans are defined in the BeanFactory for this namespace,
     * we default to BeanNameUrlHandlerMapping.
     */
    private void initHandlerMappings(ApplicationContext context) {
        this.handlerMappings = null;

        if (this.detectAllHandlerMappings) {
            // Find all HandlerMappings in the ApplicationContext, including ancestor contexts.
            Map<String, HandlerMapping> matchingBeans =
                    BeanFactoryUtils.beansOfTypeIncludingAncestors(context, HandlerMapping.class, true, false);
            if (!matchingBeans.isEmpty()) {
                this.handlerMappings = new ArrayList<HandlerMapping>(matchingBeans.values());
                // We keep HandlerMappings in sorted order.
                OrderComparator.sort(this.handlerMappings);
            }
        }
        else {
            try {
                HandlerMapping hm = context.getBean(HANDLER_MAPPING_BEAN_NAME, HandlerMapping.class);
                this.handlerMappings = Collections.singletonList(hm);
            }
            catch (NoSuchBeanDefinitionException ex) {
                // Ignore, we'll add a default HandlerMapping later.
            }
        }

        // Ensure we have at least one HandlerMapping, by registering
        // a default HandlerMapping if no other mappings are found.
        if (this.handlerMappings == null) {
            this.handlerMappings = getDefaultStrategies(context, HandlerMapping.class);
            if (logger.isDebugEnabled()) {
                logger.debug("No HandlerMappings found in servlet '" + getServletName() + "': using default");
            }
        }
    }
事实上这里面的handlerMappings 内部有一个handlemap用来存储请求对应的处理器全类名,所以就能很方便地使用request里面的请求路径找到处理器,这里的遍历会先去寻找bean配置的请求,再去寻找注解配置的请求
实际上的操作就是根据Spring配置文件中(这里说IOC容器更加严谨)配置的所有请求映射,然后加入到这个list当中,这样的话,我们上一步中的操作就合理了,遍历所有请求映射,然后根据请求内容获取到合适的处理器,但是Springmvc并不是使用这个处理器直接处理请求,他在这里会根据请求在自己的处理器适配器集合中寻找一个合适的适配器并使用这个来处理请求,也就是下面的样子
try {
                    // Actually invoke the handler.
                    //适配器执行目标方法,将执行信息封装成ModelAndView
                    mv = ha.handle(processedRequest, response, mappedHandler.getHandler());
                }
                finally {
                    if (asyncManager.isConcurrentHandlingStarted()) {
                        return;
                    }
                }
可以看到最终处理器适配器处理请求并生成了MaodelAndView进行视图渲染
protected void doDispatch(HttpServletRequest request, HttpServletResponse response) throws Exception {
        HttpServletRequest processedRequest = request;
        HandlerExecutionChain mappedHandler = null;
        boolean multipartRequestParsed = false;

        WebAsyncManager asyncManager = WebAsyncUtils.getAsyncManager(request);

        try {
            ModelAndView mv = null;
            Exception dispatchException = null;

            try {
                processedRequest = checkMultipart(request);
                multipartRequestParsed = processedRequest != request;

                // Determine handler for the current request.
                mappedHandler = getHandler(processedRequest);
                if (mappedHandler == null || mappedHandler.getHandler() == null) {
                    noHandlerFound(processedRequest, response);
                    return;
                }

                // Determine handler adapter for the current request.
                HandlerAdapter ha = getHandlerAdapter(mappedHandler.getHandler());

                // Process last-modified header, if supported by the handler.
                String method = request.getMethod();
                boolean isGet = "GET".equals(method);
                if (isGet || "HEAD".equals(method)) {
                    long lastModified = ha.getLastModified(request, mappedHandler.getHandler());
                    if (logger.isDebugEnabled()) {
                        String requestUri = urlPathHelper.getRequestUri(request);
                        logger.debug("Last-Modified value for [" + requestUri + "] is: " + lastModified);
                    }
                    if (new ServletWebRequest(request, response).checkNotModified(lastModified) && isGet) {
                        return;
                    }
                }

                if (!mappedHandler.applyPreHandle(processedRequest, response)) {
                    return;
                }

                try {
                    // Actually invoke the handler.
                    mv = ha.handle(processedRequest, response, mappedHandler.getHandler());
                }
                finally {
                    if (asyncManager.isConcurrentHandlingStarted()) {
                        return;
                    }
                }

                applyDefaultViewName(request, mv);
                mappedHandler.applyPostHandle(processedRequest, response, mv);
            }
            catch (Exception ex) {
                dispatchException = ex;
            }
            //转发到页面
            processDispatchResult(processedRequest, response, mappedHandler, mv, dispatchException);
        }
        catch (Exception ex) {
            triggerAfterCompletion(processedRequest, response, mappedHandler, ex);
        }
        catch (Error err) {
            triggerAfterCompletionWithError(processedRequest, response, mappedHandler, err);
        }
        finally {
            if (asyncManager.isConcurrentHandlingStarted()) {
                // Instead of postHandle and afterCompletion
                mappedHandler.applyAfterConcurrentHandlingStarted(processedRequest, response);
                return;
            }
            // Clean up any resources used by a multipart request.
            if (multipartRequestParsed) {
                cleanupMultipart(processedRequest);
            }
        }
    }
之后Springmvc将这个视图交付
ViewResover处理视图,并向前端返回View,至此全部的过程就完结了,页面已经跳转到另一个页面,就好像什么都没发生一样,下面总结一下工作流程:
(1)前端控制器DispatcherServlet拦截用户的请求
(2)MappedHandler会根据容器中的请求映射匹配合适的处理器,得到处理器执行链
(3)根据处理器得到相应的处理器适配器HandleAdaptor
(4)处理器适配器处理请求,拿到对应的响应视图ModelAndView
(5)ViewResolver进行视图渲染,并返回一个View
(6)前端控制器获取到View,并完成页面跳转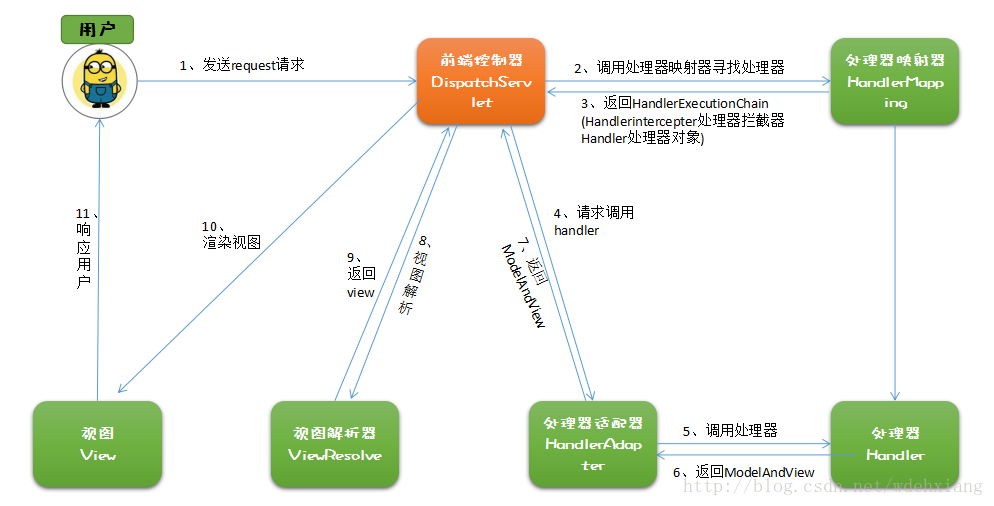
- 关于DispatcherServlet的更多讨论,更加深层次的分析
第一个部分是对于getHandle的研究,这里在之前讨论过,是使用了一个循环来实现了对于处理器的遍历,但是究竟遍历了什么呢,看一眼源码
这里看到的是对于handlerMappings它本身存储了两个对象,我们去遍历,遍历的也是这两个对象,对于第一个对象上午雷讲的是对于在配置文件中配置的Servlet以及相关的映射,这种操作在初代版本的JavaWeb项目中是常用的配置方式,但是目前我们的项目中web.xml文件中仅有一个前端控制器,不存在其他Servlet点开详情发现其内容,不出所料也就是空空如也,事实上beanNameUrlHandleMapping和DefaultAnnotationHandleMapping中存储Servlet中的映射方法都是使用一个map将映射和Servlet的全类名联系起来,最后拿到的处理器也就是我们自己编写的Servlet
第二个细节就是对于目标方法的执行细节,但是在之前就已经提到过,真正去执行方法的其实是处理器适配器,事实上Springmvc会根据处理器寻找对应的适配器,具体的操作看一眼源码
可以很清楚的看到,这里又在遍历list,这个list有三个元素分别指的是原生的HttpRequestHandlerAdapter和另外两个是配置,在现在的开发中使用注解进行映射的编写已经是常态了,所以不难推测,这里真正有用的其实就是最后一个AnnotationMethodHandlerAdaper,点开详细内容观察,其实就是如此,因为第一个和第二个的内容为空,只有第三个有内容,真实的逻辑就很明了了
- 关于RequestMapping的讨论
在Springmvc中,@RequestMapping用来映射方法,他是一个接口,可以用在方法或者类上,具体的参数解析如下
(1)value:映射的具体值
(2)method:指定接受的请求方法类型,默认全部接受
(3)params:
(4)headers
(5)consumes
(6)produces
对于Springmvc内置的九大组件的介绍(其实是DispatherServlet九大属性的介绍)
/** 多部分解析器--文件上传相关 */
private MultipartResolver multipartResolver;

/** 区域解析器--国际化相关 */
private LocaleResolver localeResolver;

/** 主题解析器--用处不大 */
private ThemeResolver themeResolver;

/** 处理器映射 */
private List<HandlerMapping> handlerMappings;

/** 处理器适配器 */
private List<HandlerAdapter> handlerAdapters;

/**Springmvc异常处理 */
private List<HandlerExceptionResolver> handlerExceptionResolvers;

/** 请求向视图名转化的转换器 */
private RequestToViewNameTranslator viewNameTranslator;

/** 闪存映射管理器--貌似可以允许重定向携带参数 */
private FlashMapManager flashMapManager;

/** 视图解析器 */
private List<ViewResolver> viewResolvers;
那么这九个组件的初始化行为发生在哪里呢,我们可以找到在DispatherServlet中存在着一个方法,方法onfresh() ```java @Override protected void onRefresh(ApplicationContext context) {
initStrategies(context);}
//不难看到,实际上运行的方法是initStrategies(),我们点进去可以看到 /**
 * Initialize the strategy objects that this servlet uses.
 * <p>May be overridden in subclasses in order to initialize further strategy objects.
 */
protected void initStrategies(ApplicationContext context) {
    initMultipartResolver(context);
    initLocaleResolver(context);
    initThemeResolver(context);
    initHandlerMappings(context);
    initHandlerAdapters(context);
    initHandlerExceptionResolvers(context);
    initRequestToViewNameTranslator(context);
    initViewResolvers(context);
    initFlashMapManager(context);
}
可以看到一个不多,一个不少,九个组件都在这里使用IOC容器进行各自的初始化操作<br />2020/7/8 今天不想学Springmvc了,看点别的去

27. Springmvc中使用到的信息传递--从Controller传递到页面

(1)使用Map传递<br />(2)使用Model传递<br />(3)使用ModelMap传递
```java
@Controller
public class OptputController {

    private static String Info = "info";

    @RequestMapping("testMap")
    public String testMap(Map<String, Object> result){
        System.out.println("testMap...");
        result.put("msg", "悠悠的古城中");
        return Info;
    }

    @RequestMapping("testModel")
    public String testModel(Model result){
        System.out.println("testModel...");
        result.addAttribute("msg", "悠悠的古城中");
        return Info;
    }

    @RequestMapping("testModelMap")
    public String testModel(ModelMap result){
        System.out.println("testModelMap...");
        result.addAttribute("msg", "悠悠的古城中");
        return Info;
    }
}
这里最后的数据都被存储到了请求域中,而且三者虽然形式不同,但是最后是用的就是一个类,这个类就是BindingAwareModelMap,不难看出map和Model都仅仅是一个接口,最后发挥作用的肯定是一个实现类,BindingAwareModelMap继承自ExtendedModelMap,而这个父类的样子是这样的
他可以说是Model和ModelMap的共同子类,而对于ModelMap来说,其父类是LinkedHashMap,这个就不用看源码了,妥妥的map子类,所以来说三种方式最后殊途同归,Springmvc的策略就是使用BindingawareModelMap实现信息的传递,而且最后信息是被塞到了请求域中供页面调用

若有收获,就点个赞吧
0 人点赞
