关于文件操作,各个语言都是有相关的api。而在java中的文件操作,一直是我忽略的,之前总觉得麻烦,无用,当我在使用 springboot的时候,意识到自己对这块知识的欠缺,但也并为在意,因为我一直都在用 阿里云oss来存放文件信息,有一说一,这个确实方便,而且可以使用文件直传,并不会占用我们后台自己的带宽。以后的趋势也应该如此,但是最近操作系统和数据结构又用到了文件读取操作,那没办法,我还是来仔细看看吧。
File
关于 File 这个类,是java 对文件以及文件目录信息的封装,它不存在 io流操作,但是在学io流操作之前,请务必了解一下 File 这个类。
前提:你要知道,相对路径和绝对路径的区别,过于简单,这里就不写了。
实例化
来一个hello word 代码。
在项目根目录下创建一个 hello.txt
File 构造方法的参数可以是一个文件路径,也可以是目录,这个路径默认从项目 或者Module 的根路径下开始
(Ps: 如果在 Main 方法里,会从 项目根目录开始)
- File(String pathName) 文件路径
- File(parent,chirld)父目录和子目录
要注意的是,如果你的文件路径和目录路径 不存在的话,并不会报异常,File 这个类仅仅是通过 路径来读取文件的信息(不是文件内容)加载到内存中,如果文件不存在的话并没有关系。
//文件默认从 项目根目录下开始File f1 = new File("hello.txt");System.out.println(f1);//hello.txt//目录: 父目录,子目录File f2 = new File("C:\\data\\java\\java", "src");System.out.println(f2);//C:\data\java\java\src
常用的 api 获取文件基本信息
- getName() 返回文件的名字
- getPath() 返回文件相对路径
- getAbsolutePath() 返回文件绝对路径
- length() 返回文件字节长度,如果文件不存在,长度为0,
- lastModified() 返回文件最后的修改时间,(时间戳格式)
- 如果是目录的话,list() 返回文件目录结构,返回的是 String[] 类型
listFiles() 返回的是File[] 类型的目录结构
  @Test
  public void testMethod() {

      //如果文件存在的话,file会去读取文件信息
      //如果不存在,则大小为null,也获取不到修改时间等信息。但要注意,它并不会报异常
      File f1 = new File("hello1.txt");

      //名字
      System.out.println(f1.getName());
      //相对路径
      System.out.println(f1.getPath());
      //绝对路径
      System.out.println(f1.getAbsolutePath());
      //文件长度
      System.out.println(f1.length());
      //上次修改时间
      System.out.println(f1.lastModified());

      System.out.println();

      //如果是目录的话,可以读取目录下的文件信息
      File f2 = new File("C:\\data\\java", "java");

      //如果文件不存在,那么 list的时候会报错
      for (String s : f2.list()) {
          System.out.println(s);
      }

      //还可以读取成文件形式
      for (File file : f2.listFiles()) {
          System.out.println(file);
      }
  }
移动文件并且重命名
这个操作类似与 Linux 中的 move 指令,我们可以通过move 移动文件的方式重命名
renameTo(File file) 移动到参数中 file 的文件位置
如果文件存在,那么移动失败 返回 false,移动成功返回 true
    @Test
    public void testMove() {
        File f1 = new File("hello.txt");
        File f2 = new File("hello2.txt");

        System.out.println(f1.length()==0?"文件为空":f1.length());//10
        System.out.println(f2.length()==0?"文件为空":f2.length());//文件为空

        //移动文件到 f2 的位置并且重命名为 f2, 类似与 linux 中的move操作
        //如果f2 文件存在,移动失败返回false, f2 不存在,移动成功返回true
        boolean b = f1.renameTo(f2);
        System.out.println(b);//true

        System.out.println(f1.length()==0?"文件为空":f1.length());//文件为空
        System.out.println(f2.length()==0?"文件为空":f2.length());//文件为空
    }
获取文件在磁盘中的具体信息
- isDirectory() 是不是目录
- isHidden() 是不是隐藏类型
- isFile() 是不是文件
- exists() 文件是否存在
- canRead() 文件是否可读
- canWrite() 文件是否可写
    @Test
    public void testFileInfo() {
        File f1 = new File("hello2.txt");
        //是不是目录
        System.out.println(f1.isDirectory());//false
        //是不是隐藏
        System.out.println(f1.isHidden());//false
        //是不是文件
        System.out.println(f1.());//true
        //在磁盘中存不存在
        System.out.println(f1.exists());//true
        //是不是可读
        System.out.println(f1.canRead());//true
        //是不是可写
        System.out.println(f1.canWrite());//true
    }
文件的创建和删除操作
- createNewFile() 如果文件不存在,那么创建一个文件,然后 true,如果文件存在,则创建失败返回 false
- delete() 删除文件,删除的时候并不会走回收站
- mkdir()创建文件目录 比如 hello 创建目录 hello
mkdirs()创建多级文件目录,如果你创建 hello/files, hello也不存在的话,那么hello一并创建
  //文件操作
  @Test
  public void testCreateAndDelete() throws IOException {
      File f1 = new File("hi.txt");
      //如果文件不存在,那么创建一个新的文件
      if (!f1.exists()) {
          boolean create = f1.createNewFile();
          System.out.println(create);
      } else {
          //文件存在就删除,疯狂套娃,注意一下,删除的时候并不会走回收站
          boolean delete = f1.delete();
          System.out.println(delete);
      }

      //目录存在, 创建失败
      //mkdir()创建文件目录 /hello 创建目录 hello
      File f2 = new File("C:\\data\\java\\java", "hello");
      System.out.println(f2.mkdir());

      //mkdirs()创建多级文件目录,如果你创建 hello/files, hello也不存在的话,那么hello一并创建
      File f3 = new File("C:\\data\\java\\java\\hello", "files");
      System.out.println(f3.mkdirs());
  }
虽然 File 只是对 硬盘上文件的基本信息读取,但并没有对文件的内容进行操作,如果需要对文件内容进行读取或者写入,那么就需要用到 IO 流了,而File 正是IO流中所要用到的对象
IO 流
IO 流是 input/output 的缩写,I/O 技术是非常实用的技术,用来处理设备之间的信息传输,比如网络通讯,文件读取等
在java 程序中,对数据的输入和输出,使用 “流(Stream)”的方式进行。java.io 包下提供各种流类和接口,并通过标准的方法输入和输出
流的分类
io流可以根据流向区分,也可以按照数据单位不同区分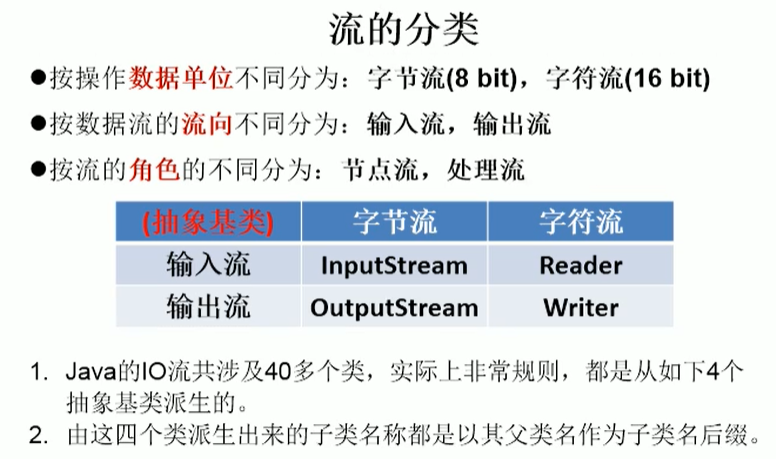
字节流,是以 byte为单位,它的数据都是010101二进制,所以一般用来处理图像,视频。
字符流以 char 为单位,一般用来处理文件内容,它可以清楚的知道数据的内容,比如文本内容 a ,b,c,d
输入流和输出流是按照不同的流向来区分的,但是要注意的是,你是站在文件的角度还是程序的角度。
一般的,在java里我们都是站在程序的角度,或者说站在内存的角度。
比如我们读取文本,那么,这个流就是输入流,
如果我们将程序的数据写入文本,那么这个流就是输出流
至于所谓的节点流还是处理流,这个就有点难了。
如果我们的流是直接作用于文件上的,那么这个流就是节点流。
在节点流的基础上,在进行封装的流被称为处理流。
🌰:
比如说你现在要洗澡,然后拿根水管直接接上水龙头,那么这个水管就是节点流,如果你在水管的外边又套了一根管子来让水流加快,那么这个管子就是处理流。
上图中的四个流都是抽象类,我们可以用它来区分输入流还是输出流,字节流还是字符流,
但并不能创建他的实例,与之对应的节点流分别为
节点流 节点流基础上的处理流(这里被叫做缓冲流)
FileInputStream BufferedInputStream
FileOutputStream BufferedOutputStream
FileReader BufferedReader
FileWriter BufferedWriter
Reader 和 Writer 来读写文件内容
Reader
使用Reader 读取文本内容。
read() 方法,返回的是int 类型,-1为读完文件,要输出文件内容的话,我们可以进行char类型的强转
如果文件不存在,会报异常
    @Test
    public void testReader() throws IOException {
        //指明要操作的文件
        File file = new File("hello.txt");
        //选择 合适的流
        FileReader fileReader = new FileReader(file);

        //返回读入的一个字符,如果为 -1 代表文件读完。
        int read = fileReader.read();
        while (read != -1) {
            System.out.print((char)read);
            read = fileReader.read();
        }

        //关闭流
        fileReader.close();

    }
虽然,我这里hi直接把异常抛出去了,但是还是建议使用try/catch ,因为即使出现了异常,流也必须是要关闭的。
read 方法一次只能获取一个字父,那么我们想一次性读取5个呢?
就要使用 read的重载方法 read(char [] cbuf)
    @Test
    public void testReader2() throws IOException {
        //指明要操作的文件
        File file = new File("hello.txt");
        //选择 合适的流
        FileReader fileReader = new FileReader(file);

        //返回读入的一个字符,如果为 -1 代表文件读完。
        char[] cbuf = new char[5];
        //返回读取的文本内容,比如第一次是5,但是文件中只剩下3个字符的话,那么返回3
        int len = fileReader.read(cbuf);
        while (len != -1) {
            //数组转 string
            String str= new String(cbuf,0, len);
            System.out.print(str);
            len = fileReader.read(cbuf);
        }

        //关闭流
        fileReader.close();
    }
writer
写数据到文件里,其实于写入的套路都是一样的
- 找到指定文件位置,创建File类
- 选择合适的流
- 进行操作
- 关闭流
要注意的是,写入的时候,如果文件不存在的话,会自动创建一个新文件.
如果需要在文件原有内容的基础上写入,那么必须在构造参数里,将append 这一个功能开启
写入的两个方法
- append可以链式调用,添加多个数据
- writer只能添加一个
- apend方法中参数可以为null 会以字符串”null”的形式添加到文件中 writer会报空指针异常
代码:
    @Test
    public void testWriter() throws IOException {
        //指明要操作的文件
        File file = new File("hi.txt");

        //写入的时候,如果文件不存在的话,会自动创建一个新文件
        //如果想要写入的时候,在原有数据的基础上添加,那么需要在构造方法里,打开append,默认的时候为false
//        FileWriter fileWriter = new FileWriter(file);
        FileWriter fileWriter = new FileWriter(file, true);

        //write 只能添加一次
        fileWriter.write("halo write\n");

        //append 可以使用链式方法多次添加数据
        fileWriter.append("hi ")
                .append("hello ")
                .append("this is append\n");

        fileWriter.close();
    }
InputStream 和 OutputStream
读取图片后复制成一份新的图片
通过 inputStream 读取图片数据
outputStream 写入图片数据
需要注意的是 ,byte这个数组的大小,决定着你一次读取多少个字节,其实我们一般都写成1024
    @Test
    public void testStream() {
        copyFile("test.png","test1.png");
    }

    /**
     * 复制文件
     * @param srcPath 原文件路径
     * @param destPath 目的路径
     */
    public void copyFile(String srcPath, String destPath) {
        File file = new File(srcPath);
        File file1 = new File(destPath);

        FileInputStream inputStream = null;
        FileOutputStream outputStream = null;
        try {
            inputStream = new FileInputStream(file);
            outputStream = new FileOutputStream(file1);
            //复制的过程
            byte[] buffer = new byte[1024];
            int len;
            while ((len = inputStream.read(buffer)) != -1) {
                outputStream.write(buffer, 0, len);
            }


        } catch (IOException e) {
            e.printStackTrace();
        } finally {
            try {
                if (inputStream != null)
                    inputStream.close();
                if (outputStream != null)
                    outputStream.close();
            } catch (IOException e) {
                e.printStackTrace();
            }
        }

    }
缓冲流 (建议使用!!)
缓冲流是在上边四个节点流的基础上的处理流,在开发中,我们基本不回去使用上边那四个基本流,因为效率太慢。
缓冲流可以提高读取和写入文件的速度
(Ps:缓冲流是在节点流的基础上进行操作的,所以节点流是 缓冲流的构造参数,如果外层的缓冲流关闭,那么内部的节点流会跟着关闭)
点开源码可以发现,缓冲流是有默认缓冲区的,默认大小为8192 也就是8k,在传输数据的过程中,数据先放入缓冲区中,如果缓冲区满了,他会自动 flush() 然后写入文件中,然后再读取,再写入。
但是你也可以自己手动改 flush 立即写入文件中。
使用缓冲流复制图片
    //实现非文本文件复制,这里以 png 的为例
    @Test
    public void testBuffered() {
        //找文件
        File file = new File("test.png");
        File file1 = new File("test1.png");

        //造流
        BufferedInputStream inputStream = null;
        BufferedOutputStream outputStream = null;
        try {
            inputStream = new BufferedInputStream(new FileInputStream(file));
            outputStream = new BufferedOutputStream(new FileOutputStream(file1));
            //复制的过程
            byte[] buffer = new byte[1024];
            int len;
            while ((len = inputStream.read(buffer)) != -1) {
                outputStream.write(buffer, 0, len);
            }


        } catch (IOException e) {
            e.printStackTrace();
        } finally {
            try {
                //关闭外层的 处理流,内部的节点流会跟着关闭
                if (inputStream != null)
                    inputStream.close();
                if (outputStream != null)
                    outputStream.close();
            } catch (IOException e) {
                e.printStackTrace();
            }
        }
    }
转换流
转换流提供 字节流到字符流的转换。转换流也是处理流。
在 i/o 流中,如果你字节流中的数据都是文本数据,那么用字符流操作其实更快。
而 InputStreamReader 是将字节的输入流转成 字符的输入流。
OutputStreamWriter 将字符输出流转成 字节的输出流 (没有写错,这是差别)。
可以用来解码和编码,比如你读取 utf-8 格式的文件,但是你读取的数据其实已经在内存了,这个时候我们可以更改写出的数据的编码,比如写出的时候使用 gbk 格式。
utf-8 解码
    @Test
    public void testInputStreamReder() throws IOException {
        //File file = new File("hello.txt");
        //如果传入 stringPath,会自动创建 File
        FileInputStream in = new FileInputStream("hello.txt");
        //系统默认的编码
        //InputStreamReader inputStreamReader = new InputStreamReader(in);
        //指定文件格式,一般取决于读取的文件的编码
        InputStreamReader inputStreamReader = new InputStreamReader(in,"UTF-8");

        char[] cbuf = new char[1024];
        int len;
        while ((len  = inputStreamReader.read(cbuf)) != -1) {
            System.out.println(new String(cbuf,0,len));
        }

        inputStreamReader.close();

    }
读取 utf-8 转成 gbk 格式
    @Test
    public void testInputStreamReaderAndOutputStreamWriter() throws IOException {
        FileInputStream in = new FileInputStream("hello.txt");
        FileOutputStream out = new FileOutputStream("hello2.txt");

        InputStreamReader inputStreamReader = new InputStreamReader(in,"utf-8");
        OutputStreamWriter outputStreamWriter = new OutputStreamWriter(out,"gbk");

        char[] cbuf = new char[1024];
        int len;
        while ((len  = inputStreamReader.read(cbuf)) != -1) {
            outputStreamWriter.write(cbuf,0,len);
        }

        inputStreamReader.close();
        outputStreamWriter.close();
    }
其实io流的东西还是比较多了,这里还没讲完,但是好像够用了。其余想了解的可以自行了解。

若有收获,就点个赞吧
0 人点赞
