React 路由管理
- 不同的路径渲染不同的组件
- 有两种实现方式
- HashRouter:利用hash实现路由切换
- BrowserRouter:实现h5 Api实现路由的切换
HashRouter
- 利用 hash 实现路由切换
public/hash.html
<!DOCTYPE html><html lang="en"><head><meta charset="UTF-8"><meta http-equiv="X-UA-Compatible" content="IE=edge"><meta name="viewport" content="width=device-width, initial-scale=1.0"><title>hash router</title></head><body><div id="root"></div><ul><li><a href="#/a">/a</a></li><li><a href="#/b">/b</a></li></ul><script>// 监听 hash 值变化window.addEventListener('hashchange', () => {console.log(window.location.hash);let pathname = window.location.hash.slice(1);document.getElementById('root').innerHTML = pathname;})</script></body></html>
BrowserRouter
- 利用h5 Api实现路由的切换
- 注意:前端路由完全是由前端控制的,跟后端无关。
history
- HTML5规范给我们提供了一个 history 接口
- HTML5 History API包括2个方法:
history.pushState()和history.replaceState(),和1个事件window.onpopstate
pushState
history.pushState(stateObject, title, url),包括三个参数- 第一个参数用于存储该url对应的状态对象,该对象可在onpopstate事件中获取,也可在history对象中获取
- 第二个参数是标题,目前浏览器并未实现
- 第三个参数则是设定的url
- pushState 函数向浏览器的历史堆栈压入一个 url 为设定值的记录,并改变历史堆栈的当前指针至栈顶
replaceState
- 该接口与pushState参数相同,含义也相同
- 唯一的区别在于
replaceState是替换浏览器历史堆栈的当前历史记录为设定的url - 需要注意的是
replaceState不会改动浏览器历史堆栈的当前指针
onpopstate
- 该事件是window的属性
- 该事件会在调用浏览器的前进、后退以及执行
history.forward、history.back、和history.go触发,因为这些操作有一个共性,即修改了历史堆栈的当前指针 - 在不改变 document 的前提下,一旦当前指针改变则会触发
onpopstate事件
示例
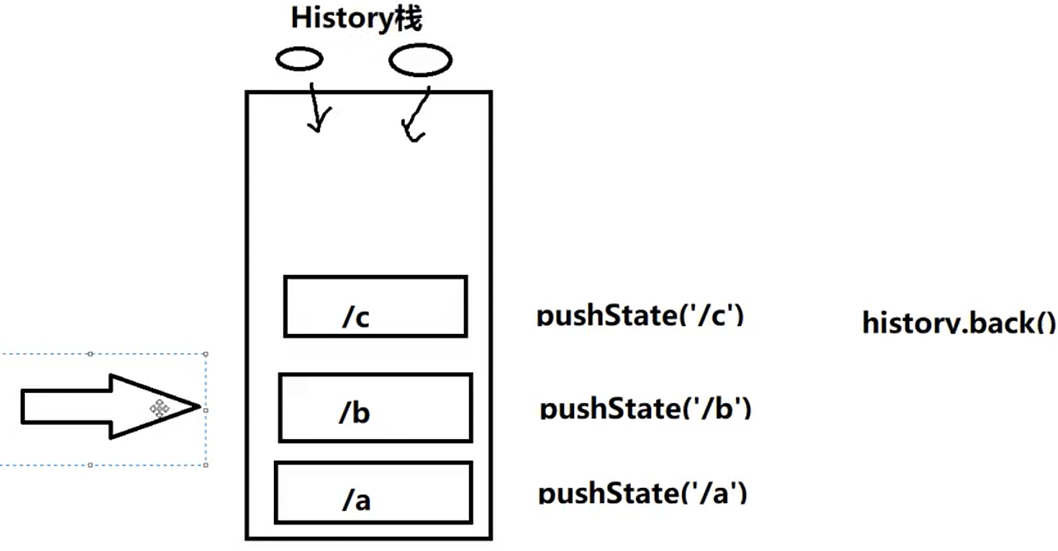
- 浏览器针对每个页面维护一个
History栈,执行pushState函数可压入设定的url至栈顶,同时修改当前指针 - 当执行
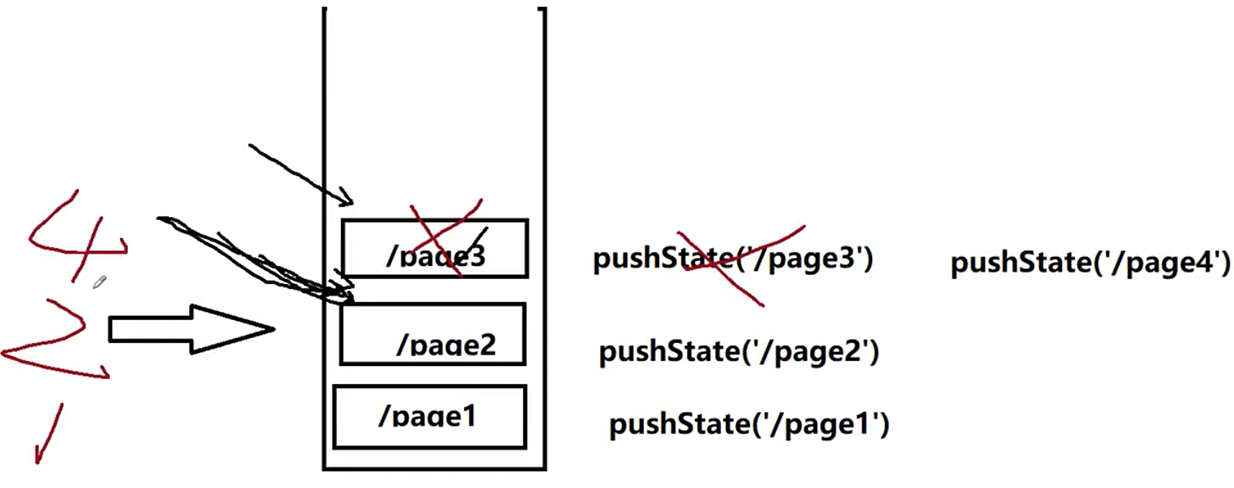
back和forward操作时,history 栈大小并不会改变(history.length不变),仅仅移动当前指针的位置 若当前指针在 history 栈的中间位置(非栈顶),此时执行
pushState会在指针当前的位置添加此条目,并成为新的栈顶<!DOCTYPE html><html lang="en"><head><meta charset="UTF-8"><meta http-equiv="X-UA-Compatible" content="IE=edge"><meta name="viewport" content="width=device-width, initial-scale=1.0"><title>hash router</title></head><body><div id="root"></div><script>// 这个 history 是一个全局管理var globalHistory = window.history;(function(history){let oldPushState = history.pushState;history.pushState = function (pathname, state){let result = oldPushState.apply(history, arguments);if (typeof window.onpushstate){window.onpushstate(new CustomEvent('pushstate', {detail: {pathname, state}}));}return result;}})(globalHistory);const oldHistoryLength = globalHistory.length; //历史条目的长度// 当调用 pushState 的时候,会执行这个函数。(这个浏览器不支持,需要自己处理)window.onpushstate = (event) => {console.log('push', event);}// 当回退或前进的时候,会执行这个。(这个监听是浏览器自带的,默认支持)window.onpopstate = (event) => {console.log('pop', event);}// http://localhost:3000/browser.html// ([1])添加新条目page1,指针移至page1setTimeout(() => {globalHistory.pushState({page: 1}, {title: 'page1'}, '/page1');console.log(globalHistory.length - oldHistoryLength); //1}, 1000)// ([1,2])添加新条目page2,指针移至page2setTimeout(() => {globalHistory.pushState({page: 2}, {title: 'page2'}, '/page2');console.log(globalHistory.length - oldHistoryLength); //2}, 2000)// ([1,2,3])添加新条目page3,指针移至page3setTimeout(() => {globalHistory.pushState({page: 3}, {title: 'page3'}, '/page3');console.log(globalHistory.length - oldHistoryLength); //3}, 3000)// ([1,2,3])页面后退回page2,指针移回page2。(注意:条目的数量不会因此减少1个)setTimeout(() => {globalHistory.back();console.log(globalHistory.length - oldHistoryLength); //3}, 4000)// ([1,2,4])在指针位置(page2处)添加新条目page4,指针移至page4。(page4会成为新的栈顶,page3也就不存在了)。setTimeout(() => {globalHistory.pushState({page: 4}, {title: 'page4'}, '/page4');console.log(globalHistory.length - oldHistoryLength); //3}, 5000)// ([1,2,4])没有添加新条目,指针也仍在page4(因为已经在栈顶了,所以已经没办法再往上移了)setTimeout(() => {globalHistory.go(1);console.log(globalHistory.length - oldHistoryLength); //3}, 6000)</script></body></html>
基本路由
安装
cnpm i -S react-router-dom
src/index.js
import React from 'react';import ReactDOM from 'react-dom';import { HashRouter as Router, Route} from 'react-router-dom';import Home from './components/Home'import User from './components/User'import Profile from './components/Profile'// Router 路由容器,Route 路由规则ReactDOM.render(<Router><Route exact path="/" component={Home} /><Route path="/user" component={User} /><Route path="/profile" component={Profile} /><Route render={props => <div>未发现路由页面</div>} /></Router>,document.getElementById('root'));
src/components/Home.js
const Home = (ps) => {console.log(ps);return (<div>Home</div>)}export default Home;
Router 路由容器
Router 是所有路由组件共用的底层接口。通常,我们的应用程序将使用其中一个高级路由器代替:
最常见的使用底层的
import { Router } from 'react-router';import { HashRouter, BrowserRouter } from 'react-router-dom';import createHashHistory from 'history/createHashHistory';import createBrowserHistory from 'history/createBrowserHistory'const history = createBrowserHistory()<Router history={history}><App/></Router>
属性
history用来导航的history对象。children需要渲染的单一组件。
Route 路由规则
Route 组件也许是 React Router 中最重要的组件,它可以让你理解并学习如何使用它。它最基本的职责是在location与 Route 的 path 匹配时呈现一些 UI。
Route 传递给组件的参数
所有三种渲染方法都将通过相同的三个 Route 属性。
history
location
location 代表应用程序现在在哪,你想让它去哪,或者甚至它曾经在哪,它看起来就像:
router 将在这几个地方为您提供一个 location 对象:
- Route component as this.props.location
- Route render as ({ location }) => ()
- Route children as ({ location }) => ()
- withRouter as this.props.location
注意:它也可以在history.location找到,但是你不应该使用它,因为它是可变的。
location 对象永远不会发生变化,因此你可以在生命周期钩子中使用它来确定何时导航,这对数据抓取和动画非常有用。
match
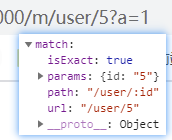
一个match 对象中包涵了有关如何匹配 URL 的信息。match对象中包涵以下属性:
params- (object) key/value 与动态路径的 URL 对应解析isExact- (boolean)true 如果匹配整个 URL (没有结尾字符)path- (string) 用于匹配的路径模式。被嵌套在中使用 url- (string) 用于匹配部分的 URL 。被嵌套在中使用
你将会在这些地方用到match对象:
- Route component 例如this.props.match
- Route render 例如({ match }) => ()
- Route children 例如({ match }) => ()
- withRouter 例如this.props.match
- matchPath 例如 返回值
如果 Route 没有path,那么将会一直与他最近的父级匹配。这也同样适用于withRouter。
Route 渲染组件的方法
component
值是一个组件,不能写自定义的逻辑。
当您使用component(而不是render或children)Route 使用从给定组件React.createElement创建新的React element。这意味着,如果您为component道具提供了内联功能,则每次渲染都会创建一个新组件。这会导致现有组件卸载和安装新组件,而不是仅更新现有组件。当使用内联函数进行内联渲染时,使用render或者children(如下所示)。
<Route path="/user/:username" component={User}/>const User = ({ history, location, match }) => {return <h1>Hello {match.params.username}!</h1>}
render: func
值是一个函数,如果路径匹配的话,会渲染这个函数的返回值。(匹配才渲染,不匹配不渲染)
这允许方便的内联渲染和包裹,而不是上面那种不想要的重新安装的解释。您可以传递一个在位置匹配时调用的函数,而不是使用属性为您创建新的React elementcomponent,该render属性接收所有相同的route props的component渲染属性。
PS:
优先于 因此不要在同一个 使用两者。
// convenient inline rendering<Route path="/home" render={() => <div>Home</div>}/>// wrapping/composingconst FadingRoute = ({ component: Component, ...rest }) => (<Route {...rest} render={props => (<FadeIn><Component {...props}/></FadeIn>)}/>)<FadingRoute path="/cool" component={Something}/>
children: func
与 render 差不多。(不管匹配不匹配都渲染)
有时你需要渲染路径是否匹配位置。在这些情况下,您可以使用函数children属性,它的工作原理与渲染完全一样,不同之处在于它是否存在匹配。
children渲染道具接收所有相同的route props作为component和render方法,如果 Route 与 URL 不匹配,match则为null,这允许你动态调整你的 UI 界面,基于路线是否匹配,如果路线匹配我们则添加一个active类
警告:
<ul><ListItemLink to="/somewhere"/><ListItemLink to="/somewhere-else"/></ul>const ListItemLink = ({ to, ...rest }) => (<Route path={to} children={({ match }) => (<li className={match ? 'active' : ''}><Link to={to} {...rest}/></li>)}/>)<Route children={({ match, ...rest }) => ({/* Animate will always render, so you can use lifecyclesto animate its child in and out */}<Animate>{match && <Something {...rest}/>}</Animate>)}/>
render 与 children 两种方式对比
相同点
- children 与 render 都是函数
- 都会接收路由属性对象,返回一个虚拟DOM进行渲染
-
不同点
render 是匹配才渲染,不匹配不渲染
- children 是不管匹不匹配,都会渲染。如果匹配有match属性;如果不匹配,没有match属性
Route props属性
export interface RouteProps<Path extends string = string,Params extends { [K: string]: string | undefined } = ExtractRouteParams<Path, string>> {location?: H.Location;component?: React.ComponentType<RouteComponentProps<any>> | React.ComponentType<any>;render?: (props: RouteComponentProps<Params>) => React.ReactNode;children?: ((props: RouteChildrenProps<Params>) => React.ReactNode) | React.ReactNode;path?: Path | readonly Path[];exact?: boolean;sensitive?: boolean;strict?: boolean;}
path 匹配路径
任何path-to-regexp可以解析的有效的 URL 路径。
<Router basename="/m"><Route path="/" exact component={Home} /><Route path="/user/:id" component={User} /> {/*动态路由(参数路由)*/}<Route path="/profile/phone" component={Profile} /></Router>
exact 是否精确匹配(是否匹配整个字符串,后面不能跟子路径)
| path | location.pathname | exact | matches? |
|---|---|---|---|
| /one | /one/two | true | no |
| /one | /one/two | false | yes |
<Route path="/" exact component={Home} /><Route path="/one" exact component={One} />
strict 是否严格匹配(是否允许结尾有一个可选的/ )
如果为true当真实的路径具有一个斜线将只匹配一个斜线location.pathname,如果有更多的URL段location.pathname,将不起作用。
<Route path="/one/" strict component={One} />
| path | location.pathname | matches? |
|---|---|---|
| /one/ | /one | no |
| /one/ | /one/ | yes |
| /one/ | /one/two | yes (不起作用了) |
PS:可以使用strict来强制执行location.pathname没有结尾斜杠,但为了执行此操作,strict和exact必须都是true。
<Route path="/one" exact strict component={One}/>
| path | location.pathname | matches? |
|---|---|---|
| /one | /one | yes |
| /one | /one/ | no |
| /one | /one/two | no |
sensitive 是否大小写敏感
如果路径区分大小写,则为true,则匹配。
<Route sensitive path="/one" component={One}/>
| path | location.pathname | sensitive | matches? |
|---|---|---|---|
| /one | /one | true | yes |
| /One | /one | true | no |
| /One | /one | false | yes |
location: object
一个
如果您需要将
如果
Switch
渲染与该地址匹配的第一个子节点
这与仅使用一堆有什么区别?
jsx
<Router>
  <Route path="/about" component={About}/>
  <Route path="/:user" component={User}/>
  <Route component={NoMatch}/>
</Router>
如果 URL 是/about, 那么jsx
import { Switch, Route } from 'react-router';
<Router>
<Switch>
<Route exact path="/" component={Home}/>
<Route path="/about" component={About}/>
<Route path="/:user" component={User}/>
<Route component={NoMatch}/>
</Switch>
</Router>
现在,如果我们在/about,jsx
<Redirect push to="/somewhere/else" />
##### to
重定向到的 URL 或 location,可以是任何path-to-regexp能够理解有效 URL 路径。在to中使用的 URL 参数必须由from覆盖。
javascript
    <Router>
    <Switch>
      <Route exact path="/" component={Home} />
      <Route path="/user/:id" component={User} />
      <Route path="/profile" component={Profile} />
      {/*如果上面链接都不匹配,将自动跳转到 /bb */}
      <Redirect to="/bb" />
    </Switch>
  </Router>
jsx
<Redirect
  to={{
    pathname: "/login",
    search: "?utm=your+face",
    state: { referrer: currentLocation }
  }}
/>
> state对象可以通过重定向到组件中的this.props.locations.state来访问。这个新的referrer键(它不是一个特殊的名字)将通过路径名’/login’指向Login组件中的this.props.locations.state.referrer来访问。
##### from
重定向 from 的路径名。可以是任何path-to-regexp能够识别的有效的 URL 路径。所有匹配的 URL 参数都提供给to中的模式。必须包含在to中使用的所有参数。to未使用的其他参数将被忽略。这只能用于在
{/ Redirect with matched parameters /}
<a name="y9zeB"></a># Link在应用程序周围提供声明式的,可访问的导航。<a name="uEvBG"></a>##### to: string链接位置的字符串表示,通过连接位置的路径名,搜索和 hash 属性创建。```javascriptimport { Link } from 'react-router-dom'<Link to="/about">About</Link><Link to='/courses?sort=name' replace />
to: object
一个可以具有以下任何属性的对象:
- pathname: 表示要链接到的路径的字符串。
- search: 表示查询参数的字符串形式。
- hash: 放入网址的 hash,例如#a-hash。
- state: 状态持续到location。
<Link to={{pathname: '/courses',search: '?sort=name',hash: '#the-hash',state: { fromDashboard: true }}}/>
replace: bool
如果为true,则单击链接将替换历史堆栈中的当前入口,而不是添加新入口。innerRef: function
允许访问ref组件的底层。``jsx const refCallback = node => { console.log(node); // <a href="/m/profile">用户</a> //node` refers to the mounted DOM element or null when unmounted }
用户
<a name="iqG8N"></a>##### others还可以传递您想要放在<a>上的属性,例如标题,ID,className等。<a name="bI6vP"></a>##### Link标签和a标签有什么区别?从最终渲染的DOM来看,这两者都是链接,都是a标签,区别是: Link标签是react-router里实现路由跳转的链接,一般配合Route使用,react-router接下了其默认的链接跳转行为,区别于传统的页面跳转,Link标签的"跳转"行为只会触发相匹配的Route对应的页面内容更新,而不会刷新整个页面<br />Link标签做的三件事情:- 1.有onclick那就执行onclick- 2.click的时候阻止a标签默认事件- 3.根据跳转href(即使是to),用history(web前端路由两种方式之一,history&hash)跳转,此时只是链接变了,并没有刷新页面而标签就是普通的超链接了,用于从当前页面跳转到href指向的里一个页面(非锚点情况)<a name="NKi6y"></a># 嵌套路由<a name="PvrN4"></a>##### src/index.js 一级路由```jsximport React from 'react';import ReactDOM from 'react-dom';import { BrowserRouter as Router, Route, Switch, Link} from 'react-router-dom';import Home from './components/Home'import User from './components/User'import Profile from './components/Profile'ReactDOM.render(<Router basename="/m"><ul><li><Link to="/">首页</Link></li><li><Link to="/user">用户管理</Link></li><li><Link to="/profile">个人中心</Link></li></ul><Switch><Route exact path="/" component={Home} /><Route path="/user" component={User} /><Route path="/profile" component={Profile} /><Route render={props => <div>未发现路由页面</div>} /></Switch></Router>,document.getElementById('root'));
src/components/User.js 二级路由
import { Redirect, Route, Switch, Link} from 'react-router-dom';import UserList from './UserList';import UserAdd from './UserAdd';import UserDetail from './UserDetail';const User = (ps) => {console.log('User', ps);return (<div><ul><li><Link to="/user/list">用户列表</Link></li><li><Link to="/user/add">添加用户</Link></li></ul><Switch><Route path="/user/list" component={UserList} /><Route path="/user/add" component={UserAdd} /><Route path="/user/detail/:id" component={UserDetail} /><Redirect to="/user/list" /></Switch></div>)}export default User;
src/utils.js 模拟数据
export const UserAPI = {list(){let usersString = localStorage.getItem('users');let users = usersString ? JSON.parse(usersString) : [];return users;},add(user){let users = UserAPI.list();users.push(user);localStorage.setItem('users', JSON.stringify(users));},find(id){let users = UserAPI.list();return users.find(item => item.id === id);},}
src/components/UserList.js
import React from 'react'import { Link} from 'react-router-dom';import { UserAPI } from '../utils'class UserList extends React.Component {state = {users: []}componentDidMount(){let users = UserAPI.list();this.setState({users});}render (){return (<ul>{this.state.users.map(item => (<li key={item.id}><Link to={{pathname: `/user/detail/${item.id}`,state: item,}}>{item.name}</Link></li>))}</ul>)}}export default UserList;
src/components/UserAdd.js
import React from 'react'import { UserAPI } from '../utils'class UserAdd extends React.Component {nameRef = React.createRef();handleSubmiit = (event) => {event.preventDefault();let name = this.nameRef.current.value;UserAPI.add({ id: Date.now() + '', name });this.props.history.push('/user/list');}render (){return (<form onSubmit={this.handleSubmiit}><input type="text" ref={this.nameRef} /><button type="submit">提交</button></form>)}}export default UserAdd;
src/components/UserDetail.js
import React from 'react'import { UserAPI } from '../utils';class UserDetail extends React.Component {state = {user: {}}componentDidMount(){let user = this.props.location.state;if (!user){let id = this.props.match.params.id;user = UserAPI.find(id);}if (user) this.setState({user});}render (){let { user } = this.state;return (<div><p>ID: {user.id}</p><p>name: {user.name}</p></div>)}}export default UserDetail;
受保护路由
进入需要权限的路由页面a,没权限的话(比如没登录),先去登录,登录后再跳回之前的路由页面a。
src/index.js
import React from 'react';import ReactDOM from 'react-dom';import { BrowserRouter as Router, Route, Switch, Redirect, Link} from 'react-router-dom';import Home from './components/Home'import User from './components/User'import Profile from './components/Profile'import Protected from './components/Protected'import Login from './components/Login'ReactDOM.render(<Router basename="/m"><ul><li><Link to="/">首页</Link></li><li><Link to="/user">用户管理</Link></li><li><Link to="/profile">个人中心</Link></li></ul><Switch><Route exact path="/" component={Home} /><Route path="/user" component={User} />- {/* <Route path="/profile" component={Profile} /> */}+ <Protected path="/profile" component={Profile} /> {/*如果用户登录了,才可以访问 profile 页面*/}+ <Route path="/login" component={Login} /><Route render={props => <div>未发现路由页面</div>} /></Switch></Router>,document.getElementById('root'));
src/components/Protected.js
import { Route, Redirect } from 'react-router-dom'const Protected = (ps) => {let {path, component: RouteComponent} = ps;return (<Route path={path} render={routeProps => (localStorage.getItem('login') ? <RouteComponent {...routeProps} />: <Redirect to={{pathname: "/login", state: {from: path}}} />)} />)}export default Protected;
src/components/Login.js
import React from 'react'class UserAdd extends React.Component {login = () => {let {props, state} = this;localStorage.setItem('login', 'true');let to = '/';if (props.location.state) to = props.location.state.from || '/';props.history.push(to);}render (){return (<button onClick={this.login}>登录</button>)}}export default UserAdd;
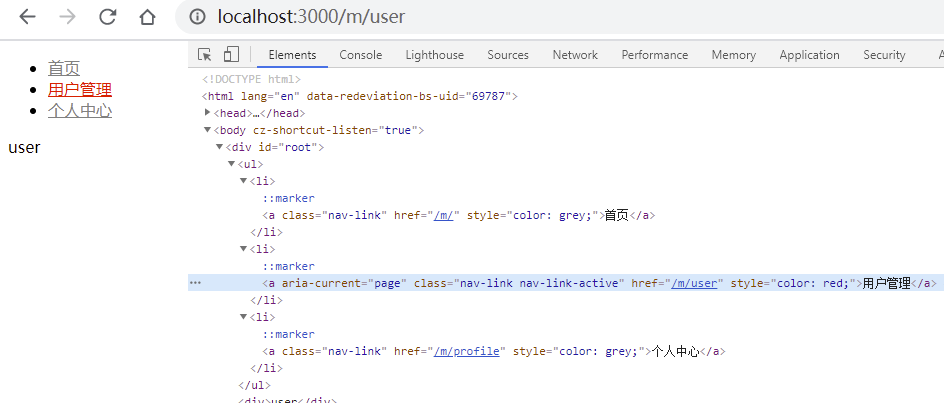
NavLink
一个特殊版本的Link,当它与当前 URL 匹配时,为其渲染元素添加样式属性。
activeClassName: string
要给出的元素的类处于活动状态时。默认的给定类是active。它将与className属性一起使用。
activeStyle: object
exact
strict
isActive: func
一个为了确定链接是否处于活动状态而添加额外逻辑的函数,如果你想做的不仅仅是验证链接的路径名与当前 URL 的pathname是否匹配,那么应该使用它。
location
isActive比较当前的历史 location(通常是当前的浏览器 URL )。为了与不同的位置进行比较,可以传递一个location。
示例
<ul><li><NavLinkclassName="nav-link"activeClassName="nav-link-active"style={{color: 'grey'}}activeStyle={{color: 'red'}}exactto="/">首页</NavLink></li><li><NavLinkclassName="nav-link"activeClassName="nav-link-active"style={{color: 'grey'}}activeStyle={{color: 'red'}}to="/user">用户管理</NavLink></li><li><NavLinkclassName="nav-link"activeClassName="nav-link-active"style={{color: 'grey'}}activeStyle={{color: 'red'}}to="/profile">个人中心</NavLink></li></ul>
withRouter
通过withRouter高阶组件访问history对象的属性和最近的
src/index.js
import React from 'react';import ReactDOM from 'react-dom';import { BrowserRouter as Router, Route, Switch} from 'react-router-dom';import Home from './components/Home'// import User from './components/User'import Profile from './components/Profile'import NavBar from './components/NavBar'ReactDOM.render(<Router basename="/m"><NavBar title="返回首页" /><Switch><Route exact path="/" component={Home} />{/* <Route path="/user" component={User} /> */}<Route path="/profile" component={Profile} /><Route render={props => <div>未发现路由页面</div>} /></Switch></Router>,document.getElementById('root'));
src/components/NavBar.js
import React from 'react';import {withRouter} from 'react-router-dom'function NavBar(props){console.log(props);return (<div onClick={() => props.history.push('/')}>{props.title}</div>)}export default withRouter(NavBar);

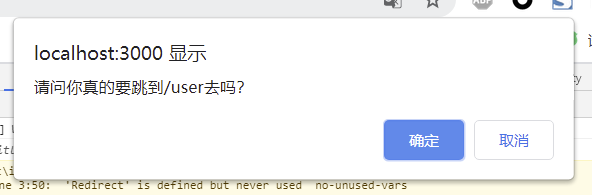
Prompt 跳转拦截
export interface PromptProps {message: string | ((location: H.Location, action: H.Action) => string | boolean);when?: boolean;}export class Prompt extends React.Component<PromptProps, any> {}
src/components/Profile.js
import { Prompt } from 'react-router-dom';const Profile = (ps) => {return (<div><span>Profile</span>{/* Prompt 的 when 属性为true就阻止;否则不阻止 */}<Prompt when={true} message={(location, action) => {return `请问你真的要跳到${location.pathname}去吗?`;}} /></div>)}export default Profile;
hooks
import React from 'react';import ReactDOM from 'react-dom';import { BrowserRouter as Router, Route, Switch, Link,useParams, useLocation, useHistory, useRouteMatch} from 'react-router-dom';function UserDetail(){let params = useParams(); //获取路径参数 {id: '1'}let history = useHistory(); //获取历史对象(history对象)let location = useLocation(); //获取路径对象 {pathname, search, hash, state, key}console.log(params, history, location,);return <div>{`id: ${params.id} -- name: ${location.state.name}`}</div>;}function Post(){//获取路由匹配match对象 {isExact, params, path, url}let match = useRouteMatch({path: '/post/:id',strict: false, //是否严格匹配sensitive: false, //大小写是否敏感});return match ? <div>{`id: ${match.params.id}`}</div> : <div>not found</div>}ReactDOM.render(<Router basename="/m"><ul><li><Link to="/">首页</Link></li><li><Link to={{pathname: `/user/detail/1`, state: {id:1, name: '张三'}}}>用户详情</Link></li><li><Link to="/post/1">帖子</Link></li></ul><Switch><Route exact path="/" component={Home} /><Route path="/user/detail/:id" component={UserDetail} /><Route path="/post" component={Post} /></Switch></Router>,document.getElementById('root'));
路由懒加载 Suspense、lazy
Suspense
在动态导入的帮助下,React Suspense让我们轻松定义延迟加载的组件。
// OtherComponent是通过懒加载加载进来的,所以渲染页面的时候可能会有延迟,// 但使用了Suspense之后,可优化交互。const OtherComponent = React.lazy(() => import('./OtherComponent'));// 在 <OtherComponent /> 外面使用Suspense标签,// 并在fallback中声明OtherComponent加载完成前做的事,即可优化整个页面的交互function MyComponent() {return (<div><Suspense fallback={<div>Loading...</div>}><OtherComponent /></Suspense></div>);}
fallback 属性接受任何在组件加载过程中你想展示的 React 元素。你可以将 Suspense 组件置于懒加载组件之上的任何位置。你甚至可以用一个 Suspense 组件包裹多个懒加载组件。
const OtherComponent = React.lazy(() => import('./OtherComponent'));const AnotherComponent = React.lazy(() => import('./AnotherComponent'));function MyComponent() {return (<div><Suspense fallback={<div>Loading...</div>}><section><OtherComponent /><AnotherComponent /></section></Suspense></div>);}
lazy
示例1:
import React, {Suspense, lazy} from 'react';import ReactDOM from 'react-dom';import { BrowserRouter as Router, Route, Switch} from 'react-router-dom';ReactDOM.render(<Router><Switch><Suspense fallback={<div>loading...</div>}><Route exact path="/" component={lazy(() => import('./components/Home'))} /><Route path="/profile" component={lazy(() => import('./components/Profile'))} /></Suspense></Switch></Router>,document.getElementById('root'));
示例2:
import React, {Suspense} from 'react';import ReactDOM from 'react-dom';import { BrowserRouter as Router, Route, Switch} from 'react-router-dom';const LazyHome = React.lazy(() => import('./components/Home'));const LazyProfile = React.lazy(() => import('./components/Profile'));function Loading(){return <div>loading...</div>;}ReactDOM.render(<Router basename="/m"><Switch><Route exact path="/" component={(props) => (<Suspense fallback={<Loading />}><LazyHome {...props} /></Suspense>)} /><Route path="/profile" component={(props) => (<Suspense fallback={<Loading />}><LazyProfile {...props} /></Suspense>)} /></Switch></Router>,document.getElementById('root'));

若有收获,就点个赞吧
0 人点赞
