本文参考
- PyTorch Autograd Explained - In-depth Tutorial
- PyTorch Autograd
- CSC321 Lecture 10: Automatic Differentiation
- Getting Started with PyTorch Part 1: Understanding how Automatic Differentiation works
- PyTorch 101, Part 1: Understanding Graphs, Automatic Differentiation and Autograd
- Understanding Autograd: 5 Pytorch tensor functions
- https://pytorch.org/docs/stable/notes/autograd.html
- Example implementation of reverse-mode autodiff
本文基于PyTorch1.7.0,https://github.com/pytorch/pytorch/tree/v1.7.0 如果本文有不清楚或者不正确的地方,请在评论区指正
PyTorch Basics
Neural networks and Backpropagation
创建和训练一个神经网络包括以下必要的步骤:
- 定义网络结构
- 把训练数据输入到网络中进行前向计算
- 计算损失函数
- 反向传播计算网络权重
- 更新网络权重
Automatic Differentiation
简单的神经网络
把上面的操作可视化为计算图,如下图b = w1 * ac = w2 * ad = (w3 * b) + (w4 * c)L = f(d)

【图片来自 Getting Started with PyTorch Part 1: Understanding how Automatic Differentiation works】
计算每个可学习参数的权重w1、w2、w3、w4的偏导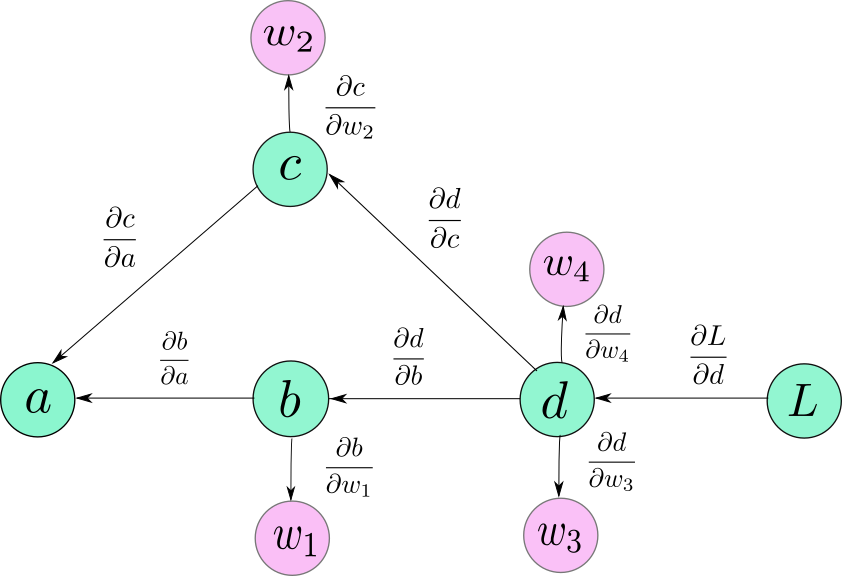
【图片来自 Getting Started with PyTorch Part 1: Understanding how Automatic Differentiation works】
根据链式公式求得每个权重相对于损失L的偏导
Dynamic Computational graph
数据和操作的运算过程是在运行时定义的,因此构建的计算图是动态的,所以我们可以在定义网络结构的时候使用条件语句。
import torch

def abs(t1, t2):
    if t1 > t2:
        return t1 - t2
    else:
        return t2 - t1

a = torch.tensor(2.0)
b = torch.tensor(3.0)
print(abs(a, b))  # tensor(1.)
计算图是在hook的帮助下使用autograd类构建的。
两个tensor相乘的DCG如下图: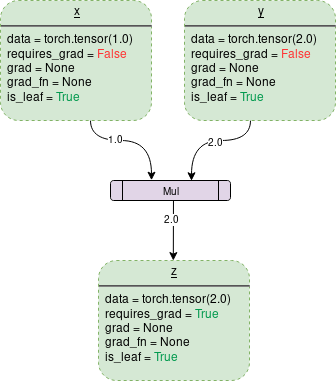
【图片来自 PyTorch Autograd】
虚线框中的x、y、z是tensor,紫色框中的Mul是操作。
tensor中有几个与自动求导相关的属性:
data
存储数据requires_grad
设置为True则表示该Tensor需要求导,可以通过tensor的requires_grad_()方法设置grad
保存tensor的梯度值,如果tensor的requires_grad属性为Fasle或者未调用backward()之前都为None
- grad_fn
保存用于计算梯度的backward函数
- is_leaf
用于表示tensor是否为叶子节点。一个节点有几种情况会是叶子节点:
- 使用
x = torch.tensor(1.0)或者x = torch.randn(1, 1)等方法创建 - 使用
requires_grad == False的tensor通过运算生成,例如两个requires_grad为False的tensor相加生成的tensor - 从已有tensor中调用.detach()创建
当设置tensor的# tensor是叶子节点的几种情况 >>> import torch >>> a = torch.tensor(1.0) >>> a.is_leaf True >>> b = torch.randn(1, 1) >>> b.is_leaf True >>> c = a + b >>> c.is_leaf True >>> d = torch.tensor(1.0, requires_grad=True) >>> e = a + d >>> e.is_leaf # d是requires_grad=True的tensor,所以生成的tensor不再是叶子节点 False >>> f = e.detach() >>> f.is_leaf Truerequires_grad为True, PyTorch会记录操作以及保存每一步的梯度函数。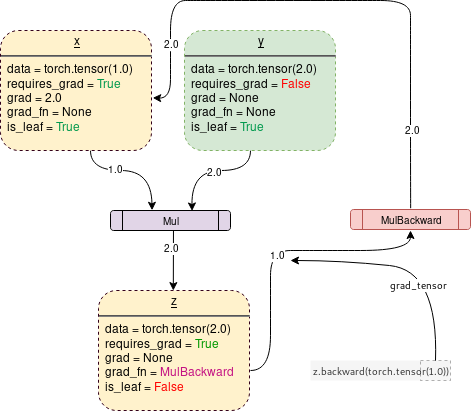
【图片来自 PyTorch Autograd】
下面的代码会生成上面的计算图 ```python import torch
Creating the graph
x = torch.tensor(1.0, requires_grad = True) y = torch.tensor(2.0) z = x * y
Displaying
for i, name in zip([x, y, z], “xyz”): print(f”{name}\ndata: {i.data}\nrequires_grad: {i.requires_grad} \ngrad: {i.grad}\ngrad_fn: {i.grad_fn}\nis_leaf: {i.is_leaf}\n”) “”” x data: 1.0 requires_grad: True grad: None grad_fn: None is_leaf: True
y data: 2.0 requires_grad: False grad: None grad_fn: None is_leaf: True
z
data: 2.0
requires_grad: True
grad: None
grad_fn:
在测试推理的过程中,为了避免PyTorch生成计算图所耗费的资源,可以在代码中使用`with torch.no_grad():`,<br />这样推理得更快。
```python
import torch
# Creating the graph
x = torch.tensor(1.0, requires_grad = True)
# Check if tracking is enabled
print(x.requires_grad) #True
y = x * 2
print(y.requires_grad) #True

with torch.no_grad():
    # Check if tracking is enabled
    y = x * 2
    print(y.requires_grad) #False

若有收获,就点个赞吧
0 人点赞
