一、简介
网络爬虫的定义:
网络爬虫(又被称为网页蜘蛛,网络机器人)就是模拟客户端发送网络请求,获取响应数据,一种按照一定的规则,自动地抓取万维网信息的程序或脚本。
网络爬虫的作用:
模拟客户端发送请求获取响应数据, 按照一定规则, 自动从万维网上获取信息的程序。
网络爬虫与浏览器的区别:
网络爬虫与浏览器的区别:
浏览器是展示数据的, 而网络爬虫是采集数据的。
Python爬虫用到的知识点:
- Python语法知识。
- 重要内置库urllib, http等,用于下载网页
- 正则表达式re、BeautifulSoup(bs4)、Xpath(lxml)等网页解析工具
- 反爬机制,header,robot,时间间隔,代理ip,隐含字段等
- 特殊网站的爬取,解决登录、Cookie、动态网页等问题
- 数据储存
- Python的多线程、多进程进行爬取,提高爬虫效率
- 爬虫的框架,Scrapy、PySpider等
-
二、爬虫需要的库以及解析方式
请求-现 HTTP 请求操作
1.urllib库
Python有一个内置的urllib库,可谓是爬虫过程非常重要的一部分了。这个内置库的使用就可以完成向服务器发出请求并获得网页的功能。
查看urllib库存在的方法。import urllibprint(dir(urllib))
['__builtins__', '__cached__', '__doc__', '__file__', '__loader__', '__name__', '__package__', '__path__', '__spec__']
Error:
urllib举出的exception类,里面主要包括了两个重要的exception类,URLError类和HTTPError类。
class URLError(OSError):# URLError is a sub-type of OSError, but it doesn't share any of# the implementation. need to override __init__ and __str__.# It sets self.args for compatibility with other EnvironmentError# subclasses, but args doesn't have the typical format with errno in# slot 0 and strerror in slot 1. This may be better than nothing.def __init__(self, reason, filename=None):self.args = reason,self.reason = reasonif filename is not None:self.filename = filenamedef __str__(self):return '<urlopen error %s>' % self.reason


- URLError类是OSError的子类,继承OSError,没有自己的任何行为特点,但是将作为error里面所有其它类型的基类使用。
URLError类初始化定义了reason参数,意味着当使用URLError类的对象时,可以查看错误的reason。
class HTTPError(URLError, urllib.response.addinfourl):"""Raised when HTTP error occurs, but also acts like non-error return"""__super_init = urllib.response.addinfourl.__init__def __init__(self, url, code, msg, hdrs, fp):self.code = codeself.msg = msgself.hdrs = hdrsself.fp = fpself.filename = url# The addinfourl classes depend on fp being a valid file# object. In some cases, the HTTPError may not have a valid# file object. If this happens, the simplest workaround is to# not initialize the base classes.if fp is not None:self.__super_init(fp, hdrs, url, code)def __str__(self):return 'HTTP Error %s: %s' % (self.code, self.msg)def __repr__(self):return '<HTTPError %s: %r>' % (self.code, self.msg)# since URLError specifies a .reason attribute, HTTPError should also# provide this attribute. See issue13211 for discussion.@propertydef reason(self):return self.msg@propertydef headers(self):return self.hdrs@headers.setterdef headers(self, headers):self.hdrs = headers
HTTPError是URLError的子类,当HTTP发生错误将举出HTTPError。
- HTTPError也是HTTP有效回应的实例,因为HTTP协议错误是有效的回应,包括状态码,headers和body。所以看到在HTTPError初始化的时候定义了这些有效回应的参数。
- 当使用HTTPError类的对象时,可以查看状态码,headers等
注意:
URLError发生时,就会返回reason,或者HTTPError发生错误时就会返回code。
request
urllib.request 定义了一些打开 URL 的函数和类,包含授权验证、重定向、浏览器 cookies等。
urllib.request 可以模拟浏览器的一个请求发起过程。
我们可以使用 urllib.request 的 urlopen 方法来打开一个 URL,语法格式如下:
如:
urllib.request.urlopen(url, data=None, [timeout, ]*, cafile=None, capath=None, cadefault=False, context=None)
- url:url 地址。
- data:发送到服务器的其他数据对象,默认为 None。
- timeout:设置访问超时时间。
- cafile 和 capath:cafile 为 CA 证书, capath 为 CA 证书的路径,使用 HTTPS 需要用到。
- cadefault:已经被弃用。
- context:ssl.SSLContext类型,用来指定 SSL 设置。
如
import urllib.requestresponse = urllib.request.urlopen('http://python.org/')#读取整个网站页面result = response.read().decode('utf-8')print(result)#读取一行print(response.readline())#读取文件的全部内容,它会把读取的内容赋值给一个列表变量。print(response.readlines())for line in response.readlines():print(line)
模拟浏览器请求头:
抓取网页一般需要对 headers(网页头信息)进行模拟,这时候需要使用到 urllib.request.Request 类。
class urllib.request.Request(url, data=None, headers={}, origin_req_host=None, unverifiable=False, method=None)
- url:url 地址。
- data:发送到服务器的其他数据对象,默认为 None。
- headers:HTTP 请求的头部信息,字典格式。
- origin_req_host:请求的主机地址,IP 或域名。
- unverifiable:很少用整个参数,用于设置网页是否需要验证,默认是False。。
- method:请求方法, 如 GET、POST、DELETE、PUT等。
如:
import urllib.requestimport urllib.parseurl = 'https://www.baidu.com/'#头部信息header = {'User-Agent':'Mozilla/5.0 (X11; Fedora; Linux x86_64) AppleWebKit/537.36 (KHTML, like Gecko) Chrome/58.0.3029.110 Safari/537.36'}request = urllib.request.Request(url,headers=header)reponse = urllib.request.urlopen(request).read()print(reponse)
parse
urllib.parse 用于解析 URL
urllib.parse.urlparse(urlstring, scheme='', allow_fragments=True)
urlstring 为 字符串的 url 地址,scheme 为协议类型,allow_fragments 参数为 false,则无法识别片段标识符。相反,它们被解析为路径,参数或查询组件的一部分,并 fragment 在返回值中设置为空字符串。
from urllib.parse import urlparseo = urlparse("https://baidu.com")print(o)
解析结果说明:
| 属性 | 索引 | 值 | 值(如果不存在) |
|---|---|---|---|
| scheme | 0 | URL协议 | scheme 参数 |
| netloc | 1 | 网络位置部分 | 空字符串 |
| path | 2 | 分层路径 | 空字符串 |
| params | 3 | 最后路径元素的参数 | 空字符串 |
| query | 4 | 查询组件 | 空字符串 |
| fragment | 5 | 片段识别 | 空字符串 |
| username | 用户名 | None | |
| password | 密码 | None | |
| hostname | 主机名(小写) | None | |
| port | 端口号为整数(如果存在) | None |
robotparser
urllib.robotparser 用于解析 robots.txt 文件。
robots.txt(统一小写)是一种存放于网站根目录下的 robots 协议,它通常用于告诉搜索引擎对网站的抓取规则。
urllib.robotparser 提供了 RobotFileParser 类,语法如下:
class urllib.robotparser.RobotFileParser(url='')
- set_url(url) - 设置 robots.txt 文件的 URL。
- read() - 读取 robots.txt URL 并将其输入解析器。
- parse(lines) - 解析行参数。
- can_fetch(useragent, url) - 如果允许 useragent 按照被解析 robots.txt 文件中的规则来获取 url 则返回 True。
- mtime() -返回最近一次获取 robots.txt 文件的时间。 这适用于需要定期检查 robots.txt 文件更新情况的长时间运行的网页爬虫。
- modified() - 将最近一次获取 robots.txt 文件的时间设置为当前时间。
- crawl_delay(useragent) -为指定的 useragent 从 robots.txt 返回 Crawl-delay 形参。 如果此形参不存在或不适用于指定的 useragent 或者此形参的 robots.txt 条目存在语法错误,则返回 None。
- request_rate(useragent) -以 named tuple RequestRate(requests, seconds) 的形式从 robots.txt 返回 Request-rate 形参的内容。 如果此形参不存在或不适用于指定的 useragent 或者此形参的 robots.txt 条目存在语法错误,则返回 None。
site_maps() - 以 list() 的形式从 robots.txt 返回 Sitemap 形参的内容。 如果此形参不存在或者此形参的 robots.txt 条目存在语法错误,则返回 None。
import urllib.robotparserrp = urllib.robotparser.RobotFileParser()rp.set_url("http://www.musi-cal.com/robots.txt")rp.read()rrate = rp.request_rate("*")print(rrate)
2.requests
requests 是一个优雅而简单的 Python HTTP请求库。
requests 的作用是 发送请求获取响应数据。pip install requests
使用步骤:
2. 发送请求, 获取响应
response = requests.get(‘http://www.baidu.com‘)
print(response)
3. 获取响应数据
print(response.encoding) # ISO-8859-1
response.encoding = ‘utf8’
print(response.text)
print(response.content.decode())
response 常见属性<br />response.text : 响应体 str类型.<br />response.ecoding : 二进制转换字符使用的编码.<br />respones.content: 响应体 bytes类型<br />案例:丁香园疫情首```python# 1. 导入模块import requests# 2. 发送请求, 获取响应response = requests.get('https://ncov.dxy.cn/ncovh5/view/pneumonia')# 3. 从响应中, 获取数据# print(response.text)print(response.content.decode())
3.selenium
自动化测试工具。一个调用浏览器的 driver,通过这个库你可以直接调用浏览器完成某些操作,比如输入验证码。
查看官网
4.aiohttp
基于 asyncio 实现的 HTTP 框架。异步操作借助于 async/await 关键字,使用异步库进行数据抓取,可以大大提高效率。
功能:
- 同时支持客户端使用和服务端使用
- 同时支持服务端WebSockets组件和客户端WebSockets组件
- web服务器具有中间件、信号组件和可插拨路由的功能
安装:
#python 3.6pip install aiohttp==1.3.3
由于上下文的缘故,请求代码必须在一个异步的函数中进行:
async def fn():pass
基本语法:
async with aiohttp.request('GET','https://github.com') as r:await r.text()
#指定编码await resp.text(encoding='windows-1251')#适合读取图像等await resp.read()#request案例#超时处理timeoutasync with session.get('https://github.com', timeout=60) as r:
客户端:
import aiohttp, asyncioasync def main():async with aiohttp.ClientSession() as session:async with session.get('http://baidu.com') as response:print('Status:', response.status)print('Content-type:', response.headers['content-type'])html = await response.text()print(f'Body: {html[:15]}...')loop = asyncio.get_event_loop()loop.run_until_complete(main())
服务端:
from aiohttp import web# 视图函数async def hello(request):name = request.match_info.get('name', 'Python')text = f'Hello, {name}'return web.Response(text=text)app = web.Application()app.router.add_get("/", hello) # 添加路由if __name__ == '__main__':web.run_app(app, host='127.0.0.1')
解析-从网页中提取信息
1.beautifulsoup
html 和 XML 的解析,从网页中提取信息,同时拥有强大的API和多样解析方式。
安装:
# 安装 Beautiful Soup 4pip install bs4# 安装 lxmlpip install lxml
BeautifulSoup对象:
代表要解析整个文档树, 它支持 遍历文档树 和 搜索文档树 中描述的大部分的方法.
# 1. 导入模块from bs4 import BeautifulSoup# 2. 创建BeautifulSoup对象#指定解析器 lxmlsoup = BeautifulSoup('<html>data</html>', 'lxml')print(soup)
BeautifulSoup对象的find方法:
find(self, name=None, attrs={}, recursive=True, text=None, **kwargs)参数name: 标签名attrs: 属性字典recursive: 是否递归循环查找text: 根据文本内容查找返回查找到的第一个元素对象
如:
1.根据标签名查找: soup.find(‘a’)
2.根据属性查找: soup.find(id = ‘link1’) 或 soup.find(attrs = {‘id’: ‘link1’})
3.根据文本内容查找 : soup.find(text = ‘Elsie’ )
Tag 对象介绍:
Tag对象对应于原始文档中的XML或HTML标签Tag有很多方法和属性, 可用 遍历文档树 和 搜索文档树 以及获取标签内容
Tag 对象常见属性:
name: 获取标签名称
attrs: 获取标签所有属性的键和值
text: 获取标签的文本字符串
使用:
# 1. 导入模块from bs4 import BeautifulSoup# 2. 准备文档字符串html = '''<html><head><title>The Dormouse's story</title></head><body><p class="title"><b>The Dormouse's story</b></p><p class="story">Once upon a time there were three little sisters; and their names were<a href="http://example.com/elsie" class="sister" id="link1">Elsie</a>,<a href="http://example.com/lacie" class="sister" id="link2">Lacie</a>and<a href="http://example.com/tillie" class="sister" id="link3">Tillie</a>;and they lived at the bottom of a well.</p><p class="story">...</p>'''# 3. 创建BeautifulSoup对象soup = BeautifulSoup(html, 'lxml')# 4. 查找title标签title = soup.find('title')print(title)# 5. 查找a 标签a = soup.find('a')print(a)# 查找所有的a标签a_s = soup.find_all('a')print(a_s)# 二. 根据属性进行查找# 查找id为link1的标签# 方式1: 通过命名参数进行指定的a = soup.find(id='link1')print(a)# 方式2: 使用attrs来指定属性字典, 进行查找a = soup.find(attrs={'id': 'link1'})print(a)# 三. 根据文本内容进行查找text = soup.find(text='Elsie')print(text)# Tag对象print(type(a)) # <class 'bs4.element.Tag'>print('标签名', a.name)print('标签所有属性', a.attrs)
案例:
# 1. 导入相关模块import requestsfrom bs4 import BeautifulSoupimport reimport json# 2. 发送请求, 获取疫情首页内容response = requests.get('https://ncov.dxy.cn/ncovh5/view/pneumonia')home_page = response.content.decode()# print(home_page)# 3. 使用BeautifulSoup提取疫情数据soup = BeautifulSoup(home_page, 'lxml')script = soup.find(id='getListByCountryTypeService2true')text = script.text# print(text)# 4. 使用正则表达式, 提取json字符串json_str = re.findall(r'\[.+\]', text)[0]# print(json_str)# 5. 把json字符串转换为Python类型的数据last_day_corona_virus = json.loads(json_str)print(last_day_corona_virus)
2.pyquery
jQuery 的 Python 实现,能够以 jQuery 的语法来操作解析 HTML 文档,易用性和解析速度都很好。
功能:
- 初始化为PyQuery对象
- 常用的CCS选择器
- 伪类选择器
- 查找标签
- 获取标签信息
安装:
pip install pyquery
引用方法:
from pyquery import PyQuery as pq
初始化:
1.字符串初始化
from pyquery import PyQuery as pq#初始化为PyQuery对象html = """<html lang="en"><head>简单好用的<title>PyQuery</title></head><body><ul id="container"><li class="object-1">Python</li><li class="object-2">大法</li><li class="object-3">好</li></ul></body></html>"""doc = pq(html)print(type(doc))print(doc)
2.html文件初始化
from pyquery import PyQuery as pq#初始化为PyQuery对象test_html = pq(filename = 'test.html')print(type(test_html))print(test_html)
3.网址响应进行初始化
from pyquery import PyQuery as pq#初始化为PyQuery对象response = pq(url = 'https://www.baidu.com')print(type(response))print(response)
pyquery库会默认调用urllib库,如果想使用selenium或者requests库,可以自定义PyQuery的opener参数。
from pyquery import PyQueryfrom selenium.webdriver import PhantomJS#用selenium访问urldef selenium_opener(url):driver = PhantomJS(executable_path = 'phantomjs的路径')driver.get(url)html = driver.page_sourcedriver.quit()return html#注意,使用时opener参数是函数名,没有括号的!PyQuery(url='https://www.baidu.com/', opener=selenium_opener)
cookies、headers
from pyquery import PyQuerycookies = {'Cookie':'你的cookie'}headers = {'User-Agent':'Mozilla/5.0 (Macintosh; Intel Mac OS X 10_12_5) AppleWebKit/537.36 (KHTML, like Gecko) Chrome/61.0.3163.100 Safari/537.36'}PyQuery(url='https://www.baidu.com/',headers=headers,cookies=cookies)
基本CSS选择器
id为container的标签
from pyquery import PyQuery as pq#初始化为PyQuery对象html = """<html lang="en"><head>简单好用的<title>PyQuery</title></head><body><ul id="container"><li class="object-1">Python</li><li class="object-2">大法</li><li class="object-3">好</li></ul></body></html>"""response = pq(html)print(response('#container'))print(type(response('#container')))
class为object-1的标签
from pyquery import PyQuery as pq#初始化为PyQuery对象html = """<html lang="en"><head>简单好用的<title>PyQuery</title></head><body><ul id="container"><li class="object-1">Python</li><li class="object-2">大法</li><li class="object-3">好</li></ul></body></html>"""doc = pq(html)print(doc('.object-1'))
标签名为body的标签
from pyquery import PyQuery as pq#初始化为PyQuery对象html = """<html lang="en"><head>简单好用的<title>PyQuery</title></head><body><ul id="container"><li class="object-1">Python</li><li class="object-2">大法</li><li class="object-3">好</li></ul></body></html>"""doc = pq(html)print(doc('body'))
多种css选择器使用
print(doc('html #container'))
伪类选择器
伪类nth
print(pseudo_doc('li:nth-child(2)'))#打印第一个li标签print(pseudo_doc('li:first-child'))#打印最后一个标签print(pseudo_doc('li:last-child'))
contains
#找到含有Python的li标签print(pseudo_doc("li:contains('Python')"))#找到含有好的li标签print(pseudo_doc("li:contains('好')"))
查找标签
按照条件在Pyquery对象中查找符合条件的标签,类似于BeautifulSoup中的find方法。
id=container的标签
print(doc.find('#container'))
子辈标签-children方法
#id=container的标签的子辈标签container = doc.find('#container')print(container.children())
父辈标签-parent方法
object_2 = doc.find('.object-2')print(object_2.parent())
兄弟标签-siblings方法
object_2 = doc.find('.object-2')print(object_2.siblings())
获取标签的信息
1.标签属性值的提
.attr() 传入 标签的属性名,返回属性值
object_2 = doc.find('.object-2')print(object_2.attr('class'))
2.标签内的文本
.text()
html_text = """<html lang="en"><head>简单好用的<title>PyQuery</title></head><body><ul id="container">Hello World!<li class="object-1">Python</li><li class="object-2">大法</li><li class="object-3">好</li></ul></body></html>"""docs = pq(html_text)print(docs.text())
tips:
如果我只想获得Hello World这个,不想得到其他的文本,可以使用remove方法将li标签去掉,然后再使用text方法
container = docs.find('#container')container.remove('li')print(container.text())
3.lxml
支持HTML和XML的解析,支持XPath解析方式,而且解析效率非常高。
安装
pip install lxml
官方文档:http://lxml.de/index.html
XPath语法
XPath,全称XML Path Language,即XML路径语言,它是一门在XML文档中查找信息的语言,它最初是用来搜寻XML文档的,但是它同样适用于HTML文档的搜索
XPath的选择功能十分强大,它提供了非常简明的路径选择表达式,另外,它还提供了超过100个内建函数,用于字符串、数值、时间的匹配以及节点、序列的处理等,几乎所有我们想要定位的节点,都可以用XPath来选择
官方文档
1.XPath 开发工具
- 开源的XPath表达式编辑工具:XMLQuire(XML格式文件可用)
- Chrome插件 XPath Helper
- Firefox插件 XPath Checker
2.Chrome中安装XPath 开发工具
1.重启浏览器,快捷键CTRL+SHIFT+X开启XPath Helper插件;2.长按CTRL+SHIFT,鼠标指向需提取的段落,按X开启或关闭提取,提取到的段落会变为黄色。
3,选取节点
XPath 使用路径表达式来选取 XML 文档中的节点或者节点集。这些路径表达式和我们在常规的电脑文件系统中看到的表达式非常相似。
下面列出了最常用的路径表达式:
| 表达式 | 描述 |
|---|---|
| nodename | 选取此节点的所有子节点。 |
| / | 从根节点选取。 |
| // | 从匹配选择的当前节点选择文档中的节点,而不考虑它们的位置。 |
| . | 选取当前节点。 |
| .. | 选取当前节点的父节点。 |
| @ | 选取属性。 |
|
如:
路径表达式 |
结果 |
|---|---|
| bookstore | 选取 bookstore 元素的所有子节点。 |
| /bookstore | 选取根元素 bookstore。注释:假如路径起始于正斜杠( / ),则此路径始终代表到某元素的绝对路径! |
| bookstore/book | 选取属于 bookstore 的子元素的所有 book 元素。 |
| //book | 选取所有 book 子元素,而不管它们在文档中的位置。 |
| bookstore//book | 选择属于 bookstore 元素的后代的所有 book 元素,而不管它们位于 bookstore 之下的什么位置。 |
| //@lang | 选取名为 lang 的所有属性。 |
4.谓词
谓语用来查找某个特定的节点或者包含某个指定的值的节点,被嵌在方括号中。
在下面的表格中,我们列出了带有谓语的一些路径表达式,以及表达式的结果:
| 表达式 | 描述 |
|---|---|
| [@attrib] | 选取具有给定属性的所有元素 |
| [@attrib=’value’] | 选取给定属性具有给定值的所有元素 |
| [tag] | 选取所有具有指定元素的直接子节点 |
| [tag=’text’] | 选取所有具有指定元素并且文本内容是text节点 |
如:
| 路径表达式 | 结果 |
|---|---|
| /bookstore/book[1] | 选取属于 bookstore 子元素的第一个 book 元素。 |
| /bookstore/book[last()] | 选取属于 bookstore 子元素的最后一个 book 元素。 |
| /bookstore/book[last()-1] | 选取属于 bookstore 子元素的倒数第二个 book 元素。 |
| /bookstore/book[position()<3] | 选取最前面的两个属于 bookstore 元素的子元素的 book 元素。 |
| //title[@lang] | 选取所有拥有名为 lang 的属性的 title 元素。 |
| //title[@lang=’eng’] | 选取所有 title 元素,且这些元素拥有值为 eng 的 lang 属性。 |
| /bookstore/book[price>35.00] | 选取 bookstore 元素的所有 book 元素,且其中的 price 元素的值须大于 35.00。 |
| /bookstore/book[price>35.00]/title | 选取 bookstore 元素中的 book 元素的所有 title 元素,且其中的 price 元素的值须大于 35.00。 |
| | //div[contains(@class,”f1”)] | 选择div属性包含”f1”的元素 |
5.选取未知节点
XPath 通配符可用来选取未知的 XML 元素。
| 通配符 | 描述 |
|---|---|
| * | 匹配任何元素节点。 |
| @* | 匹配任何属性节点。 |
| node() | 匹配任何类型的节点. |
如:
| 路径表达式 | 结果 |
|---|---|
| /bookstore/* | 选取 bookstore 元素的所有子元素。 |
| //* | 选取文档中的所有元素。 |
| html/node()/meta/@* | 选择html下面任意节点下的meta节点的所有属性 |
| //title[@*] | 选取所有带有属性的 title 元素。 |
6.选取若干路径
通过在路径表达式中使用“|”运算符,您可以选取若干个路径。
实例
在下面的表格中,我们列出了一些路径表达式,以及这些表达式的结果:
| 路径表达式 | 结果 |
|---|---|
| //book/title | //book/price | 选取 book 元素的所有 title 和 price 元素。 |
| //title | //price | 选取文档中的所有 title 和 price 元素。 |
| /bookstore/book/title | //price | 选取属于 bookstore 元素的 book 元素的所有 title 元素,以及文档中所有的 price 元素。 |
7.XPath的运算符
案例:
#encoding: utf-8# 导入etree时需要手动,不会有提示from lxml import etreetext = """<div><ul><li class="aaa item-0"><a href="link1.html">第一个</a></li><li class="bbb item-1"><a href="link2.html">second item</a></li></ul></div>"""# 从字符串中读取def parse_text():htmlElement = etree.HTML(text)print(etree.tostring(htmlElement,encoding='utf-8').decode("utf-8"))# 从文件中读取html代码def parse_tencent_file():htmlElement = etree.parse("tencent.html")print(etree.tostring(htmlElement, encoding='utf-8').decode('utf-8'))# 解析html,指定解析器,有时候html代码不规范需要指定解析器def parse_lagou_file():# 指定解析器parser = etree.HTMLParser(encoding='utf-8')htmlElement = etree.parse("lagou.html",parser=parser)print(etree.tostring(htmlElement, encoding='utf-8').decode('utf-8'))def findText():html = etree.HTML(text, etree.HTMLParser())result = html.xpath('//li[@class="aaa"]/a/text()')result1 = html.xpath('//li[contains(@class,"aaa")]/a/text()')print(result)print(result1)if __name__ == '__main__':parse_text()findText()# parse_file()# parse_lagou_file()
lxml结合xpath
案例:
#encoding: utf-8# 导入etree时需要手动,不会有提示from lxml import etreeimport requestsdef findText():# 2. 发送请求, 获取响应response = requests.get('https://www.tuliu.com/read-135151.html')response.encoding = 'utf8'html = etree.HTML(response.text, etree.HTMLParser())result = html.xpath('/html/body/div[2]/div[3]/div[1]/div[1]/div[1]/h2/text()')print(result)if __name__ == '__main__':findText()
4.tesserocr
一个 OCR 库,在遇到验证码(图形验证码为主)的时候,可直接用 OCR 进行识别。
Windows 安装:
在 Windows 下,首先需要下载 tesseract,它为 tesserocr 提供了支持。
tesseract 下载地址: http://digi.bib.uni-mannheim.de/tesseract
其中文件名中带有 dev 的为开发版本,不带 dev 的为稳定版本,可以选择下载不带 dev 的版本, 例如可以选择下载 tesseract-ocr-setup-3 .05.01.exe。
下载完成后双击运行,安装程序。需要注意的是,需要句选 Additional language data(download)选项来安装 OCR 识别支持的语言包,这样 OCR 便可以识别多国语言 。
配置环境变量: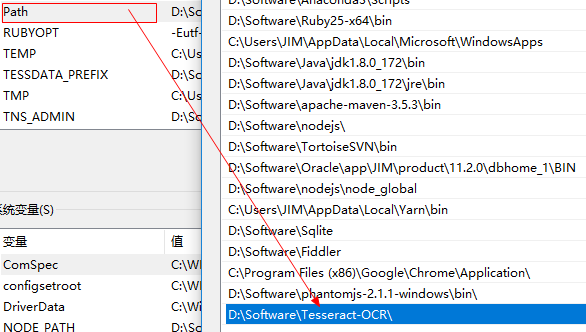

安装依赖:
pip install tesserocr pillow
如果通过 pip 安装失败,可以尝试 Anaconda 下的 conda 来安装:
conda install -c simonflueckiger tesserocr pillow
图片连接:
https://raw.githubusercontent.com/Python3WebSpider/TestTess/master/image.png
import tesserocrfrom PIL import Image#第一种方式image = Image.open('image.png')result = tesserocr.image_to_text(image)print(result)#第二种方式print(tesserocr.file_to_text('image.png'))
存储-Python 与数据库交互
pymysql:
一个纯 Python 实现的 MySQL 客户端操作库。
pymongo:
一个用于直接连接 mongodb 数据库进行查询操作的库。
redisdump:
一个用于 redis 数据导入/导出的工具。基于 ruby 实现的,因此使用它,需要先安装 Ruby。
反爬虫机制
ip代理池,模拟user-agent,识别验证码,爬取时间控制等。
参考文档
爬虫框架
Scrapy:
很强大的爬虫框架,可以满足简单的页面爬取(比如可以明确获知url pattern的情况)。用这个框架可以轻松爬下来如亚马逊商品信息之类的数据。但是对于稍微复杂一点的页面,如 weibo 的页面信息,这个框架就满足不了需求了。
Crawley:
高速爬取对应网站的内容,支持关系和非关系数据库,数据可以导出为 JSON、XML 等。
Portia:
可视化爬取网页内容。
newspaper:
提取新闻、文章以及内容分析。
python-goose:
java 写的文章提取工具。
cola:
一个分布式爬虫框架。项目整体设计有点糟,模块间耦合度较高。

若有收获,就点个赞吧
0 人点赞
