一,配置
- centos7.6(1810内核)(CentOS-7-x86_64-DVD-1810.iso)
- jdk1.8.0.301 (jdk-8u301-linux-x64.tar.gz)
- git-2.31.1 (git-2.31.1.tar.gz)
- apache-maven-3.6.3 (apache-maven-3.6.3-bin.tar.gz)
- mysql-5.7.22 (mysql-5.7.22-linux-glibc2.12-x86_64.tar.gz)
- nginx-1.20.1(nginx-1.20.1.tar.gz)
- tomcat9(tomcat-9.0.53)
- redis-5.0.8(redis-5.0.9.tar.gz)
- rabbitmq-server-3.8.22-1.el7(rabbitmq-server-3.8.22-1.el7.noarch.rpm) + esl-erlang_23.3.4.5-1.e17 (erlang-23.3.4.5-1.el7.x86_64.rpm)
- nacos-server-2.0.3
- nexus-3.29.0-02
- gitlab-ce-13.12.9-ce.0.el7.x86_64.rpm
- jenkins-2.289.3-1.1(jenkins-2.289.3-1.1.noarch.rpm)
- mycat
- zentao
- xiaoyaoji

二,软件安装
1,centos7.6(1810内核)
Oracle VM VirtualBox 虚拟机内安装
新建目录/usr/local /opt 放所有安装的应用软件/opt/tars 放所有的安装包
##########开机启动目录##################方式一Created symlink from /etc/systemd/system/multi-user.target.wants/redis.service to /usr/lib/systemd/system/redis.service/etc/systemd/system/multi-user.target.wants/ #自启目录,软连接/usr/lib/systemd/system/redis.service #自启目录,对应systemctl(包含service)systemctl enable nacos.service #开机自启systemctl disable nacos.service #取消自启方式二/etc/init.d #自启目录,对应service##对文件赋予执行权限chmod +x /etc/init.d/mysqldchmod 777 /etc/init.d/mysqldchkconfig --add mysqld #增加mysqld服务chkconfig --del mysqld #移除mysqld服务chkconfig mysqld on #开启mysqld自启服务chkconfig mysqld off #关闭mysqld自启服务chkconfig --list #查询mysqld服务情况
查看防火墙规则 firewall-cmd --list-all防火墙服务状态 systemctl status firewalld.service防火墙状态 firewall-cmd --state开启防火墙 systemctl start firewalld.service重启防火墙 systemctl restart firewalld.service关闭防火墙 systemctl stop firewalld.service永久关闭防火墙 systemctl disable firewalld永久关闭防火墙 systemctl disable firewalld.service永久开启防火墙 systemctl enable firewalld.service开放80端口 firewall-cmd --permanent --add-port=80/tcp移除80端口 firewall-cmd --permanent --remove-port=80/tcp重启防火墙 systemctl restart firewalld.service;重新载入配置 firewall-cmd --reload
端口被占用
找到占用的端口,并杀掉查看所有进程: netstat -nao查找指定端口进程:netstat -nao|find "8086" netstat -ano|findstr 8086终止指定PID进程: taskkill -F /pid 8548netstat -tunlp|grep 5601
SSH配置
vim /etc/ssh/sshd_config ## SSH配置文件Port 22systemctl restart sshd ##重启SSH服务
2,jdk1.8.0.301
1 解压,移动到/usr/local目录tar -zxvf jdk-8u301-linux-x64.tar.gzmv jdk1.8.0_301 jdkmv jdk/ /usr/local/java
或 tar -zxvf jdk-8u301-linux-x64.tar.gz -C /data
2 配置全局环境变量 vim /etc/profile
#====================jdk1.8=============================export JAVA_HOME=/usr/local/java/jdkexport JRE_HOME=$JAVA_HOME/jreexport CLASSPATH=.:$CLASSPATH:$JAVA_HOME/lib:$JRE_HOME/libexport PATH=$PATH:$JAVA_HOME/bin:$JRE_HOME/bin
3 使配置生效 source /etc/profile
4 测试 java -version
3,nodejs
1,下载地址
https://nodejs.org/en/download/
2,解压,移动到/usr/local目录tar -xvf node-v14.18.0-linux-x64.tar.xzmv node-v14.18.0-linux-x64 /usr/local/nodejs
或 tar -xvf node-v14.18.0-linux-x64.tar.xz -C /usr/local/nodejs
3,配置全局环境变量 vim /etc/profile
#====================nodejs14.18========================export NODE_HOME=/usr/local/nodeexport PATH=$PATH:$NODE_HOME/binexport NODE_PATH=$NODE_HOME/lib/node_modules
4,使配置生效 source /etc/profile
5,测试 node -v npm -v
4,git-2.31.1
1 下载地址 :
https://git-scm.com/download/linux
https://www.kernel.org/pub/software/scm/git/git-2.31.1.tar.gz
2 解压编译
# 安装编译依赖yum -y install autoconfyum -y install gcc gcc-c++ libstdc++-develyum -y install openssl-devel# 解压mkdir -p /opt/gitTemptar -zxvf git-2.31.1.tar.gz -C /opt/gitTempcd git-2.31.1mkdir -p /usr/local/git# 检验相关依赖,设置安装路径./configure --prefix=/usr/local/git# 编译安装make && make install#可以删除临时文件rm -rf git-2.31.1
3 .配置全局环境变量 vim/etc/profile
#====================gti2.32.1==========================export GIT_HOME=/usr/local/gitexport PATH=$PATH:$GIT_HOME/bin
4 使配置生效 source /etc/profile
5 测试 git --version
5,apache-maven-3.6.3
1 解压,移动到/usr/local目录tar -zxvf apache-maven-3.6.3-bin.tar.gz -C /usr/local/maven
2 配置全局环境变量 vim /etc/profile
#====================maven3.6.3=========================export MAVEN_HOME=/usr/local/mavenexport PATH=$PATH:$MAVEN_HOME/bin
<!-- 配置Maven中央仓库 首选下载路径 --><!-- 阿里云仓库 --><mirror><id>alimaven</id><mirrorOf>central</mirrorOf><name>aliyun maven</name><url>http://maven.aliyun.com/nexus/content/repositories/central/</url></mirror><!-- 中央仓库1 --><mirror><id>repo1</id><mirrorOf>central</mirrorOf><name>Human Readable Name for this Mirror.</name><url>http://repo1.maven.org/maven2/</url></mirror><!-- 中央仓库2 --><mirror><id>repo2</id><mirrorOf>central</mirrorOf><name>Human Readable Name for this Mirror.</name><url>http://repo2.maven.org/maven2/</url></mirror>
3 使配置生效 source /etc/profile
4 测试 mvn --version
6,tomcat-9.0.53
1 下载地址 https://tomcat.apache.org/download-90.cgi
apache-tomcat-9.0.53.tar.gz
2 安装
#解压 apache-tomcat-9.0.53.tar.gz 并移动到 /usr/local/tomcat 目录下tar -zxvf apache-tomcat-9.0.53.tar.gzmv apache-tomcat-9.0.53 /usr/local/tomcat#启动命令cd /usr/local/tomcat/bin/./startup.sh
3 开机启动
方式一
/etc/init.d/下 新建tomcatvim /etc/init.d/tomcat
#!/bin/sh# chkconfig: 345 99 10# description: Auto-starts tomcat# /etc/init.d/tomcatd# Tomcat auto-start# Source function library.#. /etc/init.d/functions# source networking configuration.#. /etc/sysconfig/networkRETVAL=0export JAVA_HOME=/usr/local/java/jdkexport JRE_HOME=/usr/local/java/jdk/jreexport CATALINA_HOME=/usr/local/tomcatexport CATALINA_BASE=/usr/local/tomcatstart(){if [ -f $CATALINA_HOME/bin/startup.sh ];thenecho $"Starting Tomcat"$CATALINA_HOME/bin/startup.shRETVAL=$?echo " OK"return $RETVALfi}stop(){if [ -f $CATALINA_HOME/bin/shutdown.sh ];thenecho $"Stopping Tomcat"$CATALINA_HOME/bin/shutdown.shRETVAL=$?sleep 1ps -fwwu root | grep tomcat|grep -v grep | grep -v PID | awk '{print $2}'|xargs kill -9echo " OK"# [ $RETVAL -eq 0 ] && rm -f /var/lock/...return $RETVALfi}case "$1" instart)start;;stop)stop;;restart)echo $"Restaring Tomcat"$0 stopsleep 1$0 start;;*)echo $"Usage: $0 {start|stop|restart}"exit 1;;esacexit $RETVAL
chmod 775 /etc/init.d/tomcatchkconfig --add tomcat #增加服务chkconfig --del tomcat #移除服务chkconfig tomcat on #开机自启服务chkconfig tomcat off #关闭自启服务chkconfig --list #查询服务情况
方法二
linux 下tomcat开机自启动
在/etc/rc.d/rc.local中加入:/usr/local/tomcat/bin/startup.sh
安全问题
#禁止自动部署服务配置 修改Tomcat 根目录下的配置文件conf/server.xml,#将host节点的autoDeploy属性设置为“false”,如果host的deployOnStartup属性(如没有deployOnStartup配置可以忽略)为“true”,则也将其更改为“false”
7,nginx-1.20.1
1 下载地址 http://nginx.org/download/
2 安装依赖
1 先安装gcc-c++编译器yum install gcc-c++ yum install -y openssl openssl-devel2 再安装pcre包yum install -y pcre pcre-devel3 再安装zlib包yum install -y zlib zlib-devel
3 下面进行nginx的安装
## 解压tar -zxvf nginx-1.20.1.tar.gz##进入nginx目录cd nginx-1.20.1## 配置安路径,默认路径./configure --prefix=/usr/local/nginx#./configure --prefix=/data/nginx# makemakemake install# 查找安装路径where is nginx
配制环境变量vim /etc/profile
#====================nginx1.20.0========================export PATH=$PATH:$JAVA_HOME/bin:/usr/local/nginx/sbinexport CLASSPATH=.:$JAVA_HOME/lib/dt.jar:$JAVA_HOME/lib/tools.jarexport JRE_HOME=$JAVA_HOME/jre
配置可选mkdir -p /usr/local/nginx/conf.d 放所有的配置文件vim /usr/local/nginx/conf/nginx.conf
#user nobody;worker_processes 1;error_log logs/error.log;#error_log logs/error.log notice;#error_log logs/error.log info;pid logs/nginx.pid;events {worker_connections 1024;}http {include mime.types;default_type application/octet-stream;log_format main '$remote_addr - $remote_user [$time_local] "$request" ''$status $body_bytes_sent "$http_referer" ''"$http_user_agent" "$http_x_forwarded_for"';access_log logs/access.log main;sendfile on;#tcp_nopush on;#keepalive_timeout 0;keepalive_timeout 65;#gzip on;include /usr/local/nginx/conf.d/*.conf;}
vim /usr/local/nginx/conf.d/test.conf
server {listen 8800;server_name localhost;#charset koi8-r;#access_log logs/host.access.log main;location / {root html;index index.html index.htm;}#error_page 404 /404.html;# redirect server error pages to the static page /50x.htmlerror_page 500 502 503 504 /50x.html;location = /50x.html {root html;}# proxy the PHP scripts to Apache listening on 127.0.0.1:80#location ~ \.php$ {# proxy_pass http://127.0.0.1;#}# pass the PHP scripts to FastCGI server listening on 127.0.0.1:9000#location ~ \.php$ {# root html;# fastcgi_pass 127.0.0.1:9000;# fastcgi_index index.php;# fastcgi_param SCRIPT_FILENAME /scripts$fastcgi_script_name;# include fastcgi_params;#}# deny access to .htaccess files, if Apache's document root# concurs with nginx's one#location ~ /\.ht {# deny all;#}}# another virtual host using mix of IP-, name-, and port-based configuration#server {# listen 8000;# listen somename:8080;# server_name somename alias another.alias;# location / {# root html;# index index.html index.htm;# }#}# HTTPS server#server {# listen 443 ssl;# server_name localhost;# ssl_certificate cert.pem;# ssl_certificate_key cert.key;# ssl_session_cache shared:SSL:1m;# ssl_session_timeout 5m;# ssl_ciphers HIGH:!aNULL:!MD5;# ssl_prefer_server_ciphers on;# location / {# root html;# index index.html index.htm;# }#}
4 启动
进入sbin目录,可以看到有一个可执行文件nginx,直接./nginx执行就OK了。
./nginx 启动./nginx -s stop 关闭./nginx -s reload 重启
5 测试
然后在网页上访问自己的IP就可以了默认端口为80(出现如下欢迎界面就成功了!)
http://192.168.5.116:80
6 开放端口
#开放80端口firewall-cmd --query-port=80/tcpfirewall-cmd --add-port=80/tcp --permanent#重启防火墙systemctl restart firewalld
7 配置nginx开机自启动cd /etc/systemd/systemvim nginx.service
[Unit]Description=nginx serviceAfter=network.target[Service]Type=forkingExecStart=/usr/local/nginx/sbin/nginxExecReload=/usr/local/nginx/sbin/nginx -s reloadExecStop=/usr/local/nginx/sbin/nginx -s quitPrivateTmp=true[Install]WantedBy=multi-user.target
保存脚本文件后设置文件的执行权限chmod a+x /etc/init.d/nginx
使用chkconfig进行管理,将nginx服务加入chkconfig管理列表chkconfig --add /etc/init.d/nginx
使用service对nginx进行启动,停止、重启等操作
service nginx startservice nginx stopservice nginx restartservice nginx reloadsystemctl daemon-reload #重新加载systemctl enable nacos.service #开机自启systemctl disable nacos.service #取消开机自启systemctl start nacos.service #启动
九、可能出现的问题
- 1)、linux重启后无法开启nginx问题”var/run/nginx/nginx.pid” no such file or directory
每次重启虚拟机后,var/run/nginx/目录都会被删除,所以无法在这个目录创建nginx.pid文件,可以自己创建/var/run/nginx/目录,然后可以运行,但治标不治本,下次虚拟机重启目录还会丢失。
解决方法:再次重启虚拟机,nginx正常运行。
原因:我们在配置文件显式的指定nginx.pid文件存放位置,然后创建logs文件夹,当linux重启后,logs文件夹不会被删除
查看是否启动成功ps -ef | grep nginx
8,mysql-5.7.33
1、下载
https://downloads.mysql.com/archives/community/
mysql-5.7.33-linux-glibc2.12-x86_64.tar.gz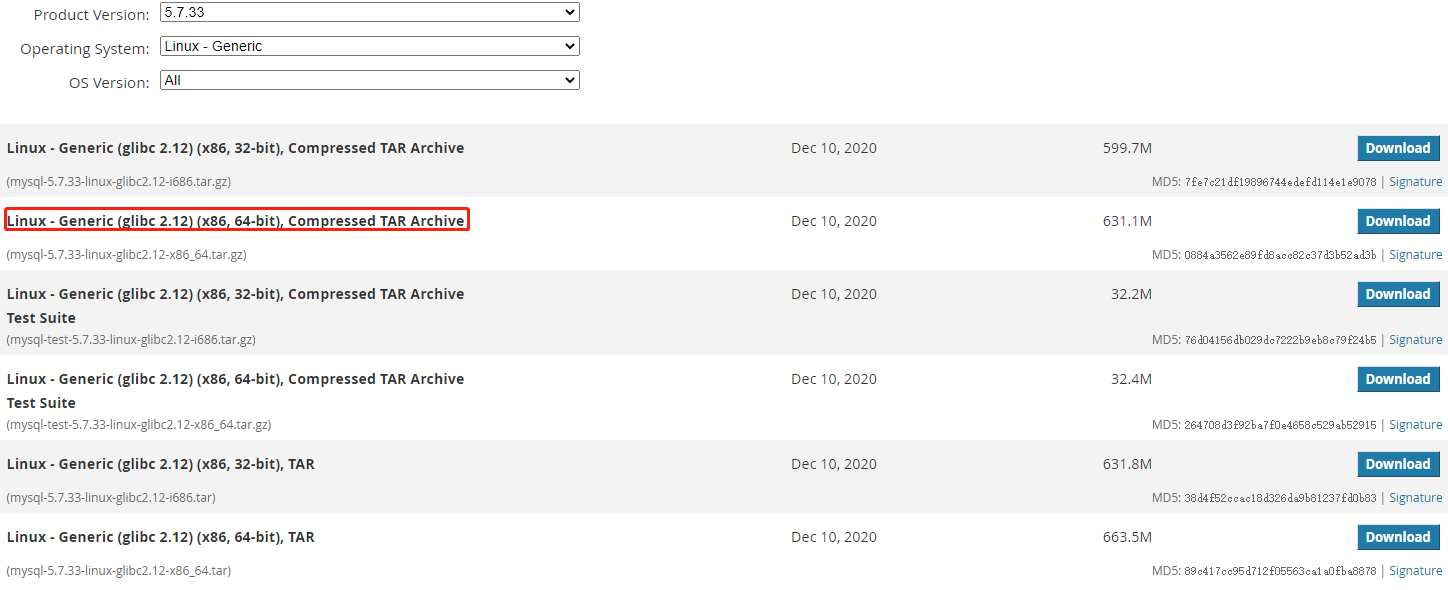
2、解压tar -zxvf mysql-5.7.33-linux-glibc2.12-x86_64.tar.gz -C /opt
#复制解压后的mysql目录mv mysql-5.7.33-linux-glibc2.12-x86_64 /opt/mysql
3、添加用户组和用户
#添加用户组和用户 添加用户mysql 到用户组mysql 给mysql5.7.33用户组和权限groupadd mysqluseradd -g mysql mysqlchown -R mysql:mysql /opt/mysql
4、配置
查询并卸载系统自带的Mariadb
rpm -qa | grep mariadbrpm -e --nodeps 文件名rpm -e --nodeps mariadb-libs-5.5.60-1.el7_5.x86_64yum -y install libaio原因是:以前的Linux系统中数据库大部分是mysql,不过自从被sun收购之后,就没用集成在centos这些开源Linux系统中了,那么如果想用的话就需要自己安装了,首先centos7 已经不支持mysql,因为收费了你懂得,所以内部集成了mariadb,而安装mysql的话会和mariadb的文件冲突,所以需要先卸载掉mariadb,以下为卸载mariadb,安装mysql的步骤。

mkdir -p /opt/mysql/log-binmkdir -p /opt/mysql/datamkdir -p /opt/mysql/logstouch /opt/mysql/logs/error.logcp /opt/mysql/support-files/mysql.server /etc/init.d/mysqldchmod 755 /etc/init.d/mysqld
修改启动脚本
vim /etc/init.d/mysqld
#修改项:
basedir=/opt/mysqldatadir=/opt/mysql/data
修改配置文件 vim /etc/my.cnf
[client]default-character-set = utf8socket = /opt/mysql/mysql.sock[mysql]default-character-set = utf8[mysqld]##sql_mode=NO_ENGINE_SUBSTITUTION,STRICT_TRANS_TABLES##设置utf8字符集###character-set-client-handshake = FALSEcharacter-set-server = utf8collation-server = utf8_unicode_ciinit_connect=‘SET NAMES utf8’##创建新表时将使用的默认存储引擿default-storage-engine=INNODB##端口port=3306bind-address = 0.0.0.0 # 表示允许任何主机登陆MySQL##路径设置-开始-baseDir###basedir = /opt/mysqldatadir = /opt/mysql/datasocket = /opt/mysql/mysql.sockpid-file = /opt/mysql/mysqld.pid##mysql错误日志log_error = /opt/mysql/logs/error.log##慢查询日志slow_query_log = ON##慢查询日志slow_query_log_file =/opt/mysql/logs/slowquery.log##超过0.5秒记录long_query_time = 10##sql语句执行时间大于long_query_time至少被检查到的次数。min_examined_row_limit = 100##mysql未使用索引或索引扫描是否被记录到慢查询日志中log_queries_not_using_indexes = 1##用来表示每分钟允许记录到slow log的且未使用索引的SQL语句次数log_throttle_queries_not_using_indexes = 10##innodb日志文件存放位置##innodb_log_group_home_dir = /opt/mysql/innodb##innodb共享表空间文件##innodb_data_home_dir = /opt/mysql/innodb##InnoDB打开idb文件数量##innodb_open_files = 512##innodb_buffer_pool_size = 4G##innodb_buffer_pool_instances = 1##mysql所有操作日志 生产服务器不开启##general_log = OFF##mysql所有操作日志##general_log_file = /opt/mysql/logs/general.log##==========主从复制(主)=====================##数据库服务器IDserver-id = 1##开启二进制日志##log-bin=/opt/mysql/log-bin/mysql-bin##log_bin_basename##log_bin_index##需要同步的数据库##binlog-do-db=crm##不需要同步的数据库binlog-ignore-db=mysql##同binlog,定义binlog的位置和名称log_bin_index = /opt/mysql/log-bin/binlog.index##binlog格式,复制有3种模式STATEMENT,ROW,MIXEDbinlog_format = row##只保留最近10天的binlog日志expire_logs_days = 10##每个binlog日志文件的最大容量max_binlog_size = 50M##二进制缓冲区日志大小binlog_cache_size = 1M##每个session分配的binlog缓存大小##事务提交前产生的日志,记录到Cache中;事务提交后,则把日志持久化到磁盘binlog_cache_size = 2M##开启log_slave_updates,从库的更新操作记录进binlog日志#log_slave_updates = ON## sync_binlog=0(默认),事务提交后MySQL不刷新binlog_cache到磁盘,而让Filesystem自行决定##或者cache满了才同步。##sync_binlog=n,每进行n次事务提交之后,MySQL将binlog_cache中的数据强制写入磁盘。sync_binlog = 0##将row模式下的sql语句,记录到binlog日志,默认是0(off)#binlog_rows_query_log_events = ONsymbolic-links=0##mysql允许的并发操作数量max_connections = 512##mysql连接池线程数量thread_cache_size = 256##在缓冲区中表的数量 一般4g内存2048table_open_cache = 512key_buffer_size = 1G##关闭一个交互的连接之前所要等待的秒数interactive_timeout = 200##关闭一个非交互的连接之前所要等待的秒数wait_timeout = 200##禁用local_infile选项会降低攻击者通过SQL注入漏洞器读取敏感文件的能力local-infile=0##0不自动提交 1自动提交事务autocommit = 1##mysql可以timestamp字段可以使用nullexplicit_defaults_for_timestamp = ON##跳过反向域名解析(mysql不可使用域名登录)skip_name_resolve = ON##MySQL暂时停止回答新请求之前的短时间内多少个请求可以被存在堆栈中back_log = 256##错误连接次数max_connect_errors = 30##每次最大提交数据包大小max_allowed_packet = 8M##MEMORY引擎单表大小max_heap_table_size = 1024M##每个临时表大小tmp_table_size = 2M##配置表名不区分大小写 1:不区分#lower_case_table_names = 1##每客户端索引和表查询数据缓冲区大小read_rnd_buffer_size = 2M##全表扫描数据缓冲区大小read_buffer_size = 2M##批量写入缓冲区大小bulk_insert_buffer_size = 16M##每客户端排序数据缓冲区大小sort_buffer_size = 256K##每客户端join数据缓冲区大小join_buffer_size = 512K##关闭查询缓存(QC)#query_cache_size = 0#query_cache_type = 0##mysql事务隔离级别#transaction_isolation = READ-COMMITTED##记录管理语句#log_slow_admin_statements = 1##记录复制语句#log_slow_slave_statements = 1##记录警告日志#log_warnings = 1
5 初始化
#给mysql5.7.33用户组和权限chown -R mysql:mysql /opt/mysql#初始化mysql/opt/mysql/bin/mysqld --initialize-insecure --user=mysql --basedir=/opt/mysql --datadir=/opt/mysql/data#不能初始化yum -y install numactl.x86_64; yum -y install libaio
6 测试
#启动服务 service mysqld start
#测试连接bin/mysql -uroot
#加入环境变量,编辑vim /etc/profile,这样可以在任何地方用mysql命令了
#====================mysql5.7.33========================export PATH=$PATH:/opt/mysql/bin
source /etc/profileservice mysqld start #启动mysqlservice mysqld stop #关闭mysqlservice mysqld status #查看运行状态
firewall-cmd --permanent --add-port=3306/tcp 开放3306端口firewall-cmd --permanent --remove-port=3306/tcp 移除3306端口firewall-cmd --reload 重新载入配置
7 远程连接的用户权限
解决1:更改 ‘mysql’数据库’user’表’host’项,从’localhost’改成 ‘%’。
./bin/mysql -urootuse mysql;select 'host' from user where user='root';update user set host = '%' where user='root'; ##设置外网可以访问update user set authentication_string=password('123456') where user='root'; ##修改密码flush privileges;
解决2:直接授权
复制代码代码如下:GRANT ALL PRIVILEGES ON *.* TO 'root'@'%' IDENTIFIED BY '123456' WITH GRANT OPTION;
5.2 安装时的一些错误
-bash: ./scripts/mysql_install_db: /usr/bin/perl: bad interpreter: 没有那个文件或目录
解决:yum -y install perl perl-devel
Installing MySQL system tables…./bin/mysqld: error while loading shared libraries: libaio.so.1: cannot open shared object file: No such file or directory
解决:yum -y install libaio-devel
8 设置开机启动
##将服务文件复制一份到init.d下,并重命名为mysqldcp /opt/mysql/support-files/mysql.server /etc/init.d/mysqld##对文件赋予执行权限chmod +x /etc/init.d/mysqld 或 chmod 777 /etc/init.d/mysqld##增加mysqld服务chkconfig --add mysqld##查询mysqld服务情况chkconfig --list mysqldmysqld 0:off 1:off 2:on 3:on 4:on 5:on 6:off 默认的运行级别为2,3,4,5##如果3,4,5 为off:chkconfig --level 345 mysqld on##重启服务器验证:reboot
9,mycat1.6.7.6
1 下载地址
http://dl.mycat.org.cn/
2 安装流程
安装Java环境(mycat基于java) —> 下载mycat —> 新建mycat用户 —> 解压mycat —> 配置环境变量 —> 启动mycat
# 解压tar -zxvf Mycat-server-1.6.7.6-release-linux.tar.gz# 剪切到/usr/local下mv mycat /usr/local/# 创建专门运行mycat账号adduser mycat# 切换到mycat文件夹路径下cd /usr/local# 将文件权限赋给mycat账号chown mycat:mycat -R /usr/local/mycat#配置环境变量添加vim /etc/profile#====================mycat1.6.7.6=======================export PATH=$PATH:/usr/local/mycat/bin# 刷新文件source /etc/profile# 切换mycat用户su mycat#切换目录cd /usr/local/mycat/bin/#启动mycat./mycat start./mycat console #带控制台
3 配置mycat的读写分离
配置逻辑库和数据节点vim /usr/local/mycat/conf/schema.xml
<?xml version="1.0"?><!DOCTYPE mycat:schema SYSTEM "schema.dtd"><mycat:schema xmlns:mycat="http://io.mycat/"><!-- <schema name="TESTDB" checkSQLschema="true" sqlMaxLimit="100" randomDataNode="dn1"> --><!-- auto sharding by id (long) --><!--splitTableNames 启用<table name 属性使用逗号分割配置多个表,即多个表使用这个配置--><!--fetchStoreNodeByJdbc 启用ER表使用JDBC方式获取DataNode--><!--<table name="customer" primaryKey="id" dataNode="dn1,dn2" rule="sharding-by-intfile" autoIncrement="true" fetchStoreNodeByJdbc="true"><childTable name="customer_addr" primaryKey="id" joinKey="customer_id" parentKey="id"> </childTable></table>--><!-- <table name="oc_call" primaryKey="ID" dataNode="dn1$0-743" rule="latest-month-calldate"/> --><!-- </schema> --><!-- 逻辑数据库名name --><schema name="testdb" checkSQLschema="false" sqlMaxLimit="100" dataNode="dn1"></schema><!-- <schema name="crm" checkSQLschema="false" sqlMaxLimit="100" dataNode="dn2"></schema> --><!-- <dataNode name="dn1$0-743" dataHost="localhost1" database="db$0-743"/> --><dataNode name="dn1" dataHost="host1" database="testdb" /><!--<dataNode name="dn2" dataHost="localhost1" database="db2" /><dataNode name="dn3" dataHost="localhost1" database="db3" /><dataNode name="dn4" dataHost="sequoiadb1" database="SAMPLE" />--><!--<dataNode name="jdbc_dn1" dataHost="jdbchost" database="db1" /><dataNode name="jdbc_dn2" dataHost="jdbchost" database="db2" /><dataNode name="jdbc_dn3" dataHost="jdbchost" database="db3" />--><!-- balance="0" 默认读写库 --><dataHost name="host1" maxCon="1000" minCon="10" balance="1" writeType="0" dbType="mysql" dbDriver="native" switchType="1" slaveThreshold="100"><heartbeat>select user()</heartbeat><!-- can have multi write hosts --><writeHost host="hostM1" url="192.168.5.200:3306" user="root" password="123456"><!-- 读库 读写分离; 写走hostM1,读走hostS1; hostM1宕机了, hostS1也不可用 --><readHost host="hostS1" url="192.168.5.201:3306" user="root" password="123456" /><!-- <readHost host="hostS2" url="192.168.5.114:3306" user="root" password="123456" /> --></writeHost><!-- 高可用,hostM1宕机了, hostM2顶上 --><!-- <writeHost host="hostM2" url="192.168.5.112:3306" user="root" password="123456" /> --></dataHost><!--<dataHost name="sequoiadb1" maxCon="1000" minCon="1" balance="0" dbType="sequoiadb" dbDriver="jdbc"><heartbeat> </heartbeat><writeHost host="hostM1" url="sequoiadb://1426587161.dbaas.sequoialab.net:11920/SAMPLE" user="jifeng" password="jifeng"></writeHost></dataHost><dataHost name="oracle1" maxCon="1000" minCon="1" balance="0" writeType="0" dbType="oracle" dbDriver="jdbc"><heartbeat>select 1 from dual</heartbeat><connectionInitSql>alter session set nls_date_format='yyyy-mm-dd hh24:mi:ss'</connectionInitSql><writeHost host="hostM1" url="jdbc:oracle:thin:@127.0.0.1:1521:nange" user="base" password="123456" > </writeHost> </dataHost><dataHost name="jdbchost" maxCon="1000" minCon="1" balance="0" writeType="0" dbType="mongodb" dbDriver="jdbc"><heartbeat>select user()</heartbeat><writeHost host="hostM" url="mongodb://192.168.0.99/test" user="admin" password="123456" ></writeHost></dataHost><dataHost name="sparksql" maxCon="1000" minCon="1" balance="0" dbType="spark" dbDriver="jdbc"><heartbeat> </heartbeat><writeHost host="hostM1" url="jdbc:hive2://feng01:10000" user="jifeng" password="jifeng"></writeHost></dataHost>--><!--<dataHost name="jdbchost" maxCon="1000" minCon="10" balance="0" dbType="mysql" dbDriver="jdbc"><heartbeat>select user()</heartbeat><writeHost host="hostM1" url="jdbc:mysql://localhost:3306" user="root" password="123456"> </writeHost></dataHost>--></mycat:schema>
配置服务器权限vim /usr/local/mycat/conf/server.xml
<?xml version="1.0" encoding="UTF-8"?><!-- - - Licensed under the Apache License, Version 2.0 (the "License");- you may not use this file except in compliance with the License. - Youmay obtain a copy of the License at - - http://www.apache.org/licenses/LICENSE-2.0- - Unless required by applicable law or agreed to in writing, software -distributed under the License is distributed on an "AS IS" BASIS, - WITHOUTWARRANTIES OR CONDITIONS OF ANY KIND, either express or implied. - See theLicense for the specific language governing permissions and - limitationsunder the License. --><!DOCTYPE mycat:server SYSTEM "server.dtd"><mycat:server xmlns:mycat="http://io.mycat/"><system><property name="nonePasswordLogin">0</property> <!-- 0为需要密码登陆、1为不需要密码登陆 ,默认为0,设置为1则需要指定默认账户--><property name="ignoreUnknownCommand">0</property><!-- 0遇上没有实现的报文(Unknown command:),就会报错、1为忽略该报文,返回ok报文。在某些mysql客户端存在客户端已经登录的时候还会继续发送登录报文,mycat会报错,该设置可以绕过这个错误--><property name="useHandshakeV10">1</property><property name="removeGraveAccent">1</property><property name="useSqlStat">0</property> <!-- 1为开启实时统计、0为关闭 --><property name="useGlobleTableCheck">0</property> <!-- 1为开启全加班一致性检测、0为关闭 --><property name="sqlExecuteTimeout">300</property> <!-- SQL 执行超时 单位:秒--><property name="sequenceHandlerType">1</property><!--<property name="sequnceHandlerPattern">(?:(\s*next\s+value\s+for\s*MYCATSEQ_(\w+))(,|\)|\s)*)+</property>INSERT INTO `travelrecord` (`id`,user_id) VALUES ('next value for MYCATSEQ_GLOBAL',"xxx");--><!--必须带有MYCATSEQ_或者 mycatseq_进入序列匹配流程 注意MYCATSEQ_有空格的情况--><property name="sequnceHandlerPattern">(?:(\s*next\s+value\s+for\s*MYCATSEQ_(\w+))(,|\)|\s)*)+</property><property name="subqueryRelationshipCheck">false</property> <!-- 子查询中存在关联查询的情况下,检查关联字段中是否有分片字段 .默认 false --><property name="sequenceHanlderClass">io.mycat.route.sequence.handler.HttpIncrSequenceHandler</property><!-- 端口 --><property name="serverPort">3307</property><!-- 配置该属性的时候一定要保证mycat的字符集和mysql 的字符集是一致的 --><property name="charset">utf8</property><!-- 指定每次分配socker direct buffer 的值,默认是4096字节 --><property name="processorBufferChunk">4096</property><!-- 配置系统可用的线程数量,默认值为CPU核心X每个核心运行线程的数量 --><property name="processors">4</property><!-- <property name="useCompression">1</property>--> <!--1为开启mysql压缩协议--><!-- <property name="fakeMySQLVersion">5.6.20</property>--> <!--设置模拟的MySQL版本号--><!-- <property name="processorBufferChunk">40960</property> --><!--<property name="processors">1</property><property name="processorExecutor">32</property>--><!--默认为type 0: DirectByteBufferPool | type 1 ByteBufferArena | type 2 NettyBufferPool --><property name="processorBufferPoolType">0</property><!--默认是65535 64K 用于sql解析时最大文本长度 --><!--<property name="maxStringLiteralLength">65535</property>--><!--<property name="sequenceHandlerType">0</property>--><!--<property name="backSocketNoDelay">1</property>--><!--<property name="frontSocketNoDelay">1</property>--><!--<property name="processorExecutor">16</property>--><!--<property name="serverPort">8066</property><property name="managerPort">9066</property><property name="idleTimeout">300000</property><property name="authTimeout">15000</property><property name="bindIp">0.0.0.0</property><property name="dataNodeIdleCheckPeriod">300000</property> 5 * 60 * 1000L; //连接空闲检查<property name="frontWriteQueueSize">4096</property> <property name="processors">32</property>--><!--分布式事务开关,0为不过滤分布式事务,1为过滤分布式事务(如果分布式事务内只涉及全局表,则不过滤),2为不过滤分布式事务,但是记录分布式事务日志--><property name="handleDistributedTransactions">0</property><!-- off heap for merge/order/group/limit 1开启 0关闭 --><property name="useOffHeapForMerge">0</property><!-- 单位为m --><property name="memoryPageSize">64k</property><!-- 单位为k --><property name="spillsFileBufferSize">1k</property><property name="useStreamOutput">0</property><!-- 单位为m --><property name="systemReserveMemorySize">384m</property><!-- 是否采用zookeeper协调切换 --><property name="useZKSwitch">false</property><!-- XA Recovery Log日志路径 --><!-- <property name="XARecoveryLogBaseDir">./</property> --><!-- XA Recovery Log日志名称 --><!-- <property name="XARecoveryLogBaseName">tmlog</property> --><!-- 如果为 true的话 严格遵守隔离级别,不会在仅仅只有select语句的时候在事务中切换连接 --><property name="strictTxIsolation">false</property><!-- 如果为0的话,涉及多个DataNode的catlet任务不会跨线程执行 --><property name="parallExecute">0</property><property name="serverBacklog">2048</property></system><!-- 全局SQL防火墙设置 --><!-- 白名单可以使用通配符%或着* --><!-- 例如<host host="127.0.0.*" user="root"/> --><!-- 例如<host host="127.0.*" user="root"/> --><!-- 例如<host host="127.*" user="root"/> --><!-- 例如<host host="1*7.*" user="root"/> --><!-- 这些配置情况下对于127.0.0.1都能以root账户登录 --><!--<firewall><whitehost><host host="1*7.0.0.*" user="root"/></whitehost><blacklist check="false"> </blacklist></firewall>--><!-- 全权限帐号 --><user name="mycat" defaultAccount="true"><property name="password">123456</property><property name="schemas">testdb</property><!-- <property name="schemas">db_dwxc_mall_prod,crm,job,payment</property> --><property name="defaultSchema">testdb</property><!--No MyCAT Database selected 错误前会尝试使用该schema作为schema,不设置则为null,报错 --><!-- 表级 DML 权限设置 --><!--<privileges check="false"><schema name="TESTDB" dml="0110" ><table name="tb01" dml="0000"></table><table name="tb02" dml="1111"></table></schema></privileges>--></user><!-- 只读用户 --><user name="user"><property name="password">123456</property><property name="schemas">testdb</property><property name="readOnly">true</property><property name="defaultSchema">testdb</property></user></mycat:server>
设置内存占用 vim /usr/local/mycat/conf/wrapper.conf
#wrapper.java.command=javawrapper.java.command=/usr/local/jdk/bin/java# wrapper.java.additional.9=-Xmx4G# wrapper.java.additional.10=-Xms1Gwrapper.java.additional.9=-Xmx128Mwrapper.java.additional.10=-Xm64M
firewall-cmd --permanent --add-port=3307/tcp 开放3307端口firewall-cmd --permanent --remove-port=3307/tcp 移除3307端口firewall-cmd --reload 重新载入配置#切换路径cd /usr/local/mycat/bin#重启./mycat restart
开机自启
方法一:vim /etc/init.d/mycat
#!/bin/sh## Simple Mycat init.d script conceived to work on Linux systems# as it does use of the /proc filesystem.### BEGIN INIT INFO# Provides: mycat# Default-Start: 2 3 4 5# Default-Stop: 0 1 6# Short-Description: Mycat data structure server# Description: Mycat data structure server. See https://github.com/MyCATApache/Mycat-Server### END INIT INFOEXEC=/usr/local/mycat/bin/mycatPIDFILE=/usr/local/mycat/mycat.pidcase "$1" instart)if [ -f $PIDFILE ]thenecho "$PIDFILE exists, process is already running or crashed"elseecho "Starting Mycat server..."$EXEC startfi;;stop)if [ ! -f $PIDFILE ]thenecho "$PIDFILE does not exist, process is not running"elsePID=$(cat $PIDFILE)echo "Stopping ..."$EXEC stopwhile [ -x /proc/${PID} ]doecho "Waiting for Mycat to shutdown ..."sleep 1doneecho "Mycat stopped"fi;;*)echo "Please use start or stop as first argument";;esac
设置权限 chmod +x /etc/init.d/mycat增加开机服务 chkconfig --add mycat设置开机启动 chkconfig mycat on移除开机启动 chkconfig mycat off查看开机启动 chkconfig --list
方法二:
#修改脚本文件 rc.localvim /etc/rc.d/rc.localexport JAVA_HOME=/usr/local/jdk/usr/local/mycat/bin/mycat start
好了 我们来连接一下看一下效果,最终效果如下图所示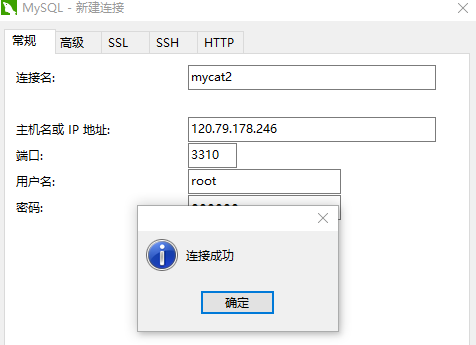
因为之前配置好了主从复制,所以两个数据库数据时同步的,然后当你读取数据的时候是读取的slave的数据,所以读写分离完成,
项目开发中,我们只需要将mysql的连接地址换成mycat的地址即可,无需任何其余操作,更不会造成多余的业务逻辑,这样,我们基于mycat的读写分离算是大功告成啦!
常用命令
强制走master:/*!mycat:db_type=master*/ select * from tbl_user强制走slave: /*!mycat:db_type=slave*/ select * from tbl_userfirewall-cmd --permanent --add-port=3307/tcp 开放3307端口firewall-cmd --permanent --remove-port=3307/tcp 移除3307端口firewall-cmd --reload 重新载入配置设置权限 chmod +x /etc/init.d/mycat增加开机服务 chkconfig --add mycat设置开机启动 chkconfig mycat on移除开机启动 chkconfig mycat off查看开机启动 chkconfig --list
10,redis-5.0.9
1 下载地址
http://download.redis.io/releases/
2 安装gcc依赖
由于 redis 是用 C 语言开发,安装之前必先确认是否安装 gcc 环境(gcc -v),如果没有安装,执行以下命令进行安装
gcc -v // 查看gcc版本yum install -y gcc-c++ // 默认安装4.8.5版本
3 下载并解压安装包wget http://download.redis.io/releases/redis-6.0.9.tar.gztar -zxvf redis-5.0.9.tar.gz
4 编译/安装
编译
cd切换到redis解压目录下cd /usr/local/redis安装 (默认安装路径:/usr/local/redis/ )进入 src 目录后执行 make installcd /usr/local/redismake install 安装在当前目录的src目录make install PREFIX=/usr/local/redis 安装并指定安装目录
注:如果报错: 加入参数再编译:MALLOC=libc eg: make MALLOC=libc
可能会出现以下错误
jemalloc/jemalloc.h:没有那个文件或目录cd src && make allmake[1]: Entering directory `/opt/redis-5.0.8/src'CC adlist.oIn file included from adlist.c:34:0:zmalloc.h:50:31: fatal error: jemalloc/jemalloc.h: No such file or directory#include <jemalloc/jemalloc.h>^compilation terminated.make[1]: *** [adlist.o] Error 1make[1]: Leaving directory
5 启动服务,指定配置文件
firewall-cmd --permanent --add-port=6379/tcp 开放6379端口firewall-cmd --permanent --remove-port=6379/tcp 移除6379端口firewall-cmd --reload 重新载入配置
mkdir /usr/local/redis/logsmkdir /usr/local/redis/configcp /usr/local/redis/redis.conf /usr/local/redis/config/redis_6379.conf./redis-server ../config/redis_6379.conf ##加载指定的配置文件启动127.0.0.1:6379> info Server ##查看当前加载的配置文件
后台启动
修改配置文件 vim redis.conf
(1) 注释掉69 bind 127.0.0.1 (原因:bind 127.0.0.1生效,只能本机访问redis)(解决只能特定网段连接的限制;正式服务器部署如阿里云、华为云,为项目安全严格可以保留注释,自己测试服务使用的话就注释掉)
(2) 将88 protected-mode 属性改为 no (关闭保护模式,不然会阻止远程访问;同上,正式服务器项目上线可不修改)
(3) 将137 daemonize 属性改为 yes (这样启动时就是后台启动)
(4) 将171 logfile “/usr/local/redis/logs/redis.log”
将171 requirepass foobared
requirepass 123456
设置密码
(5) 将699 appendonly属性改为 yes (这样启动时就是后台启动)
6 设置开机启动
创建启动脚本文件 redidvim /etc/init.d/redis
复制粘贴以下内容:
#!/bin/sh## Simple Redis init.d script conceived to work on Linux systems# as it does use of the /proc filesystem.### BEGIN INIT INFO# Provides: redis_6379# Default-Start: 2 3 4 5# Default-Stop: 0 1 6# Short-Description: Redis data structure server# Description: Redis data structure server. See https://redis.io### END INIT INFO#redis配置信息REDISPORT=6379EXEC=/usr/local/redis/bin/redis-serverCLIEXEC=/usr/local/redis/bin/redis-cliPIDFILE=/var/run/redis_${REDISPORT}.pid#redis启动时加载的配置文CONF="/usr/local/redis/config/redis_6379.conf"case "$1" instart)if [ -f $PIDFILE ]thenecho "$PIDFILE exists, process is already running or crashed"elseecho "Starting Redis server..."$EXEC $CONFfi;;stop)if [ ! -f $PIDFILE ]thenecho "$PIDFILE does not exist, process is not running"elsePID=$(cat $PIDFILE)echo "Stopping ..."$CLIEXEC -p $REDISPORT shutdownwhile [ -x /proc/${PID} ]doecho "Waiting for Redis to shutdown ..."sleep 1doneecho "Redis stopped"fi;;*)echo "Please use start or stop as first argument";;esac
设置脚本权限 chmod +x /etc/init.d/redis
使用service命令使用redis service redis start
增加redis 服务 chkconfig --add redis
设置开机启动 chkconfig redis on
移除开机启动 chkconfig redis off
查看开机启动 chkconfig --list redis
测试 redis
7 卸载
卸载redis非常的简单,只需要简单的三步
停止redis服务器 ps aux|grep redis
通过下面的命令停止redis服务器 redis-cli shutdown
需要注意的是,由于我的redis命令都安装到/usr/local/bin目录下面了,并且添加到环境变量PATH里面了,所以可以直接运行。
删除make的时候生成的几个redisXXX的文件
ll /usr/local/binrm -f /usr/local/bin/redis*ll /usr/local/bin
顺便也删除掉解压后的文件目录和所以文件rm -rf redis
这样,redis就卸载完成了。
11,rabbitmq-server-3.8.22-1.el7
详见:https://www.yuque.com/zhang.qiang/rabbitmq/yh881k
12,MongoDb-4.2.5
下载地址:https://fastdl.mongodb.org/linux/mongodb-linux-x86_64-rhel70-4.2.5.tgz
1,我们安装到 /opt/mongodb 下,首先将.tgz 文件传到 /home 下。
tar -xzvf ./mongodb-linux-x86_64-rhel70-4.2.5.tgz # 解压cd /opt/mongodb# 创建相应的目录mkdir confmkdir logsmkdir data# 创建配置文件vim ./conf/mongodb.confport=27017 #端口dbpath= /home/mongodb-linux-x86_64-rhel70-4.2.5/data #数据库存文件存放目录logpath= /home/mongodb-linux-x86_64-rhel70-4.2.5/logs/mongodb.log #日志文件存放路径logappend=true #使用追加的方式写日志fork=true #以守护进程的方式运行,创建服务器进程maxConns=1000 #最大同时连接数noauth=true #不启用验证journal=true #每次写入会记录一条操作日志(通过journal可以重新构造出写入的数据)。#即使宕机,启动时wiredtiger会先将数据恢复到最近一次的checkpoint点,然后重放后续的journal日志来恢复。storageEngine=wiredTiger #存储引擎有mmapv1、wiretiger、mongorocksbind_ip = 0.0.0.0 #这样就可外部访问了,例如从win10中去连虚拟机中的MongoDB
role 除了 readWrite,还有其他角色列表如下:Read:允许用户读取指定数据库readWrite:允许用户读写指定数据库dbAdmin:允许用户在指定数据库中执行管理函数,如索引创建、删除,查看统计或访问system.profileuserAdmin:允许用户向system.users集合写入,可以找指定数据库里创建、删除和管理用户clusterAdmin:只在admin数据库中可用,赋予用户所有分片和复制集相关函数的管理权限。readAnyDatabase:只在admin数据库中可用,赋予用户所有数据库的读权限readWriteAnyDatabase:只在admin数据库中可用,赋予用户所有数据库的读写权限userAdminAnyDatabase:只在admin数据库中可用,赋予用户所有数据库的userAdmin权限dbAdminAnyDatabase:只在admin数据库中可用,赋予用户所有数据库的dbAdmin权限。root:只在admin数据库中可用。超级账号,超级权限再次编辑 ./conf/mongodb.conf,设置:authorization: enabled #启用验证
启动
vim ./start.sh#!/bin/bash./mongod --config ../conf/mongodb.confif [ $? -eq 0 ]; thenecho -e " 启动成功!启动端口为默认 27017 "exit 0elseecho -e "启动失败...... "exit 1fivim ./stop.sh输入以下内容保存:#!/bin/bashecho 'Stop mongodb is begin ...'./mongod -shutdown --config ../conf/mongodb.confif [ $? -eq 0 ]; thenecho -e "mongdb 停止成功!"elseecho -e "mongdb 停止失败......m"exit 1fiecho 'Stop mongodb is end ...'chmod 777 start.sh # 修改执行权限chmod 777 stop.sh
自启 vim /etc/init.d/mongodb
#!/bin/sh#chkconfig: 2345 80 90#description: mongodbstart() {/opt/mongodb/bin/mongod --config /opt/mongodb/conf/mongodb.conf}stop() {/opt/mongodb/bin/mongod -config /opt/mongodb/conf/mongodb.conf --shutdown}case "$1" instart)start;;stop)stop;;restart)stopstart;;*)echo $"Usage: $0 {start|stop|restart}"exit 1esac
测试
./bin/mongo -u "admin" -p "123456" --authenticationDatabase "admin"> use admin> show dbs;
12,elasticsearch7.6.2
下载地址:https://www.elastic.co/cn/downloads/past-releases/elasticsearch-7-6-2
https://www.elastic.co/cn/downloads/past-releases/elasticsearch-6-2-2
kibana:https://www.elastic.co/cn/downloads/kibana
分词器 :https://github.com/medcl/elasticsearch-analysis-ik/releases
logstash:https://www.elastic.co/cn/downloads/logstash
一,安装elasticsearch7.6.2
tar -zxvf elasticsearch-7.6.2-linux-x86_64.tar.gzmv elasticsearch-7.6.2 elasticsearchmv elasticsearch /opt# 创建es组和用户groupadd esuseradd es -g es# 新增es操作账户useradd espasswd es设置密码:laowanglaowang[root@w158 opt]# chown -R es:es /opt/elasticsearch
修改配置文件 vim elasticsearch.yml
mkdir datacd config/cp elasticsearch.yml elasticsearch.yml.bak#其余全部注释,直接复制进去,ip根据本机进行修改path.data: /opt/elasticsearch/datapath.logs: /opt/elasticsearch/logscluster.initial_master_nodes: ["node-1"]#集群的名称cluster.name: es#节点名称,其余两个节点分别为node-1 和node-3node.name: node-1#指定该节点是否有资格被选举成为master节点,默认是true,es是默认集群中的第一台机器为master,如果这台机挂了就会重新选举master#node.master: true#允许该节点存储数据(默认开启)#node.data: true#设置为true来锁住内存。因为内存交换到磁盘对服务器性能来说是致命的,当jvm开始swapping时es的效率会降低,所以要保证它不swap#bootstrap.memory_lock: true#设置network.host 使es可以在其他服务器访问network.host: 0.0.0.0http.port: 9200# 设置节点间交互的tcp端口,默认是9300transport.tcp.port: 9300#Elasticsearch将绑定到可用的环回地址,并将扫描端口9300到9305以尝试连接到运行在同一台服务器上的其他节点。discovery.seed_hosts: ["127.0.0.1", "[::1]"]#discovery.zen.ping.unicast.hosts: ["192.168.85.158"]#允许跨域访问http.cors.enabled: truehttp.cors.allow-origin: "*"#开启x-pack验证xpack.security.enabled: truexpack.license.self_generated.type: basicxpack.security.transport.ssl.enabled: true#执行设置用户名和密码的命令,这里需要为4个用户分别设置密码,elastic, kibana, logstash_system,beats_system#Elasticsearch需要提前启动一次,否则会出现以下Error:#ERROR: Elasticsearch keystore file is missing [/kaysen#lasticsearch必须处于启动状态,否则会出现以下Error#Connection failure to: http://127.0.0.1:9200/_security/_authenticate?pretty failed: Connection refused (Connection refused)#ERROR: Failed to connect to elasticsearch at http://127.0.0.1:9200/_security/_authenticate?pretty. Is the URL correct and elasticsearch running?#密码生成的两种方式 auto:各用户自动生成密码;interactive:手动设置密码。./bin/elasticsearch-setup-passwords interactive
设置 jvm.option (默认为1g 服务器内存足够,可跳过)vim /elasticsearch/config/jvm.options
-Xms512m-Xmx512m
设置 vm.max_map_count(如果小于262144就修改或没有设置就执行这一步)vim /etc/sysctl.conf
往/etc/sysctl.conf里追加以下内容:vm.max_map_count = 655360
设置limits.conf 修改内核参数
vim /etc/security/limits.conf
#往limits.conf里追加以下内容:es soft nofile 65536es hard nofile 65536
刷新参数: sysctl -p
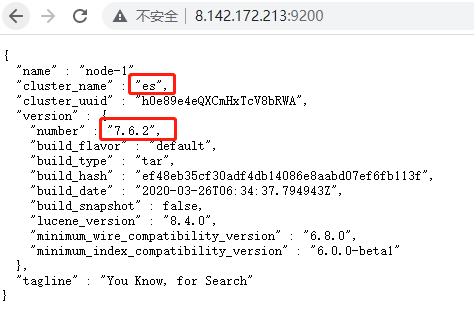
测试 地址:http://192.168.85.158:9200
# 切换到es用户su es# 启动cd /usr/local/elk/elasticsearch-7.6.2./bin/elasticsearch# 后台启动,默认log文件目录:/usr/local/elasticsearch-7.6.2/logs/my-es.log./bin/elasticsearch -d# 关闭ps -aef|grep elasticsearchKill -9 -F 1213
开机自启
#!/bin/bash#chkconfig: 345 63 37#description: elasticsearch#processname: elasticsearch-7.10.2# 这个目录是你Es所在文件夹的目录export ES_HOME=/opt/elasticsearchcase $1 instart)su es<<!cd $ES_HOME./bin/elasticsearch -d -p pidexit!echo "elasticsearch is started";;stop)pid=`cat $ES_HOME/pid`kill -9 $pidecho "elasticsearch is stopped";;restart)pid=`cat $ES_HOME/pid`kill -9 $pidecho "elasticsearch is stopped"sleep 1su es<<!cd $ES_HOME./bin/elasticsearch -d -p pidexit!echo "elasticsearch is started";;*)echo "start|stop|restart";;esacexit 0
报错
[es@vince elasticsearch-7.6.2]$ ./bin/elasticsearch -dException in thread "main" java.lang.RuntimeException: starting java failed with [1]output:## There is insufficient memory for the Java Runtime Environment to continue.# Native memory allocation (mmap) failed to map 986513408 bytes for committing reserved memory.# An error report file with more information is saved as:# logs/hs_err_pid17395.log解决:调小启动内存vi /usr/local/elasticsearch-7.6.2/config/jvm.options# 修改为512m#-Xms2g#-Xmx2g-Xms512m-Xmx512m
failed to obtain node locks(绑定节点失败)
uncaught exception in thread [main]java.lang.IllegalStateException: failed to obtain node locks, tried [[/usr/local/elk/elasticsearch-7.6.2/data]] with lock id [0]; maybe these locations are not writable or multiple nodes were started without increasing [node.max_local_storage_nodes] (was [1])?at org.elasticsearch.env.NodeEnvironment.<init>(NodeEnvironment.java:301)解决:由于上一次没有正常关闭es导致。# 查看进程ps aux | grep elastic# 查询到以下进程es 12705 0.0 0.0 112728 976 pts/2 R+ 23:53 0:00 grep --color=auto elastices 30116 12.1 41.2 2833332 776204 pts/2 Sl 23:48 0:36 /usr/local/elk/elasticsearch-7.6.2/jdk/bin/java -Des.networkaddress.cache.ttl=60 -Des.networkaddress.cache.negative.ttl=10 -XX:+AlwaysPreTouch -Xss1m -Djava.awt.headless=true -Dfile.encoding=UTF-8 -Djna.nosys=true -XX:-OmitStackTraceInFastThrow -Dio.netty.noUnsafe=true -Dio.netty.noKeySetOptimization=true -Dio.netty.recycler.maxCapacityPerThread=0 -Dio.netty.allocator.numDirectArenas=0 -Dlog4j.shutdownHookEnabled=false -Dlog4j2.disable.jmx=true -Djava.locale.providers=COMPAT -Xms512m -Xmx512m -XX:+UseConcMarkSweepGC -XX:CMSInitiatingOccupancyFraction=75 -XX:+UseCMSInitiatingOccupancyOnly -Djava.io.tmpdir=/tmp/elasticsearch-14028617868054823808 -XX:+HeapDumpOnOutOfMemoryError -XX:HeapDumpPath=data -XX:ErrorFile=logs/hs_err_pid%p.log -Xlog:gc*,gc+age=trace,safepoint:file=logs/gc.log:utctime,pid,tags:filecount=32,filesize=64m -XX:MaxDirectMemorySize=268435456 -Des.path.home=/usr/local/elk/elasticsearch-7.6.2 -Des.path.conf=/usr/local/elk/elasticsearch-7.6.2/config -Des.distribution.flavor=default -Des.distribution.type=tar -Des.bundled_jdk=true -cp /usr/local/elk/elasticsearch-7.6.2/lib/* org.elasticsearch.bootstrap.Elasticsearch -d# 杀掉进程,重新启动就可以了kill -9 30116
(1)ERROR: bootstrap checks failed
max file descriptors [4096] for elasticsearch process likely too low, increase to at least [65536]
原因:无法创建本地文件问题,用户最大可创建文件数太小解决方案:切换到 root 用户,编辑 limits.conf 配置文件, 添加类似如下内容:vi /etc/security/limits.conf添加如下内容:* soft nofile 65536* hard nofile 131072* soft nproc 2048* hard nproc 4096备注: * 代表 Linux 所有用户名称(比如 es)保存、退出、重新登录才可生效
(2)max virtual memory areas vm.max_map_count [65530] likely too low, increase to at least [262144]
原因:最大虚拟内存太小大讲台科技- 2 -解决方案:切换到 root 用户下,修改配置文件 sysctl.confvi /etc/sysctl.conf添加下面配置:vm.max_map_count=655360并执行命令(配置生效):sysctl -p然后重新启动 elasticsearch,即可启动成功。
二,安装kibana7.6.2
1,直接接解压到 /opt/kibana
2,修改配置文件vim /opt/kibana/config/kibana.yml
server.port: 5601server.host: "0.0.0.0"elasticsearch.hosts: ["http://localhost:9200"]i18n.locale: "zh-CH"#如果ES设置密码elasticsearch.username: "elastic"elasticsearch.password: "123456"
3,测试 http://8.142.172.213:5601/
#启动su escd /opt/kibana/bin./kibana#关闭进程netstat -tunlp|grep 5601
4,开机自启cd /etc/init.dvim kibana
#!/bin/bash#chkconfig: 345 63 37#description: kibana#processname:kibana-7.6.2export KIBANA_HOME=/opt/kibanacase $1 instart)su es<<!cd $KIBANA_HOMEnohup ./bin/kibana -p pid &exit!echo "kibana is started";;stop)pid=`cat $KIBANA_HOME/pid`kill -9 $pidecho "kibana is stopped";;restart)pid=`cat $KIBANA_HOME/pid`kill -9 $pidecho "kibana is stopped"sleep 5su es<<!cd $KIBANA_HOME./bin/kibana -p pid &exit!echo "kibana is started";;*)echo "start|stop|restart";;esacexit 0
- systemctl enable kibana #开机自启
- systemctl start kibana #启动
- systemctl stop kibana #停止
- systemctl restart kibana #重启
三,中文分词器
下载好相应版本的zip包,解压后放到elasticsearch/plugins/下,然后需要删除原压缩包文件。
一下命令使用的es用户,非root用户。如果使用了root用户请将ik目录赋权限给es用户。 ```css cd /opt/software mkdir ik unzip -d ik/ elasticsearch-analysis-ik-7.6.2.zip mv ik/ /opt/elasticsearch/plugins/
chown -R es:es /opt/elasticsearch/
<a name="kbbpP"></a>### 四,logstash-7.6.2下载地址:[https://www.elastic.co/cn/downloads/logstash](https://www.elastic.co/cn/downloads/logstash)<br />es、kibana、logstash的版本要一致<br />安装目录 `/opt/logstash`<br />添加配置文件 logstash.conf<br />`vim /opt/logstash/config/logstash.conf ````cppinput {tcp {#开放远程连接host => "0.0.0.0"port => 4560mode => "server"codec => json_lines}}output {elasticsearch {#ES的部署位置hosts => "localhost:9200"#存储在ES中的索引名,对应下面的SpringBoot集成 logstash 的日志配置文件里{“appname”:“file-manager”}index => "springboot-logstash-%{+YYYY.MM.dd}%{[appname]}"}}
户动
cd logstash/bin./logstash -f ../config/logstash.conf
12,nacos-server-2.0.3
1,下载地址
https://github.com/alibaba/nacos/releases
nacos-server-2.0.3.tar.gz
2,安装tar -zxvf nacos-server-2.0.3.tar.gzmv nacos /usr/local/
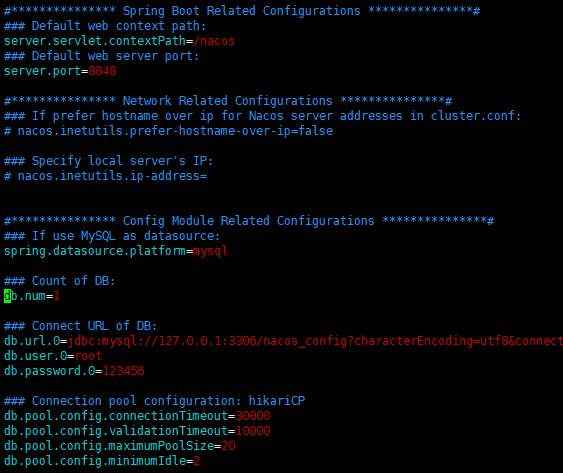
3,修改配置文件 application.propertiesvim /usr/local/nacos/conf/application.properties
#*************** Spring Boot Related Configurations ***************#### Default web context path:server.servlet.contextPath=/nacos### Default web server port:server.port=8848#*************** Network Related Configurations ***************#### If prefer hostname over ip for Nacos server addresses in cluster.conf:# nacos.inetutils.prefer-hostname-over-ip=false### Specify local server's IP:# nacos.inetutils.ip-address=#*************** Config Module Related Configurations ***************#### If use MySQL as datasource:spring.datasource.platform=mysql### Count of DB:db.num=1### Connect URL of DB:db.url.0=jdbc:mysql://127.0.0.1:3306/nacos_config?characterEncoding=utf8&connectTimeout=1000&socketTimeout=3000&autoReconnect=true&useUnicode=true&useSSL=false&serverTimezone=UTCdb.user.0=rootdb.password.0=123456### Connection pool configuration: hikariCPdb.pool.config.connectionTimeout=30000db.pool.config.validationTimeout=10000db.pool.config.maximumPoolSize=20db.pool.config.minimumIdle=2
执行/opt/nacos/conf目录下nacos-mysql.sql文件,进行数据库初始化
4,启动i18n.locale: “zh-CH”
进入bin目录 cd /usr/local/nacos/bin
启动nacos命令(-m standalone 指定启动模式为单机版): ./startup.sh -m standalone
查看日志tail -500f /usr/local/nacos/logs/start.out
5,测试
默认端口为8848,在application.aproperties中可以配置。
centos7给防火墙开发8848端口: firewall-cmd --zone=public --add-port=8848/tcp --permanent
重新载入防火墙:firewall-cmd --reload
访问nacos控制台,http://192.168.2.220:8848/nacos ( http://ip:8848/nacos)
用户名密码均为:nacos
关闭nacos命令,bin目录下执行 ./shutdown.sh
单机版部署成功。
6,开机自启(无)vim /nacos.service
添加如下:
[Unit]Description=nacosAfter=network.target[Service]Type=forkingExecStart=/usr/local/nacos/bin/startup.sh -m standaloneExecReload=/usr/local/nacos/bin/shutdown.shExecStop=/usr/local/nacos/bin/shutdown.shPrivateTmp=true[Install]WantedBy=multi-user.target
修改启动脚本vim /usr/local/nacos/bin/startup.sh
[ ! -e "$JAVA_HOME/bin/java" ] && JAVA_HOME=$HOME/jdk/java[ ! -e "$JAVA_HOME/bin/java" ] && JAVA_HOME=/usr/java[ ! -e "$JAVA_HOME/bin/java" ] && JAVA_HOME=/opt/taobao/java## 增加Jdk位置[ ! -e "$JAVA_HOME/bin/java" ] && JAVA_HOME=/usr/local/java/jdk[ ! -e "$JAVA_HOME/bin/java" ] && unset JAVA_HOME
保存退出后,执行以下命令
systemctl daemon-reload #重新加载systemctl enable nacos.service #开机自启systemctl disable nacos.service #取消开机自启systemctl start nacos.service #启动
13,seata-1.3
1 解压
unzip seata-server-1.3.0.zipmv seata /usr/local
2 新建 vim config.txt
store.mode=dbstore.db.datasource=druidstore.db.dbType=mysqlstore.db.driverClassName=com.mysql.jdbc.Driverstore.db.url=jdbc:mysql://172.0.0.1:3306/jx_seata?useUnicode=truestore.db.user=rootstore.db.password=123456store.db.minConn=5store.db.maxConn=30store.db.globalTable=global_tablestore.db.branchTable=branch_tablestore.db.queryLimit=100store.db.lockTable=lock_tablestore.db.maxWait=5000service.vgroupMapping.mall-product-tx-group=defaultservice.vgroupMapping.mall-order-tx-group=defaultservice.vgroupMapping.mall-ware-tx-group=default
3 新建 /usr/local/seata/conf/sh/nacos-config.sh
#!/usr/bin/env bash# Copyright 1999-2019 Seata.io Group.## Licensed under the Apache License, Version 2.0 (the "License");# you may not use this file except in compliance with the License.# You may obtain a copy of the License at、## http://www.apache.org/licenses/LICENSE-2.0## Unless required by applicable law or agreed to in writing, software# distributed under the License is distributed on an "AS IS" BASIS,# WITHOUT WARRANTIES OR CONDITIONS OF ANY KIND, either express or implied.# See the License for the specific language governing permissions and# limitations under the License.while getopts ":h:p:g:t:u:w:" optdocase $opt inh)host=$OPTARG;;p)port=$OPTARG;;g)group=$OPTARG;;t)tenant=$OPTARG;;u)username=$OPTARG;;w)password=$OPTARG;;?)echo " USAGE OPTION: $0 [-h host] [-p port] [-g group] [-t tenant] [-u username] [-w password] "exit 1;;esacdoneif [[ -z ${host} ]]; thenhost=localhostfiif [[ -z ${port} ]]; thenport=8848fiif [[ -z ${group} ]]; thengroup="SEATA_GROUP"fiif [[ -z ${tenant} ]]; thentenant=""fiif [[ -z ${username} ]]; thenusername=""fiif [[ -z ${password} ]]; thenpassword=""finacosAddr=$host:$portcontentType="content-type:application/json;charset=UTF-8"echo "set nacosAddr=$nacosAddr"echo "set group=$group"failCount=0tempLog=$(mktemp -u)function addConfig() {curl -X POST -H "${contentType}" "http://$nacosAddr/nacos/v1/cs/configs?dataId=$1&group=$group&content=$2&tenant=$tenant&username=$username&password=$password" >"${tempLog}" 2>/dev/nullif [[ -z $(cat "${tempLog}") ]]; thenecho " Please check the cluster status. "exit 1fiif [[ $(cat "${tempLog}") =~ "true" ]]; thenecho "Set $1=$2 successfully "elseecho "Set $1=$2 failure "(( failCount++ ))fi}count=0for line in $(cat $(dirname "$PWD")/config.txt | sed s/[[:space:]]//g); do(( count++ ))key=${line%%=*}value=${line#*=}addConfig "${key}" "${value}"doneecho "========================================================================="echo " Complete initialization parameters, total-count:$count , failure-count:$failCount "echo "========================================================================="if [[ ${failCount} -eq 0 ]]; thenecho " Init nacos config finished, please start seata-server. "elseecho " init nacos config fail. "fi
4 开机自机脚本/etc/init.d/seata
#!/bin/bash##chkconfig: 345 63 37#description: seata#processname: seataexport NODE_HOME=/usr/local/nodejsexport JAVA_HOME=/usr/local/jdkexport CLASSPATH=.:$JAVA_HOME/lib/dt.jar:$JAVA_HOME/lib/tools.jarexport NODE_PATH=$NODE_HOME/lib/node_modulesexport PATH=$PWD/bin:/usr/local/openresty/nginx/sbin:$JAVA_HOME/bin:$NODE_HOME/bin:$PATHSEATA_HOME=/usr/local/seatacase $1 instart)nohup sh $SEATA_HOME/bin/seata-server.sh -p 8091 -h 192.168.5.200 > seata.out 2>&1 &echo $! > $SEATA_HOME/bin/seata.pidecho "seata is started";;stop)pid=`cat $SEATA_HOME/bin/seata.pid`kill -9 $pidecho "seata is stopped";;restart)pid=`cat $SEATA_HOME/bin/seata.pid`kill -9 $pidecho "seata is stopped"sleep 1nohup sh $SEATA_HOME/bin/seata-server.sh -p 8091 -h 192.168.5.200 > seata.out 2>&1 &echo $! > $SEATA_HOME/bin/seata.pidecho "seata is started";;*)echo "start|stop|restart";;esacexit 0
使用service命令使用redis service seata start
增加服务 chkconfig --add seata
设置开机启动 chkconfig seata on
移除开机启动 chkconfig seata off
查看开机启动 chkconfig --list seata
14,nexus-3.29.0-02
构建Nexus私服 nexus-3.29.0-02 (详见nexus)
1 用户权限
- 使用专用的操作系统用户帐户在给定主机上运行nexus。新建用户:nexus,密码:nexus
- 足够的文件句柄限制:确保用户的打开文件描述符数量限制增加到65,536或更高(/etc/security/limits.conf)
- root用户登录服务器创建nexus用户并授权 ```bash groupadd nexus useradd nexus -g nexus passwd nexus 提示输入密码:nexus 再次输入密码:nexus
mkdir -p /opt/nexus/
chown -R nexus:nexus /opt/nexus/
chmod 775 /opt/nexus/
**2 安装**<br />`tar -zxvf nexus-3.29.0-02-unix.tar.gz ` <br />`mv nexus-3.29.0-02 /opt/nexus `<br />3,配置<br />修改nexus启动初始化内存(**不是必须的,视服务器配置决定,4C8G则不需要修改**)<br />`vim /opt/nexus/bin/nexus.vmoptions `(默认2700m)```css-Xms384m-Xmx384m-XX:MaxDirectMemorySize=384m-XX:+UnlockDiagnosticVMOptions-XX:+LogVMOutput-XX:LogFile=./sonatype-work/nexus3/log/jvm.log-XX:-OmitStackTraceInFastThrow-Djava.net.preferIPv4Stack=true-Dkaraf.home=.-Dkaraf.base=.-Dkaraf.etc=etc/karaf-Djava.util.logging.config.file=etc/karaf/java.util.logging.properties-Dkaraf.data=./sonatype-work/nexus3-Dkaraf.log=./sonatype-work/nexus3/log-Djava.io.tmpdir=./sonatype-work/nexus3/tmp-Dkaraf.startLocalConsole=false
修改nexus端口(不是必须的,默认监听端口8083)vim /opt/nexus/etc/nexus-default.properties
# Jetty sectionapplication-port=8803application-host=0.0.0.0nexus-args=${jetty.etc}/jetty.xml,${jetty.etc}/jetty-http.xml,${jetty.etc}/jetty-requestlog.xmlnexus-context-path=/# Nexus sectionnexus-edition=nexus-pro-editionnexus-features=\nexus-pro-featurenexus.hazelcast.discovery.isEnabled=true
4 启动
firewall-cmd --permanent --add-port=8803/tcp 开放8803端口firewall-cmd --permanent --remove-port=8803/tcp 移除8803端口firewall-cmd --reload 重新载入配置
cd /opt/nexus/bin./nexus start或者./nexus run &启动成功的提示:Starting nexus----------------------------------------------如果是root用户启动,则会提示:WARNING: ************************************************************WARNING: Detected execution as "root" user. This is NOT recommended!WARNING: ************************************************************Starting nexus说明已经安装启动成功,上面报错意思是nexus建议不要用root用户来启动nexus,但并不影响启动
检查nexus进程: ps -ef | grep nexus
5 测试
http://192.168.5.200:8803
admin
密码:**cat /opt/sonatype-work/nexus3/admin.password cat /opt/nexus/sonatype-work/nexus3/admin.password**
6 设置开机启动
创建启动脚本文件 nexusvim /etc/init.d/nexus
复制粘贴以下内容:
服务必须在运行级2,3,4,5下被启动或关闭,启动的优先级是30,关闭的优先级是95。优先级范围是0-100,数字越大,优先级越低
#!/bin/bash#chkconfig:2345 30 95#description:nexus#processname:nexusexport JAVA_HOME=/usr/local/java/jdk/case $1 instart) su root /opt/nexus/bin/nexus start;;stop) su root /opt/nexus/bin/nexus stop;;status) su root /opt/nexus/bin/nexus status;;restart) su root /opt/nexus/bin/nexus restart;;dump) su root /opt/nexus/bin/nexus dump;;console) su root /opt/nexus/bin/nexus console;;*) echo "Usage: nexus {start|stop|run|run-redirect|status|restart|force-reload}"esac
设置脚本权限 chmod +x /etc/init.d/nexus
使用service命令启动 service nexus start
增加nexus服务 chkconfig --add nexus
移除服务 chkconfig --del nexus
设置开机启动 chkconfig nexus on
关闭开机启动 chkconfig --list nexus
15,getlab13.12.9
详见 https://www.yuque.com/zhang.qiang/gitlab/ge259r
16,jenkins-2.319.3-1.1
1 下载地址
官方镜像:https://get.jenkins.io/war-stable/
清华大学:https://mirrors.tuna.tsinghua.edu.cn/jenkins/redhat-stable/
2去Jenkins官网下载Jenkins,Centos的话会下载到.rpm安装文件
jenkins-2.319.3-1.1.noarch.rpm
2 安装
## 安装 epel-releasyum -y install epel-release## 安装 daemonizeyum -y install daemonize## 安装Jenkinsrpm -ivh jenkins-2.319.3-1.1.noarch.rpm
报错:
warning: jenkins-2.319.3-1.1.noarch.rpm: Header V4 RSA/SHA512 Signature, key ID 45f2c3d5: NOKEY
error: Failed dependencies:
daemonize is needed by jenkins-2.319.3-1.1.noarch
解决:
后面加上--force --nodeps 忽视依赖关系rpm -ivh jenkins-2.319.3-1.1.noarch.rpm --force --nodeps
3 查看安装位置 rpm -qc jenkins
[root@zhangqiang tars]# rpm -qc jenkins/etc/init.d/jenkins #配置文件 配置jdk安装路径/etc/logrotate.d/jenkins #默认的JENKINS_HOME目录/etc/sysconfig/jenkins#其余目录/usr/lib/jenkins/jenkins.war #WAR包/var/lib/jenkins/ #默认的JENKINS_HOME目录,改为/data/jenkins/var/log/jenkins/jenkins.log #Jenkins日志文件
4 修改配置文件**mkdir -p /opt/jenkins **
配置端口 vim /etc/sysconfig/jenkins
JENKINS_HOME="/opt/jenkins" #主目录JENKINS_USER="root" #默认用户JENKINS_PORT="8801" #端口
java安装地址 :which java
/usr/local/jdk/bin/java
配置jdk位置 vim /etc/init.d/jenkins
candidates="/etc/alternatives/java/usr/lib/jvm/java-1.8.0/bin/java/usr/lib/jvm/jre-1.8.0/bin/java/usr/lib/jvm/java-11.0/bin/java/usr/lib/jvm/jre-11.0/bin/java/usr/lib/jvm/java-11-openjdk-amd64/usr/bin/java/usr/local/java/jdk/bin/java #jdk配置
5 常用命令
重新加载配置文件 systemctl daemon-reload
启动命令为 service jenkins start
启动 systemctl start jenkins
开机启动 systemctl enable jenkins
使配置生效 source /etc/profile
使用service命令使用redis service jenkins start
增加服务 chkconfig --add jenkins
设置开机启动 chkconfig jenkins on
移除开机启动 chkconfig jenkins off
查看开机启动 chkconfig --list jenkins
firewall-cmd --permanent --add-port=8801/tcp 开放8801端口firewall-cmd --permanent --remove-port=8801/tcp 移除8801端口firewall-cmd --reload 重新载入配置
6 测试
http://192.168.5.116:8801/cat /var/lib/jenkins/secrets/initialAdminPasswordcat /opt/jenkins/secrets/initialAdminPassword
注意:配置国内的镜像 官方下载插件慢 更新下载地址
cd {你的Jenkins工作目录}/updates #进入更新配置位置cd /root/.jenkins/updates/
sed -i 's/http:\/\/updates.jenkins-ci.org\/download/https:\/\/mirrors.tuna.tsinghua.edu.cn\/jenkins/g' default.json && sed -i 's/http:\/\/www.google.com/https:\/\/www.baidu.com/g' default.json
这是直接修改的配置文件,如果前边Jenkins用sudo启动的话,那么这里的两个sed前均需要加上sudo
重启Jenkins,安装插件,选择安装推荐的插件
关闭防火墙
查看防火墙规则 firewall-cmd --list-all防火墙服务状态 systemctl status firewalld.service防火墙状态 firewall-cmd --state开启防火墙 systemctl start firewalld.service重启防火墙 systemctl restart firewalld.service关闭防火墙 systemctl stop firewald.service永久关闭防火墙 systemctl disable firewalld永久关闭防火墙 systemctl disable firewalld.service永久开启防火墙 systemctl enable firewalld.service开放80端口 firewall-cmd --permanent --add-port=80/tcp移除80端口 firewall-cmd --permanent --remove-port=80/tcp重启防火墙 systemctl restart firewalld.service;重新载入配置 firewall-cmd --reload
7 插件
Locale 汉化
Role-based Authorization Strategy 权限插件
Deploy to container —支持自动化代码部署到tomcat容器
GIT plugin 将Git与 Jenkins集成在一起。可能已经安装,可在已安装列表中查询出来
Maven Integration 利用Maven编译,打包所需插件
Publish Over SSH 通过ssh连接ssh 插件
ThinBackup 备份插件
SSH plugin 使用 SSH 协议远程执行 shell 命令
Discard old builds 丢弃旧的构建
8 卸载
#卸载rpm -e jenkins#检查是否卸载成功rpm -ql jenkins#彻底删除残留文件find / -iname jenkins | xargs -n 1000 rm -rf
17,zentao15.5
Centos7.4系统下安装httpd,mysql5.7,php7.2环境运行禅道
https://www.zentao.net/book/zentaopmshelp/40.html
一、运行环境说明
运行环境为 Apache + PHP(7.0/7.1/7.2版本) + MySQL(5.5/5.6/5.7版本)/mariadb 组合 ,Nginx 其次。
PHP需要使用 pdo, pdo_mysql, json, filter, openssl, mbstring, zlib, curl, gd, iconv 模块,需要确保 PHP 运行环境有加载上述模块。
二、安装并开启 Apache 服务
yum -y install httpd #安装Apache服务systemctl start httpd.service #开启Apache服务systemctl stop httpd.service #关闭Apache服务systemctl restart httpd.service #重启Apache服务systemctl enable httpd.service #Apache服务开机启动systemctl status httpd.service #查看Apache服务状态
关闭防火墙( 或者自行百度相关指令开启服务器的 80 端口 ),以便排除因为网络问题 , 无法访问 Apache 服务
systemctl stop firewalld.service # 关闭防火墙systemctl disable firewalld.service # 禁止firewall开机启动systemctl status firewalld.service # 查看防火墙状态systemctl start firewalld.service # 开启防火墙
关闭 SELINUX,未关闭时可能有无法授予 /var 路径下文件的读写权限问题,关闭命令如下:setenforce 0 # 临时关闭SELINUX, 重启服务器失效
编辑 **/etc/selinux/config **文件,将 SELINUX 的值设置为 disabled , 下次开机 SELINUX 就不会启动了vim /etc/selinux/config # 修改文件中的 SELINUX=disabled
错误:Permission denied: AH00072: make_sock: could not bind to address 0.0.0.0:8888
//安装semanageyum provides /usr/sbin/semanageyum -y install policycoreutils-python//查看默认允许的端口semanage port -l | grep -w http_port_t// http_port_t tcp 80, 81, 443, 488, 8008, 8009, 8443, 9000//使用semanage添加apache侦听的端口semanage port -a -t http_port_t -p tcp 8888//启动apachesystemctl start httpd
apache 会被安装到:/etc/httpd/
apache 配置文件地址: /etc/httpd/conf/httpd.conf
apache 网站文件默认访问路径:/var/www/html/
三、安装PHP7.2版本
PHP7.2 版本需要配置 yum 源 :
rpm -Uvh https://mirror.webtatic.com/yum/el7/epel-release.rpmrpm -Uvh https://mirror.webtatic.com/yum/el7/webtatic-release.rpm
yum 安装 PHP7.2 所需组件 :
yum -y install php72w php72w-pdo php72w-mysql php72w-mbstring php72w-ldap php72w-gd php72w-json php72w-xml php72w-zip
四、安装mysql5数据库
详见mysql5.7.33安装
五、安装禅道软件
1. 下载新版禅道软件 源码包, 下载地址: http://www.zentao.net/download.html
2. 上传至服务器的 /opt/zentaopms 目录
3. 使用 unzip 命令解压禅道源码包程序。
yum -y install unzip # 安装unzip解压unzip ZenTaoPMS.*.zip -d /opt # 解压禅道源码包

4. 修改 Apache 访问路径: vim /etc/httpd/conf/httpd.conf
#Listen 12.34.56.78:80Listen 8804DocumentRoot "/opt/zentaopms/www/"<Directory "/opt/zentaopms/www/">AllowOverride All
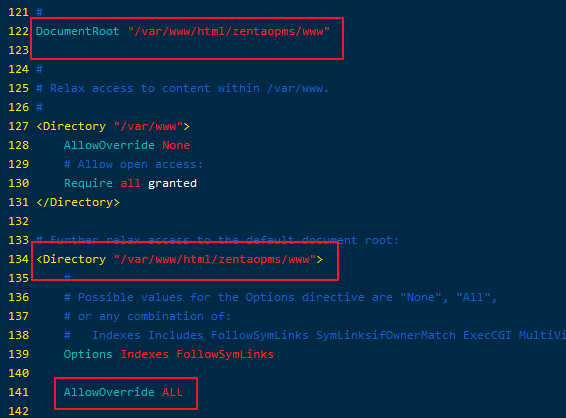
启动 Apache 服务 systemctl restart httpd
浏览器访问 http://192.168.5.200:8804 地址,安装禅道即可。
错误: PDO_MySQL扩展未加载yum install -y mariadb-libs
数据库配置文件 /var/www/html/zentaopms/config/my.php
卸载我的httpd,首先要停止httpd服务,命令如下:systemctl stop httpd
用yum -erase命令卸载,命令如下:yum erase httpd.x86_64
ApachHttp加固
##设置连接超时时间Timeout 10##确保限制对apache目录和文件的其他写访问文件权限##执行以下操作删除$ APACHE_PREFIX($ APACHE_PREFIX是apache的安装目录默认例/usr/local/apache2或/var/www/html如自定义请自行查找)目录上的其他写访问权限:##chmod -R o-w $ APACHE_PREFIX## chmod -R o-w /opt/zentaopms/www## chmod -R o-w /var/www/html##确保禁用http跟踪方法服务配置 TRACE方法不需要,并且很容易受到滥用,因此应该将其禁用##配置文件路径:/etc/httpd/conf/httpd.conf##加固建议##1.vim path(path为主配置文件的绝对路径,如果您的主配置文件中包含include <path>,则<path>为您的子配置文件路径) 2.找到选项TraceEnable将其值设置为off 如没有请增加TraceEnable off##隐藏 Apache 的版本号及其它敏感信息确保未启用服务器签名不存在或者off个人信息保护##服务器签名在服务器充当代理时很有用,因为它们有助于用户将错误与代理而非目标服务器区分开。 但是,在这个在上下文中,显得很鸡肋,而且存在被识别的可能##配置文件路径::/etc/httpd/conf/httpd.conf##1.使用vim编辑器对配置文件进行编辑 vim pathpath为主配置文件的绝对路径,如果您的主配置文件中包含include <path>,则<path>为您的子配置文件路径)##2.找到ServerSignature将其设置为ServerSignature Off 如没有,请增加ServerSignature OffServerTokens Prod## 确保Web根目录的选项受到限制 禁止 Apache 列表显示文件数据保密性<Directory "/opt/zentaopms/www/">Options NoneRequire all grantedAllowOverride All</Directory>
18,xiaoyaoji
1 下载地址
http://git.oschina.net/zhoujingjie/apiManager/releases
2 安装
安装Tomcat9
将xiaoyaoji-2.1.7.1.tar.gz 解压,将xiaoyaoji.war放到Tomcat/webapps目录下
tar -zxvf xiaoyaoji-2.1.7.1.tar.gzmv xiaoyaoji.war /usr/local/tomcat/webapps/
修改端口 vim /usr/local/tomcat/conf/server.xml
<Connector port="8805" protocol="HTTP/1.1" connectionTimeout="20000" redirectPort="8443" />
初始化数据库
新建数据库 xiaoyaoji 将 xiaoyaoji.war 解压后中 xiaoyaoji.sql表导入

若有收获,就点个赞吧
0 人点赞
