Nacos官方架构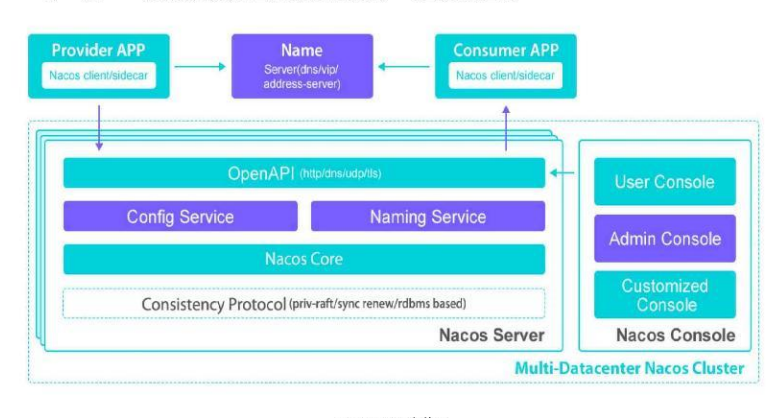
nacos官方架构图
provider app:服务提供者
consumer app:服务消费者
name server:通过vip(Vritual ip) 或者dns的方式实现nacos高可用集群的服务路由
nacos server:nacos服务提供者,里面包含open api是功能访问入口,Config service,naming service是nacos提供的配置服务,名字服务模块;consistency protocol是一致性协议,用来实现nacos集群节点的数据同步,这里使用的是raft算法;
nacos console:nacos控制台
整体来说,服务提供者通过vip访问nacos server高可用几圈,基于open api完成服务的注册和服务的查询,nacos server本身可以支持主备模式,所以底层会采用数据一致性算法来完成从借点的数据同步,服务消费者也是如此,基于opeapi从nacos server中查询服务列表
注册中心的原理
服务注册的功能主要体现在:
☐ 服务实力在启东市注册到服务注册表,并在关闭时注销
☐ 服务消费者查询服务注册表,获得可用实力
☐ 服务注册中心需要调用服务实例的健康检查api来验证它是否能够处理请求

nacos服务注册与发现的实现原理
nacos是什么时候完成的服务注册?
在spring-cloud-commons包下的meta-inf/spring.factory文件中可以发现如下配置
*spring.factory的作用
org.springframework.cloud.client.serviceregistry.AutoServiceRegistrationAutoConfiguration
该类就是服务注册相关的的配置类,其详细代码如下
//// Source code recreated from a .class file by IntelliJ IDEA// (powered by FernFlower decompiler)//package org.springframework.cloud.client.serviceregistry;import javax.annotation.PostConstruct;import org.springframework.beans.factory.annotation.Autowired;import org.springframework.boot.autoconfigure.condition.ConditionalOnProperty;import org.springframework.context.annotation.Configuration;import org.springframework.context.annotation.Import;@Configuration@Import({AutoServiceRegistrationConfiguration.class})@ConditionalOnProperty(value = {"spring.cloud.service-registry.auto-registration.enabled"},matchIfMissing = true)public class AutoServiceRegistrationAutoConfiguration {@Autowired(required = false)private AutoServiceRegistration autoServiceRegistration;@Autowiredprivate AutoServiceRegistrationProperties properties;public AutoServiceRegistrationAutoConfiguration() {}@PostConstructprotected void init() {if (this.autoServiceRegistration == null && this.properties.isFailFast()) {throw new IllegalStateException("Auto Service Registration has been requested, but there is no AutoServiceRegistration bean");}}}
在改配置类中可以看到注入了一个autoServiceRegistration和properties
首先看一下properties主要是引入自动注册的一些属性,通过@Import({AutoServiceRegistrationConfiguration.class})引入AutoServiceRegistrationConfiguration类,在AutoServiceRegistrationConfiguration类上通过@EnableConfigurationProperties({AutoServiceRegistrationProperties.class})引入对应的配置;
其次autoServiceRegistration的注入AutoServiceRegistration接口其实现类AbstractAutoServiceRegistration的具体实现如下
public abstract class AbstractAutoServiceRegistration<R extends Registration> implements AutoServiceRegistration, ApplicationContextAware, ApplicationListener<WebServerInitializedEvent> {//省略部分代码public void onApplicationEvent(WebServerInitializedEvent event) {this.bind(event);}/** @deprecated */@Deprecatedpublic void bind(WebServerInitializedEvent event) {ApplicationContext context = event.getApplicationContext();if (!(context instanceof ConfigurableWebServerApplicationContext) || !"management".equals(((ConfigurableWebServerApplicationContext)context).getServerNamespace())) {this.port.compareAndSet(0, event.getWebServer().getPort());this.start();}}public void start() {if (!this.isEnabled()) {if (logger.isDebugEnabled()) {logger.debug("Discovery Lifecycle disabled. Not starting");}} else {if (!this.running.get()) {this.context.publishEvent(new InstancePreRegisteredEvent(this, this.getRegistration()));this.register();if (this.shouldRegisterManagement()) {this.registerManagement();}this.context.publishEvent(new InstanceRegisteredEvent(this, this.getConfiguration()));this.running.compareAndSet(false, true);}}}protected void register() {this.serviceRegistry.register(this.getRegistration());}}
该类的关系图如下所示
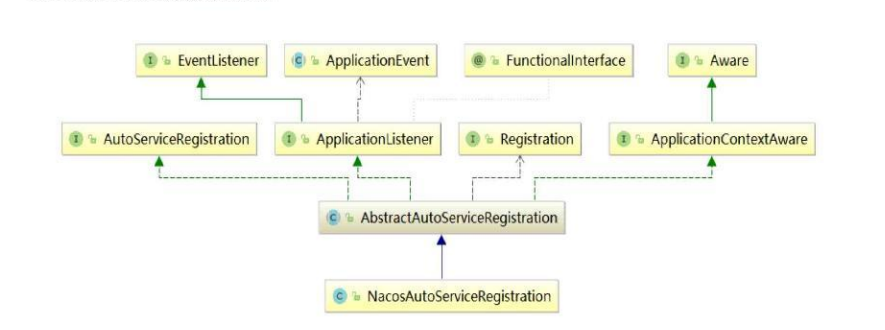
可以看到AutoServiceRegistration接口的实现类AbstractAutoServiceRegistration类除了实现AutoServiceRegistration接口还实现了ApplicationListener和ApplicationContextAware接口;
ApplicationListener是一种事件监听机制,其中方法的作用是监听某个指定的时间,而AbstractAutoServiceRegistration实现了改抽象方法,并且监听WebServerInitializedEvent时间(当webServer初始化完成之后),调用this.bind(envet)方法,在bind方法中调用start()方法,在start()方法中调用register()方法,在register()方法中调用
this.serviceRegistry.register(this.getRegistration());
完成服务的注册;
NacosServiceRegistry的实现
在上文中看到最终nacos的注册调用的this.serviceRegistry.register(this.getRegistration());方法,该方法是ServiceRegistry接口中的方法,而该接口的唯一实现类为NacosServiceRegistry,具体代码如下:
public class NacosServiceRegistry implements ServiceRegistry<Registration> {

    private static final Logger log = LoggerFactory.getLogger(NacosServiceRegistry.class);
private final NacosDiscoveryProperties nacosDiscoveryProperties;
private final NamingService namingService;

public NacosServiceRegistry(NacosDiscoveryProperties nacosDiscoveryProperties) {
    this.nacosDiscoveryProperties = nacosDiscoveryProperties;
    this.namingService = nacosDiscoveryProperties.namingServiceInstance();
}

    //省略部分代码
    public void register(Registration registration) {
    if (StringUtils.isEmpty(registration.getServiceId())) {
        log.warn("No service to register for nacos client...");
    } else {
        String serviceId = registration.getServiceId();
        Instance instance = new Instance();
        instance.setIp(registration.getHost());
        instance.setPort(registration.getPort());
        instance.setWeight((double)this.nacosDiscoveryProperties.getWeight());
        instance.setClusterName(this.nacosDiscoveryProperties.getClusterName());
        instance.setMetadata(registration.getMetadata());

        try {
            this.namingService.registerInstance(serviceId, instance);
            log.info("nacos registry, {} {}:{} register finished", new Object[]{serviceId, instance.getIp(), instance.getPort()});
        } catch (Exception var5) {
            log.error("nacos registry, {} register failed...{},", new Object[]{serviceId, registration.toString(), var5});
        }

    }
}
    }
在该方法中最终调用了this.namingService.registerInstance(serviceId, instance);来完成服务的的注册,该方法的具体逻辑如下
public class NacosNamingService implements NamingService {

    //省略部分代码
    //registerInstance有很多方法,可以根据不同的参数进行调用,例如groupName等等参数
    public void registerInstance(String serviceName, Instance instance) throws NacosException {
    this.registerInstance(serviceName, "DEFAULT_GROUP", instance);
}

public void registerInstance(String serviceName, String groupName, Instance instance) throws NacosException {
    if (instance.isEphemeral()) {
        BeatInfo beatInfo = new BeatInfo();
        beatInfo.setServiceName(NamingUtils.getGroupedName(serviceName, groupName));
        beatInfo.setIp(instance.getIp());
        beatInfo.setPort(instance.getPort());
        beatInfo.setCluster(instance.getClusterName());
        beatInfo.setWeight(instance.getWeight());
        beatInfo.setMetadata(instance.getMetadata());
        beatInfo.setScheduled(false);
        this.beatReactor.addBeatInfo(NamingUtils.getGroupedName(serviceName, groupName), beatInfo);
    }

    this.serverProxy.registerService(NamingUtils.getGroupedName(serviceName, groupName), groupName, instance);
}
}
此段代码主要逻辑如下
通过this.beatReactor.addBeatInfo(NamingUtils.getGroupedName(serviceName, groupName), beatInfo);创建心跳信息实现健康检测,Nacos Server必须要确保注册的服务实例是健康的,而心跳检测就是服务健康检测的手段;
public class BeatReactor {
    private ScheduledExecutorService executorService;
    private volatile long clientBeatInterval;
    private NamingProxy serverProxy;
    public final Map<String, BeatInfo> dom2Beat;
//省略部分代码
public void addBeatInfo(String serviceName, BeatInfo beatInfo) {
    LogUtils.NAMING_LOGGER.info("[BEAT] adding beat: {} to beat map.", beatInfo);
    this.dom2Beat.put(this.buildKey(serviceName, beatInfo.getIp(), beatInfo.getPort()), beatInfo);
    MetricsMonitor.getDom2BeatSizeMonitor().set((double)this.dom2Beat.size());
}
//通过schedule定时想服务端放松一个数据包,然后启动一个线程不断检测服务端的回应,如果在设定时间内没有收到服务端的回应,则认为服务器出现了故障
class BeatProcessor implements Runnable {
    BeatProcessor() {
    }

    public void run() {
        try {
            Iterator var1 = BeatReactor.this.dom2Beat.entrySet().iterator();

            while(var1.hasNext()) {
                Entry<String, BeatInfo> entry = (Entry)var1.next();
                BeatInfo beatInfo = (BeatInfo)entry.getValue();
                if (!beatInfo.isScheduled()) {
                    beatInfo.setScheduled(true);
                    BeatReactor.this.executorService.schedule(BeatReactor.this.new BeatTask(beatInfo), 0L, TimeUnit.MILLISECONDS);
                }
            }
        } catch (Exception var7) {
            LogUtils.NAMING_LOGGER.error("[CLIENT-BEAT] Exception while scheduling beat.", var7);
        } finally {
            BeatReactor.this.executorService.schedule(this, BeatReactor.this.clientBeatInterval, TimeUnit.MILLISECONDS);
        }

    }
}

}
this.serverProxy.registerService(NamingUtils.getGroupedName(serviceName, groupName), groupName, instance);
实现服务的注册
nacos服务动态感知原理
服务消费者不仅需要获得服务提供者的地址列表,还需要在服务实力出现异常时监听服务地址的变化
可以通过调用subscribe方法来实现监听,其中serviceName表示服务名,EnventListener表示监听到的事件
public void subscribe(String serviceName, EventListener listener) throws NacosException {
    this.subscribe(serviceName, (List)(new ArrayList()), listener);
}
或者调用selectInstance方法,如果讲subscribe属性设置为true,会自动注册监听
public List<Instance> selectInstances(String serviceName, String groupName, boolean healthy, boolean subscribe) throws NacosException {
    return this.selectInstances(serviceName, groupName, new ArrayList(), healthy, subscribe);
}
服务动态感知的原理
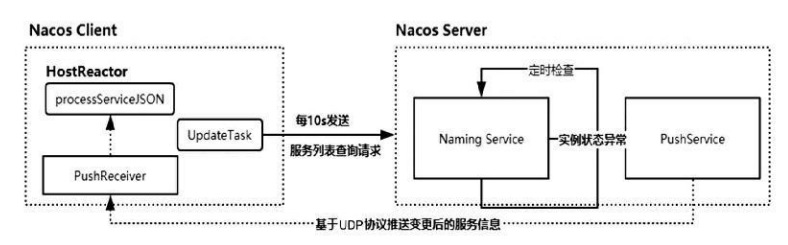
服务动态感知的原理
如上图所示,Nacos客户端有一个hostReactor类,它的功能是实现服务的动态更新,基本原理是
客户端发起时间订阅后,在hostReactor类中有一个updateTask线程,每10s发送一次pull请求,获取服务端最新的地址列表
对于服务表,它和服务提供者的实例之间维持了心跳检测,一旦服务提供者出现异常,则会发送一个push消息给nacos客户端,也就是服务消费者
服务消费者收到请求后,使用hostReactor中提供的processServiceJson解析消息,并更新本地服务地址列表

若有收获,就点个赞吧
0 人点赞
