<template><div class="home_container"><div class="home_header">头部</div><div class="home_menu">菜单</div><div class="home_content">右侧内容</div></div></template><script setup lang='ts'></script><style lang="less" scoped>.home_container{position: relative;height: 100%;.home_header{height: 70px;background-color: skyblue;}.home_menu{position: absolute;top: 70px;left: 0;bottom: 0;width: 250px;background-color: pink;}.home_content{position: absolute;top: 70px;left: 250px;bottom: 0;width: 1030px;background-color: yellow;}}</style>
pinia
需要存储接口返回的用户信息,借助pinia
新建store/index.ts
import { defineStore } from "pinia";import { Names } from "./store-namespace";export const useUserStore = defineStore(Names.User, {state: () => {return {menus: [],};},//类似于computed 可以帮我们去修饰我们的值getters: {},//可以操作异步 和 同步提交stateactions: {updateMenus(menus: Array<{}>){this.menus = menus;}},});
方便管理,引入仓库命名空间
export const enum Names {User = 'USER'}
在main.ts里挂载
import { createPinia } from 'pinia'const store = createPinia();app.use(store);
在组件里引用时
import {useUserStore} from '../../store'const User = useUserStore();getAdminInfoApi().then(res => {if(res.code === 200){User.menus = res.data.menus;console.log(User.menus);router.push('/home')}})
数据预处理
目前得到的menus如下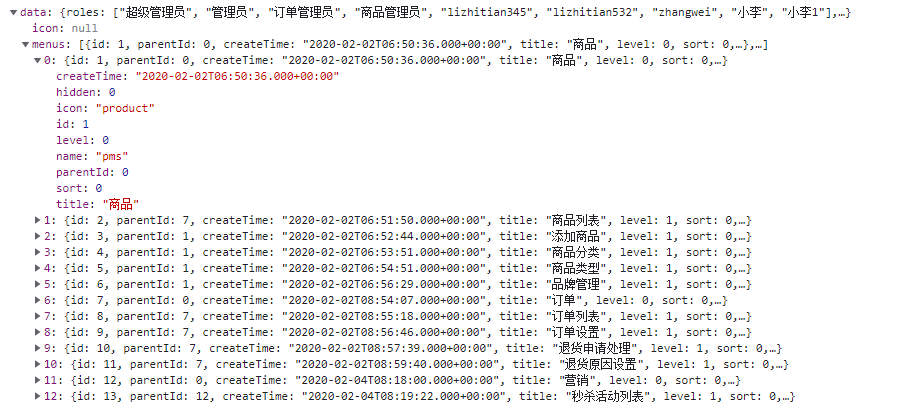
但是我们使用elementPlus里的菜单组件时,若需要使用二级菜单,必须处理其数据结构
并且,一级菜单的id与其对应的二级菜单的parentId一致
借助getters产生新的数据来渲染菜单
为了让二级菜单更好找到一级菜单,我们把新数据定义为对象,而且让一级菜单的id作为属性名key,一级菜单对象作为值
getters: {getNewMenus() {const newMenus:NewMenus = {};const menus = this.menus;for (let i = 0; i < menus.length; ++i) {if (menus[i].parentId === 0) {newMenus[menus[i].id] = menus[i]}}return newMenus;},},
二级菜单需要对号入座,放到其parentId对应的一级菜单的children属性中
注意,因为要给newMenus增加属性,因此在格式定义上也需要优化
//定义menus对象的接口,children只有一级菜单才有,才用?interface MenuObj {parentId: number;id: number;children?: MenuObj[];}//仓库数据的menus格式interface State {menus: MenuObj[];}// 二级菜单的menusinterface NewMenus {[key: number]: MenuObj;}
getters: {getNewMenus(state) {const newMenus: NewMenus = {};const menus = state.menus;for (let i = 0; i < menus.length; ++i) {if (menus[i].parentId === 0) {newMenus[menus[i].id] = { ...menus[i] };}}for (let i = 0; i < menus.length; ++i) {if (menus[i].parentId !== 0) {let parentId = menus[i].parentId;newMenus[parentId] = newMenus[parentId] || {};newMenus[parentId].children = newMenus[parentId].children || [];newMenus[parentId].children?.push(menus[i]);}}return newMenus;},},
因为每个二级菜单对象里只有基本数据类型,使用浅拷贝即可
newMenus[menus[i].id] = { …menus[i] };
使用两个for循环:
避免有些一级菜单还没加到数组中,其二级菜单就已经被查找到,从而失去该有的位置。
确保newMenus[parentId]有值,避免遇到undefined
newMenus[parentId] = newMenus[parentId] || {};
因为需要添加children属性,为了代码兼容性,给一个空数组作为默认值
newMenus[parentId].children = newMenus[parentId].children || [];
pinia持久化
yarn add pinia-plugin-persist
import { createPinia } from 'pinia'import piniaPersist from 'pinia-plugin-persist'const app = createApp(App);const store = createPinia();store.use(piniaPersist);app.use(store); //记得调整store与路由的挂载顺序
最后在仓库中需要持久化存储的数据里使用
persist: {//这里存储默认使用的是sessionenabled: true,strategies: [{//更改默认存储,我更改为localStoragestorage: localStorage,// 可以选择哪些进入local存储,这样就不用全部都进去存储了paths: ["menus"],},],},

若有收获,就点个赞吧
0 人点赞
