导学
在之前的学习中,我们发现虽然可以在Jsp中使用Java语言,但是HTML和Java的结合好像不是那么紧密,而且操作HTML元素好像也不是那么方便。那么有没有一种简单的方式,来获取值并操作HTML元素呢?
EL表达式
EL表达式是一种非常简单的数据表达方式,EL(Expression Language)表达式语言的出现就是为了简化JSP的输出。在早期的Jsp中,没有EL表达式,所有的程序都要使用out对象来一行行的输出。
语法:
${表达式}
实例:
public class Student {private String name;private String mobile;public String getName() {return name;}public void setName(String name) {this.name = name;}public String getMobile() {return mobile;}public void setMobile(String mobile) {this.mobile = mobile;}public String toString() {return name + ":" + mobile;}}
@WebServlet("/info")public class StudentServlet extends HttpServlet {private static final long serialVersionUID = 1L;public StudentServlet() {super();}protected void doGet(HttpServletRequest request, HttpServletResponse response) throws ServletException, IOException {Student stu = new Student();stu.setName("子墨");stu.setMobile(null);String grade = "A";request.setAttribute("grade", grade);request.setAttribute("student", stu);request.getRequestDispatcher("/info.jsp").forward(request, response);}}
<%@ page language="java" contentType="text/html; charset=UTF-8"pageEncoding="UTF-8" import = "com.dodoke.el.Student"%><!DOCTYPE html><html><head><meta charset="UTF-8"><title>Insert title here</title></head><body><%Student stu = (Student)request.getAttribute("student");String grade = (String)request.getAttribute("grade");out.println("<h1>姓名:" + stu.getName() + "</h1>");out.println("<h2>手机:" + stu.getMobile() + "</h2>");out.println("<h2>评级:" + grade + "</h2>");%></body></html>
EL表达式版
<%@ page language="java" contentType="text/html; charset=UTF-8"pageEncoding="UTF-8"%><!DOCTYPE html><html><head><meta charset="UTF-8"><title>Insert title here</title></head><body><h1>姓名:${requestScope.student.name }</h1><h2>手机:${requestScope.student.mobile }</h2><h2>评级:${requestScope.grade }</h2></body></html>
通过以上的例子,我们可以看出EL表达式的应用非常简单,而且还不需要导入要使用的类,下面我们就来看看EL表达式的使用细节。
EL的作用域对象
EL表达式包含四种不同的作用域:
- pageScope:从当前页面取值
- requestScope:从当前请求中获取属性值
- sessionScope:从当前会话中获取属性值
- applicationScope:从当前应用获取全局属性值
这四种作用域,作用范围从小到大,而且这四种作用域也对应了我们四种取值范围。当我们忽略书写这四种作用域时,el表达式将按作用域从小到大的顺序依次尝试获取。
@WebServlet("/info")public class StudentServlet extends HttpServlet {private static final long serialVersionUID = 1L;public StudentServlet() {super();}protected void doGet(HttpServletRequest request, HttpServletResponse response) throws ServletException, IOException {Student stu = new Student();stu.setName("子墨");stu.setMobile(null);String grade = "A";HttpSession session = request.getSession();session.setAttribute("grade", grade);session.setAttribute("student", stu);//request.setAttribute("grade", grade);//request.setAttribute("student", stu);request.getRequestDispatcher("/info.jsp").forward(request, response);}}
<%@ page language="java" contentType="text/html; charset=UTF-8"pageEncoding="UTF-8"%><!DOCTYPE html><html><head><meta charset="UTF-8"><title>Insert title here</title></head><body><h1>姓名:${sessionScope.student.name }</h1><h2>手机:${sessionScope.student.mobile }</h2><h2>评级:${sessionScope.grade }</h2></body></html>
问:代码修改为这样以后该如何,得到的结果是多少?
protected void doGet(HttpServletRequest request, HttpServletResponse response) throws ServletException, IOException {String teacher = request.getParameter("teacher");//获取在地址栏向服务器传入的参数?teacher=sammyStudent stu = new Student();stu.setName("子墨");stu.setMobile(null);String grade = "A";request.setAttribute("grade","B");request.getServletContext().setAttribute("grade","C");HttpSession session = request.getSession();session.setAttribute("grade", grade);session.setAttribute("student", stu);//request.setAttribute("grade", grade);//request.setAttribute("student", stu);request.getRequestDispatcher("/info.jsp").forward(request, response);}
EL表达式输出
语法:
${[作用域].属性名.[子属性名]}
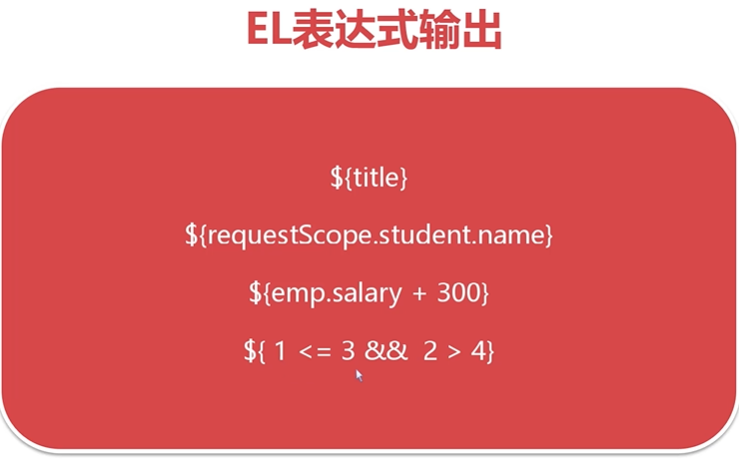
el表达式支持将运算结果输出,也支持绝大多数对象的输出,本质是执行toString方法,也就是我们可以尝试重写toString方法,输出对象的信息。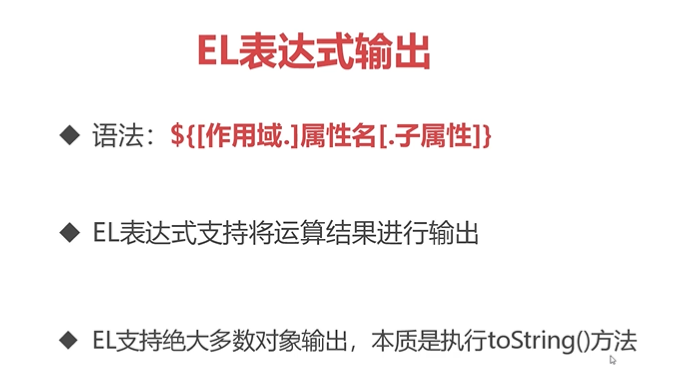
输出参数
要求:查找并总结getParameter()方法和getAttribute()方法的区别
在Servlet中我们可以通过getParameter()方法来实现获取前端浏览器的参数,那么如何使用el表达式来接收其他页面传递的参数呢?
EL表达式内置param对象来简化参数的输出,它的语法:
${param.参数名}
<%@ page language="java" contentType="text/html; charset=UTF-8"pageEncoding="UTF-8"%><!DOCTYPE html><html><head><meta charset="UTF-8"><title>Insert title here</title></head><body><h1>姓名:${sessionScope.student.name }</h1><h2>手机:${sessionScope.student.mobile }</h2><h2>${param.teacher}</h2>//输出地址栏输入的参数数据teacher=sammy//getParameter("teacher")的简化形式<h2>评级:${sessionScope.grade }</h2></body></html>
JSTL标签库
- JSTL(JSP Standard Tag Library),JSP标准标签库
- JSTL用于简化JSP开发,提高代码的可读性和可维护性
- JSTL由SUN(Oracle)定义规范,由Apache Tomcat团队实现
JSTL可以帮助我们实现表格的循环,判断,数据的迭代等功能。JSTL下载与安装
el表达式,不需要下载任何的Jar包,这是因为现版本的jsp内置el表达式的实现,但是JSTL就需要下载Jar包并安装到项目中。
下载地址:http://tomcat.apache.org/
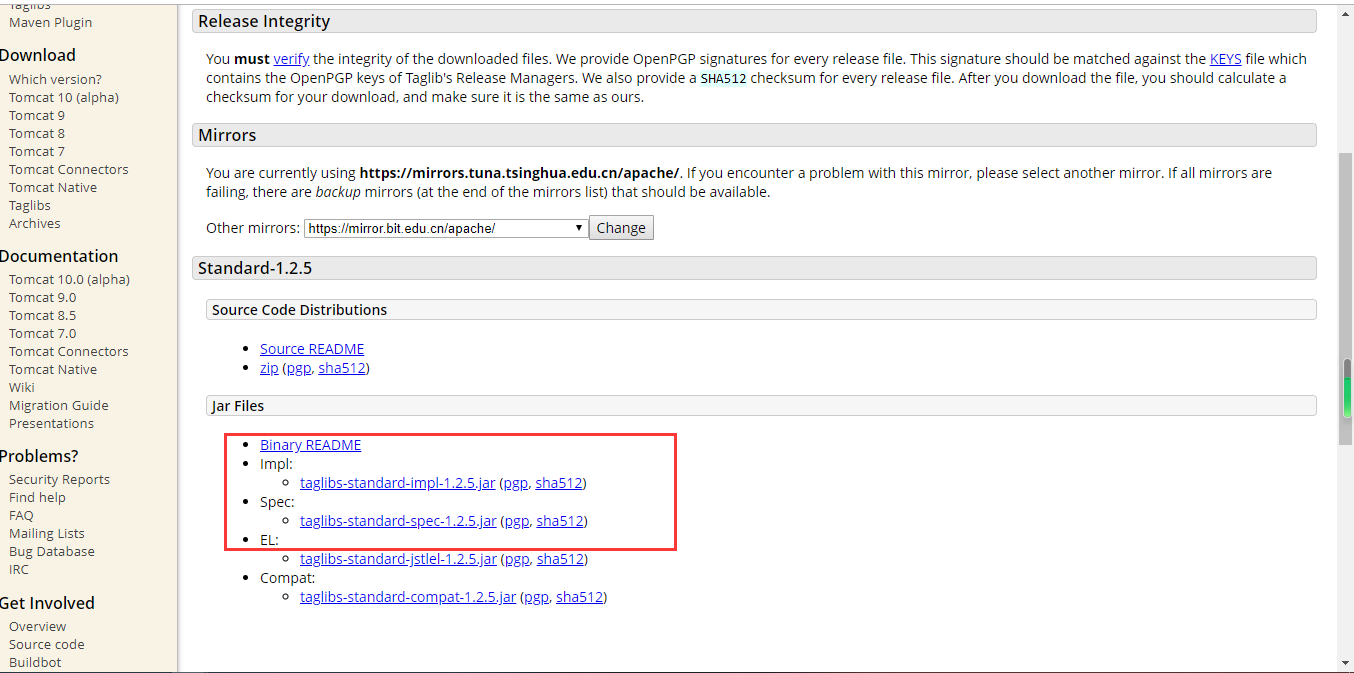
JSTL 1.2.5组件介绍:
需要下载的是一个spec的包,一个是impl包,剩下的包,el的包是为了支持el表达式,现在el已经内置标签库了,所以不需要下载导入即可使用。第四个jar包是为了兼容1.0以下的包而使用的 我们现在使用的是1.2.5因此无需引入。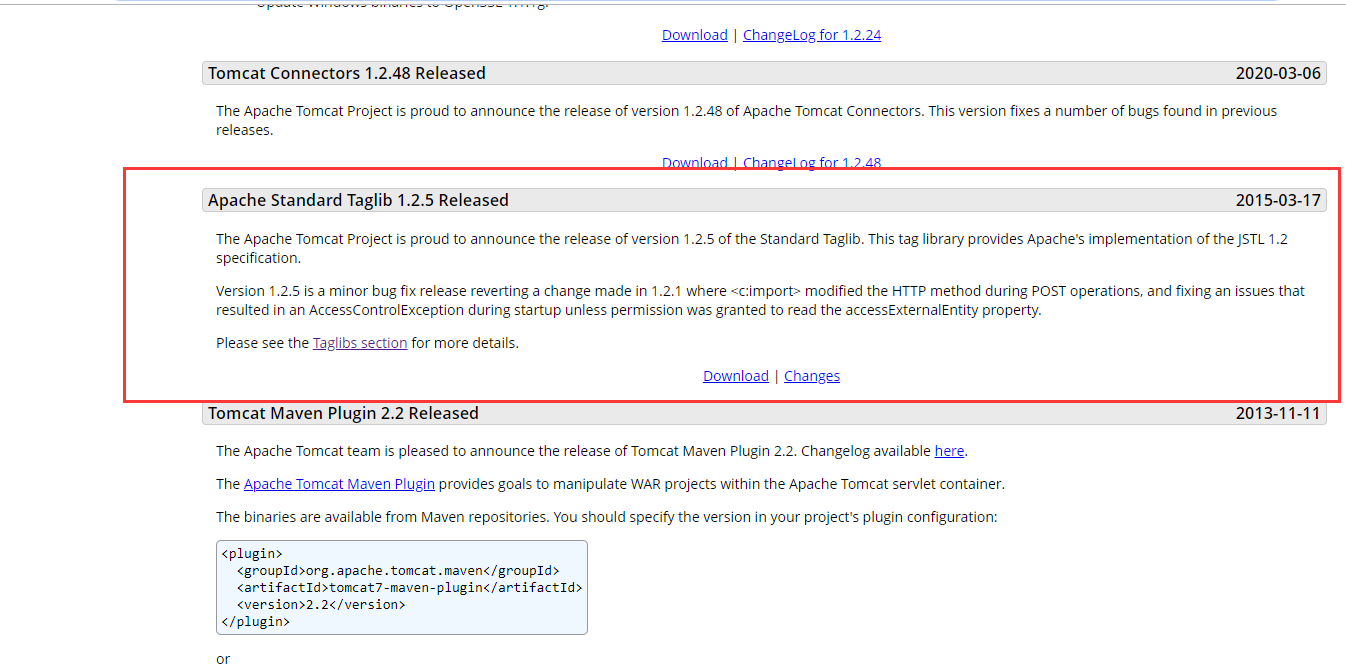
安装JSTL
JSTL的两种安装方式:
- 将Jar文件复制到工程的/WEB-INF/lib目录下(对单体项目进行设置-推荐)
- 将Jar文件复制到Tomcat安装目录的lib目录(全局设置)
JSTL的标签库
JSTL按功能划分,可分为五类标签库: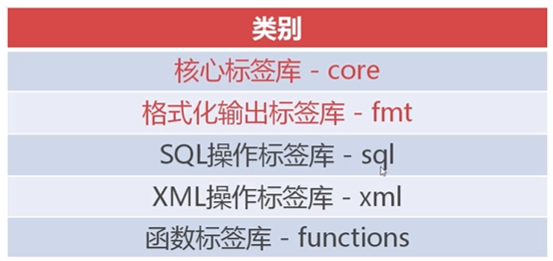
除了头两种,剩下的已经不使用了,因为在Java中提供了更好的支持。
引用JSTL核心库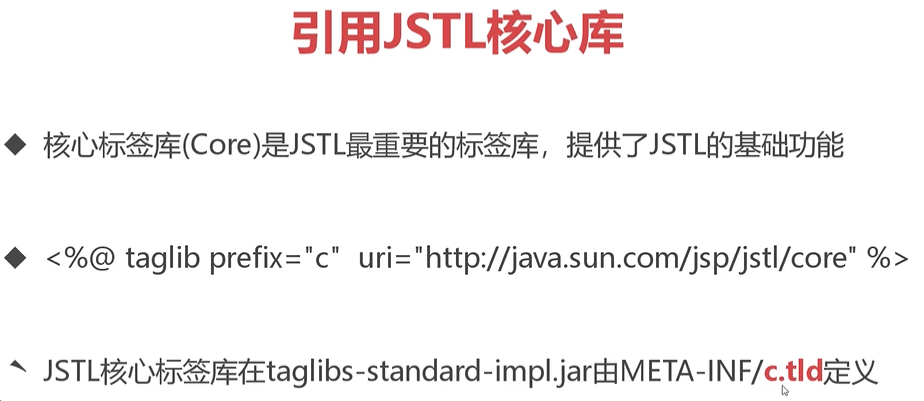
核心标签库,提供了JSTL的基础功能,引用时需要在页面上引入该核心库<%@taglib prefix="c" uri="http://java.sun.com/jsp/jstl/core"%>
JSTL判断标签
JSTL核心库提供了两组判断的标签:
<c:if>用于单分支判断<c:choose>、<c:when>、<c:otherwise>用于多分支判断@WebServlet("/jstl")public class JstlServlet extends HttpServlet {private static final long serialVersionUID = 1L;public JstlServlet() {super();}protected void doGet(HttpServletRequest request, HttpServletResponse response) throws ServletException, IOException {request.setAttribute("score", 58);request.setAttribute("grade", "B");request.getRequestDispatcher("/core.jsp").forward(request, response);}}
<%@ page language="java" contentType="text/html; charset=UTF-8"pageEncoding="UTF-8"%><!-- 在Java或者JSP文件中输入 Alt + / 可出现智能提示 --><!-- uri指定使用哪个标签库,prefix指定使用时的前缀,prefix属性的值是可以改变的,只不过我们一般习惯用c表示。 --><%@ taglib uri = "http://java.sun.com/jsp/jstl/core" prefix = "c" %><!DOCTYPE html><html><head><meta charset="UTF-8"><title>Insert title here</title></head><body><h1>${requestScope.score}</h1><!-- 简单判断:test属性中填写true或false,用于决定c:if中的HTML语句是否输出 --><c:if test = "${score >= 60 }"><h1 style = "color:green">恭喜,你已通过测试</h1></c:if><c:if test = "${score < 60 }"><h1 style = "color:red">对不起,再接再厉</h1></c:if><!-- 复杂判断:choose when otherwise -->${grade }<c:choose><!-- 注意单引号,在JSTL中可以使用等号进行字符串的判断 --><c:when test="${grade == 'A'}"><h2>你很优秀</h2></c:when><c:when test="${grade == 'B' }"><h2>不错呦</h2></c:when><c:when test="${grade == 'C' }"><h2>水平一般,需要提高</h2></c:when><c:when test = "${grade == 'D'}"><h2>需要努力啦,不要气馁</h2></c:when><c:otherwise><h2>一切随缘吧</h2></c:otherwise></c:choose></body></html>
JSTL遍历标签
<c:forEach>标签用于遍历集合(Collection)中的每一个对象。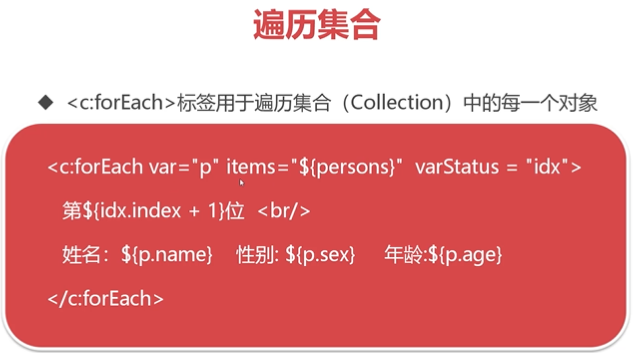 ```java
public class Company {
private String cname;
private String url;
```java
public class Company {
private String cname;
private String url;public Company(String cname , String url) {
this.cname = cname;this.url = url;
}
public String getCname() {
return cname;
} public void setCname(String cname) {
this.cname = cname;
} public String getUrl() {
return url;
} public void setUrl(String url) {
this.url = url;
}
}
```java@WebServlet("/jstl")public class JstlServlet extends HttpServlet {private static final long serialVersionUID = 1L;public JstlServlet() {super();}protected void doGet(HttpServletRequest request, HttpServletResponse response) throws ServletException, IOException {request.setAttribute("score", 58);request.setAttribute("grade", "B");List list = new ArrayList();list.add(new Company("腾讯" , "www.tencent.com"));list.add(new Company("百度" , "www.baidu.com"));list.add(new Company("渡课网" , "www.dodoke.com"));request.setAttribute("companys", list);request.getRequestDispatcher("/core.jsp").forward(request, response);}}
<%@ page language="java" contentType="text/html; charset=UTF-8"pageEncoding="UTF-8"%><!-- 在Java或者JSP文件中输入 Alt + / 可出现智能提示 --><!-- uri指定使用哪个标签库,prefix指定使用时的前缀,prefix属性的值是可以改变的,只不过我们一般习惯用c表示。 --><%@ taglib uri = "http://java.sun.com/jsp/jstl/core" prefix = "c" %><!DOCTYPE html><html><head><meta charset="UTF-8"><title>Insert title here</title></head><body><h1>${requestScope.score}</h1><!-- test属性中填写true或false,用于决定c:if中的HTML语句是否输出 --><c:if test = "${score >= 60 }"><h1 style = "color:green">恭喜,你已通过测试</h1></c:if><c:if test = "${score < 60 }"><h1 style = "color:red">对不起,再接再厉</h1></c:if><!-- choose when otherwise -->${grade }<c:choose><!-- 注意单引号,在JSTL中可以使用等号进行字符串的判断 --><c:when test="${grade == 'A'}"><h2>你很优秀</h2></c:when><c:when test="${grade == 'B' }"><h2>不错呦</h2></c:when><c:when test="${grade == 'C' }"><h2>水平一般,需要提高</h2></c:when><c:when test = "${grade == 'D'}"><h2>需要努力啦,不要气馁</h2></c:when><c:otherwise><h2>一切随缘吧</h2></c:otherwise></c:choose><!-- forEach标签用于遍历集合List companys = (List)request.getAttribute("companys")for(Company c : companys){out.print("...")}items 代表循环的数据源var = c 指的是每一次循环得到的变量都会赋值给cidx = index 循环的索引,但是索引值还是需要通过以下的index属性来获取idx.index属性代表循环的索引值(0开始)--><c:forEach varStatus="idx" items = "${requestScope.companys }" var = "c"><h2 style="color:green">${idx.index + 1}-${c.cname }-${c.url }</h2></c:forEach></body></html>
fmt格式化标签库
fmt格式化标签库可以使数据按照我们设想的格式进行输出。
它的引用地址为:
http://java.sun.com/jsp/jstl/fmt
在这个标签库中,主要学习两种格式化语句:
格式化日期标签<fmt:formateDate value="" pattern="">
格式化数字标签<fmt:formatNumber value="" pattern="">
<%@ page language="java" contentType="text/html; charset=UTF-8"pageEncoding="UTF-8"%><%@ taglib uri="http://java.sun.com/jsp/jstl/fmt" prefix="fmt" %><%@ taglib uri="http://java.sun.com/jsp/jstl/core" prefix="c" %><!DOCTYPE html><html><head><meta charset="UTF-8"><title>Insert title here</title></head><body><%//就在当前页面设置数据源,不再创建servlet了request.setAttribute("amt", 1987654.326);request.setAttribute("now", new java.util.Date());request.setAttribute("html", "<a href='index.html'>index</a>");request.setAttribute("nothing", null);%><h2>${now }</h2><!--formatDate patternyyyy - 四位年MM - 两位月dd - 两位日HH - 24小时制hh - 12小时制mm - 分钟ss - 秒数SSS - 毫秒--><h2><!-- value指原始的数据值,pattern表示转换的格式 --><fmt:formatDate value="${requestScope.now }" pattern="yyyy年MM月dd日 HH时mm分ss秒 SSS毫秒" /></h2><h2>${amt }</h2><h2>¥<fmt:formatNumber value = "${amt }" pattern="0,000.00"></fmt:formatNumber>元</h2><!-- 设置输出方式 --><h2>null默认值:<c:out value="${nothing }" default="无"></c:out> </h2><!-- 设置输出时是否转义 --><h2><c:out value="${ html}" escapeXml="true"></c:out></h2></body></html>
综合训练
通常在进行实际项目的开发时,前端工程师会发送给我们一个静态的页面,而我们要做的就是将这样的静态页面变为动态页面。
静态演示Demo下载地址:链接: https://pan.baidu.com/s/1HFMuCGeg5tox-1MWzGs_vQ 提取码: 2j2z
实例:
public class Employee {private Integer empno;private String ename;private String department;private String job;private Float salary;public Employee(Integer empno, String ename, String department, String job, Float salary) {super();this.empno = empno;this.ename = ename;this.department = department;this.job = job;this.salary = salary;}public Integer getEmpno() {return empno;}public void setEmpno(Integer empno) {this.empno = empno;}public String getEname() {return ename;}public void setEname(String ename) {this.ename = ename;}public String getDepartment() {return department;}public void setDepartment(String department) {this.department = department;}public String getJob() {return job;}public void setJob(String job) {this.job = job;}public Float getSalary() {return salary;}public void setSalary(Float salary) {this.salary = salary;}}
@WebServlet("/list")public class ListServlet extends HttpServlet {private static final long serialVersionUID = 1L;public ListServlet() {super();}protected void doGet(HttpServletRequest request, HttpServletResponse response) throws ServletException, IOException {ServletContext context = request.getServletContext();if(context.getAttribute("employees") == null) {List list = new ArrayList();Employee emp = new Employee(7731 , "刘志敏" , "市场部" , "客户代表" , 10000f);list.add(emp);list.add(new Employee(8871 , "张倩" , "研发部" , "运维工程师" , 8000f));context.setAttribute("employees", list);}request.getRequestDispatcher("/employee.jsp").forward(request, response);}}
<%@ page contentType="text/html;charset=utf-8"%><%@ taglib uri = "http://java.sun.com/jsp/jstl/core" prefix = "c" %><%@ taglib uri = "http://java.sun.com/jsp/jstl/fmt" prefix = "fmt" %><!DOCTYPE html><html><head><meta charset="UTF-8"><meta name="viewport" content="width=device-width,initial-scale=1"><title>员工列表</title><link href="css/bootstrap.css" type="text/css" rel="stylesheet"></link><script type="text/javascript" src="js/jquery-1.11.1.min.js"></script><script type="text/javascript" src="js/bootstrap.js"></script><style type="text/css">.pagination {margin: 0px}.pagination > li > a, .pagination > li > span {margin: 0 5px;border: 1px solid #dddddd;}.glyphicon {margin-right: 3px;}.form-control[readonly] {cursor: pointer;background-color: white;}#dlgPhoto .modal-body{text-align: center;}.preview{max-width: 500px;}</style><script>$(function () {$("#btnAdd").click(function () {$('#dlgForm').modal()});})</script></head><body><div class="container"><div class="row"><h1 style="text-align: center">dodoke员工信息表</h1><div class="panel panel-default"><div class="clearfix panel-heading "><div class="input-group" style="width: 500px;"><button class="btn btn-primary" id="btnAdd"><span class="glyphicon glyphicon-zoom-in"></span>新增</button></div></div><table class="table table-bordered table-hover"><thead><tr><th>序号</th><th>员工编号</th><th>姓名</th><th>部门</th><th>职务</th><th>工资</th><th> </th></tr></thead><tbody><c:forEach items = "${applicationScope.employees}" var = "emp" varStatus="idx" ><tr><td>${idx.index + 1}</td><td>${emp.empno }</td><td>${emp.ename }</td><td>${emp.department }</td><td>${emp.job }</td><td style="color: red;font-weight: bold">¥<fmt:formatNumber value = "${emp.salary }" pattern="0,000.00" ></fmt:formatNumber></td></tr></c:forEach></tbody></table></div></div></div><!-- 表单 --><div class="modal fade" tabindex="-1" role="dialog" id="dlgForm"><div class="modal-dialog" role="document"><div class="modal-content"><div class="modal-header"><button type="button" class="close" data-dismiss="modal" aria-label="Close"><span aria-hidden="true">×</span></button><h4 class="modal-title">新增员工</h4></div><div class="modal-body"><form action="/employee/create" method="post" ><div class="form-group"><label >员工编号</label><input type="text" name="empno" class="form-control" id="empno" placeholder="请输入员工编号"></div><div class="form-group"><label >员工姓名</label><input type="text" name="ename" class="form-control" id="ename" placeholder="请输入员工姓名"></div><div class="form-group"><label>部门</label><select id="dname" name="department" class="form-control"><option selected="selected">请选择部门</option><option value="市场部">市场部</option><option value="研发部">研发部</option><option value="后勤部">后勤部</option></select></div><div class="form-group"><label>职务</label><input type="text" name="job" class="form-control" id="sal" placeholder="请输入职务"></div><div class="form-group"><label >工资</label><input type="text" name="salary" class="form-control" id="sal" placeholder="请输入工资"></div><div class="form-group" style="text-align: center;"><button type="submit" class="btn btn-primary">保存</button></div></form></div></div><!-- /.modal-content --></div><!-- /.modal-dialog --></div><!-- /.modal --></body></html>
@WebServlet("/create")public class CreateServlet extends HttpServlet {private static final long serialVersionUID = 1L;public CreateServlet() {super();}protected void doPost(HttpServletRequest request, HttpServletResponse response) throws ServletException, IOException {request.setCharacterEncoding("UTF-8");String empno = request.getParameter("empno");String ename = request.getParameter("ename");String department = request.getParameter("department");String job = request.getParameter("job");String salary = request.getParameter("salary");System.out.println(empno);Employee emp = new Employee(Integer.parseInt(empno) , ename , department , job , Float.parseFloat(salary));ServletContext context = request.getServletContext();List employees = (List)context.getAttribute("employees");employees.add(emp);context.setAttribute("employees", employees);request.getRequestDispatcher("/employee.jsp").forward(request, response);}}

