Service
- 服务的作用?
服务(Service)是Android中实现程序后台运行的解决方案,它非常适合去执行那些不需要和用户交互而且还要求长期运行的任务。
- 服务与应用进程的关系
不过需要注意的是,服务并不是运行在一个独立的进程当中的,而是依赖于创建服务时所在的应用程序进程。当某个应用程序进程被杀掉时,所有依赖于该进程的服务也会停止运行。
服务的生命周期
- onCreate()
- onStartCommand()
- onDestory()
如何调用服务
Context.startService()
同时需要在Manifest中进行注册:<service android:name=".service.MyService"/>
如何停止服务?
stopService() 或stopSelf()
补充: 如何开启新的线程?
new Thread(){@Overridepublic void run(){//耗时的操作}}.start();
简便的service服务:IntentService
IntentService将用户的请求执行在一个子线程中,用户只需要覆写onHandleIntent函数,并且在该函数中完成自己的耗时操作即可。需要注意的是,在任务执行完毕之后IntentService会调用stopSelf自我销毁,因此,它适用于完成一些短期的耗时任务。
public class MyIntentService extends IntentService{MyIntentService(){super(MyIntentService.class.getname());}@overrideprotected void onHandleIntent(Intent intent){//耗时的操作}}
线程
定义一个线程只需要新建一个类继承自Thread,然后重写父类的run()方法,并在里面编写耗时逻辑即可
异步消息处理机制:
由四部分组成:
- Message:线程之间传递的消息。
- Handler:处理者。有sendMessage()和handleMessage()两个方法。
- MessageQuene:消息队列,用于存放所有的消息,每一个线程中只有一个messageQuene对象
- Looper: MessageQuene中的管家,当我们调用Loop()方法后,就会进入无限循环,
不过为了更加方便我们在子线程中对UI进行操作,Android还提供了另外一些好用的工具,比如AsyncTask。借助AsyncTask,即使你对异步消息处理机制完全不了解,也可以十分简单地从子线程切换到主线程。
AsyncTask
安卓中封装好的异步消息处理机制
有3个参数:
- Params:执行asyncTask需要传入的参数
- Progress:后台执行任务时,在界面上显示当前的进度
- Result:返回结果
有哪4个方法需要重写:
- onPreExecute():这个方法会在后台任务开始执行之前调用,用于进行一些界面上的初始化操作,比如显示一个进度条对话框等
- doInBackground()
- onProgressUpdate()
- onPostExecute()
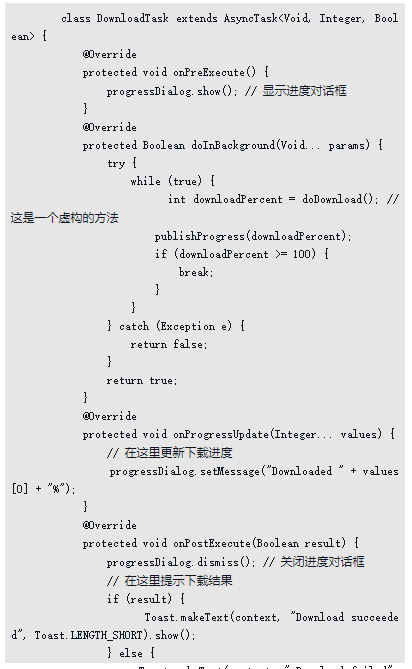
简单来说,使用AsyncTask的诀窍就是,在doInBackground()方法中执行具体的耗时任务,在onProgressUpdate()方法中进行UI操作,在onPostExecute()方法中执行一些任务的收尾工作。
服务代码实现:
activity_main.xml:
<serviceandroid:name=".MyService"android:enabled="true"android:exported="true"></service>
mainactivity.java
public class MainActivity extends AppCompatActivity implements View.OnClickListener {@Overrideprotected void onCreate(Bundle savedInstanceState) {super.onCreate(savedInstanceState);setContentView(R.layout.activity_main);//服务Button start_Service = (Button) findViewById(R.id.start_service);Button stop_Service = (Button) findViewById(R.id.stop_service);start_Service.setOnClickListener(this);stop_Service.setOnClickListener(this); //this指的是什么?是view,也就是当前的图像窗口。}@Overridepublic void onClick(View view) { //重写onclick方法switch (view.getId()){case R.id.start_service:Intent startIntent = new Intent(this, MyService.class);startService(startIntent);//开始服务break;case R.id.stop_service:Intent stopIntent = new Intent(this,MyService.class);stopService(stopIntent);//停止服务break;default:break;}}}//代码对比:紧对比click方法,与本章节service无关。public class MainActivity extends Activity {private Button btnOne,btnTwo;@Overrideprotected void onCreate(Bundle savedInstanceState) {super.onCreate(savedInstanceState);setContentView(R.layout.activity_main);btnOne = (Button) findViewById(R.id.btnOne);btnTwo = (Button) findViewById(R.id.btnTwo);btnTwo.setOnClickListener(new OnClickListener() { //这里就是把onclicklistener方法//写在setonclicklistener里面@Overridepublic void onClick(View v) {if(btnTwo.getText().toString().equals("按钮不可用")){btnOne.setEnabled(false);btnTwo.setText("按钮可用");}else{btnOne.setEnabled(true);btnTwo.setText("按钮不可用");}}});}}
MyService.java
package com.example.demon;import android.app.DownloadManager;import android.app.Notification;import android.app.PendingIntent;import android.app.Service;import android.content.Intent;import android.content.IntentFilter;import android.graphics.Bitmap;import android.graphics.BitmapFactory;import android.os.Binder;import android.os.IBinder;import android.util.Log;import androidx.annotation.Nullable;import androidx.core.app.NotificationCompat;public class MyService extends Service {public MyService() {}@Overridepublic IBinder onBind(Intent intent) {// TODO: Return the communication channel to the service.throw new UnsupportedOperationException("Not yet implemented");}@Overridepublic void onCreate() {//每次服务创建时调用super.onCreate();Log.d("MyService", "onCreate 执行了");// Intent intent = new Intent(this, MainActivity.class);// PendingIntent pi = PendingIntent.getActivity(this, 0, intent, 0);// Notification notification = new NotificationCompat.Builder(this).setContentTitle("This is the content title").setContentText("This is content text").setWhen(System.currentTimeMillis()).setSmallIcon(R.mipmap.ic_launcher).setLargeIcon(BitmapFactory.decodeResource(getResources(), R.mipmap.ic_launcher)).setContentIntent(pi).build();// startForeground(1, notification);}@Overridepublic int onStartCommand(Intent intent, int flags, int startId) {//每次服务启动的时候调用通常情况下,// 如果我们希望服务一旦启动就立刻去执行某个动作,// 就可以将逻辑写在onStartCommand()方法里。// 而当服务销毁时,我们又应该在onDestroy()方法中// 去回收那些不再使用的资源。Log.d("MyService", "onStartCommand 执行了");return super.onStartCommand(intent, flags, startId);}@Overridepublic void onDestroy() {//每次服务销毁的时候调用Log.d("MyService", "On Destory 执行了");super.onDestroy();}}//public class MyService extends Service {// private DownloadBinder mBinder = new DownloadBinder();// class DownloadBinder extends Binder{// //新建了一个类,继承自Binder类// public void startDownload() {// Log.d( "My Service", "startDownload executed");// }//// public int getProgress(){// Log.d("My service", "getProgress executed");// return 0;// }// }//// @Nullable// @Override// public IBinder onBind(Intent intent) {// return mBinder;// }//}//创建一个专门的Binder对象来对下载功能进行管理

若有收获,就点个赞吧
0 人点赞
