Web开发的基础:Servlet。具体地说,有以下几点:
- Servlet规范定义了几种标准组件:Servlet、JSP、Filter和Listener;
- Servlet的标准组件总是运行在Servlet容器中,如Tomcat、Jetty、WebLogic等。
直接使用Servlet进行Web开发好比直接在JDBC上操作数据库,比较繁琐,更好的方法是在Servlet基础上封装MVC框架,基于MVC开发Web应用,大部分时候,不需要接触Servlet API,开发省时省力。
开发Web应用,首先要选择一个优秀的MVC框架。常用的MVC框架有:
- Struts:最古老的一个MVC框架,目前版本是2,和1.x有很大的区别;
- WebWork:一个比Struts设计更优秀的MVC框架,但不知道出于什么原因,从2.0开始把自己的代码全部塞给Struts 2了;
- Turbine:一个重度使用Velocity,强调布局的MVC框架;
- 其他100+MVC框架……(略)
Spring虽然都可以集成任何Web框架,但是,Spring本身也开发了一个MVC框架,就叫Spring MVC。这个MVC框架设计得足够优秀以至于我们已经不想再费劲去集成类似Struts这样的框架了。
1.使用Spring MVC
Java Web的基础:Servlet容器,以及标准的Servlet组件:
- Servlet:能处理HTTP请求并将HTTP响应返回;
- JSP:一种嵌套Java代码的HTML,将被编译为Servlet;
- Filter:能过滤指定的URL以实现拦截功能;
- Listener:监听指定的事件,如ServletContext、HttpSession的创建和销毁。
此外,Servlet容器为每个Web应用程序自动创建一个唯一的ServletContext实例,这个实例就代表了Web应用程序本身。
如果直接使用Spring MVC,我们写出来的代码类似:
@Controllerpublic class UserController {@GetMapping("/register")public ModelAndView register() {...}@PostMapping("/signin")public ModelAndView signin(@RequestParam("email") String email, @RequestParam("password") String password) {...}...}
但是,Spring提供的是一个IoC容器,所有的Bean,包括Controller,都在Spring IoC容器中被初始化,而Servlet容器由JavaEE服务器提供(如Tomcat),Servlet容器对Spring一无所知,他们之间到底依靠什么进行联系,又是以何种顺序初始化的?
在理解上述问题之前,我们先把基于Spring MVC开发的项目结构搭建起来。首先创建基于Web的Maven工程,引入如下依赖:
- org.springframework:spring-context:5.2.0.RELEASE
- org.springframework:spring-webmvc:5.2.0.RELEASE
- org.springframework:spring-jdbc:5.2.0.RELEASE
- javax.annotation:javax.annotation-api:1.3.2
- io.pebbletemplates:pebble-spring5:3.1.2
- ch.qos.logback:logback-core:1.2.3
- ch.qos.logback:logback-classic:1.2.3
- com.zaxxer:HikariCP:3.4.2
- org.hsqldb:hsqldb:2.5.0
以及provided依赖:
- org.apache.tomcat.embed:tomcat-embed-core:9.0.26
- org.apache.tomcat.embed:tomcat-embed-jasper:9.0.26
这个标准的Maven Web工程目录结构如下: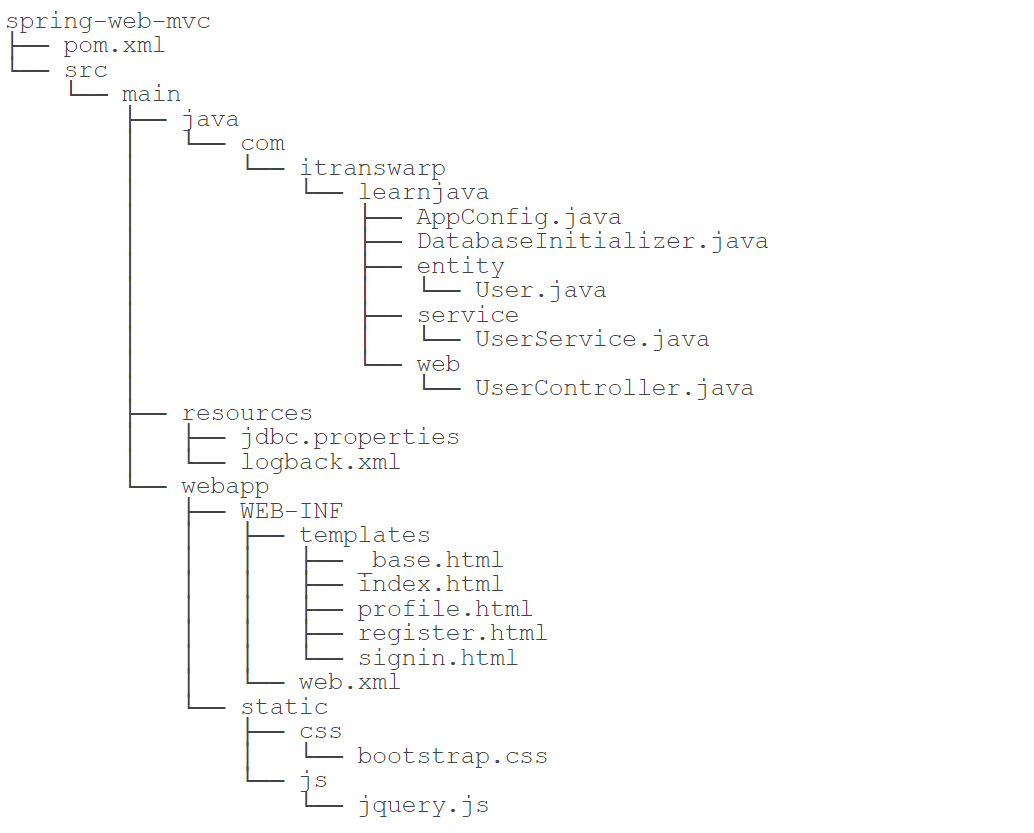
其中,src/main/webapp是标准web目录,WEB-INF存放web.xml,编译的class,第三方jar,以及不允许浏览器直接访问的View模版,static目录存放所有静态文件。
在src/main/resources目录中存放的是Java程序读取的classpath资源文件,除了JDBC的配置文件jdbc.properties外,我们又新增了一个logback.xml,这是Logback的默认查找的配置文件:
<?xml version="1.0" encoding="UTF-8"?><configuration><appender name="STDOUT"class="ch.qos.logback.core.ConsoleAppender"><layout class="ch.qos.logback.classic.PatternLayout"><Pattern>%d{yyyy-MM-dd HH:mm:ss} %-5level %logger{36} - %msg%n</Pattern></layout></appender><logger name="com.itranswarp.learnjava" level="info" additivity="false"><appender-ref ref="STDOUT" /></logger><root level="info"><appender-ref ref="STDOUT" /></root></configuration>
上面给出了一个写入到标准输出的Logback配置,可以基于上述配置添加写入到文件的配置。
在src/main/java中就是我们编写的Java代码了。
1.配置Spring MVC
和普通Spring配置一样,我们编写正常的AppConfig后,只需加上@EnableWebMvc注解,就“激活”了Spring MVC:
@Configuration@ComponentScan@EnableWebMvc // 启用Spring MVC@EnableTransactionManagement@PropertySource("classpath:/jdbc.properties")public class AppConfig {...}
除了创建DataSource、JdbcTemplate、PlatformTransactionManager外,AppConfig需要额外创建几个用于Spring MVC的Bean:
@BeanWebMvcConfigurer createWebMvcConfigurer() {return new WebMvcConfigurer() {@Overridepublic void addResourceHandlers(ResourceHandlerRegistry registry) {registry.addResourceHandler("/static/**").addResourceLocations("/static/");}};}
WebMvcConfigurer并不是必须的,但我们在这里创建一个默认的WebMvcConfigurer,只覆写addResourceHandlers(),目的是让Spring MVC自动处理静态文件,并且映射路径为/static/**。
另一个必须要创建的Bean是ViewResolver,因为Spring MVC允许集成任何模板引擎,使用哪个模板引擎,就实例化一个对应的ViewResolver:
@BeanViewResolver createViewResolver(@Autowired ServletContext servletContext) {PebbleEngine engine = new PebbleEngine.Builder().autoEscaping(true).cacheActive(false).loader(new ServletLoader(servletContext)).extension(new SpringExtension()).build();PebbleViewResolver viewResolver = new PebbleViewResolver();viewResolver.setPrefix("/WEB-INF/templates/");viewResolver.setSuffix("");viewResolver.setPebbleEngine(engine);return viewResolver;}
ViewResolver通过指定prefix和suffix来确定如何查找View。上述配置使用Pebble引擎,指定模板文件存放在/WEB-INF/templates/目录下。
剩下的Bean都是普通的@Component,但Controller必须标记为@Controller,例如:
// Controller使用@Controller标记而不是@Component:@Controllerpublic class UserController {// 正常使用@Autowired注入:@AutowiredUserService userService;// 处理一个URL映射:@GetMapping("/")public ModelAndView index() {...}...}
如果是普通的Java应用程序,我们通过main()方法可以很简单地创建一个Spring容器的实例:
public static void main(String[] args) {ApplicationContext context = new AnnotationConfigApplicationContext(AppConfig.class);}
但是问题来了,现在是Web应用程序,而Web应用程序总是由Servlet容器创建,那么,Spring容器应该由谁创建?在什么时候创建?Spring容器中的Controller又是如何通过Servlet调用的?
在Web应用中启动Spring容器有很多种方法,可以通过Listener启动,也可以通过Servlet启动,可以使用XML配置,也可以使用注解配置。这里,我们只介绍一种最简单的启动Spring容器的方式。
第一步,我们在web.xml中配置Spring MVC提供的DispatcherServlet:
<!DOCTYPE web-app PUBLIC"-//Sun Microsystems, Inc.//DTD Web Application 2.3//EN""http://java.sun.com/dtd/web-app_2_3.dtd" ><web-app><servlet><servlet-name>dispatcher</servlet-name><servlet-class>org.springframework.web.servlet.DispatcherServlet</servlet-class><init-param><param-name>contextClass</param-name><param-value>org.springframework.web.context.support.AnnotationConfigWebApplicationContext</param-value></init-param><init-param><param-name>contextConfigLocation</param-name><param-value>com.itranswarp.learnjava.AppConfig</param-value></init-param><load-on-startup>0</load-on-startup></servlet><servlet-mapping><servlet-name>dispatcher</servlet-name><url-pattern>/*</url-pattern></servlet-mapping></web-app>
初始化参数contextClass指定使用注解配置的AnnotationConfigWebApplicationContext,配置文件的位置参数contextConfigLocation指向AppConfig的完整类名,最后,把这个Servlet映射到/*,即处理所有URL。
上述配置可以看作一个样板配置,有了这个配置,Servlet容器会首先初始化Spring MVC的DispatcherServlet,在DispatcherServlet启动时,它根据配置AppConfig创建了一个类型是WebApplicationContext的IoC容器,完成所有Bean的初始化,并将容器绑到ServletContext上。
因为DispatcherServlet持有IoC容器,能从IoC容器中获取所有@Controller的Bean,因此,DispatcherServlet接收到所有HTTP请求后,根据Controller方法配置的路径,就可以正确地把请求转发到指定方法,并根据返回的ModelAndView决定如何渲染页面。
最后,我们在AppConfig中通过main()方法启动嵌入式Tomcat:
public static void main(String[] args) throws Exception {Tomcat tomcat = new Tomcat();tomcat.setPort(Integer.getInteger("port", 8080));tomcat.getConnector();Context ctx = tomcat.addWebapp("", new File("src/main/webapp").getAbsolutePath());WebResourceRoot resources = new StandardRoot(ctx);resources.addPreResources(new DirResourceSet(resources, "/WEB-INF/classes", new File("target/classes").getAbsolutePath(), "/"));ctx.setResources(resources);tomcat.start();tomcat.getServer().await();}
上述Web应用程序就是我们使用Spring MVC时的一个最小启动功能集。由于使用了JDBC和数据库,用户的注册、登录信息会被持久化。
2.编写Controller
有了Web应用程序的最基本的结构,我们的重点就可以放在如何编写Controller上。Spring MVC对Controller没有固定的要求,也不需要实现特定的接口。以UserController为例,编写Controller只需要遵循以下要点:
总是标记@Controller而不是@Component:
@Controllerpublic class UserController {...}
一个方法对应一个HTTP请求路径,用@GetMapping或@PostMapping表示GET或POST请求:
@PostMapping("/signin")public ModelAndView doSignin(@RequestParam("email") String email,@RequestParam("password") String password,HttpSession session) {...}
需要接收的HTTP参数以@RequestParam()标注,可以设置默认值。如果方法参数需要传入HttpServletRequest、HttpServletResponse或者HttpSession,直接添加这个类型的参数即可,Spring MVC会自动按类型传入。
返回的ModelAndView通常包含View的路径和一个Map作为Model,但也可以没有Model,例如:
return new ModelAndView("signin.html"); // 仅View,没有Model
返回重定向时既可以写new ModelAndView(“redirect:/signin”),也可以直接返回String:
public String index() {if (...) {return "redirect:/signin";} else {return "redirect:/profile";}}
如果在方法内部直接操作HttpServletResponse发送响应,返回null表示无需进一步处理:
public ModelAndView download(HttpServletResponse response) {byte[] data = ...response.setContentType("application/octet-stream");OutputStream output = response.getOutputStream();output.write(data);output.flush();return null;}
对URL进行分组,每组对应一个Controller是一种很好的组织形式,并可以在Controller的class定义出添加URL前缀,例如:
@Controller@RequestMapping("/user")public class UserController {// 注意实际URL映射是/user/profile@GetMapping("/profile")public ModelAndView profile() {...}// 注意实际URL映射是/user/changePassword@GetMapping("/changePassword")public ModelAndView changePassword() {...}}
实际方法的URL映射总是前缀+路径,这种形式还可以有效避免不小心导致的重复的URL映射。
可见,Spring MVC允许我们编写既简单又灵活的Controller实现。
使用Spring MVC时,整个Web应用程序按如下顺序启动:
- 启动Tomcat服务器;
- Tomcat读取web.xml并初始化DispatcherServlet;
- DispatcherServlet创建IoC容器并自动注册到ServletContext中。
启动后,浏览器发出的HTTP请求全部由DispatcherServlet接收,并根据配置转发到指定Controller的指定方法处理。
2.使用REST
使用Spring MVC开发Web应用程序的主要工作就是编写Controller逻辑。在Web应用中,除了需要使用MVC给用户显示页面外,还有一类API接口,我们称之为REST,通常输入输出都是JSON,便于第三方调用或者使用页面JavaScript与之交互。
直接在Controller中处理JSON是可以的,因为Spring MVC的@GetMapping和@PostMapping都支持指定输入和输出的格式。如果我们想接收JSON,输出JSON,那么可以这样写:
@PostMapping(value = "/rest",consumes = "application/json;charset=UTF-8",produces = "application/json;charset=UTF-8")@ResponseBodypublic String rest(@RequestBody User user) {return "{\"restSupport\":true}";}
对应的Maven工程需要加入Jackson这个依赖:com.fasterxml.jackson.core:jackson-databind:2.11.0
注意到@PostMapping使用consumes声明能接收的类型,使用produces声明输出的类型,并且额外加了@ResponseBody表示返回的String无需额外处理,直接作为输出内容写入HttpServletResponse。输入的JSON则根据注解@RequestBody直接被Spring反序列化为User这个JavaBean。
直接用Spring的Controller配合一大堆注解写REST太麻烦了,因此,Spring还额外提供了一个@RestController注解,使用@RestController替代@Controller后,每个方法自动变成API接口方法。我们还是以实际代码举例,编写ApiController如下:
@RestController@RequestMapping("/api")public class ApiController {@AutowiredUserService userService;@GetMapping("/users")public List<User> users() {return userService.getUsers();}@GetMapping("/users/{id}")public User user(@PathVariable("id") long id) {return userService.getUserById(id);}@PostMapping("/signin")public Map<String, Object> signin(@RequestBody SignInRequest signinRequest) {try {User user = userService.signin(signinRequest.email, signinRequest.password);return Map.of("user", user);} catch (Exception e) {return Map.of("error", "SIGNIN_FAILED", "message", e.getMessage());}}public static class SignInRequest {public String email;public String password;}}
编写REST接口只需要定义@RestController,然后,每个方法都是一个API接口,输入和输出只要能被Jackson序列化或反序列化为JSON就没有问题。我们用浏览器测试GET请求,可直接显示JSON响应。
要测试POST请求,可以用curl命令:
$ curl -v -H "Content-Type: application/json" -d '{"email":"bob@example.com","password":"bob123"}' http://localhost:8080/api/signin> POST /api/signin HTTP/1.1> Host: localhost:8080> User-Agent: curl/7.64.1> Accept: */*> Content-Type: application/json> Content-Length: 47>< HTTP/1.1 200< Content-Type: application/json< Transfer-Encoding: chunked< Date: Sun, 10 May 2020 08:14:13 GMT<{"user":{"id":1,"email":"bob@example.com","password":"bob123","name":"Bob",...
注意观察上述JSON的输出,User能被正确地序列化为JSON,但暴露了password属性,这是我们不期望的。要避免输出password属性,可以把User复制到另一个UserBean对象,该对象只持有必要的属性,但这样做比较繁琐。另一种简单的方法是直接在User的password属性定义处加上@JsonIgnore表示完全忽略该属性:
public class User {...@JsonIgnorepublic String getPassword() {return password;}...}
但是这样一来,如果写一个register(User user)方法,那么该方法的User对象也拿不到注册时用户传入的密码了。如果要允许输入password,但不允许输出password,即在JSON序列化和反序列化时,允许写属性,禁用读属性,可以更精细地控制如下:
public class User {...@JsonProperty(access = Access.WRITE_ONLY)public String getPassword() {return password;}...}
同样的,可以使用@JsonProperty(access = Access.READ_ONLY)允许输出,不允许输入。
使用@RestController可以方便地编写REST服务,Spring默认使用JSON作为输入和输出。
要控制序列化和反序列化,可以使用Jackson提供的@JsonIgnore和@JsonProperty注解。
3.集成Filter
在Spring MVC中,DispatcherServlet只需要固定配置到web.xml中,剩下的工作主要是专注于编写Controller。
但是,在Servlet规范中,我们还可以使用Filter。如果要在Spring MVC中使用Filter,应该怎么做?
在上一节的Web应用中可能发现了,如果注册时输入中文会导致乱码,因为Servlet默认按非UTF-8编码读取参数。为了修复这一问题,我们可以简单地使用一个EncodingFilter,在全局范围类给HttpServletRequest和HttpServletResponse强制设置为UTF-8编码。
可以自己编写一个EncodingFilter,也可以直接使用Spring MVC自带的一个CharacterEncodingFilter。配置Filter时,只需在web.xml中声明即可:
<web-app><filter><filter-name>encodingFilter</filter-name><filter-class>org.springframework.web.filter.CharacterEncodingFilter</filter-class><init-param><param-name>encoding</param-name><param-value>UTF-8</param-value></init-param><init-param><param-name>forceEncoding</param-name><param-value>true</param-value></init-param></filter><filter-mapping><filter-name>encodingFilter</filter-name><url-pattern>/*</url-pattern></filter-mapping>...</web-app>
因为这种Filter和我们业务关系不大,注意到CharacterEncodingFilter其实和Spring的IoC容器没有任何关系,两者均互不知晓对方的存在,因此,配置这种Filter十分简单。
我们再考虑这样一个问题:如果允许用户使用Basic模式进行用户验证,即在HTTP请求中添加头Authorization: Basic email:password,这个需求如何实现?
编写一个AuthFilter是最简单的实现方式:
@Componentpublic class AuthFilter implements Filter {@AutowiredUserService userService;public void doFilter(ServletRequest request, ServletResponse response, FilterChain chain)throws IOException, ServletException {HttpServletRequest req = (HttpServletRequest) request;// 获取Authorization头:String authHeader = req.getHeader("Authorization");if (authHeader != null && authHeader.startsWith("Basic ")) {// 从Header中提取email和password:String email = prefixFrom(authHeader);String password = suffixFrom(authHeader);// 登录:User user = userService.signin(email, password);// 放入Session:req.getSession().setAttribute(UserController.KEY_USER, user);}// 继续处理请求:chain.doFilter(request, response);}}
现在问题来了:在Spring中创建的这个AuthFilter是一个普通Bean,Servlet容器并不知道,所以它不会起作用。
如果我们直接在web.xml中声明这个AuthFilter,注意到AuthFilter的实例将由Servlet容器而不是Spring容器初始化,因此,@Autowire根本不生效,用于登录的UserService成员变量永远是null。
所以,得通过一种方式,让Servlet容器实例化的Filter,间接引用Spring容器实例化的AuthFilter。Spring MVC提供了一个DelegatingFilterProxy,专门来干这个事情:
<web-app><filter><filter-name>authFilter</filter-name><filter-class>org.springframework.web.filter.DelegatingFilterProxy</filter-class></filter><filter-mapping><filter-name>authFilter</filter-name><url-pattern>/*</url-pattern></filter-mapping>...</web-app>
我们来看实现原理:
- Servlet容器从web.xml中读取配置,实例化DelegatingFilterProxy,注意命名是authFilter;
- Spring容器通过扫描@Component实例化AuthFilter。
当DelegatingFilterProxy生效后,它会自动查找注册在ServletContext上的Spring容器,再试图从容器中查找名为authFilter的Bean,也就是我们用@Component声明的AuthFilter。
DelegatingFilterProxy将请求代理给AuthFilter,核心代码如下:
public class DelegatingFilterProxy implements Filter {private Filter delegate;public void doFilter(...) throws ... {if (delegate == null) {delegate = findBeanFromSpringContainer();}delegate.doFilter(req, resp, chain);}}
这就是一个代理模式的简单应用。我们画个图表示它们之间的引用关系如下: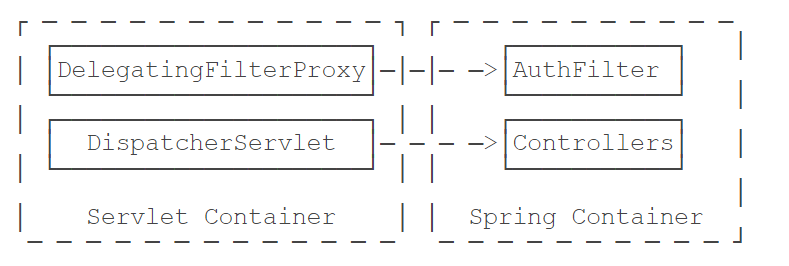
如果在web.xml中配置的Filter名字和Spring容器的Bean的名字不一致,那么需要指定Bean的名字:
<filter><filter-name>basicAuthFilter</filter-name><filter-class>org.springframework.web.filter.DelegatingFilterProxy</filter-class><!-- 指定Bean的名字 --><init-param><param-name>targetBeanName</param-name><param-value>authFilter</param-value></init-param></filter>
实际应用时,尽量保持名字一致,以减少不必要的配置。
当一个Filter作为Spring容器管理的Bean存在时,可以通过DelegatingFilterProxy间接地引用它并使其生效。
4.使用Interceptor
在Web程序中,注意到使用Filter的时候,Filter由Servlet容器管理,它在Spring MVC的Web应用程序中作用范围如下: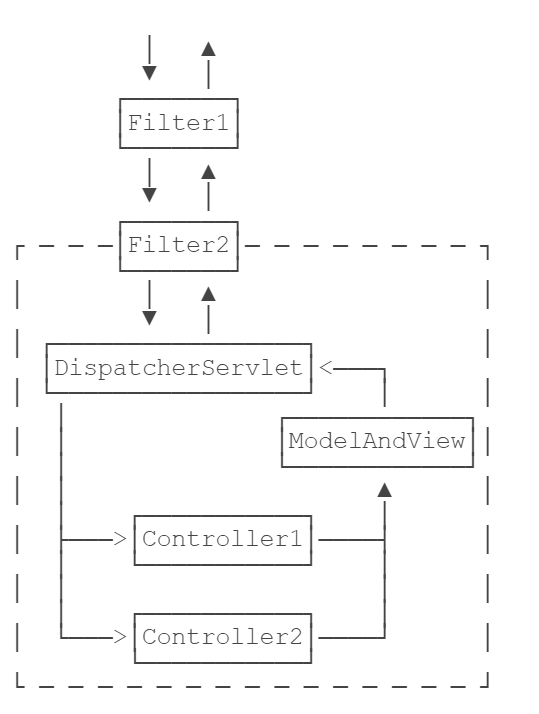
上图虚线框就是Filter2的拦截范围,Filter组件实际上并不知道后续内部处理是通过Spring MVC提供的DispatcherServlet还是其他Servlet组件,因为Filter是Servlet规范定义的标准组件,它可以应用在任何基于Servlet的程序中。
如果只基于Spring MVC开发应用程序,还可以使用Spring MVC提供的一种功能类似Filter的拦截器:Interceptor。和Filter相比,Interceptor拦截范围不是后续整个处理流程,而是仅针对Controller拦截: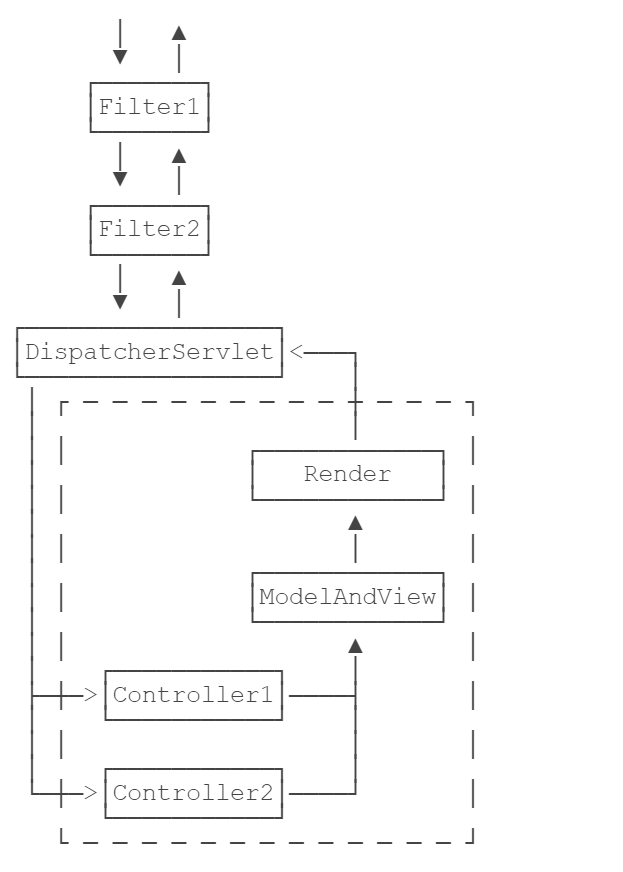
上图虚线框就是Interceptor的拦截范围,注意到Controller的处理方法一般都类似这样:
@Controllerpublic class Controller1 {@GetMapping("/path/to/hello")ModelAndView hello() {...}}
所以,Interceptor的拦截范围其实就是Controller方法,它实际上就相当于基于AOP的方法拦截。因为Interceptor只拦截Controller方法,所以要注意,返回ModelAndView并渲染后,后续处理就脱离了Interceptor的拦截范围。
使用Interceptor的好处是Interceptor本身是Spring管理的Bean,因此注入任意Bean都非常简单。此外,可以应用多个Interceptor,并通过简单的@Order指定顺序。我们先写一个LoggerInterceptor:
@Order(1)@Componentpublic class LoggerInterceptor implements HandlerInterceptor {final Logger logger = LoggerFactory.getLogger(getClass());@Overridepublic boolean preHandle(HttpServletRequest request, HttpServletResponse response, Object handler) throws Exception {logger.info("preHandle {}...", request.getRequestURI());if (request.getParameter("debug") != null) {PrintWriter pw = response.getWriter();pw.write("<p>DEBUG MODE</p>");pw.flush();return false;}return true;}@Overridepublic void postHandle(HttpServletRequest request, HttpServletResponse response, Object handler, ModelAndView modelAndView) throws Exception {logger.info("postHandle {}.", request.getRequestURI());if (modelAndView != null) {modelAndView.addObject("__time__", LocalDateTime.now());}}@Overridepublic void afterCompletion(HttpServletRequest request, HttpServletResponse response, Object handler, Exception ex) throws Exception {logger.info("afterCompletion {}: exception = {}", request.getRequestURI(), ex);}}
一个Interceptor必须实现HandlerInterceptor接口,可以选择实现preHandle()、postHandle()和afterCompletion()方法。preHandle()是Controller方法调用前执行,postHandle()是Controller方法正常返回后执行,而afterCompletion()无论Controller方法是否抛异常都会执行,参数ex就是Controller方法抛出的异常(未抛出异常是null)。
在preHandle()中,也可以直接处理响应,然后返回false表示无需调用Controller方法继续处理了,通常在认证或者安全检查失败时直接返回错误响应。在postHandle()中,因为捕获了Controller方法返回的ModelAndView,所以可以继续往ModelAndView里添加一些通用数据,很多页面需要的全局数据如Copyright信息等都可以放到这里,无需在每个Controller方法中重复添加。
我们再继续添加一个AuthInterceptor,用于替代上一节使用AuthFilter进行Basic认证的功能:
@Order(2)@Componentpublic class AuthInterceptor implements HandlerInterceptor {final Logger logger = LoggerFactory.getLogger(getClass());@AutowiredUserService userService;@Overridepublic boolean preHandle(HttpServletRequest request, HttpServletResponse response, Object handler)throws Exception {logger.info("pre authenticate {}...", request.getRequestURI());try {authenticateByHeader(request);} catch (RuntimeException e) {logger.warn("login by authorization header failed.", e);}return true;}private void authenticateByHeader(HttpServletRequest req) {String authHeader = req.getHeader("Authorization");if (authHeader != null && authHeader.startsWith("Basic ")) {logger.info("try authenticate by authorization header...");String up = new String(Base64.getDecoder().decode(authHeader.substring(6)), StandardCharsets.UTF_8);int pos = up.indexOf(':');if (pos > 0) {String email = URLDecoder.decode(up.substring(0, pos), StandardCharsets.UTF_8);String password = URLDecoder.decode(up.substring(pos + 1), StandardCharsets.UTF_8);User user = userService.signin(email, password);req.getSession().setAttribute(UserController.KEY_USER, user);logger.info("user {} login by authorization header ok.", email);}}}}
这个AuthInterceptor是由Spring容器直接管理的,因此注入UserService非常方便。
最后,要让拦截器生效,我们在WebMvcConfigurer中注册所有的Interceptor:
@BeanWebMvcConfigurer createWebMvcConfigurer(@Autowired HandlerInterceptor[] interceptors) {return new WebMvcConfigurer() {public void addInterceptors(InterceptorRegistry registry) {for (var interceptor : interceptors) {registry.addInterceptor(interceptor);}}...};}
如果拦截器没有生效,请检查是否忘了在WebMvcConfigurer中注册。
1.处理异常
在Controller中,Spring MVC还允许定义基于@ExceptionHandler注解的异常处理方法。我们来看具体的示例代码:
@Controllerpublic class UserController {@ExceptionHandler(RuntimeException.class)public ModelAndView handleUnknowException(Exception ex) {return new ModelAndView("500.html", Map.of("error", ex.getClass().getSimpleName(), "message", ex.getMessage()));}...}
异常处理方法没有固定的方法签名,可以传入Exception、HttpServletRequest等,返回值可以是void,也可以是ModelAndView,上述代码通过@ExceptionHandler(RuntimeException.class)表示当发生RuntimeException的时候,就自动调用此方法处理。
注意到我们返回了一个新的ModelAndView,这样在应用程序内部如果发生了预料之外的异常,可以给用户显示一个出错页面,而不是简单的500 Internal Server Error或404 Not Found。
可以编写多个错误处理方法,每个方法针对特定的异常。例如,处理LoginException使得页面可以自动跳转到登录页。
使用ExceptionHandler时,要注意它仅作用于当前的Controller,即ControllerA中定义的一个ExceptionHandler方法对ControllerB不起作用。如果我们有很多Controller,每个Controller都需要处理一些通用的异常,例如LoginException,思考一下应该怎么避免重复代码?
Spring MVC提供了Interceptor组件来拦截Controller方法,使用时要注意Interceptor的作用范围。
5.处理CORS
在开发REST应用时,很多时候,是通过页面的JavaScript和后端的REST API交互。
在JavaScript与REST交互的时候,有很多安全限制。默认情况下,浏览器按同源策略放行JavaScript调用API,即:
- 如果A站在域名a.com页面的JavaScript调用A站自己的API时,没有问题;
- 如果A站在域名a.com页面的JavaScript调用B站b.com的API时,将被浏览器拒绝访问,因为不满足同源策略。
同源要求域名要完全相同(a.com和www.a.com不同),协议要相同(http和https不同),端口要相同 。
那么,在域名a.com页面的JavaScript要调用B站b.com的API时,还有没有办法?
办法是有的,那就是CORS,全称Cross-Origin Resource Sharing,是HTML5规范定义的如何跨域访问资源。如果A站的JavaScript访问B站API的时候,B站能够返回响应头Access-Control-Allow-Origin: http://a.com,那么,浏览器就允许A站的JavaScript访问B站的API。
注意到跨域访问能否成功,取决于B站是否愿意给A站返回一个正确的Access-Control-Allow-Origin响应头,所以决定权永远在提供API的服务方手中。
关于CORS的详细信息可以参考MDN文档,这里不再详述。
使用Spring的@RestController开发REST应用时,同样会面对跨域问题。如果我们允许指定的网站通过页面JavaScript访问这些REST API,就必须正确地设置CORS。
有好几种方法设置CORS,我们来一一介绍。
1.使用@CrossOrigin
第一种方法是使用@CrossOrigin注解,可以在@RestController的class级别或方法级别定义一个@CrossOrigin,例如:
@CrossOrigin(origins = "http://local.liaoxuefeng.com:8080")@RestController@RequestMapping("/api")public class ApiController {...}
上述定义在ApiController处的@CrossOrigin指定了只允许来自local.liaoxuefeng.com跨域访问,允许多个域访问需要写成数组形式,例如origins = {“http://a.com“, “https://www.b.com"})。如果要允许任何域访问,写成origins = “*”即可。
如果有多个REST Controller都需要使用CORS,那么,每个Controller都必须标注@CrossOrigin注解。
2.使用CorsRegistry
第二种方法是在WebMvcConfigurer中定义一个全局CORS配置,下面是一个示例:
@BeanWebMvcConfigurer createWebMvcConfigurer() {return new WebMvcConfigurer() {@Overridepublic void addCorsMappings(CorsRegistry registry) {registry.addMapping("/api/**").allowedOrigins("http://local.liaoxuefeng.com:8080").allowedMethods("GET", "POST").maxAge(3600);// 可以继续添加其他URL规则:// registry.addMapping("/rest/v2/**")...}};}
这种方式可以创建一个全局CORS配置,如果仔细地设计URL结构,那么可以一目了然地看到各个URL的CORS规则,推荐使用这种方式配置CORS。
3.使用CorsFilter
第三种方法是使用Spring提供的CorsFilter,我们在集成Filter中详细介绍了将Spring容器内置的Bean暴露为Servlet容器的Filter的方法,由于这种配置方式需要修改web.xml,也比较繁琐,所以推荐使用第二种方式。
4.测试
当我们配置好CORS后,可以在浏览器中测试一下规则是否生效。
我们先用http://localhost:8080在Chrome浏览器中打开首页,然后打开Chrome的开发者工具,切换到Console,输入一个JavaScript语句来跨域访问API:
$.getJSON( "http://local.liaoxuefeng.com:8080/api/users", (data) => console.log(JSON.stringify(data)));
上述源站的域是http://localhost:8080,跨域访问的是http://local.liaoxuefeng.com:8080,因为配置的CORS不允许localhost访问,所以不出意外地得到一个错误: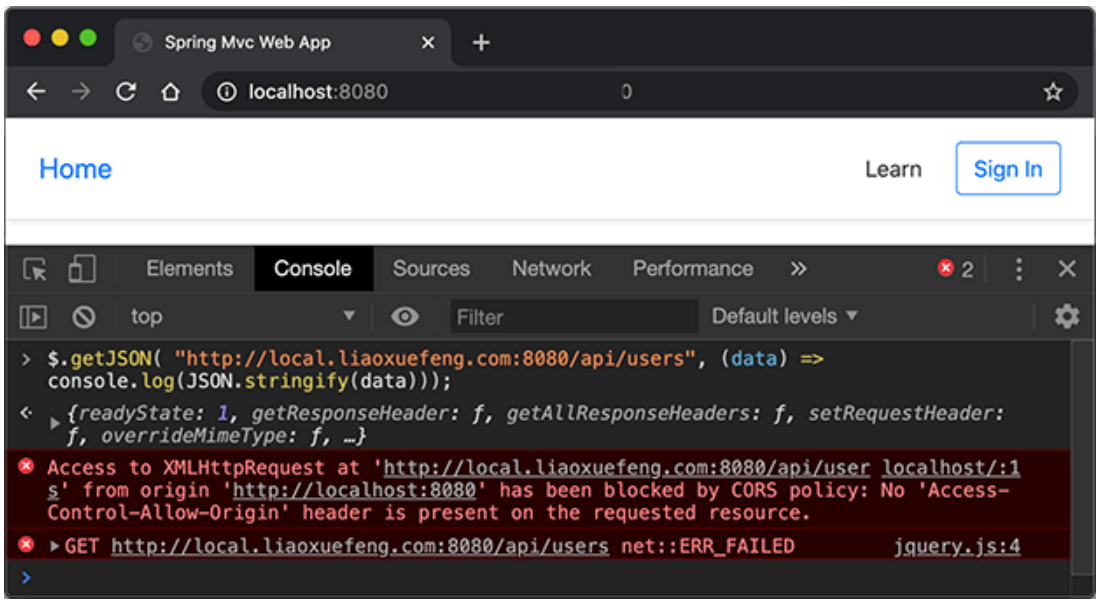
浏览题打印了错误原因就是been blocked by CORS policy。
我们再用http://local.liaoxuefeng.com:8080在Chrome浏览器中打开首页,在Console中执行JavaScript访问localhost:
$.getJSON( "http://localhost:8080/api/users", (data) => console.log(JSON.stringify(data)));
因为CORS规则允许来自http://local.liaoxuefeng.com:8080的访问,因此访问成功,打印出API的返回值: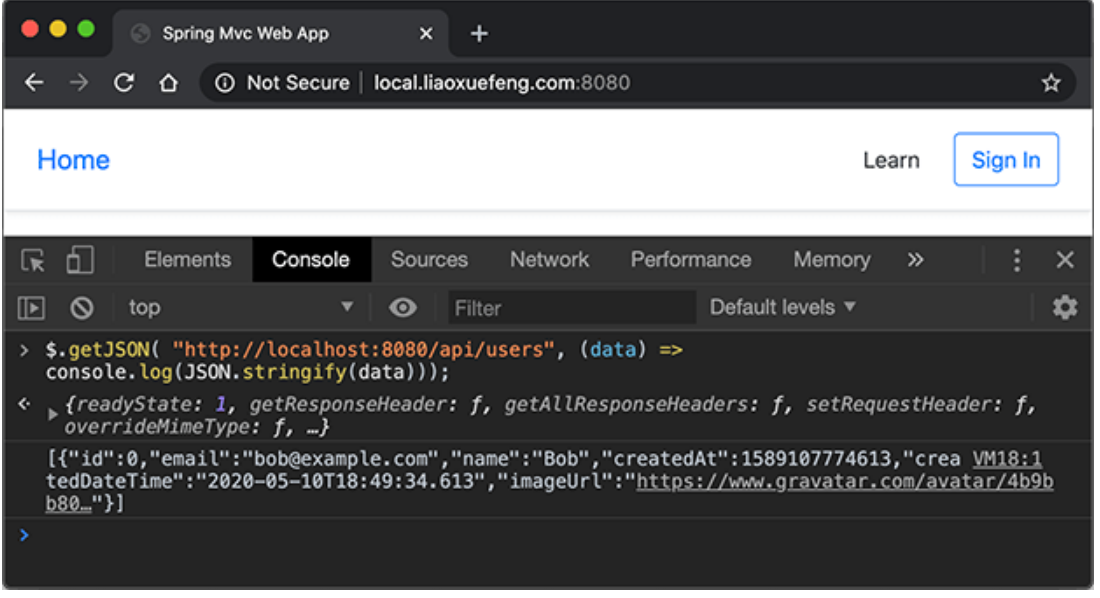
CORS可以控制指定域的页面JavaScript能否访问API。
6.国际化
在开发应用程序的时候,经常会遇到支持多语言的需求,这种支持多语言的功能称之为国际化,英文是internationalization,缩写为i18n(因为首字母i和末字母n中间有18个字母)。
还有针对特定地区的本地化功能,英文是localization,缩写为L10n,本地化是指根据地区调整类似姓名、日期的显示等。
也有把上面两者合称为全球化,英文是globalization,缩写为g11n。
在Java中,支持多语言和本地化是通过MessageFormat配合Locale实现的:
import java.text.MessageFormat;import java.util.Locale;public class Time {public static void main(String[] args) {double price = 123.5;int number = 10;Object[] arguments = { price, number };MessageFormat mfUS = new MessageFormat("Pay {0,number,currency} for {1} books.", Locale.US);System.out.println(mfUS.format(arguments));MessageFormat mfZH = new MessageFormat("{1}本书一共{0,number,currency}。", Locale.CHINA);System.out.println(mfZH.format(arguments));}}
对于Web应用程序,要实现国际化功能,主要是渲染View的时候,要把各种语言的资源文件提出来,这样,不同的用户访问同一个页面时,显示的语言就是不同的。
我们来看看在Spring MVC应用程序中如何实现国际化。
1.获取Locale
实现国际化的第一步是获取到用户的Locale。在Web应用程序中,HTTP规范规定了浏览器会在请求中携带Accept-Language头,用来指示用户浏览器设定的语言顺序,如:
Accept-Language: zh-CN,zh;q=0.8,en;q=0.2
上述HTTP请求头表示优先选择简体中文,其次选择中文,最后选择英文。q表示权重,解析后我们可获得一个根据优先级排序的语言列表,把它转换为Java的Locale,即获得了用户的Locale。大多数框架通常只返回权重最高的Locale。
Spring MVC通过LocaleResolver来自动从HttpServletRequest中获取Locale。有多种LocaleResolver的实现类,其中最常用的是CookieLocaleResolver:
@BeanLocaleResolver createLocaleResolver() {var clr = new CookieLocaleResolver();clr.setDefaultLocale(Locale.ENGLISH);clr.setDefaultTimeZone(TimeZone.getDefault());return clr;}
CookieLocaleResolver从HttpServletRequest中获取Locale时,首先根据一个特定的Cookie判断是否指定了Locale,如果没有,就从HTTP头获取,如果还没有,就返回默认的Locale。
当用户第一次访问网站时,CookieLocaleResolver只能从HTTP头获取Locale,即使用浏览器的默认语言。通常网站也允许用户自己选择语言,此时,CookieLocaleResolver就会把用户选择的语言存放到Cookie中,下一次访问时,就会返回用户上次选择的语言而不是浏览器默认语言。
2.提取资源文件
第二步是把写死在模板中的字符串以资源文件的方式存储在外部。对于多语言,主文件名如果命名为messages,那么资源文件必须按如下方式命名并放入classpath中:
- 默认语言,文件名必须为messages.properties;
- 简体中文,Locale是zh_CN,文件名必须为messages_zh_CN.properties;
- 日文,Locale是ja_JP,文件名必须为messages_ja_JP.properties;
- 其它更多语言……
每个资源文件都有相同的key,例如,默认语言是英文,文件messages.properties内容如下:
language.select=Languagehome=Homesignin=Sign Incopyright=Copyright©{0,number,#}
文件messages_zh_CN.properties内容如下:
language.select=语言home=首页signin=登录copyright=版权所有©{0,number,#}
3.创建MessageSource
第三步是创建一个Spring提供的MessageSource实例,它自动读取所有的.properties文件,并提供一个统一接口来实现“翻译”:
// code, arguments, locale:String text = messageSource.getMessage("signin", null, locale);
其中,signin是我们在.properties文件中定义的key,第二个参数是Object[]数组作为格式化时传入的参数,最后一个参数就是获取的用户Locale实例。
创建MessageSource如下:
@Bean("i18n")MessageSource createMessageSource() {var messageSource = new ResourceBundleMessageSource();// 指定文件是UTF-8编码:messageSource.setDefaultEncoding("UTF-8");// 指定主文件名:messageSource.setBasename("messages");return messageSource;}
注意到ResourceBundleMessageSource会自动根据主文件名自动把所有相关语言的资源文件都读进来。
再注意到Spring容器会创建不只一个MessageSource实例,我们自己创建的这个MessageSource是专门给页面国际化使用的,因此命名为i18n,不会与其它MessageSource实例冲突。
4.实现多语言
要在View中使用MessageSource加上Locale输出多语言,我们通过编写一个MvcInterceptor,把相关资源注入到ModelAndView中:
@Componentpublic class MvcInterceptor implements HandlerInterceptor {@AutowiredLocaleResolver localeResolver;// 注意注入的MessageSource名称是i18n:@Autowired@Qualifier("i18n")MessageSource messageSource;public void postHandle(HttpServletRequest request, HttpServletResponse response, Object handler, ModelAndView modelAndView) throws Exception {if (modelAndView != null) {// 解析用户的Locale:Locale locale = localeResolver.resolveLocale(request);// 放入Model:modelAndView.addObject("__messageSource__", messageSource);modelAndView.addObject("__locale__", locale);}}}
不要忘了在WebMvcConfigurer中注册MvcInterceptor。现在,就可以在View中调用MessageSource.getMessage()方法来实现多语言:
<a href="/signin">{{ __messageSource__.getMessage('signin', null, __locale__) }}</a>
上述这种写法虽然可行,但格式太复杂了。使用View时,要根据每个特定的View引擎定制国际化函数。在Pebble中,我们可以封装一个国际化函数,名称就是下划线_,改造一下创建ViewResolver的代码:
@BeanViewResolver createViewResolver(@Autowired ServletContext servletContext, @Autowired @Qualifier("i18n") MessageSource messageSource) {PebbleEngine engine = new PebbleEngine.Builder().autoEscaping(true).cacheActive(false).loader(new ServletLoader(servletContext))// 添加扩展:.extension(createExtension(messageSource)).build();PebbleViewResolver viewResolver = new PebbleViewResolver();viewResolver.setPrefix("/WEB-INF/templates/");viewResolver.setSuffix("");viewResolver.setPebbleEngine(engine);return viewResolver;}private Extension createExtension(MessageSource messageSource) {return new AbstractExtension() {@Overridepublic Map<String, Function> getFunctions() {return Map.of("_", new Function() {public Object execute(Map<String, Object> args, PebbleTemplate self, EvaluationContext context, int lineNumber) {String key = (String) args.get("0");List<Object> arguments = this.extractArguments(args);Locale locale = (Locale) context.getVariable("__locale__");return messageSource.getMessage(key, arguments.toArray(), "???" + key + "???", locale);}private List<Object> extractArguments(Map<String, Object> args) {int i = 1;List<Object> arguments = new ArrayList<>();while (args.containsKey(String.valueOf(i))) {Object param = args.get(String.valueOf(i));arguments.add(param);i++;}return arguments;}public List<String> getArgumentNames() {return null;}});}};}
这样,我们可以把多语言页面改写为:
<a href="/signin">{{ _('signin') }}</a>
如果是带参数的多语言,需要把参数传进去:
<h5>{{ _('copyright', 2020) }}</h5>
使用其它View引擎时,也应当根据引擎接口实现更方便的语法。
5.切换Locale
最后,我们需要允许用户手动切换Locale,编写一个LocaleController来实现该功能:
@Controllerpublic class LocaleController {final Logger logger = LoggerFactory.getLogger(getClass());@AutowiredLocaleResolver localeResolver;@GetMapping("/locale/{lo}")public String setLocale(@PathVariable("lo") String lo, HttpServletRequest request, HttpServletResponse response) {// 根据传入的lo创建Locale实例:Locale locale = null;int pos = lo.indexOf('_');if (pos > 0) {String lang = lo.substring(0, pos);String country = lo.substring(pos + 1);locale = new Locale(lang, country);} else {locale = new Locale(lo);}// 设定此Locale:localeResolver.setLocale(request, response, locale);logger.info("locale is set to {}.", locale);// 刷新页面:String referer = request.getHeader("Referer");return "redirect:" + (referer == null ? "/" : referer);}}
在页面设计中,通常在右上角给用户提供一个语言选择列表,来看看效果: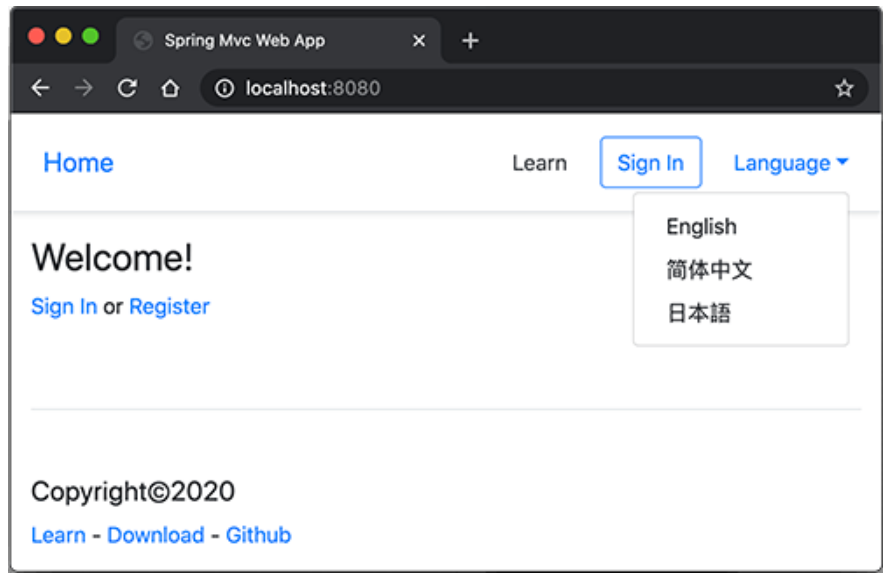
切换到中文: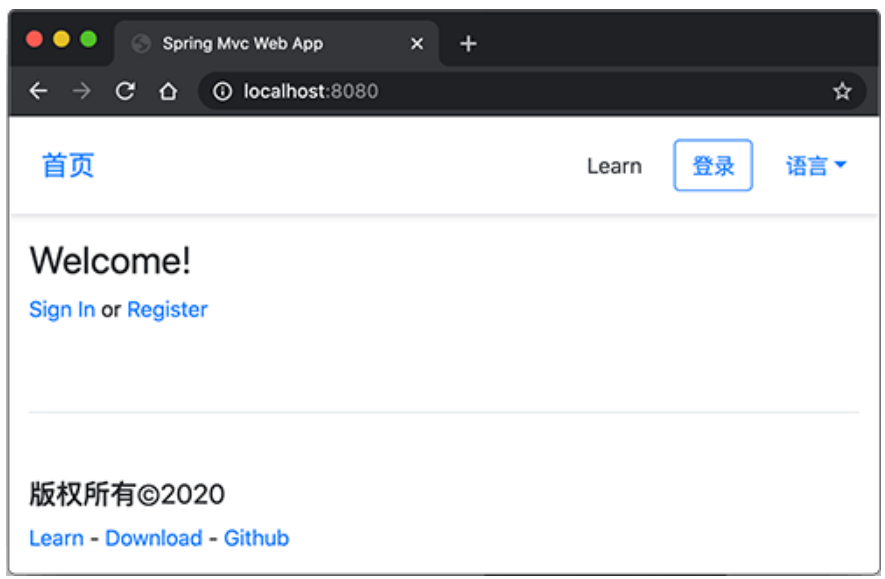
多语言支持需要从HTTP请求中解析用户的Locale,然后针对不同Locale显示不同的语言;
Spring MVC应用程序通过MessageSource和LocaleResolver,配合View实现国际化。
7.异步处理
在Servlet模型中,每个请求都是由某个线程处理,然后,将响应写入IO流,发送给客户端。从开始处理请求,到写入响应完成,都是在同一个线程中处理的。
实现Servlet容器的时候,只要每处理一个请求,就创建一个新线程处理它,就能保证正确实现了Servlet线程模型。在实际产品中,例如Tomcat,总是通过线程池来处理请求,它仍然符合一个请求从头到尾都由某一个线程处理。
这种线程模型非常重要,因为Spring的JDBC事务是基于ThreadLocal实现的,如果在处理过程中,一会由线程A处理,一会又由线程B处理,那事务就全乱套了。此外,很多安全认证,也是基于ThreadLocal实现的,可以保证在处理请求的过程中,各个线程互不影响。
但是,如果一个请求处理的时间较长,例如几秒钟甚至更长,那么,这种基于线程池的同步模型很快就会把所有线程耗尽,导致服务器无法响应新的请求。如果把长时间处理的请求改为异步处理,那么线程池的利用率就会大大提高。Servlet从3.0规范开始添加了异步支持,允许对一个请求进行异步处理。
我们先来看看在Spring MVC中如何实现对请求进行异步处理的逻辑。首先建立一个Web工程,然后编辑web.xml文件如下:
<web-app xmlns="http://xmlns.jcp.org/xml/ns/javaee"xmlns:xsi="http://www.w3.org/2001/XMLSchema-instance"xsi:schemaLocation="http://xmlns.jcp.org/xml/ns/javaee http://xmlns.jcp.org/xml/ns/javaee/web-app_3_1.xsd"version="3.1"><display-name>Archetype Created Web Application</display-name><servlet><servlet-name>dispatcher</servlet-name><servlet-class>org.springframework.web.servlet.DispatcherServlet</servlet-class><init-param><param-name>contextClass</param-name><param-value>org.springframework.web.context.support.AnnotationConfigWebApplicationContext</param-value></init-param><init-param><param-name>contextConfigLocation</param-name><param-value>com.itranswarp.learnjava.AppConfig</param-value></init-param><load-on-startup>0</load-on-startup><async-supported>true</async-supported></servlet><servlet-mapping><servlet-name>dispatcher</servlet-name><url-pattern>/*</url-pattern></servlet-mapping></web-app>
和前面普通的MVC程序相比,这个web.xml主要有几点不同:
- 不能再使用<!DOCTYPE …web-app_2_3.dtd”>的DTD声明,必须用新的支持Servlet 3.1规范的XSD声明,照抄即可;
- 对DispatcherServlet的配置多了一个
,默认值是false,必须明确写成true,这样Servlet容器才会支持async处理。
下一步就是在Controller中编写async处理逻辑。我们以ApiController为例,演示如何异步处理请求。
第一种async处理方式是返回一个Callable,Spring MVC自动把返回的Callable放入线程池执行,等待结果返回后再写入响应:
@GetMapping("/users")public Callable<List<User>> users() {return () -> {// 模拟3秒耗时:try {Thread.sleep(3000);} catch (InterruptedException e) {}return userService.getUsers();};}
第二种async处理方式是返回一个DeferredResult对象,然后在另一个线程中,设置此对象的值并写入响应:
@GetMapping("/users/{id}")public DeferredResult<User> user(@PathVariable("id") long id) {DeferredResult<User> result = new DeferredResult<>(3000L); // 3秒超时new Thread(() -> {// 等待1秒:try {Thread.sleep(1000);} catch (InterruptedException e) {}try {User user = userService.getUserById(id);// 设置正常结果并由Spring MVC写入Response:result.setResult(user);} catch (Exception e) {// 设置错误结果并由Spring MVC写入Response:result.setErrorResult(Map.of("error", e.getClass().getSimpleName(), "message", e.getMessage()));}}).start();return result;}
使用DeferredResult时,可以设置超时,超时会自动返回超时错误响应。在另一个线程中,可以调用setResult()写入结果,也可以调用setErrorResult()写入一个错误结果。
运行程序,当我们访问http://localhost:8080/api/users/1时,假定用户存在,则浏览器在1秒后返回结果: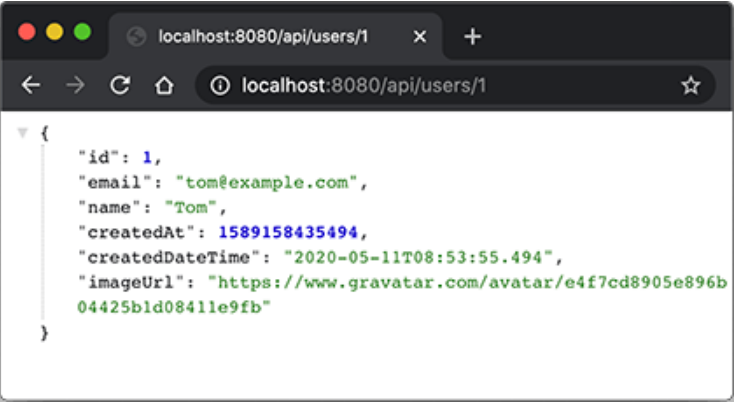
访问一个不存在的User ID,则等待1秒后返回错误结果: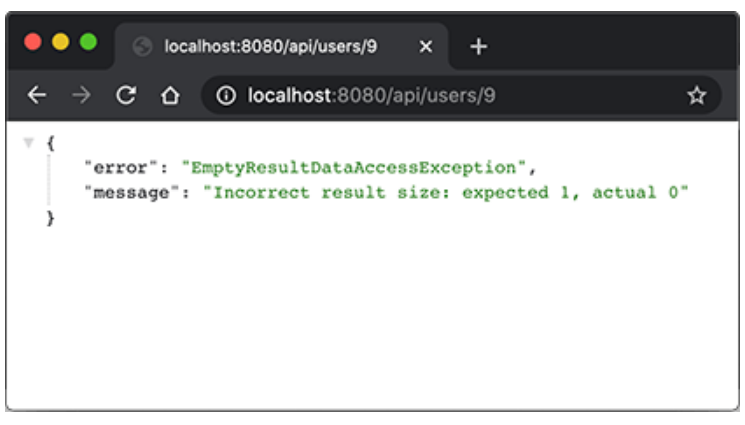
1.使用Filter
当我们使用async模式处理请求时,原有的Filter也可以工作,但我们必须在web.xml中添加
<web-app ...>...<filter><filter-name>sync-filter</filter-name><filter-class>com.itranswarp.learnjava.web.SyncFilter</filter-class></filter><filter><filter-name>async-filter</filter-name><filter-class>com.itranswarp.learnjava.web.AsyncFilter</filter-class><async-supported>true</async-supported></filter><filter-mapping><filter-name>sync-filter</filter-name><url-pattern>/api/version</url-pattern></filter-mapping><filter-mapping><filter-name>async-filter</filter-name><url-pattern>/api/*</url-pattern></filter-mapping>...</web-app>
一个声明为支持
在logback.xml配置文件中,我们把输出格式加上[%thread],可以输出当前线程的名称:
<?xml version="1.0" encoding="UTF-8"?><configuration><appender name="STDOUT" class="ch.qos.logback.core.ConsoleAppender"><layout class="ch.qos.logback.classic.PatternLayout"><Pattern>%d{yyyy-MM-dd HH:mm:ss} [%thread] %-5level %logger{36} - %msg%n</Pattern></layout></appender>...</configuration>
对于同步请求,例如/api/version,我们可以看到如下输出:
2020-05-16 11:22:40 [http-nio-8080-exec-1] INFO c.i.learnjava.web.SyncFilter - start SyncFilter...2020-05-16 11:22:40 [http-nio-8080-exec-1] INFO c.i.learnjava.web.AsyncFilter - start AsyncFilter...2020-05-16 11:22:40 [http-nio-8080-exec-1] INFO c.i.learnjava.web.ApiController - get version...2020-05-16 11:22:40 [http-nio-8080-exec-1] INFO c.i.learnjava.web.AsyncFilter - end AsyncFilter.2020-05-16 11:22:40 [http-nio-8080-exec-1] INFO c.i.learnjava.web.SyncFilter - end SyncFilter.
可见,每个Filter和ApiController都是由同一个线程执行。
对于异步请求,例如/api/users,我们可以看到如下输出:
2020-05-16 11:23:49 [http-nio-8080-exec-4] INFO c.i.learnjava.web.AsyncFilter - start AsyncFilter...2020-05-16 11:23:49 [http-nio-8080-exec-4] INFO c.i.learnjava.web.ApiController - get users...2020-05-16 11:23:49 [http-nio-8080-exec-4] INFO c.i.learnjava.web.AsyncFilter - end AsyncFilter.2020-05-16 11:23:52 [MvcAsync1] INFO c.i.learnjava.web.ApiController - return users...
可见,AsyncFilter和ApiController是由同一个线程执行的,但是,返回响应的是另一个线程。
对DeferredResult测试,可以看到如下输出:
2020-05-16 11:25:24 [http-nio-8080-exec-8] INFO c.i.learnjava.web.AsyncFilter - start AsyncFilter...2020-05-16 11:25:24 [http-nio-8080-exec-8] INFO c.i.learnjava.web.AsyncFilter - end AsyncFilter.2020-05-16 11:25:25 [Thread-2] INFO c.i.learnjava.web.ApiController - deferred result is set.
同样,返回响应的是另一个线程。
在实际使用时,经常用到的就是DeferredResult,因为返回DeferredResult时,可以设置超时、正常结果和错误结果,易于编写比较灵活的逻辑。
使用async异步处理响应时,要时刻牢记,在另一个异步线程中的事务和Controller方法中执行的事务不是同一个事务,在Controller中绑定的ThreadLocal信息也无法在异步线程中获取。
此外,Servlet 3.0规范添加的异步支持是针对同步模型打了一个“补丁”,虽然可以异步处理请求,但高并发异步请求时,它的处理效率并不高,因为这种异步模型并没有用到真正的“原生”异步。Java标准库提供了封装操作系统的异步IO包java.nio,是真正的多路复用IO模型,可以用少量线程支持大量并发。使用NIO编程复杂度比同步IO高很多,因此我们很少直接使用NIO。相反,大部分需要高性能异步IO的应用程序会选择Netty这样的框架,它基于NIO提供了更易于使用的API,方便开发异步应用程序。
在Spring MVC中异步处理请求需要正确配置web.xml,并返回Callable或DeferredResult对象。
8.使用WebSocket
WebSocket是一种基于HTTP的长链接技术。传统的HTTP协议是一种请求-响应模型,如果浏览器不发送请求,那么服务器无法主动给浏览器推送数据。如果需要定期给浏览器推送数据,例如股票行情,或者不定期给浏览器推送数据,例如在线聊天,基于HTTP协议实现这类需求,只能依靠浏览器的JavaScript定时轮询,效率很低且实时性不高。
因为HTTP本身是基于TCP连接的,所以,WebSocket在HTTP协议的基础上做了一个简单的升级,即建立TCP连接后,浏览器发送请求时,附带几个头:
GET /chat HTTP/1.1Host: www.example.comUpgrade: websocketConnection: Upgrade
就表示客户端希望升级连接,变成长连接的WebSocket,服务器返回升级成功的响应:
HTTP/1.1 101 Switching ProtocolsUpgrade: websocketConnection: Upgrade
收到成功响应后表示WebSocket“握手”成功,这样,代表WebSocket的这个TCP连接将不会被服务器关闭,而是一直保持,服务器可随时向浏览器推送消息,浏览器也可随时向服务器推送消息。双方推送的消息既可以是文本消息,也可以是二进制消息,一般来说,绝大部分应用程序会推送基于JSON的文本消息。
现代浏览器都已经支持WebSocket协议,服务器则需要底层框架支持。Java的Servlet规范从3.1开始支持WebSocket,所以,必须选择支持Servlet 3.1或更高规范的Servlet容器,才能支持WebSocket。最新版本的Tomcat、Jetty等开源服务器均支持WebSocket。
我们以实际代码演示如何在Spring MVC中实现对WebSocket的支持。首先,我们需要在pom.xml中加入以下依赖:
- org.apache.tomcat.embed:tomcat-embed-websocket:9.0.26
- org.springframework:spring-websocket:5.2.0.RELEASE
第一项是嵌入式Tomcat支持WebSocket的组件,第二项是Spring封装的支持WebSocket的接口。
接下来,我们需要在AppConfig中加入Spring Web对WebSocket的配置,此处我们需要创建一个WebSocketConfigurer实例:
@BeanWebSocketConfigurer createWebSocketConfigurer(@Autowired ChatHandler chatHandler,@Autowired ChatHandshakeInterceptor chatInterceptor){return new WebSocketConfigurer() {public void registerWebSocketHandlers(WebSocketHandlerRegistry registry) {// 把URL与指定的WebSocketHandler关联,可关联多个:registry.addHandler(chatHandler, "/chat").addInterceptors(chatInterceptor);}};}
此实例在内部通过WebSocketHandlerRegistry注册能处理WebSocket的WebSocketHandler,以及可选的WebSocket拦截器HandshakeInterceptor。我们注入的这两个类都是自己编写的业务逻辑,后面我们详细讨论如何编写它们,这里只需关注浏览器连接到WebSocket的URL是/chat。
1.处理WebSocket连接
和处理普通HTTP请求不同,没法用一个方法处理一个URL。Spring提供了TextWebSocketHandler和BinaryWebSocketHandler分别处理文本消息和二进制消息,这里我们选择文本消息作为聊天室的协议,因此,ChatHandler需要继承自TextWebSocketHandler:
@Componentpublic class ChatHandler extends TextWebSocketHandler {...}
当浏览器请求一个WebSocket连接后,如果成功建立连接,Spring会自动调用afterConnectionEstablished()方法,任何原因导致WebSocket连接中断时,Spring会自动调用afterConnectionClosed方法,因此,覆写这两个方法即可处理连接成功和结束后的业务逻辑:
@Componentpublic class ChatHandler extends TextWebSocketHandler {// 保存所有Client的WebSocket会话实例:private Map<String, WebSocketSession> clients = new ConcurrentHashMap<>();@Overridepublic void afterConnectionEstablished(WebSocketSession session) throws Exception {// 新会话根据ID放入Map:clients.put(session.getId(), session);session.getAttributes().put("name", "Guest1");}@Overridepublic void afterConnectionClosed(WebSocketSession session, CloseStatus status) throws Exception {clients.remove(session.getId());}}
每个WebSocket会话以WebSocketSession表示,且已分配唯一ID。和WebSocket相关的数据,例如用户名称等,均可放入关联的getAttributes()中。
用实例变量clients持有当前所有的WebSocketSession是为了广播,即向所有用户推送同一消息时,可以这么写:
String json = ...TextMessage message = new TextMessage(json);for (String id : clients.keySet()) {WebSocketSession session = clients.get(id);session.sendMessage(message);}
我们发送的消息是序列化后的JSON,可以用ChatMessage表示:
public class ChatMessage {public long timestamp;public String name;public String text;}
每收到一个用户的消息后,我们就需要广播给所有用户:
@Componentpublic class ChatHandler extends TextWebSocketHandler {...@Overrideprotected void handleTextMessage(WebSocketSession session, TextMessage message) throws Exception {String s = message.getPayload();String r = ... // 根据输入消息构造待发送消息broadcastMessage(r); // 推送给所有用户}}
如果要推送给指定的几个用户,那就需要在clients中根据条件查找出某些WebSocketSession,然后发送消息。
注意到我们在注册WebSocket时还传入了一个ChatHandshakeInterceptor,这个类实际上可以从HttpSessionHandshakeInterceptor继承,它的主要作用是在WebSocket建立连接后,把HttpSession的一些属性复制到WebSocketSession,例如,用户的登录信息等:
@Componentpublic class ChatHandshakeInterceptor extends HttpSessionHandshakeInterceptor {public ChatHandshakeInterceptor() {// 指定从HttpSession复制属性到WebSocketSession:super(List.of(UserController.KEY_USER));}}
这样,在ChatHandler中,可以从WebSocketSession.getAttributes()中获取到复制过来的属性。
2.客户端开发
在完成了服务器端的开发后,我们还需要在页面编写一点JavaScript逻辑:
// 创建WebSocket连接:var ws = new WebSocket('ws://' + location.host + '/chat');// 连接成功时:ws.addEventListener('open', function (event) {console.log('websocket connected.');});// 收到消息时:ws.addEventListener('message', function (event) {console.log('message: ' + event.data);var msgs = JSON.parse(event.data);// TODO:});// 连接关闭时:ws.addEventListener('close', function () {console.log('websocket closed.');});// 绑定到全局变量:window.chatWs = ws;
用户可以在连接成功后任何时候给服务器发送消息:
var inputText = 'Hello, WebSocket.';window.chatWs.send(JSON.stringify({text: inputText}));
最后,连调浏览器和服务器端,如果一切无误,可以开多个不同的浏览器测试WebSocket的推送和广播: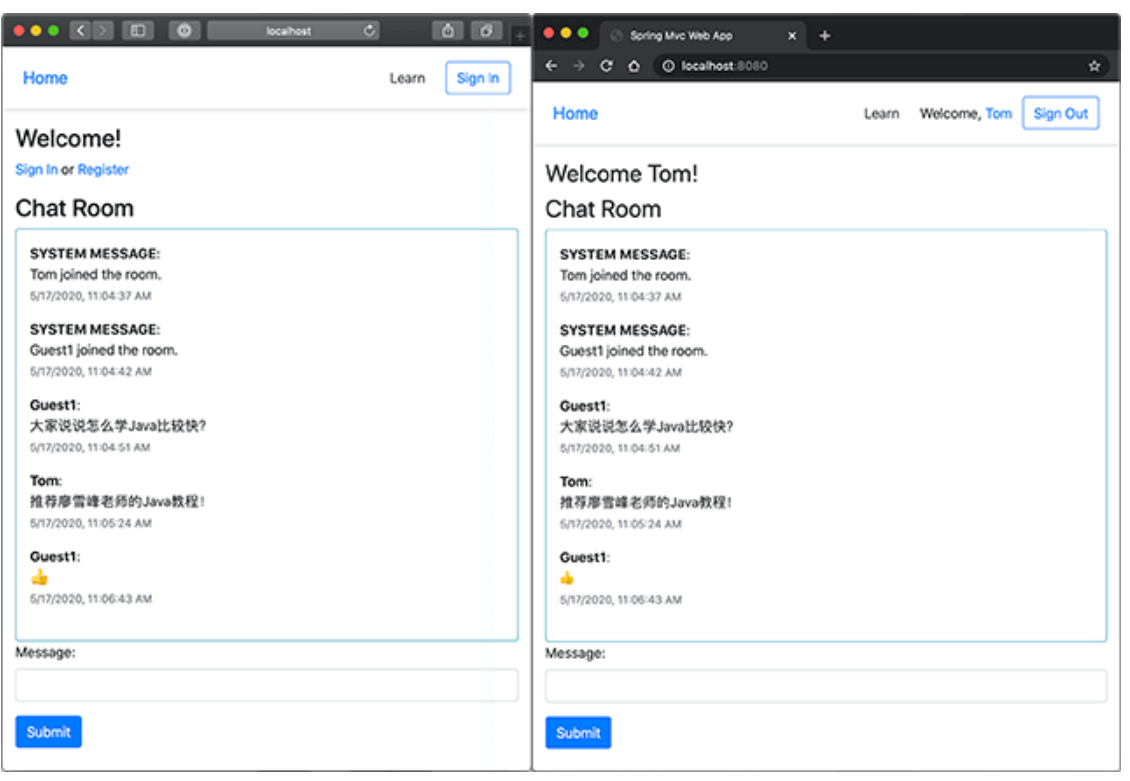
和上一节我们介绍的异步处理类似,Servlet的线程模型并不适合大规模的长链接。基于NIO的Netty等框架更适合处理WebSocket长链接。
在Servlet中使用WebSocket需要3.1及以上版本;
通过spring-websocket可以简化WebSocket的开发。

