配置虚拟主机
先修改 hosts 文件,位于 /etc/hosts,比如
$ vim /etc/hosts192.168.0.15 node1
使用 ssh 连接到指定虚拟主机,如果没有秘钥,则或提示输入密码
$ ssh node1The authenticity of host 'node1 (192.168.42.130)' can't be established.ECDSA key fingerprint is SHA256:ahhG7mkVk4N5uuIkeXBHoqM6i5i54DRvAeCCf2RJxcM.ECDSA key fingerprint is MD5:a5:fc:3f:43:70:ec:03:ca:5b:b1:f3:99:01:b9:8c:86.Are you sure you want to continue connecting (yes/no)? yesWarning: Permanently added 'node1,192.168.42.130' (ECDSA) to the list of known hosts.root@node1's password:Permission denied, please try again.root@node1's password:Permission denied, please try again.root@node1's password:Permission denied (publickey,gssapi-keyex,gssapi-with-mic,password).
客户端配置
在客户端使用 ssh-keygen -t rsa 或 ssh-keygen -t rsa -C "你的email地址" ,会在 ~/.ssh/id_rsa.pub 生成公钥
$ ssh-keygenGenerating public/private rsa key pair.Enter file in which to save the key (/root/.ssh/id_rsa):Enter passphrase (empty for no passphrase):Enter same passphrase again:Your identification has been saved in /root/.ssh/id_rsa.Your public key has been saved in /root/.ssh/id_rsa.pub.The key fingerprint is:SHA256:oGHYvzpaHaFCSxghVKQ5GR6WbZmzm24jMVSOwfMjSmo root@node1The key's randomart image is:+---[RSA 2048]----+|**=oo ||+B*X ||.*% * o || B.B = o ||= + * o S ||oE + . o ||. + . o || . =.. || +.o. |+----[SHA256]-----+
服务器端配置
生成 key 后,可以直接将公钥复制到服务器,也可使用命令提交到服务器
使用命令提交
使用 ssh-copy-id 命令将生成好的秘钥推给服务器,输入一次密码即可:
$ ssh-copy-id node1/usr/bin/ssh-copy-id: INFO: Source of key(s) to be installed: "/root/.ssh/id_rsa.pub"/usr/bin/ssh-copy-id: INFO: attempting to log in with the new key(s), to filter out any that are already installed/usr/bin/ssh-copy-id: INFO: 1 key(s) remain to be installed -- if you are prompted now it is to install the new keysroot@node1's password:Number of key(s) added: 1Now try logging into the machine, with: "ssh 'node1'"and check to make sure that only the key(s) you wanted were added.
再次登录,不需要输入密码:
$ ssh node1Last failed login: Wed Oct 24 21:38:38 CST 2018 from node1 on ssh:nottyThere were 5 failed login attempts since the last successful login.Last login: Wed Oct 24 20:18:50 2018 from 192.168.42.1[admin@node1 ~]$ exit
手动复制文件内容到 authorized_keys
在Windows下,没有 ssh-copy-id 命令,则可以使用文件复制的方式提交到服务器。
将 id_rsa.pub 文件里面的内容复制,保存到服务器端需要登录的用户根目录下 .ssh/authorized_keys 文件中,比如 /root/.ssh/authorized_keys、/home/user/.ssh/authorized_keys 即可。
或者通过FTP等方式将文件弄到服务器, 使用以下命令安全追加:
[admin@node1 .ssh]$ cat id_rsa.pub >> authorized_keys
修改 /etc/ssh/sshd_config,开启 RSA 和 公钥认证
RSAAuthentication yesPubkeyAuthentication yesAuthorizedKeysFile .ssh/authorized_keys
通过 scp 发送到服务器
如果通过以上方式不能解决, 可以通过 scp 命令发送公钥到服务器, 然后再在服务器中配置:
客户机
$ scp ./id_rsa.pub admin@sshk2:~
id_rsa.pub     100%  410     1.5MB/s   00:00
需要远程登录的服务器
cat id_rsa.pub >> ~/.ssh/authorized_keys
关闭密码验证
为了安全起见,关闭密码认证,修改 /etc/ssh/sshd_config
PasswordAuthentication no
重启 ssh 服务即可
systemctl restart sshd
此时,就可以在客户端使用私钥进行 SSH 登录, git 克隆什么的也不需要输入密码了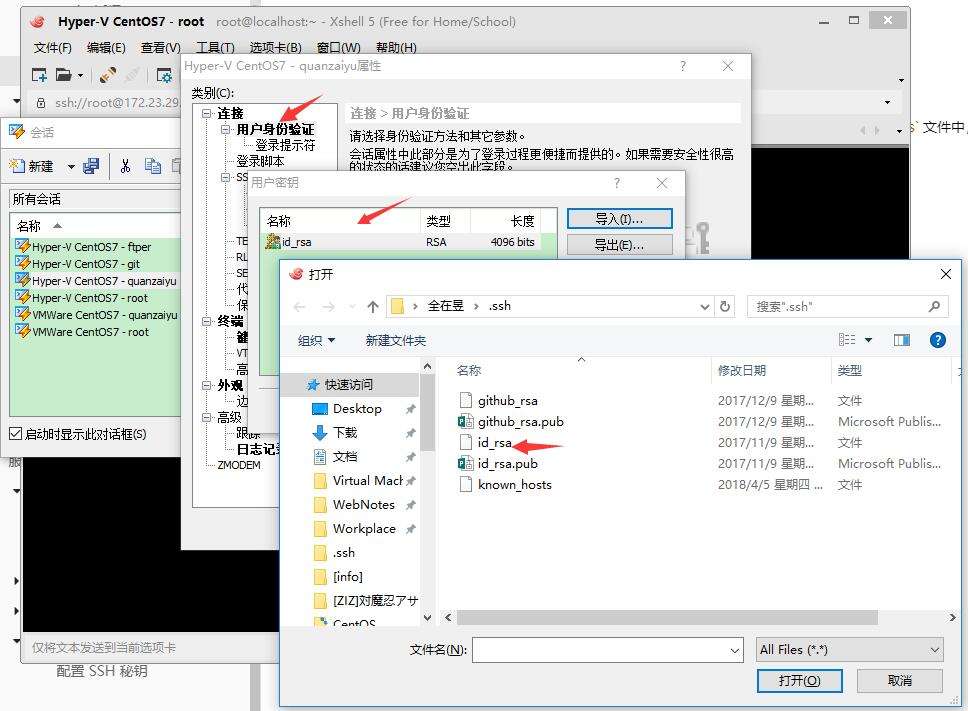
多台主机命名
当使用多台主机的时候, 如果使用默认主机名, 将很难区分其名字, 可以使用以下命令进行重命名主机名:
hostname node1
以上修改, 将在服务器不重启的条件下生效, 若服务器重启将恢复默认主机名。
或者修改配置文件 /etc/hostname, 配置将在重启服务器后生效:
$ vim /etc/hostname
node1
权限问题
如果配置了 ssh, 仍然登录不上, 那就得看看目录权限是否有问题了。
SSH对公钥,私钥的权限和所有权的要求是非常严格的,总结如下:
- 用户家目录及其 .ssh 目录所有权必须是登录用户本身,所属组也应该是登录用户本身,权限必须为700
chmod 700 ~chmod 700 ~/.ssh
- 公钥文件的所有权必须是登录用户本身,所属组也必须是登录用户本身,权限必须是644或600
chmod 644 ~/.ssh/authorized_keys
- 为了防止篡改, 建议把
id_rsa和id_rsa.pub设置为 400 (不强制)
如果权限不对,会造成不能正常登录,报错信息:Permission denied (publickey,gssapi-with-mic.....)
[root@sshk1 .ssh]# ll -a
total 24
drwx------   2 root root 4096 Dec 27 18:24 .
drwx------. 16 root root 4096 Dec 27 18:24 ..
-rw-------   1 root root  406 Dec 27 18:24 authorized_keys
-r--------   1 root root 1679 Dec 25 16:47 id_rsa
-r--------   1 root root  410 Dec 25 16:47 id_rsa.pub
-rw-------   1 root root  537 Dec 25 16:59 known_hosts
使用 man sshd, 搜索 authorized_keys 可以看出端倪:
~/.ssh/authorized_keys
        Lists the public keys (DSA, ECDSA, Ed25519, RSA) that can be used for logging in as this user.  The format of this file is described above.  The content of the file is not highly sensitive,
        but the recommended permissions are read/write for the user, and not accessible by others.

        If this file, the ~/.ssh directory, or the user's home directory are writable by other users, then the file could be modified or replaced by unauthorized users.  In this case, sshd will not
        allow it to be used unless the StrictModes option has been set to 'no'.
如果要root用户也无法修改和删除, 可以添加 i 属性:
chattr +i authorized_keys
$ lsattr authorized_keys
----i--------e-- authorized_keys
如果找不到 chattr 命令, 可以安装或重新安装:
yum install e2fsprogs
yum reinstall e2fsprogs
参考资料

若有收获,就点个赞吧
0 人点赞
