1.安装yamail模块
pip install yamail
2.发送QQ邮件
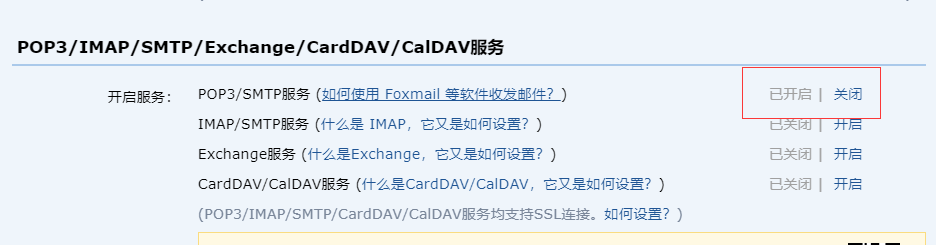
2.1 开启POP3/SMTP服务,
2.2.查找对应邮箱,发送邮件服务器地址
QQ邮箱: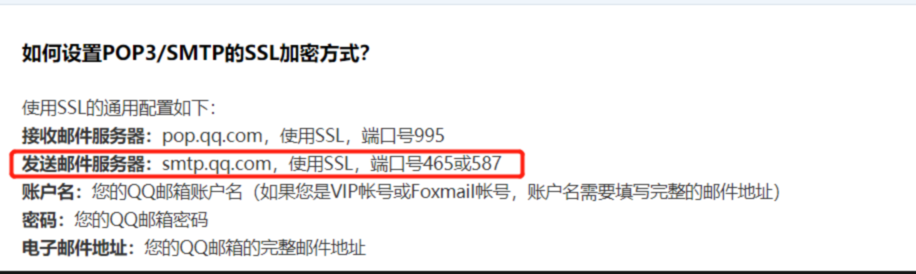
网易邮箱: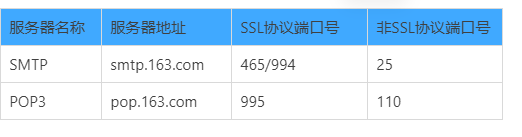
2.3.使用QQ邮件发送邮件
发给一个人:传一个字符串
发送给多个人,传list
import yamailusername = "1234455@qq.com"password = "授权码"host = "smtp.qq.com" # smtp.163.comport = 465mail = yamail.SMTP(user=username, password=password, host=host, port=port, smtp_ssl=True)# to = "1214504186@qq.com"to = ["1214504186@qq.com", "1078376500@qq.com", "1306114919@qq.com"]cc = ["1735763715@qq.com", username, "1581753566@qq.com"]subject = "大家好,今天北京下雪了,我们一起出来吃火锅"content = "晚上8点,去海底捞太阳宫店"attachments = "D:\pythonProject\Study\day7\log.py"mail.send(to=to, cc=cc, subject=subject, contents=content, attachments=attachments)
3.1参数说明
3.1.1.实例化一个SMTP类对象
#实例化一个yamail 库里的SMTP类对象m=yamail.SMTP(host=host,port=port,user=user,password=password,smtp_ssl=True)#smtp_ssl 使用SSL协议
SMTP类对象,传递的形参
username = "1234455@qq.com"password = "授权码"host = "smtp.qq.com" # smtp.163.comport = 465smtp_ssl=True #使用SSL协议
3.1.2、SMTP对象调用send方法发送邮件
m.send(to=to,subject=subject,contents=contents,cc=cc,attachments=attachments)
收件人to参数
to参数:
可以将收件人邮箱地址放到一个字符串中 例如 :”123456@qq.com”
也可以将多个收件人邮箱地址分别放到字符串后,再放到一个列表中
例如:[“123@qq.com”,”456@qq.com”]
to=["992264596@qq.com"] #收件人邮箱,可以选择多个收件人
抄送人cc参数
cc参数:
可以将抄送人邮箱地址放到一个字符串中 例如 :”123456@qq.com”
也可以将多个抄送人邮箱地址分别放到字符串后,再放到一个列表中
例如:[“123@qq.com”,”456@qq.com”]
cc=["673536548@qq.com"]
邮件附件attachments参数
attachments参数将附件本地绝地路径地址放到一个字符串中 例如 :”D:\demo.jpg”
也可以将多个附件本地绝地路径地址分别放到字符串后,再放到一个列表中
例如:
[“lidong01.png”,”lidong02.png.jpg”]
D:\study\progrm\elephant#附件attachments=[r"D:\study\progrm\elephant\demo\lidong01.png"\,r"D:\study\progrm\elephant\demo\lidong02.png"]
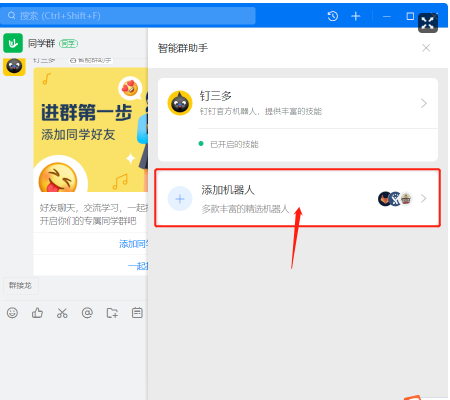
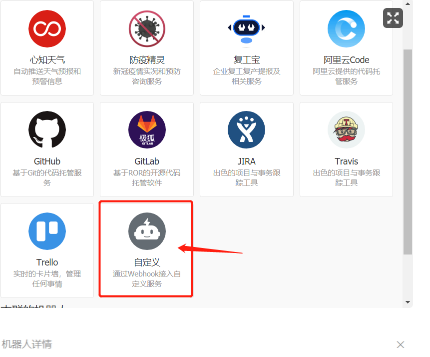
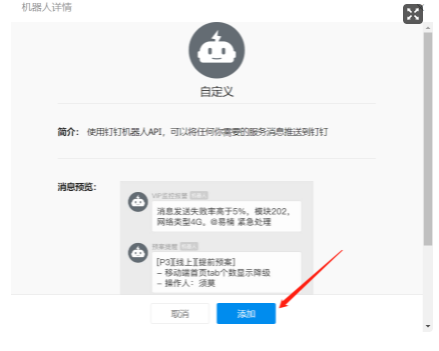
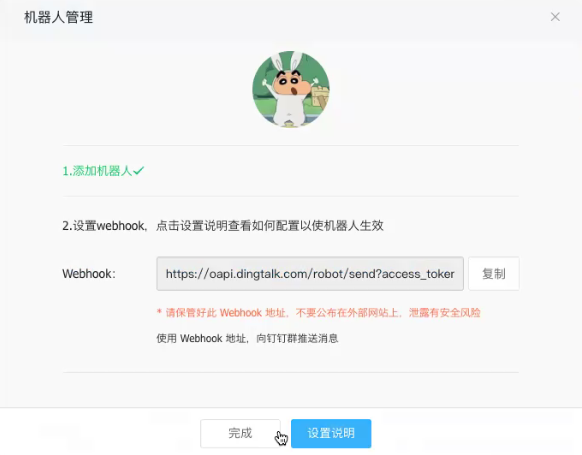
3.发送钉钉消息
3.1 添加自定义机器人
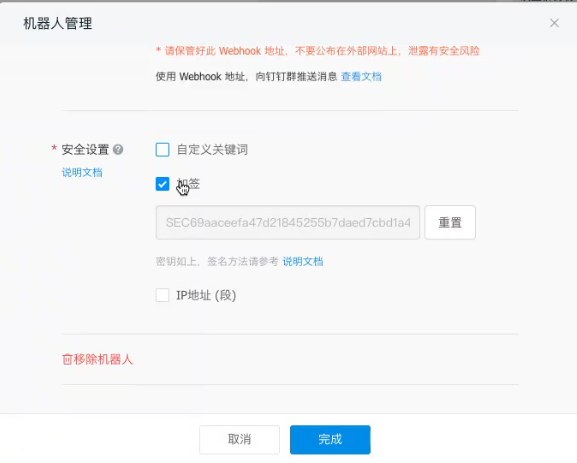
3.2自定义机器人安全设置
自定义机器人安全设置
目前有3种安全设置方式,请根据需要选择一种。
https://developers.dingtalk.com/document/robots/customize-robot-security-settings
关键字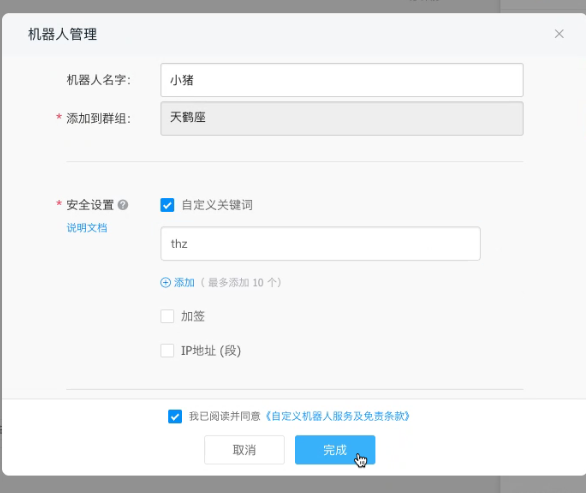
3.3选择消息类型
当前自定义机器人支持文本 (text)、链接 (link)、markdown(markdown)、ActionCard、FeedCard消息类型,请根据自己的使用场景选择合适的消息类型,达到最好的展示样式
更多消息类型,请求参数可以参考 钉钉开放平台
https://developers.dingtalk.com/document/robots/custom-robot-access
举例:text消息类型
{"at": {"atMobiles":["180xxxxxx"],"atUserIds":["user123"],"isAtAll": false},"text": {"content":"我就是我, @XXX 是不一样的烟火"},"msgtype":"text"}
| 参数 | 参数类型 | 是否必填 | 必须 |
|---|---|---|---|
| msgtype | String | 是 | 消息类型,此时固定为:text。 |
| content | String | 是 | 消息内容。 |
| atMobiles | Array | 否 | 被@人的手机号。 |
| atUserIds | Array | 否 | 被@人的用户userid。 |
| isAtAll | Boolean | 否 | 是否@所有人。 |
注意
在content里添加@人的手机号,且只有在群内的成员才可被@,非群内成员手机号会被脱敏。
注意
在content里添加@人的userid。
python实例
以 自定义关键词 安全模式,
以 发送text消息类型 举例:
import requestsurl = "https://oapi.dingtalk.com/robot/send"token = {"access_token":"token"}data = {"at": {"atMobiles":["18513112593","15503122090"],"isAtAll": True},"text": {"content":"我是机器人,thz,这是写代码发送的"},"msgtype":"text"}
加签
import requestsimport timeimport hmacimport hashlibimport base64import urllib.parsefrom loguru import loggerdef get_dding_sign(secret):timestamp = str(round(time.time() * 1000))secret_enc = secret.encode('utf-8')string_to_sign = '{}\n{}'.format(timestamp, secret)string_to_sign_enc = string_to_sign.encode('utf-8')hmac_code = hmac.new(secret_enc, string_to_sign_enc, digestmod=hashlib.sha256).digest()sign = urllib.parse.quote_plus(base64.b64encode(hmac_code))return timestamp, signdef send_dd_msg(msg, token="token",secret="secret", at=None, at_all=False):url = "https://oapi.dingtalk.com/robot/send"timestamp, sign = get_dding_sign(secret)url_params = {"access_token": token, "timestamp": timestamp, "sign": sign}data = {"at": {"atMobiles": at,"isAtAll": at_all},"text": {"content": msg},"msgtype": "text"}r = requests.post(url, params=url_params, json=data)ret = r.json()if ret.get("errcode") != 0:logger.warning("钉钉消息发送失败!返回报文是:{}", ret)return Falselogger.info("钉钉消息发送成功")return Trueif __name__ == '__main__':send_dd_msg("下课后,同学们出来打雪仗了", at=["18513112593", "15503122090"])
raise主动抛出异常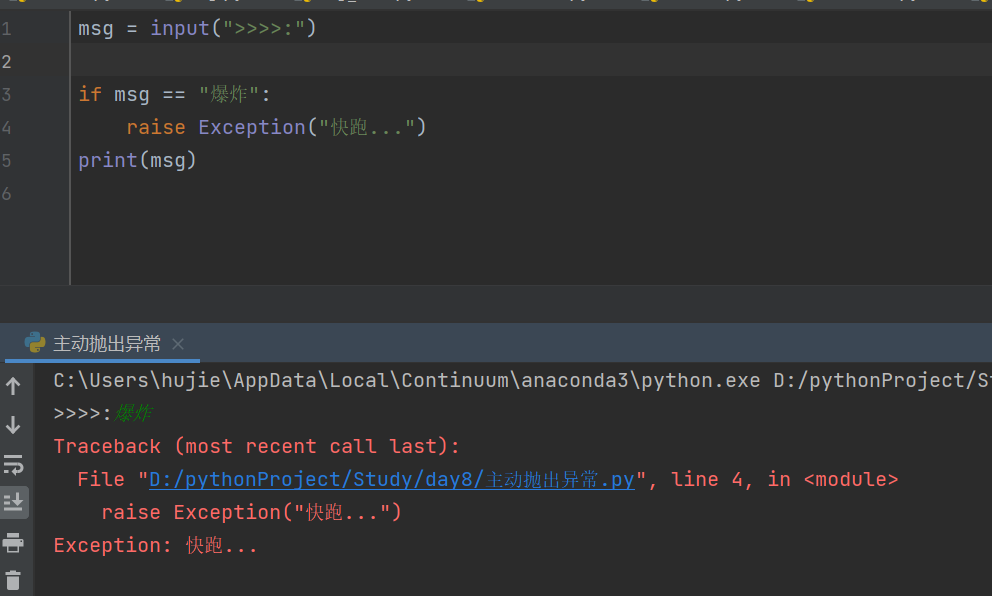

若有收获,就点个赞吧
0 人点赞
