1、安装
pip install pytest
在unittest中,写case必须得定义类,继承TestCase,而pytest不需要,类和函数都支持,
函数需要以test开头,类需要以Test开头
import pytestdef calc(a, b):return a + bdef test_calc():print("test_calc")ret = calc(1, 2)assert ret == 2class TestCalc:def test_calc1(self):print("test_calc1")ret = calc(3, 3)assert ret == 6if __name__ == '__main__':# pytest.main() # 默认找test开头的py文件pytest.main(["-vs",__file__])# pytest.main(["-vs",'pytest应用.py'])
从结果中可以看出:1条成功,1条失败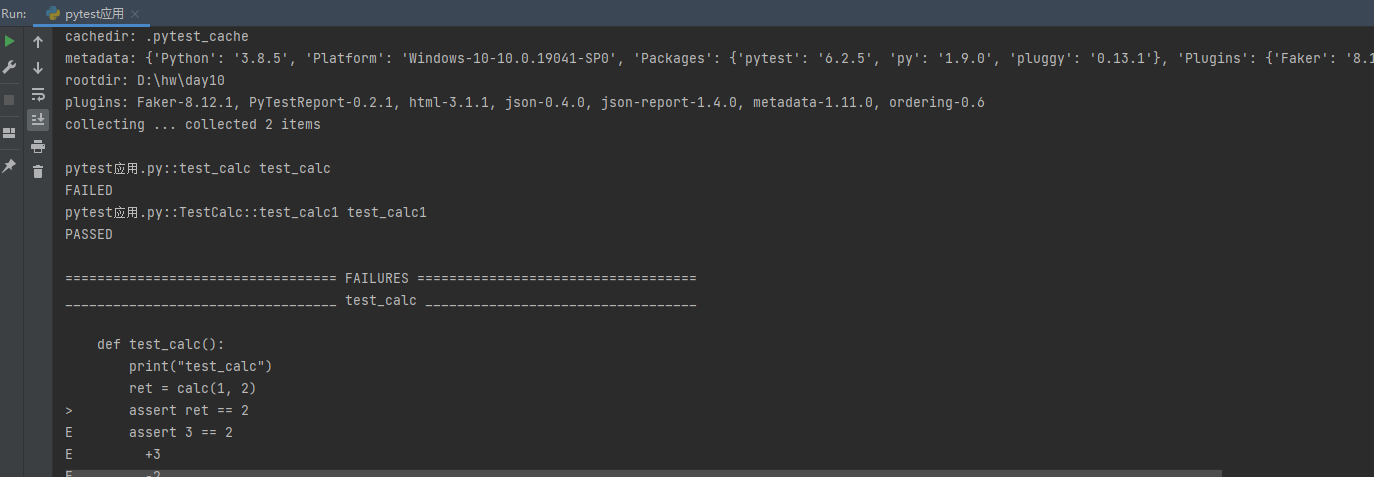
用例执行的优先级
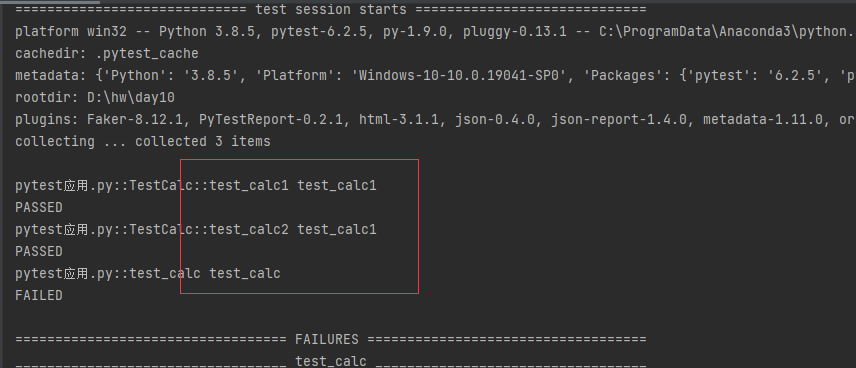
实现用例优先级,需要安装pytest-ordering这个模块, 1、标记于被测试函数, @pytest.mark.run(order=x)
2、根据order传入的参数来解决运行顺序
3、order值全为正数或负数时,值越小优先级越高
4、正负数同时存在时,正数优先极高
5、已标记和未标记的函数,已标记的函数优先极高
pip install pytest-ordering
import pytestdef calc(a, b):return a + b@pytest.mark.run(order=-1)def test_calc():print("test_calc")ret = calc(1, 2)assert ret == 2class TestCalc:@pytest.mark.run(order=1)def test_calc1(self):print("test_calc1")ret = calc(3, 3)assert ret == 6@pytest.mark.run(order=2)def test_calc2(self):print("test_calc1")ret = calc(5, 3)assert ret == 8if __name__ == '__main__':# pytest.main() # 默认找test开头的py文件pytest.main(["-vs",__file__])# pytest.main(["-vs",'pytest应用.py'])
2、前置/后置操作
用例的前置操作和后置操作
2.1函数的方式
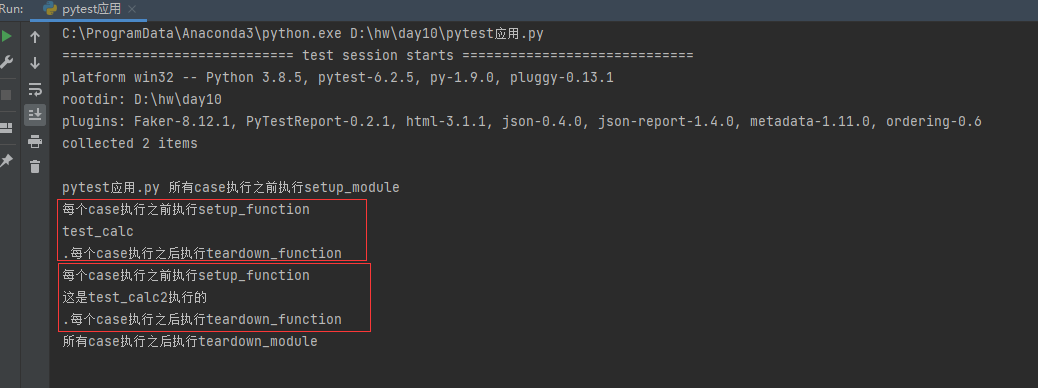
函数的方式使用setup_module、teardown_module、setup_function、teardown_function,分别是所有case运行之前执行、之后执行,每个case运行之前执行、之后执行。
import pytestdef calc(a, b):return a + bdef test_calc():print("test_calc")ret = calc(1, 2)assert ret == 3def test_calc2():print("这是test_calc2执行的")ret = calc(1, 1)assert ret == 2 # 这是一条失败的casedef setup_module():print("所有case执行之前执行setup_module")def teardown_module():print("所有case执行之后执行teardown_module")def setup_function():print("每个case执行之前执行setup_function")def teardown_function():print("每个case执行之后执行teardown_function")if __name__ == '__main__':pytest.main(['-s', __file__]) # 运行当前文件里面所有用例,# -s表示详细模式,否则不会print我们在函数里面的内容,__file__代表的是当前这个py文件,也可以直接写当前这个python文件的名字
2.2类的方式
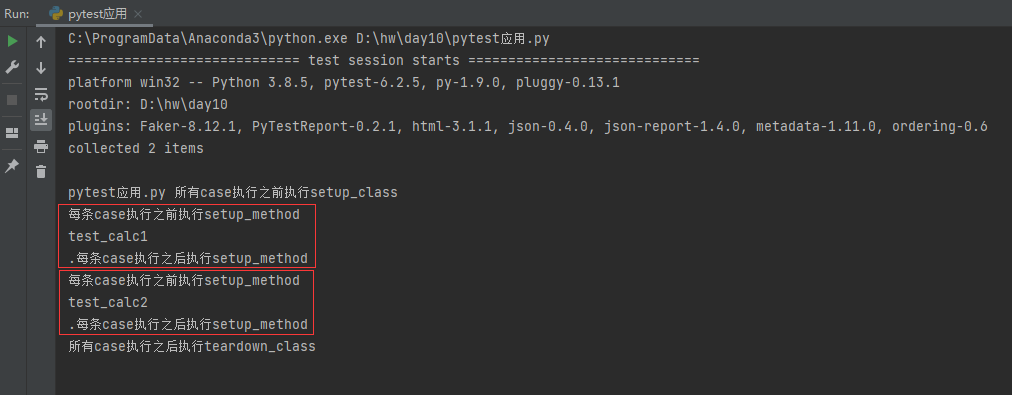
函数的方式使用setup_class、teardown_class、setup_method、teardown_method,分别是所有case运行之前执行、之后执行,每个case运行之前执行、之后执行。和unittest中的差不多,函数名不一样,不需要非得使用类方法
import pytestdef calc(a, b):return a + bclass TestCalc:def test_calc1(self):print("test_calc3")ret = calc(3, 3)assert ret == 6def test_calc2(self):print("test_calc3")ret = calc(2, 3)assert ret == 5def setup_class(self):print("所有case执行之前执行setup_class")def teardown_class(self):print("所有case执行之后执行teardown_class")def setup_method(self):print("每条case执行之前执行setup_method")def teardown_method(self):print("每条case执行之后执行setup_method")if __name__ == '__main__':pytest.main(['-s', __file__]) # 运行当前文件里面所有用例,# -s表示详细模式,否则不会print我们在函数里面的内容,__file__代表的是当前这个py文件,也可以直接写当前这个python文件的名字
3、参数化
pytest的参数化,不需要安装第三方模块,使用pytest.mark.parametrize,装饰即可,需要传入两个参数,参数名和参数值列表,参数名是一个字符串,多个参数以逗号分开,参数值传一个列表,如果多个参数需要传二维数组。
示例一:
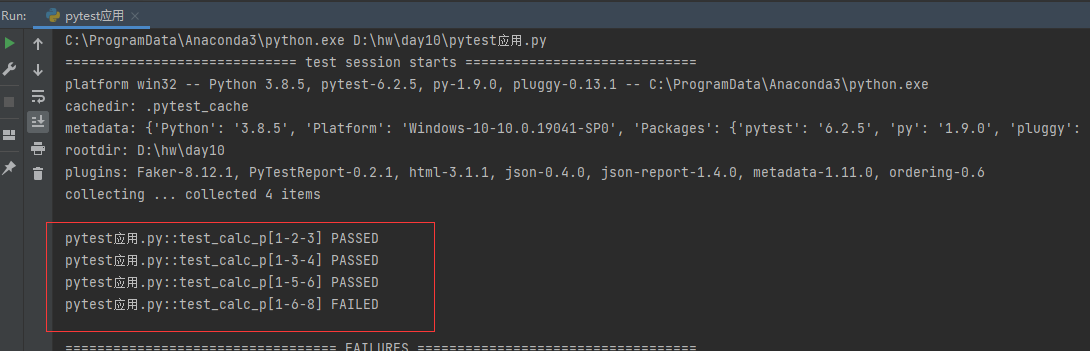
import pytestdef calc(a, b):return a + b@pytest.mark.parametrize("a,b,c", [[1, 2, 3],[1, 3, 4],[1, 5, 6],[1, 6, 8],])def test_calc_p(a, b, c):ret = calc(a, b)assert ret == cif __name__ == '__main__':pytest.main(['-sv', __file__])
示例二:
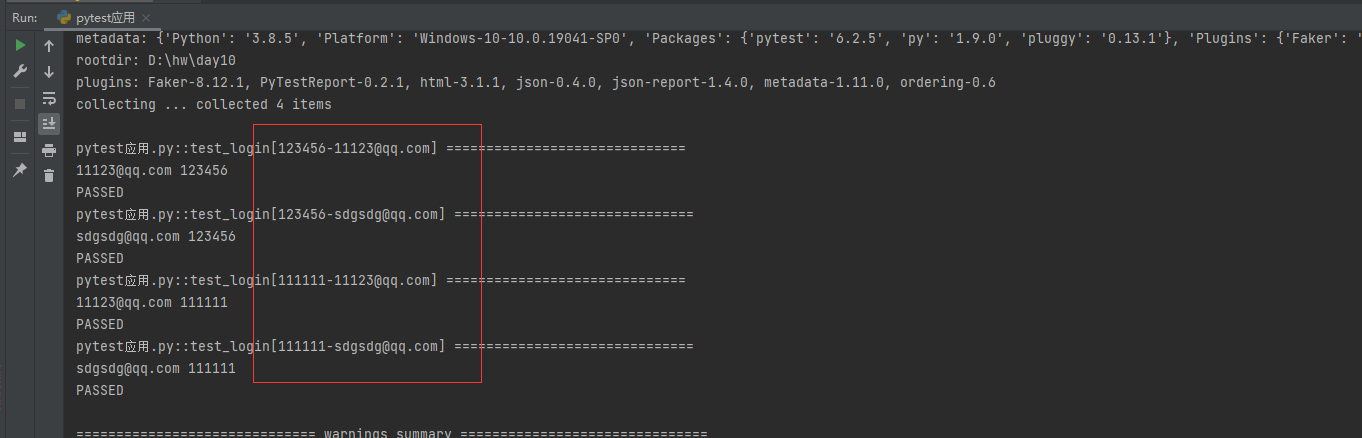
它比unittest的参数化要高级一点,支持参数的穷举组合,而unittest的参数化是不支持的
import pytestdef calc(a, b):return a + b@pytest.mark.parametrize('username', ["11123@qq.com", "sdgsdg@qq.com"])@pytest.mark.parametrize('password', ["123456","111111"])def test_login(username, password):print("=" * 30)print(username, password)if __name__ == '__main__':pytest.main(['-sv', __file__])
示例三:
import pytestdef calc(seq): # 被测函数try:ret = eval(seq)except:return Falsereturn ret@pytest.mark.parametrize("expression", ["1+2", "1/1", "1*1", "2-1"])def test_add_singe(expression): # 单个参数的写法ret = calc(expression)assert ret == 1@pytest.mark.parametrize("expression,except_value", [("1+2", 3),("1*2", 2),("1-2", -1),("1/2", 0.5),])def test_add(expression, except_value): # 多个参数ret = calc(expression)assert except_value == ret@pytest.mark.parametrize("a,c", [(1, 2), (0.5, 3)])@pytest.mark.parametrize("b", ["+", "-", "*", "/"])def test_add_other(a, b, c): # 参数组合,比如要计算1和2的加减乘除,就需要各种组合expression = "{}{}{}".format(a, b, c)ret = calc(expression)if b == "+":assert ret == a + cif b == "-":assert ret == a - cif b == "*":assert ret == a * cif b == "/":assert ret == a / cif __name__ == '__main__':pytest.main(['-vs', __file__])
4、用例跳过
用例跳过基本上和unittest一样,没有特别的,使用pytest.mark.skip和pytest.mark.skipif,可以装饰函数和类
示例一:
import pytestdef calc(a, b):return a + b@pytest.mark.skip("无条件跳过!")def test_calc1(): # 函数方式写caseprint("这是test_calc1执行的")ret = calc(1, 2)assert ret == 3def test_calc2():print("这是test_calc2执行的")ret = calc(1, 1)assert ret == 3 # 这是一条失败的caseif __name__ == '__main__':pytest.main(["-vs",__file__])
示例2:(有条件跳过)
import pytestimport sysclass TestCase:@pytest.mark.skip("无条件跳过")# 无条件跳过,就是不执行,就是玩,需要传一个字符串,说明跳过原因def test_print(self):print("test_print")@pytest.mark.skipif(sys.platform in ["win32", "darwin"], reason="不是在服务器上,不执行该条case")# if需要传2个参数,第一个参数是一个布尔值,true或者false,第二个参数是跳过的原因,reason这个参数是必传的# 带条件的跳过,比如说当运行在本地的时候,不执行这条case,本地电脑一般是mac或者Windows,这里判断一下def test_hello(self):print("test_hello")def test_normal(self):print("我是一个不跳过的case")@pytest.mark.skip("跳过整个类") # 也可以把装饰器加在类上面,跳过整个测试类class TestCase2:def test_mygod(self):print("我是一个不跳过的case")def test_my(self):print("我是一个不跳过的case")if __name__ == '__main__':pytest.main([__file__])
5、用例标签
实际运行case的时候,并不是所有情况下都需要运行所有的case,比如刚提测的时候需要运行冒烟case,其他的case不需要,这种情况下,就需要把case打上标签,运行的时候指定-m参数加上标签即可,一个case可以有多个标签,给case加标签使用pytest.mark.xxx ,xxx是标签的名字,标签的名字可以随便自己写,可以装饰测试类和测试函数。 如果标签比较多的情况下,也可以定义到一个py文件里面,统一管理。 在unittest中,是没有这个功能的。
不使用统一标签管理:示例一:
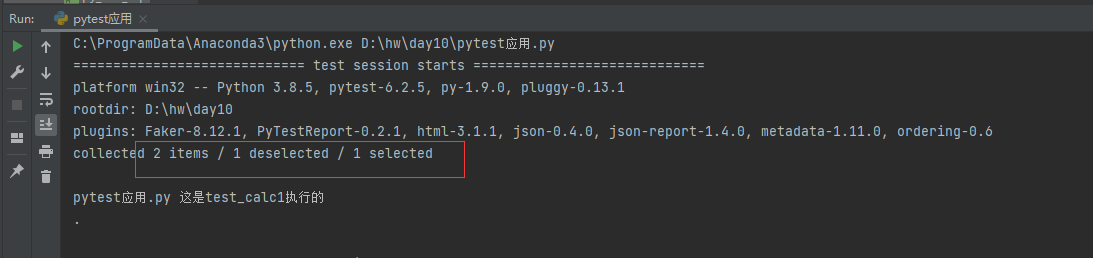
import pytestdef calc(a, b):return a + b@pytest.mark.online #加了一个“online”和“smoke”的标签@pytest.mark.smokedef test_calc1(): # 函数方式写caseprint("这是test_calc1执行的")ret = calc(1, 2)assert ret == 3@pytest.mark.online #加了一个“online”的标签def test_calc2():print("这是test_calc2执行的")ret = calc(1, 1)assert ret == 3 # 这是一条失败的caseif __name__ == '__main__':pytest.main(["-s", __file__, "-m", "smoke"]) #执行带有“smoke”标签的用例
不使用统一标签管理:示例二:
import pytestdef calc(a, b):return a + b@pytest.mark.online #加了一个“online”和“smoke”的标签@pytest.mark.smokedef test_calc1(): # 函数方式写caseprint("这是test_calc1执行的")ret = calc(1, 2)assert ret == 3@pytest.mark.online #加了一个“online”的标签def test_calc2():print("这是test_calc2执行的")ret = calc(1, 1)assert ret == 3 # 这是一条失败的caseif __name__ == '__main__':pytest.main(["-s", __file__, "-m", "smoke and online"])
统一标签管理
上面的方式使用没问题,如果我们想要知道当前有多少个标签的话,就需要从所有的case里面看一遍。 多个人同时编写case的时候,就不知道当前标签是否被别人用过,运行的时候有可能会把别人的case运行了,导致结果不正确。 这种情况下就需要统一管理标签。
首先定义一个case_tags.py,用来存放我们所有的case标签
import pytestsmoke = pytest.mark.smoke # 冒烟测试用例online = pytest.mark.online # 线上casepre = pytest.mark.pre # 预发caselocal = pytest.mark.local # 本地运行
import pytestimport case_tagsclass TestCase:def test_print(self):print("test_print")@case_tags.smokedef test_hello(self):print("test_hello")def test_normal(self):print("test_normal")@case_tags.online@case_tags.preclass TestCase2:def test_mygod(self):print("test_mygod!!!")def test_my(self):print("test_my!!!!")class TestCase3:pytestmark = [case_tags.smoke, case_tags.local]def test_car(self):print("test_car!!!")def test_fly(self):print("test_fly!!!!")if __name__ == '__main__':pytest.main([__file__, '-sm', 'smoke'])
6、pytest运行参数
前面使用pytest.main来运行case,也可以通过pytest命令在命令行中运行,可以指定运行哪个文件里面的case,从哪个目录下查找case等等。
下面是几个常用的参数
-s: 显示程序中的print/logging输出
-v: 丰富信息模式, 输出更详细的用例执行信息
-q: 安静模式, 不输出环境信息
-k:关键字匹配,用and或者or区分:匹配范围(文件名、类名、函数名)
-m:mark匹配
—last-failed : 只运行上一次失败的case
—failed-first:优先运行上一次失败的case
if __name__ == '__main__':# pytest.main(["-q",__file__]) #安静模式,不会显示pytest版本信息等等pytest.main(["-v",__file__]) #详细模式,会打印每条case执行结果,指定python文件# pytest.main(["-s",__file__]) #展示模式,函数里面有print或者日志输出,会展示,指定python文件# pytest.main(["-vs",__file__]) #展示模式+详细模式,指定python文件# pytest.main(["-vs","./cases"]) #展示模式+详细模式,指定目录# pytest.main(["./cases","-k","login"]) #指定运行包含login关键字的,包括 py文件、类、函数# pytest.main(["./cases","-k","login or register"]) #指定运行包含login或者register关键字的,包括 py文件、类、函数# pytest.main(["./cases","-k","login and online"]) #指定运行包含login并且包含online关键字的,包括 py文件、类、函数# pytest.main(["./cases","-m","smoke"]) #指定运行smoke标签的case# pytest.main(["./cases","-m","smoke or online"]) #指定运行smoke或者online标签的case# pytest.main(["./cases","-m","smoke and online"]) #指定运行smoke是并且是online标签的case# pytest.main(["./cases", "-sk", "user", "-m", "smoke"]) # 指定运行名称中包含user的,标签是smoke的case# pytest.main(["./cases", "-sk", "user", "-m", "smoke","--last-failed"]) # 指定运行名称中包含user的,上次失败的标签是smoke的case# pytest.main(["./cases", "-sk", "user", "-m", "smoke","--failed-first"]) # 指定运行名称中包含user的,优先运行上次失败的标签是smoke的case
pytest命令行
当然上面的参数一样可以在命令行里面使用pytest命令来运行case
pytest -vs a.py #只运行a.py这个文件里面的casepytest ./cases -vs #运行case目录下的pytest ./cases -m smoke #指定运行冒烟case
7、统计case运行结果
统计case运行的结果需要使用pytest-json-report插件,需要安装
pip install pytest-json-report
代码:
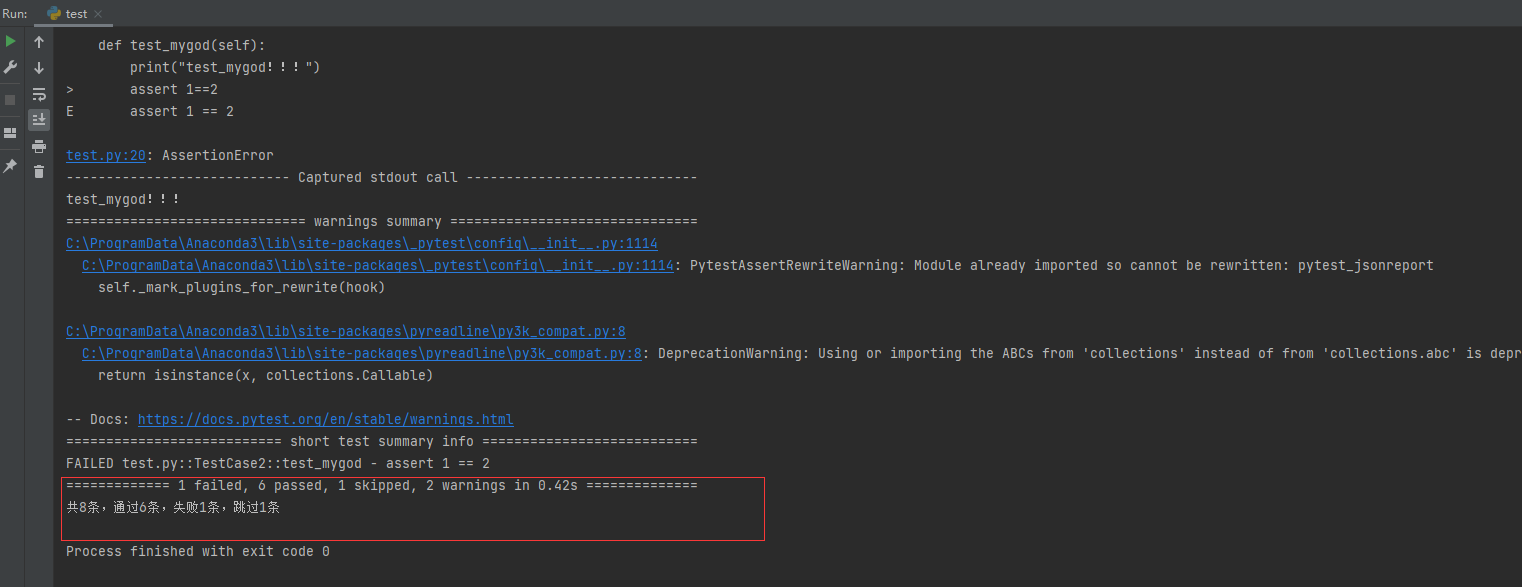
import pytestfrom pytest_jsonreport.plugin import JSONReportclass TestCase:def test_print(self):print("test_print")def test_hello(self):print("test_hello")def test_normal(self): # 可以加多个标签print("test_normal")1/0class TestCase2: # 装饰类的方式def test_mygod(self):print("test_mygod!!!")assert 1==2def test_my(self):print("test_my!!!!")class TestCase3:def test_car(self):print("test_car!!!")@pytest.mark.skip("!!")def test_car1(self):print("test_car!!!")def fly(self):print("test_fly!!!!")def test_user(): # 可以加多个标签print("test_user")if __name__ == '__main__':plugin = JSONReport()pytest.main(['--json-report-file=none', __file__], plugins=[plugin])#pytest.main(["-s", __file__, "-m", "smoke and online"],plugins=[plugin])summary = plugin.report.get("summary")passed = summary.get("passed",0)failed = summary.get("failed",0)skipped = summary.get("skipped",0)total = summary.get("total",0)print("共{}条,通过{}条,失败{}条,跳过{}条".format(total,passed,failed,skipped))
如果不写:—json-report-file=none,会在当前目录下生成一个.report.json的文件
8、测试报告
pytest有好几种测试报告插件,可以自己选择哪个好看用哪个。
1、pytest-html
安装
pip install pytest-html
#pytest.main(["--html=./report.html","--self-contained-html"])pytest.main(["-vs", __file__,"--html=./report.html","--self-contained-html"])

2、PyTestReport
安装:
pip install PyTestReport
使用:
pytest.main([ __file__,"--pytest_report", "py_test_report.html", "--pytest_title", "这是测试报告的标题", "--pytest_desc", "测试报告描述"])
会在当前目录下生成一个py_test_report.html文件

3、pytest-html-reporter
安装:
pip install pytest-html-reporter
使用:
pytest.main(["--html-report=./report_new.html"])
9、fixture
fixture的作用和前置后置操作差不多,都是起一样的作用,是case执行之前自动运行或者case执行完之后自动运行,但是比它们使用更灵活。 teardown或者setup之类的操作,是拿不到里面的返回值的,使用fixture是可以的;teardown或者setup之类的操作,没办法指定某些case运行前置条件,某些不运行,使用fixture是可以的;teardown或者setup之类的操作,如果一些跨文件的case也都需要使用同样的前置条件,那么就需要在每个文件/每个类里面都写,而fixture可以只写一次。 fixture就是一个普通的函数,使用pytest.fixture装饰之后,就变成了一个fixture,使用yield关键字,来决定是前置条件还是后置条件。
9.1、基本使用
@pytest.fixture(scope="function",autouse=True)def exe_database_sql():print("执行SQL查询") #前置操作yieldprint("关闭数据库连接") #后置操作
@pytest.fixture(scope=None,autouse=False,params=None,ids=None ,name=None)
fixture里面有个参数autouse,默认是Fasle没开启的,可以设置为True开启自动使用fixture功能,这样用例就不用每次都去传参了。
基本使用:
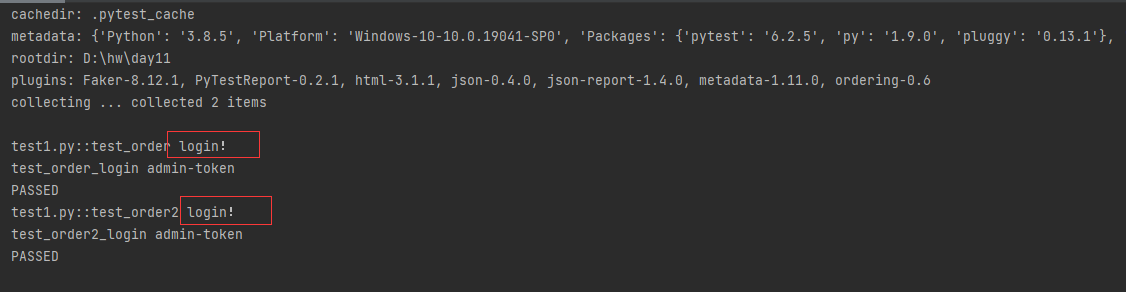
import pytest@pytest.fixturedef login(): #定义fixtureprint("login!")token = "admin-token"return tokendef test_order(login):#使用这个fixture的时候,要把这个函数名当做参数传进来print("test_order_login",login)assert 1 == 1def test_order2(login):print("test_order2_login",login)assert 1 == 1if __name__ == '__main__':pytest.main(['-vs',__file__])
9.2 scope
scope的作用是指fixture的作用范围,有4个参数可以选,function、class、module和session,默认如果不写的话是function
| 名称 | 作用范围 |
|---|---|
| function | 每个用了这个fixture的函数运行之前都会先运行这个fixture |
| class | 如果函数是在类里面的话,类里面有多个函数都使用了这个fixture,那么每个类在运行之前只会运行一次,类似setup_class |
| module | 这个python文件里面所有用到这个fixture的,这个文件里面只会运行一次 |
| session | 如果有多个python文件里面都用到了这个fixture,那么就只会运行一次 |
示例一:scope=class
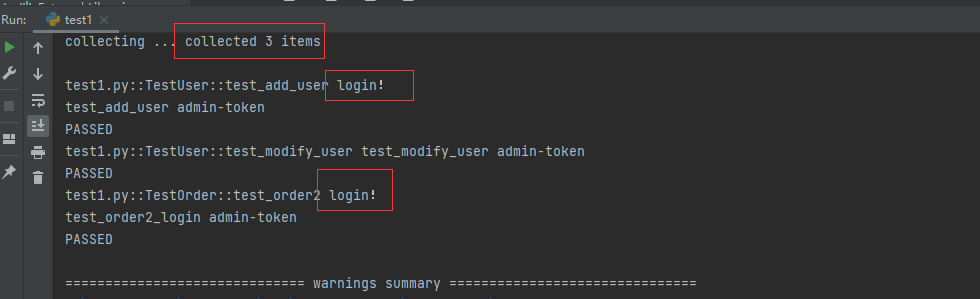
import pytest@pytest.fixture(scope="class", )def login(): # 定义fixtureprint("login!")token = "admin-token"return tokenclass TestUser:def test_add_user(self, login, ):print("test_add_user", login)def test_modify_user(self,login,):print("test_modify_user",login)class TestOrder:def test_order2(self,login):print("test_order2_login", login)assert 1 == 1if __name__ == '__main__':pytest.main(['-vs', __file__])
示例二:scope=module
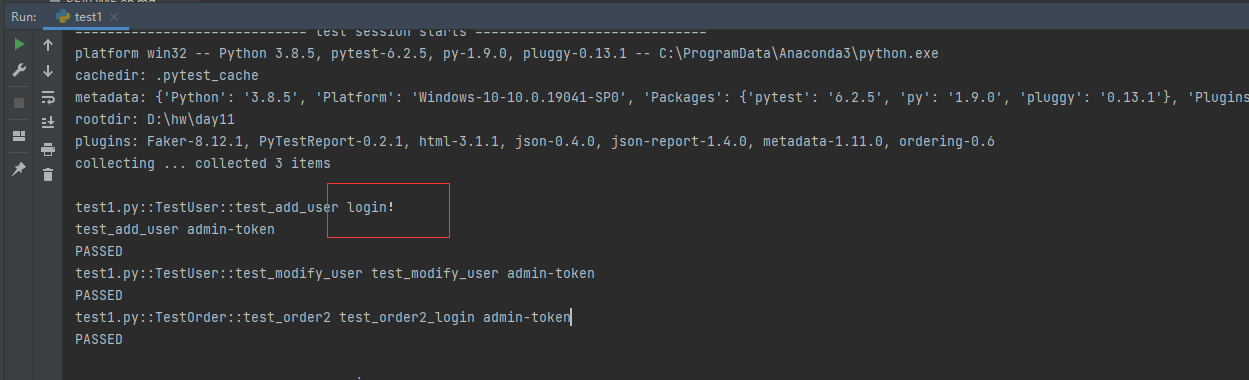
import pytest@pytest.fixture(scope="module", )def login(): # 定义fixtureprint("login!")token = "admin-token"return tokenclass TestUser:def test_add_user(self, login, ):print("test_add_user", login)def test_modify_user(self,login,):print("test_modify_user",login)class TestOrder:def test_order2(self,login):print("test_order2_login", login)assert 1 == 1if __name__ == '__main__':pytest.main(['-vs', __file__])
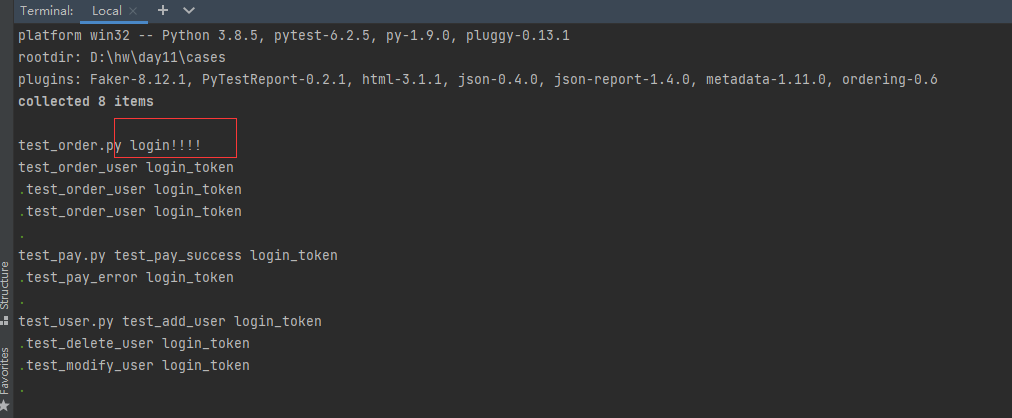
示例三:scope=”session”
session这个比较特殊需要单独说,需要定义在conftest.py这个文件里面
下面是目录结构,有3个case文件,一个conftest.py,conftest.py这个是固定的名字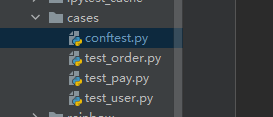
#conftest.pyimport pytest@pytest.fixture(scope='session')def login_session():print("login_session!!!")return "admin-token-session"
# test_order.pyclass TestOrder:def test_order_user(self,login):print("test_order_user",login )def test_delete_order(self,login):print("test_order_user",login)def test_update_order(self,login):print("test_order_user",login)
#test_pay.pyclass TestPay:def test_pay_success(self,login,):print("test_pay_success",login )def test_pay_error(self,login):print("test_pay_error",login)
#test_user.pyclass TestUser:def test_add_user(self,login,):print("test_add_user",login )def test_delete_user(self,login):print("test_delete_user",login)def test_modify_user(self,login):print("test_modify_user",login)if __name__ == '__main__':import pytestpytest.main(['-vs','./'])
运行case也可以使用pytest命令执行,指定运行这3个python文件
pytest -s test_order.py test_pay.py test_user.py
9.3 autouse
autouse这个参数的作用是自动使用fixture,自动使用的话,就不需要传入fixture了,case在运行之前他会自动运行fixture 使用atuouse的话,返回值就获取不到了,需要用返回值的话 ,还是需要传入fixture
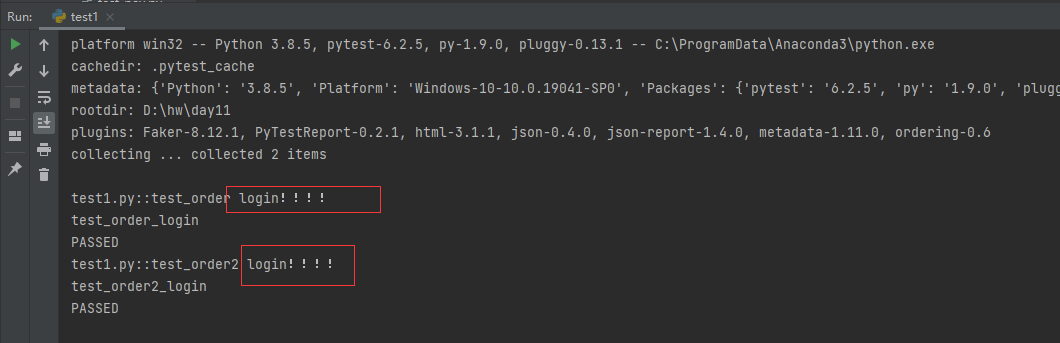
import pytest@pytest.fixture(scope="function",autouse=True)def login(): # 定义fixtureprint("login!!!!")token = "admin-token"return tokendef test_order():print("test_order_login")assert 1 == 1def test_order2():print("test_order2_login")assert 1 == 1if __name__ == '__main__':pytest.main(['-vs', __file__])
下面是结果,可以看到两个case并没有传入fixture,它自动调用了2次
9.4 fixture前置/后置操作
前面用的都是fixture的前置操作,如果使用后置操作的话,那就需要用到yield了,yield之前的代码是case执行之前做的,yield之后的代码是case执行做的。 如果使用了yield,那就不需要写return了,如果需要返回值,可以直接在 yield后面加返回值
import pytestimport os@pytest.fixture(scope="function", autouse=True)def check_dir():print("case执行之前")if not os.path.exists("imgs"):os.mkdir("imgs")yield 1111os.rmdir("imgs")print("case执行之后!!")def test_order(check_dir):print("test_order_login",check_dir)assert 1 == 1def test_order2():assert 1 == 1if __name__ == '__main__':pytest.main(['-vs', __file__])

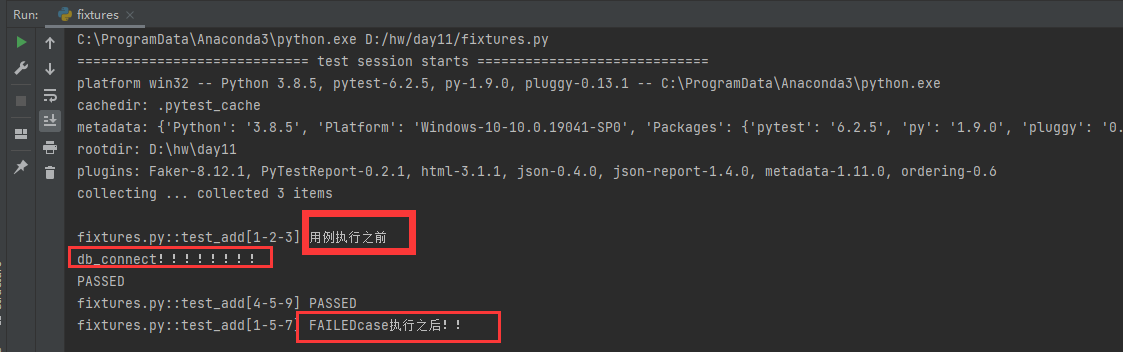
9.5、 fixture和参数化一起使用:
import pytestimport os@pytest.fixture(scope="module")def db_connect():print("db_connect!!!!!!!!")return "dfddfd"@pytest.fixture(scope="module",autouse=True)def check_dir():print("用例执行之前")if not os.path.exists("imgs"):os.mkdir("imgs")yield 1111os.rmdir("imgs")print("case执行之后!!")@pytest.mark.parametrize('a,b,c',[[1,2,3],[4,5,9],[1,5,7],])def test_add(a,b,c,db_connect,check_dir):assert a+b == cif __name__ == '__main__':pytest.main([__file__,'-vs'])

若有收获,就点个赞吧
0 人点赞
