- 一、帮助命令
- 二、镜像命令
- 三、容器命令
- 运行一个在后台执行的容器,同时,还能用控制台管理
- 运行一个带命令在后台不断执行的容器,不直接展示容器内部信息
- 为容器指定一个名字。
- 容器暴露80端口,并指定宿主机2021端口与其通信(: 之前是宿主机端口,之后是容器需暴露的端口)
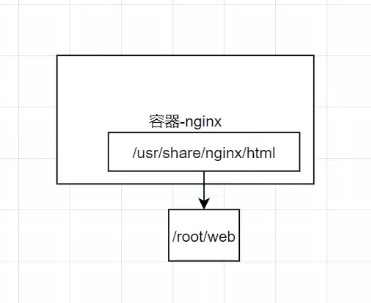
- 指定容器内目录与宿主机目录共享(: 之前是宿主机文件夹,之后是容器需共享的文件夹),
- 测试,启动并进入容器
- 我们通常容器都是使用后台方式运行的,需要进入容器,修改一些配置
- 命令
- 方法一
- 方法二
- docker exec #进入容器后开启一个新的终端,可以在里面操作(常用)
- docker attach #进入容器正在执行的终端,不会启动新的终端
- 四、常用其他命令
- 测试
一、帮助命令
docker version #查看docker版本(有client和server,看到server起来了才说明docker起来了)docker info #显示docker的系统信息,包括镜像和容器的数量docker 命令 --help #万能命令
帮助文档的地址:https://docs.docker.com/reference/
二、镜像命令
1、查看镜像
**docker images**列出本地镜像- 语法:
**docker images [OPTIONS] [REPOSITORY[:TAG]]** - OPTIONS说明: | -a,—all | 列出本地所有的镜像(含中间映像层,默认情况下,隐藏中间映像层) | | —- | —- | | —digests | 显示镜像的摘要信息(签名) | | -f,—fliter | 根据条件对输出结果进行过滤 | | —format | 格式化输出结果 | | —no-trunc | 不截断输出,即显示完整的镜像ID信息 | | -q | 只显示镜像ID |
#列出最近创建的镜像[root@VM-0-15-centos ~]# docker imagesREPOSITORY TAG IMAGE ID CREATED SIZEmysql latest 5a4e492065c7 11 days ago 514MBhello-world latest d1165f221234 5 months ago 13.3kBcentos latest 300e315adb2f 8 months ago 209MB80x86/typecho latest 3437f7346b4c 2 years ago 53.9MB#列出指定镜像名hello-world:latest的信息[root@VM-0-15-centos ~]# docker images hello-world:latestREPOSITORY TAG IMAGE ID CREATED SIZEhello-world latest d1165f221234 5 months ago 13.3kB#列出镜像名为hello-world的所有镜像信息[root@VM-0-15-centos ~]# docker images hello-worldREPOSITORY TAG IMAGE ID CREATED SIZEhello-world latest d1165f221234 5 months ago 13.3kB#也可以使用模糊查找的方式:[root@VM-0-15-centos ~]# docker images hello-world:*REPOSITORY TAG IMAGE ID CREATED SIZEhello-world latest d1165f221234 5 months ago 13.3kB#显示镜像完整的ID[root@VM-0-15-centos ~]# docker images --no-truncREPOSITORY TAG IMAGE ID CREATED SIZEmysql latest sha256:5a4e492065c722ec8cc7413552bafc6fd5434c5ad90797e898ccc4e347e21aa5 11 days ago 514MBhello-world latest sha256:d1165f2212346b2bab48cb01c1e39ee8ad1be46b87873d9ca7a4e434980a7726 5 months ago 13.3kBcentos latest sha256:300e315adb2f96afe5f0b2780b87f28ae95231fe3bdd1e16b9ba606307728f55 8 months ago 209MB80x86/typecho latest sha256:3437f7346b4c58c7451ff6e398f9b8e4019a7a34186af61aba54d0f00a71a398 2 years ago 53.9MB#显示镜像的摘要(签名)[root@VM-0-15-centos ~]# docker images --digestsREPOSITORY TAG DIGEST IMAGE ID CREATED SIZEmysql latest sha256:d45561a65aba6edac77be36e0a53f0c1fba67b951cb728348522b671ad63f926 5a4e492065c7 11 days ago 514MBhello-world latest sha256:7d91b69e04a9029b99f3585aaaccae2baa80bcf318f4a5d2165a9898cd2dc0a1 d1165f221234 5 months ago 13.3kBcentos latest sha256:5528e8b1b1719d34604c87e11dcd1c0a20bedf46e83b5632cdeac91b8c04efc1 300e315adb2f 8 months ago 209MB80x86/typecho latest sha256:4af25c76919efa862d59aeb3a2d9f2394ad3ef4b338037e8a2499c55011dbbf7 3437f7346b4c 2 years ago 53.9MB#筛选在hello-world:latest镜像之前创建的镜像[root@VM-0-15-centos ~]# docker images -f "before=hello-world:latest"REPOSITORY TAG IMAGE ID CREATED SIZEcentos latest 300e315adb2f 8 months ago 209MB80x86/typecho latest 3437f7346b4c 2 years ago 53.9MB#筛选在hello-world:latest镜像之后创建的镜像[root@VM-0-15-centos ~]# docker images -f "since=hello-world:latest"REPOSITORY TAG IMAGE ID CREATED SIZEmysql latest 5a4e492065c7 11 days ago 514MB#列出虚悬镜像[root@VM-0-15-centos ~]# docker images -f "dangling=true"REPOSITORY TAG IMAGE ID CREATED SIZE#显示镜像ID和镜像名[root@VM-0-15-centos ~]# docker images --format "{{.ID}}: {{.Repository}}"5a4e492065c7: mysqld1165f221234: hello-world300e315adb2f: centos3437f7346b4c: 80x86/typecho#以表格的形式显示镜像ID、镜像名和镜像标签[root@VM-0-15-centos ~]# docker images --format "table {{.ID}}\t{{.Repository}}\t{{.Tag}}"IMAGE ID REPOSITORY TAG5a4e492065c7 mysql latestd1165f221234 hello-world latest300e315adb2f centos latest3437f7346b4c 80x86/typecho latest#解释REPOSITORY 镜像的仓库源TAG 镜像的标签IMAGE ID 镜像的idCREATED 镜像的创建时间SIZE 镜像的大小
2、搜索镜像
**docker search**搜索镜像- 语法:
**docker search [OPTIONS] TERM** - OPTIONS说明: | —automated | 只列出 automated build类型的镜像 | | —- | —- | | -f,—filter | 列出收藏数不小于指定值的镜像 | | —no-trunc | 不截断输出,即显示完整的镜像ID信息 |
[root@VM-0-15-centos ~]# docker search mysqlNAME DESCRIPTION STARS OFFICIAL AUTOMATEDmysql MySQL is a widely used, open-source relation… 11332 [OK]mariadb MariaDB Server is a high performing open sou… 4307 [OK]mysql/mysql-server Optimized MySQL Server Docker images. Create… 840 [OK]phpmyadmin phpMyAdmin - A web interface for MySQL and M… 305 [OK]#从 Docker Hub 查找所有镜像名包含mysql,并且收藏数大于等于 3000 的镜像[root@VM-0-15-centos ~]# docker search mysql -f stars=3000NAME DESCRIPTION STARS OFFICIAL AUTOMATEDmysql MySQL is a widely used, open-source relation… 11334 [OK]mariadb MariaDB Server is a high performing open sou… 4307 [OK]#参数说明NAME #镜像仓库源的名称DESCRIPTION #镜像的描述OFFICIAL #是否 docker 官方发布STARS #类似 Github 里面的 star,表示点赞、喜欢的意思。AUTOMATED #自动构建
3、下载镜像
**docker pull**下载镜像- 语法:
**docker pull [OPTIONS] NAME[:TAG|@DIGEST]** - OPTIONS说明: | -a | 拉取所有 tagged 镜像 | | —- | —- | | —disable-content-trust | 忽略镜像的校验,默认开启 |
下载镜像 docker pull 镜像名[:tag][root@VM-0-15-centos ~]# docker pull mysqlUsing default tag: latest #如果不写tag,默认就是latestlatest: Pulling from library/mysqle1acddbe380c: Pull complete #分层下载,docker image的核心 联合文件系统bed879327370: Pull complete03285f80bafd: Pull completeccc17412a00a: Pull complete1f556ecc09d1: Pull completeadc5528e468d: Pull complete1afc286d5d53: Pull complete6c724a59adff: Pull complete0f2345f8b0a3: Pull completec8461a25b23b: Pull complete3adb49279bed: Pull complete77f22cd6c363: Pull completeDigest: sha256:d45561a65aba6edac77be36e0a53f0c1fba67b951cb728348522b671ad63f926 #签名Status: Downloaded newer image for mysql:latestdocker.io/library/mysql:latest #真实地址#等价关系docker pull mysqldocker pull docker.io/library/mysql:latest#指定版本下载[root@VM-0-15-centos ~]# docker pull mysql:5.75.7: Pulling from library/mysqle1acddbe380c: Already existsbed879327370: Already exists03285f80bafd: Already existsccc17412a00a: Already exists1f556ecc09d1: Already existsadc5528e468d: Already exists1afc286d5d53: Already exists4d2d9261e3ad: Pull completeac609d7b31f8: Pull complete53ee1339bc3a: Pull completeb0c0a831a707: Pull completeDigest: sha256:7cf2e7d7ff876f93c8601406a5aa17484e6623875e64e7acc71432ad8e0a3d7eStatus: Downloaded newer image for mysql:5.7docker.io/library/mysql:5.7#下载REPOSITORY为mysql的所有镜像docker pull -a mysql

4、删除镜像
**docker rmi**删除本地一个或多个镜像- 语法:
**docker rmi [OPTIONS] IMAGE [IMAGE...]** - OPTIONS说明: | -f | 强制删除 | | —- | —- | | —no-prune | 不移除该镜像的过程镜像,默认移除 |
[root@VM-0-15-centos ~]# docker rmi -f 镜像id #强制删除指定的镜像[root@VM-0-15-centos ~]# docker rmi -f 镜像id 镜像id 镜像id #强制删除多个指定的镜像[root@VM-0-15-centos ~]# docker rmi -f $(docker images -aq) #强制删除所有的镜像
三、容器命令
说明:我们有了镜像才可以创建容器,Linux系统下下载一个CentOS镜像来测试学习
**docker pull centos**

1、新建容器并运行命令
**docker run**创建一个新的容器并运行一个命令- 语法:
**docker run [OPTIONS] IMAGE [COMMAND] [ARG...]** OPTIONS说明: | -d, —detach=false | **指定容器运行于前台还是后台,默认为false,为true则后台运行 | | —- | —- | | -i, —interactive=false | **打开STDIN,用于控制台交互 | | -t, —tty=false | 分配tty设备,该可以支持终端登录,默认为false | | -u, —user=”” | 指定容器的用户 | | -a, —attach=[] | 登录容器(必须是以docker run -d启动的容器) | | -w, —workdir=”” | 指定容器的工作目录 | | -c, —cpu-shares=0 | 设置容器CPU权重,在CPU共享场景使用 | | -e, —env=[] | 指定环境变量,容器中可以使用该环境变量 | | -m, —memory=”” | 指定容器的内存上限 | | -P, —publish-all=false | 随机指定容器暴露的端口 | | -p, —publish=[] | 指定容器暴露的端口 | | -h, —hostname=”” | 指定容器的主机名 | | -v, —volume=[] | 给容器挂载存储卷,挂载到容器的某个目录 | | —volumes-from=[] | 给容器挂载其他容器上的卷,挂载到容器的某个目录 | | —cap-add=[] | 添加权限,权限清单详见:http://linux.die.net/man/7/capabilities | | —cap-drop=[] | 删除权限,权限清单详见:http://linux.die.net/man/7/capabilities | | —cidfile=”” | 运行容器后,在指定文件中写入容器PID值,一种典型的监控系统用法 | | —cpuset=”” | 设置容器可以使用哪些CPU,此参数可以用来容器独占CPU | | —device=[] | 添加主机设备给容器,相当于设备直通 | | —dns=[] | 指定容器的dns服务器 | | —dns-search=[] | 指定容器的dns搜索域名,写入到容器的/etc/resolv.conf文件 | | —entrypoint=”” | 覆盖image的入口点 | | —env-file=[] | 指定环境变量文件,文件格式为每行一个环境变量 | | —expose=[] | 指定容器暴露的端口,即修改镜像的暴露端口 | | —link=[] | 指定容器间的关联,使用其他容器的IP、env等信息 | | —lxc-conf=[] | 指定容器的配置文件,只有在指定—exec-driver=lxc时使用 | | —name=”” | 指定容器名字,后续可以通过名字进行容器管理,links特性需要使用名字 | | —net=”bridge” | 容器网络设置: 使用docker daemon指定的网桥 | | —net=”host” | 容器网络设置: 容器使用主机的网络 | | —net=”container” | 容器网络设置: 使用其他容器的网路,共享IP和PORT等网络资源 | | —net=”none” | 容器网络设置: 容器使用自己的网络(类似—net=bridge),但是不进行配置 | | —privileged=false | 指定容器是否为特权容器,特权容器拥有所有的capabilities | | —restart=”no” | 容器退出时不重启 | | —restart=”on-failure” | 容器故障退出(返回值非零)时重启 | | —restart=”always” | 容器退出时总是重启 | | —rm=false | 指定容器停止后自动删除容器(不支持以docker run -d启动的容器) | | —sig-proxy=true | 设置由代理接受并处理信号,但是SIGCHLD、SIGSTOP和SIGKILL不能被代理 |
docker run 镜像名 命令可选() #运行docker容器镜像
- -d #让容器后台运行
- -it #保持标准输入打开(默认为false),让容器保持交互状态,不把阻塞/等待输入当成是任务结束
- -p 主机端口:容器端口 #映射容器的端口号
- -P #随机映射镜像所需要的端口号
- -v 主机路径:容器路径 #映射容器的存储卷
- —rm #容器运行结束后自动销毁(连尸体都不会有)
- —name #设置容器名称
- —hostname #设置容器的主机名
- —restart=always #设置容器开机自动启动(systemctl start docker,systemctl enable docker搭配)
```shell
运行一个在后台执行的容器,同时,还能用控制台管理
[root@VM-0-15-centos ~]# docker ps CONTAINER ID IMAGE COMMAND CREATED STATUS PORTS NAMES [root@VM-0-15-centos ~]# docker run -i -t -d centos:latest e599b223e7e00bda6dd1af7d02248ea83c167e62e97d6a9ad821dc0b8e4c4a53 [root@VM-0-15-centos ~]# docker ps CONTAINER ID IMAGE COMMAND CREATED STATUS PORTS NAMES e599b223e7e0 centos:latest “/bin/bash” 5 seconds ago Up 4 seconds lucid_banach
运行一个带命令在后台不断执行的容器,不直接展示容器内部信息
[root@VM-0-15-centos ~]# docker ps CONTAINER ID IMAGE COMMAND CREATED STATUS PORTS NAMES e599b223e7e0 centos:latest “/bin/bash” 5 seconds ago Up 4 seconds lucid_banach [root@VM-0-15-centos ~]# docker run -d centos:latest ping www.docker.com 626b539eeba4c0fe45770d7db8782bf4f20a9c207fbdc726663700ac150cdd4e [root@VM-0-15-centos ~]# docker ps CONTAINER ID IMAGE COMMAND CREATED STATUS PORTS NAMES 626b539eeba4 centos:latest “ping www.docker.com” 5 seconds ago Up 4 seconds nifty_solomon e599b223e7e0 centos:latest “/bin/bash” 2 minutes ago Up 2 minutes lucid_banach
为容器指定一个名字。
容器暴露80端口,并指定宿主机2021端口与其通信(: 之前是宿主机端口,之后是容器需暴露的端口)
指定容器内目录与宿主机目录共享(: 之前是宿主机文件夹,之后是容器需共享的文件夹),
[root@VM-0-15-centos ~]# docker ps -a CONTAINER ID IMAGE COMMAND CREATED STATUS PORTS NAMES [root@VM-0-15-centos ~]# docker run -it -d —name=centos_server -p 2021:80 -v /etc/www:/var/www centos:latest 1e605144b3c4dc66112c7d8fba0b2dabada1d897523c56dc159705335dba5ae0 [root@VM-0-15-centos ~]# docker ps CONTAINER ID IMAGE COMMAND CREATED STATUS PORTS NAMES 1e605144b3c4 centos:latest “/bin/bash” 3 seconds ago Up 2 seconds 0.0.0.0:2021->80/tcp, :::2021->80/tcp centos_server
测试,启动并进入容器
[root@VM-0-15-centos ~]# docker run -it centos /bin/bash [root@286621faf844 /]# ls #查看容器内的centos,基础版本,很多命令都不完善 bin dev etc home lib lib64 lost+found media mnt opt proc root run sbin srv sys tmp usr var
<a name="Egn4b"></a>## 2、查看运行中的容器- `**docker ps**`- 语法:`**docker ps [OPTIONS]**`| **-a** | ** #查看所有容器,包括未运行的** || --- | --- || **-l** | ** #查看最后一个运行的容器** || **-n** | ** #列出最近创建的n个容器** || **--no-trunc** | **#不截断输出** || **-q** | ** #静默模式,只显示容器ID** || **-s** | **#显示总的文件大小** |```shell[root@VM-0-15-centos ~]# docker psCONTAINER ID IMAGE COMMAND CREATED STATUS PORTS NAMES[root@VM-0-15-centos ~]# docker ps -aCONTAINER ID IMAGE COMMAND CREATED STATUS PORTS NAMES286621faf844 centos "/bin/bash" 6 minutes ago Exited (0) 4 minutes ago eloquent_chaplyginc3740c67c633 hello-world "/hello" 2 hours ago Exited (0) 2 hours ago agitated_lamarrdea8fbdd52bb 80x86/typecho "/entrypoint.sh /app…" 3 months ago Exited (137) 2 months ago infallible_blackwell1663d813cab4 80x86/typecho "/entrypoint.sh /app…" 3 months ago Exited (137) 3 months ago cranky_dirac#列出最近创建的2个容器信息[root@VM-0-15-centos ~]# docker ps -n 2CONTAINER ID IMAGE COMMAND CREATED STATUS PORTS NAMES286621faf844 centos "/bin/bash" 6 minutes ago Exited (0) 4 minutes ago eloquent_chaplyginc3740c67c633 hello-world "/hello" 2 hours ago Exited (0) 2 hours ago agitated_lamarr
3、退出容器
(1)容器里面
- 当我们在容器里面的时候,退出容器的方式有多个

(2)容器外面
- docker stop 容器名/id
-
4、进入当前正在运行的容器
docker attach 容器id #从前台进入容器(进入后exit退出了就会杀死容器)
- docker exec -it 容器id bash #从后门进入容器(进入后exit退出了只是退出了bash,并不会杀死容器)
```shell
我们通常容器都是使用后台方式运行的,需要进入容器,修改一些配置
命令
docker exec -it 容器id bashshell
方法一
[root@VM-0-15-centos ~]# docker ps CONTAINER ID IMAGE COMMAND CREATED STATUS PORTS NAMES 4519755902f9 centos “/bin/bash” 3 minutes ago Up 3 minutes charming_mendeleev [root@VM-0-15-centos ~]# docker exec -it 4519755902f9 bash [root@4519755902f9 /]# ps -ef UID PID PPID C STIME TTY TIME CMD root 1 0 0 12:49 pts/0 00:00:00 /bin/bash root 15 0 0 12:54 pts/1 00:00:00 bash root 29 15 0 12:54 pts/1 00:00:00 ps -ef [root@4519755902f9 /]# exit exit [root@VM-0-15-centos ~]# docker ps CONTAINER ID IMAGE COMMAND CREATED STATUS PORTS NAMES 4519755902f9 centos “/bin/bash” 6 minutes ago Up 6 minutes charming_mendeleev
方法二
[root@VM-0-15-centos ~]# docker ps CONTAINER ID IMAGE COMMAND CREATED STATUS PORTS NAMES 4519755902f9 centos “/bin/bash” 6 minutes ago Up 6 minutes charming_mendeleev [root@VM-0-15-centos ~]# docker attach 4519755902f9 [root@4519755902f9 /]# exit exit [root@VM-0-15-centos ~]# docker ps CONTAINER ID IMAGE COMMAND CREATED STATUS PORTS NAMES
docker exec #进入容器后开启一个新的终端,可以在里面操作(常用)
docker attach #进入容器正在执行的终端,不会启动新的终端
<a name="RRP1J"></a>## 5、启动和停止容器的操作```shelldocker start 容器id #启动容器docker restart 容器id #重启容器docker stop 容器id #停止当前正在运行的容器docker kill 容器id #强制停止当前容器
6、删除容器
docker rm 容器id #删除指定的容器,不能删除正在运行的容器,如果要强制删除rm -fdocker rm -f $(docker ps -aq) #删除所有的容器docker ps -a -q|xargs docker rm #删除所有的容器。xargs 可以将管道或标准输入(stdin)数据转 换成命令行参数,也能够从文件的输出中读取数据。
四、常用其他命令
1、后台启动容器
[root@VM-0-15-centos ~]# docker ps -aCONTAINER ID IMAGE COMMAND CREATED STATUS PORTS NAMES[root@VM-0-15-centos ~]# docker run -d centos629a55e2dcbd2c225fa93496c2c3afdda4fe3ecea978178f638cfc246c573021[root@VM-0-15-centos ~]# docker psCONTAINER ID IMAGE COMMAND CREATED STATUS PORTS NAMES[root@VM-0-15-centos ~]# docker run -it -d centos4519755902f94979002e9188463dc3684f34f52ee15ce7fc098a1819f618287b[root@VM-0-15-centos ~]# docker psCONTAINER ID IMAGE COMMAND CREATED STATUS PORTS NAMES4519755902f9 centos "/bin/bash" 3 seconds ago Up 2 seconds charming_mendeleev[root@VM-0-15-centos ~]# docker ps -aCONTAINER ID IMAGE COMMAND CREATED STATUS PORTS NAMES4519755902f9 centos "/bin/bash" 9 seconds ago Up 8 seconds charming_mendeleev629a55e2dcbd centos "/bin/bash" 25 seconds ago Exited (0) 24 seconds ago elastic_shockley#问题:docker ps发现centos停止了#常见的坑:docker容器使用后台运行,就必须要有一个前台进程,docker容器启动后,如果发现自己没有提供服务,就会立即停止
2、查看日志
**docker logs**- 语法:
**docker logs [OPTIONS] CONTAINER**| -f | # 跟踪日志输出 | | —- | —- | | —since | # 显示某个开始时间的所有日志 | | -t | # 显示时间戳 | | —tail | # 仅列出最新N条容器日志 |
#跟踪查看容器的日志输出[root@VM-0-15-centos ~]# docker psCONTAINER ID IMAGE COMMAND CREATED STATUS PORTS NAMES[root@VM-0-15-centos ~]# docker run -it -d centos ping www.docker.com436d7e51cf42977ed7683169d0277fa50719e3b74b379e691324c1f9b65b7d2e[root@VM-0-15-centos ~]# docker psCONTAINER ID IMAGE COMMAND CREATED STATUS PORTS NAMES436d7e51cf42 centos "ping www.docker.com" 6 seconds ago Up 5 seconds musing_hypatia[root@VM-0-15-centos ~]# docker logs -f -t --tail 10 436d7e51cf422021-08-29T13:03:43.358471450Z 64 bytes from server-65-9-42-78.nrt12.r.cloudfront.net (65.9.42.78): icmp_seq=25 ttl=231 time=130 ms2021-08-29T13:03:44.357885604Z 64 bytes from server-65-9-42-78.nrt12.r.cloudfront.net (65.9.42.78): icmp_seq=26 ttl=231 time=128 ms2021-08-29T13:03:45.360448310Z 64 bytes from server-65-9-42-78.nrt12.r.cloudfront.net (65.9.42.78): icmp_seq=27 ttl=231 time=129 ms2021-08-29T13:03:46.362365414Z 64 bytes from server-65-9-42-78.nrt12.r.cloudfront.net (65.9.42.78): icmp_seq=28 ttl=231 time=129 ms2021-08-29T13:03:49.362508740Z 64 bytes from server-65-9-42-78.nrt12.r.cloudfront.net (65.9.42.78): icmp_seq=31 ttl=231 time=129 ms2021-08-29T13:03:51.364265785Z 64 bytes from server-65-9-42-78.nrt12.r.cloudfront.net (65.9.42.78): icmp_seq=33 ttl=231 time=131 ms2021-08-29T13:03:54.365170137Z 64 bytes from server-65-9-42-78.nrt12.r.cloudfront.net (65.9.42.78): icmp_seq=36 ttl=231 time=131 ms2021-08-29T13:03:56.366807947Z 64 bytes from server-65-9-42-78.nrt12.r.cloudfront.net (65.9.42.78): icmp_seq=38 ttl=231 time=131 ms2021-08-29T13:03:57.366455842Z 64 bytes from server-65-9-42-78.nrt12.r.cloudfront.net (65.9.42.78): icmp_seq=39 ttl=231 time=131 ms2021-08-29T13:03:58.334405609Z 64 bytes from server-65-9-42-78.nrt12.r.cloudfront.net (65.9.42.78): icmp_seq=40 ttl=231 time=97.5 ms
3、查看容器中进程信息
**docker top 容器ID**[root@VM-0-15-centos ~]# docker top 436d7e51cf42UID PID PPID C STIME TTY TIME CMDroot 5266 5248 0 21:03 pts/0 00:00:00 ping www.docker.com
4、查看镜像的元数据
**docker inspect 容器ID**```shell测试
[root@VM-0-15-centos ~]# docker inspect ec6e3fdec8c7 [ {
"Id": "ec6e3fdec8c7c01895d7d47a2ab08c93129c9237a7763f295d37b73f4e327095","Created": "2021-08-29T01:53:05.435416978Z","Path": "/bin/bash","Args": [],"State": {"Status": "exited","Running": false,"Paused": false,"Restarting": false,"OOMKilled": false,"Dead": false,"Pid": 0,"ExitCode": 0,"Error": "","StartedAt": "2021-08-29T01:53:05.774289777Z","FinishedAt": "2021-08-29T01:53:05.773591821Z"},"Image": "sha256:300e315adb2f96afe5f0b2780b87f28ae95231fe3bdd1e16b9ba606307728f55","ResolvConfPath": "/var/lib/docker/containers/ec6e3fdec8c7c01895d7d47a2ab08c93129c9237a7763f295d37b73f4e327095/resolv.conf","HostnamePath": "/var/lib/docker/containers/ec6e3fdec8c7c01895d7d47a2ab08c93129c9237a7763f295d37b73f4e327095/hostname","HostsPath": "/var/lib/docker/containers/ec6e3fdec8c7c01895d7d47a2ab08c93129c9237a7763f295d37b73f4e327095/hosts","LogPath": "/var/lib/docker/containers/ec6e3fdec8c7c01895d7d47a2ab08c93129c9237a7763f295d37b73f4e327095/ec6e3fdec8c7c01895d7d47a2ab08c93129c9237a7763f295d37b73f4e327095-json.log","Name": "/xenodochial_cartwright","RestartCount": 0,"Driver": "overlay2","Platform": "linux","MountLabel": "","ProcessLabel": "","AppArmorProfile": "","ExecIDs": null,"HostConfig": {"Binds": null,"ContainerIDFile": "","LogConfig": {"Type": "json-file","Config": {}},"NetworkMode": "default","PortBindings": {},"RestartPolicy": {"Name": "no","MaximumRetryCount": 0},"AutoRemove": false,"VolumeDriver": "","VolumesFrom": null,"CapAdd": null,"CapDrop": null,"CgroupnsMode": "host","Dns": [],"DnsOptions": [],"DnsSearch": [],"ExtraHosts": null,"GroupAdd": null,"IpcMode": "private","Cgroup": "","Links": null,"OomScoreAdj": 0,"PidMode": "","Privileged": false,"PublishAllPorts": false,"ReadonlyRootfs": false,"SecurityOpt": null,"UTSMode": "","UsernsMode": "","ShmSize": 67108864,"Runtime": "runc","ConsoleSize": [0,0],"Isolation": "","CpuShares": 0,"Memory": 0,"NanoCpus": 0,"CgroupParent": "","BlkioWeight": 0,"BlkioWeightDevice": [],"BlkioDeviceReadBps": null,"BlkioDeviceWriteBps": null,"BlkioDeviceReadIOps": null,"BlkioDeviceWriteIOps": null,"CpuPeriod": 0,"CpuQuota": 0,"CpuRealtimePeriod": 0,"CpuRealtimeRuntime": 0,"CpusetCpus": "","CpusetMems": "","Devices": [],"DeviceCgroupRules": null,"DeviceRequests": null,"KernelMemory": 0,"KernelMemoryTCP": 0,"MemoryReservation": 0,"MemorySwap": 0,"MemorySwappiness": null,"OomKillDisable": false,"PidsLimit": null,"Ulimits": null,"CpuCount": 0,"CpuPercent": 0,"IOMaximumIOps": 0,"IOMaximumBandwidth": 0,"MaskedPaths": ["/proc/asound","/proc/acpi","/proc/kcore","/proc/keys","/proc/latency_stats","/proc/timer_list","/proc/timer_stats","/proc/sched_debug","/proc/scsi","/sys/firmware"],"ReadonlyPaths": ["/proc/bus","/proc/fs","/proc/irq","/proc/sys","/proc/sysrq-trigger"]},"GraphDriver": {"Data": {"LowerDir": "/var/lib/docker/overlay2/9f58829d0c22ab90bee08aa58ddf072e689f795d72c4dfd3b5a95759a11357da-init/diff:/var/lib/docker/overlay2/b298ad9ced6d87c18f01408e96b63e31dbc7ef41c7b5d6a749e54636a7730b15/diff","MergedDir": "/var/lib/docker/overlay2/9f58829d0c22ab90bee08aa58ddf072e689f795d72c4dfd3b5a95759a11357da/merged","UpperDir": "/var/lib/docker/overlay2/9f58829d0c22ab90bee08aa58ddf072e689f795d72c4dfd3b5a95759a11357da/diff","WorkDir": "/var/lib/docker/overlay2/9f58829d0c22ab90bee08aa58ddf072e689f795d72c4dfd3b5a95759a11357da/work"},"Name": "overlay2"},"Mounts": [],"Config": {"Hostname": "ec6e3fdec8c7","Domainname": "","User": "","AttachStdin": false,"AttachStdout": false,"AttachStderr": false,"Tty": false,"OpenStdin": false,"StdinOnce": false,"Env": ["PATH=/usr/local/sbin:/usr/local/bin:/usr/sbin:/usr/bin:/sbin:/bin"],"Cmd": ["/bin/bash"],"Image": "centos","Volumes": null,"WorkingDir": "","Entrypoint": null,"OnBuild": null,"Labels": {"org.label-schema.build-date": "20201204","org.label-schema.license": "GPLv2","org.label-schema.name": "CentOS Base Image","org.label-schema.schema-version": "1.0","org.label-schema.vendor": "CentOS"}},"NetworkSettings": {"Bridge": "","SandboxID": "d3fedfdee8e6f0d6aa83a793c4e3e56ef29086f8e2cb6ecafc6c280c3d103b8f","HairpinMode": false,"LinkLocalIPv6Address": "","LinkLocalIPv6PrefixLen": 0,"Ports": {},"SandboxKey": "/var/run/docker/netns/d3fedfdee8e6","SecondaryIPAddresses": null,"SecondaryIPv6Addresses": null,"EndpointID": "","Gateway": "","GlobalIPv6Address": "","GlobalIPv6PrefixLen": 0,"IPAddress": "","IPPrefixLen": 0,"IPv6Gateway": "","MacAddress": "","Networks": {"bridge": {"IPAMConfig": null,"Links": null,"Aliases": null,"NetworkID": "115a2351052d4f81bc4d8f1c20f87f29da1d4bb50ae3543e2d8a1675b1630dc1","EndpointID": "","Gateway": "","IPAddress": "","IPPrefixLen": 0,"IPv6Gateway": "","GlobalIPv6Address": "","GlobalIPv6PrefixLen": 0,"MacAddress": "","DriverOpts": null}}}
} ]
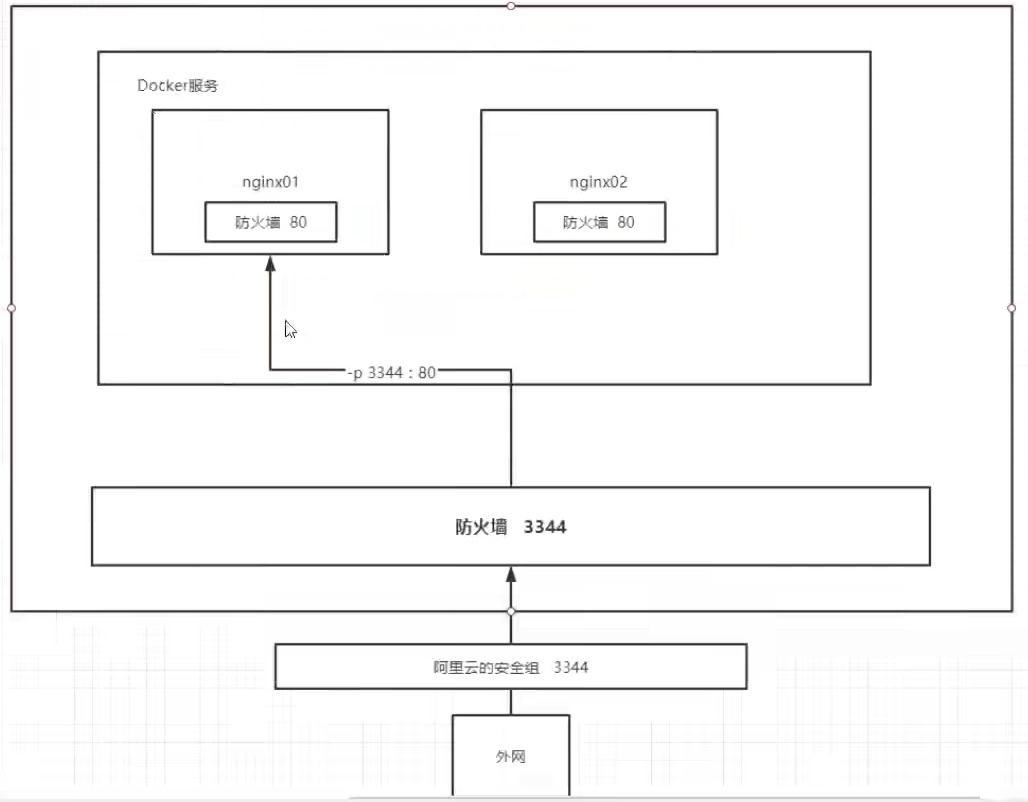
<a name="iuNUF"></a>## 5、从容器内拷贝文件到主机上- `**docker cp 容器ID:容器内路径 主机路径**`- 拷贝是一个手动过程,未来我们使用-v卷的技术,可以实现自动同步<a name="mCuiB"></a># 五、小结<a name="HuTKl"></a># 六、练习<a name="Le3f5"></a>## 1、安装部署nginx```shell[root@VM-0-15-centos ~]# docker psCONTAINER ID IMAGE COMMAND CREATED STATUS PORTS NAMES[root@VM-0-15-centos ~]# docker search nginxNAME DESCRIPTION STARS OFFICIAL AUTOMATEDnginx Official build of Nginx. 15385 [OK]jwilder/nginx-proxy Automated Nginx reverse proxy for docker con… 2061 [OK]richarvey/nginx-php-fpm Container running Nginx + PHP-FPM capable of… 816 [OK]jc21/nginx-proxy-manager Docker container for managing Nginx proxy ho… 237linuxserver/nginx An Nginx container, brought to you by LinuxS… 152tiangolo/nginx-rtmp Docker image with Nginx using the nginx-rtmp… 140 [OK]jlesage/nginx-proxy-manager Docker container for Nginx Proxy Manager 135 [OK]alfg/nginx-rtmp NGINX, nginx-rtmp-module and FFmpeg from sou… 105 [OK]jasonrivers/nginx-rtmp Docker images to host RTMP streams using NGI… 92 [OK]nginxdemos/hello NGINX webserver that serves a simple page co… 71 [OK]privatebin/nginx-fpm-alpine PrivateBin running on an Nginx, php-fpm & Al… 56 [OK]nginx/nginx-ingress NGINX and NGINX Plus Ingress Controllers fo… 55nginxinc/nginx-unprivileged Unprivileged NGINX Dockerfiles 46staticfloat/nginx-certbot Opinionated setup for automatic TLS certs lo… 24 [OK]nginx/nginx-prometheus-exporter NGINX Prometheus Exporter for NGINX and NGIN… 19schmunk42/nginx-redirect A very simple container to redirect HTTP tra… 19 [OK]nginxproxy/nginx-proxy Automated Nginx reverse proxy for docker con… 18centos/nginx-112-centos7 Platform for running nginx 1.12 or building … 15centos/nginx-18-centos7 Platform for running nginx 1.8 or building n… 13raulr/nginx-wordpress Nginx front-end for the official wordpress:f… 13 [OK]flashspys/nginx-static Super Lightweight Nginx Image 10 [OK]mailu/nginx Mailu nginx frontend 9 [OK]sophos/nginx-vts-exporter Simple server that scrapes Nginx vts stats a… 7 [OK]ansibleplaybookbundle/nginx-apb An APB to deploy NGINX 2 [OK]wodby/nginx Generic nginx 1 [OK][root@VM-0-15-centos ~]# docker pull nginxUsing default tag: latestlatest: Pulling from library/nginxe1acddbe380c: Already existse21006f71c6f: Pull completef3341cc17e58: Pull complete2a53fa598ee2: Pull complete12455f71a9b5: Pull completeb86f2ba62d17: Pull completeDigest: sha256:4d4d96ac750af48c6a551d757c1cbfc071692309b491b70b2b8976e102dd3fefStatus: Downloaded newer image for nginx:latestdocker.io/library/nginx:latest[root@VM-0-15-centos ~]# docker imagesREPOSITORY TAG IMAGE ID CREATED SIZEnginx latest dd34e67e3371 13 days ago 133MBmysql latest 5a4e492065c7 13 days ago 514MBhello-world latest d1165f221234 5 months ago 13.3kBcentos latest 300e315adb2f 8 months ago 209MB80x86/typecho latest 3437f7346b4c 2 years ago 53.9MB[root@VM-0-15-centos ~]# docker run -d --name nginx01 -p 3344:80 nginxd0850b4943fcd70f14dd895826012a77bdb219b992060fc31fea07d8f5536803[root@VM-0-15-centos ~]# docker psCONTAINER ID IMAGE COMMAND CREATED STATUS PORTS NAMESd0850b4943fc nginx "/docker-entrypoint.…" 5 seconds ago Up 4 seconds 0.0.0.0:3344->80/tcp, :::3344->80/tcp nginx01[root@VM-0-15-centos ~]# curl localhost:3344<!DOCTYPE html><html><head><title>Welcome to nginx!</title><style>body {width: 35em;margin: 0 auto;font-family: Tahoma, Verdana, Arial, sans-serif;}</style></head><body><h1>Welcome to nginx!</h1><p>If you see this page, the nginx web server is successfully installed andworking. Further configuration is required.</p><p>For online documentation and support please refer to<a href="http://nginx.org/">nginx.org</a>.<br/>Commercial support is available at<a href="http://nginx.com/">nginx.com</a>.</p><p><em>Thank you for using nginx.</em></p></body></html>

2、安装部署Tomcat
#官方的使用docker run -it --rm tomcat:9.0#我们之前的启动都是后台,停止了容器之后,容器还是可以查到 而--rm一般用来测试,用完就删除容器#下载再运行[root@VM-0-15-centos ~]# docker pull tomcat[root@VM-0-15-centos ~]# docker run -d -p 3355:8080 --name tomcat01 tomcat64dc6975f6e47c040b7c476f7a4aa8af43fff314cfc3bcc539da5524b7b1d2c5#测试访问发现找不到#进入容器[root@VM-0-15-centos ~]# docker exec -it tomcat01 /bin/bashroot@64dc6975f6e4:/usr/local/tomcat# lsBUILDING.txt LICENSE README.md RUNNING.txt conf logs temp webapps.distCONTRIBUTING.md NOTICE RELEASE-NOTES bin lib native-jni-lib webapps workroot@64dc6975f6e4:/usr/local/tomcat# cd webappsroot@64dc6975f6e4:/usr/local/tomcat/webapps# lsroot@64dc6975f6e4:/usr/local/tomcat/webapps##发现问题:1、Linux命令少了 2、没有webapps#阿里云镜像的原因。默认是最小的镜像,所有不必要的都剔除掉#保证最小的可运行环境!

#ROOT在webapps.dist目录下root@64dc6975f6e4:/usr/local/tomcat# cd webapps.distroot@64dc6975f6e4:/usr/local/tomcat/webapps.dist# lsROOT docs examples host-manager managerroot@64dc6975f6e4:/usr/local/tomcat/webapps.dist# cd ..root@64dc6975f6e4:/usr/local/tomcat# cp -r webapps.dist/* webappsroot@64dc6975f6e4:/usr/local/tomcat##再次测试,成功

若有收获,就点个赞吧
0 人点赞
