1. Controller向View传值
ViewBag
第一种方式,使用ViewBag 它是dynamic类型的,因此可以随意传值。
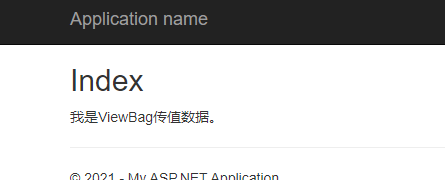
// Controllerpublic class HomeController : Controller{// GET: Homepublic ActionResult Index(){ViewBag.Content = "我是ViewBag传值数据。";return View();}}// View@{ViewBag.Title = "Index";}<h2>Index</h2>@ViewBag.Content
ViewData
第二种ViewData
一般存放一些不主要的数据。
使用方式和ViewBag不同,但它俩是一个东西。相关代码如下
public dynamic ViewBag{get{if (_dynamicViewDataDictionary == null){_dynamicViewDataDictionary = new DynamicViewDataDictionary(() => ViewData);}return _dynamicViewDataDictionary;}}public ViewDataDictionary ViewData{get{if (_viewDataDictionary == null){_viewDataDictionary = new ViewDataDictionary();}return _viewDataDictionary;}set{_viewDataDictionary = value;}}
使用方式
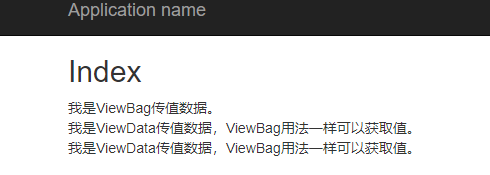
// Controllerpublic class HomeController : Controller{// GET: Homepublic ActionResult Index(){ViewBag.Content = "我是ViewBag传值数据。";ViewData["ViewData"] = "我是ViewData传值数据,ViewBag用法一样可以获取值。";return View();}}// View@{ViewBag.Title = "Index";}<h2>Index</h2>@ViewBag.Content<br />@ViewData["ViewData"]<br />@ViewBag.ViewData
TempData
存储之后,读取一次数据就被清空掉了。
本质就是Session。
public void TempDataDemo(){TempData["TempData"] = "TempData";Response.Redirect("./TempDataDemo2");}// 添加TempDataDemo2视图public ActionResult TempDataDemo2(){return View();}URL : http://localhost:63179/Home/TempDataDemoRedirect : http://localhost:63179/Home/TempDataDemo2Response : HelloTempData重新访问Url : http://localhost:63179/Home/TempDataDemo2输出为空
View(Model)
使用View方法
在Models文件夹新建Student类。
使用第二个重载方法。
public ActionResult ShowData(){return View(new Student{Id = 1,Name = "张三",Age = 18});}
生成对应的视图。使用Model属性获取数据
@model WebMvc.Models.Student@{ViewBag.Title = "ShowData";}<h2>ShowData</h2>@Model.Id@Model.Name@Model.Age
不加小写的model是弱类型视图,没有任何提示。@model里的类型一定和View方法参数里的类型一致。
2. View向Controller传值
基础
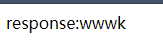
public class ViewController : Controller{public ActionResult Index(string name){return Content("response:" + name);}}
使用?name=123 可以获取到值,和Request.QueryString一样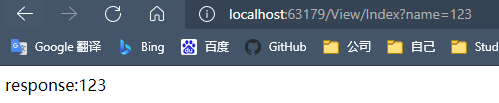
而使用post请求同样也可以获取到值。
public class ViewController : Controller{public ActionResult Index(string name){return Content("response:" + name);}public ActionResult ShowForm(){return View();}}
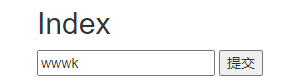
创建视图访问Index,一样可以获取到值。
@{ViewBag.Title = "ShowForm";}<h2>Index</h2><form action="/View/Index" method="post"><input type="text" name="name"/><button>提交</button></form>
使用Http特性就可以指定使用什么方式去访问。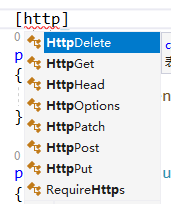
比如使用HttpGet就可以现在Index只能通过Get方式访问。
[HttpGet]public ActionResult Index(string name){return Content("response:" + name);}
使用post请求就会报404,因为没有对应的Action。
模拟登录功能(ViewModel)
在Models文件夹里,创建LoginViewModel实体,并添加验证特性。
using System.ComponentModel.DataAnnotations;namespace WebMvc.Models{public class LoginViewModel{[Required, StringLength(20, MinimumLength = 2)]public string Email { get; set; }[Required, MinLength(2)]public string Password { get; set; }}}
控制器中添加方法
public ActionResult Login(){return View();}[HttpPost]public ActionResult Login(LoginViewModel model){if (!ModelState.IsValid){return Json("输入有误!");}if (model.Email == "admin" && model.Password == "123"){return Json("Success");}else{return Json("Failed");}}
两个Login方法成对出现,无参返回视图,有参负责登录验证。
右键Login方法创建视图。选择模板Create,模型选择上面创建的。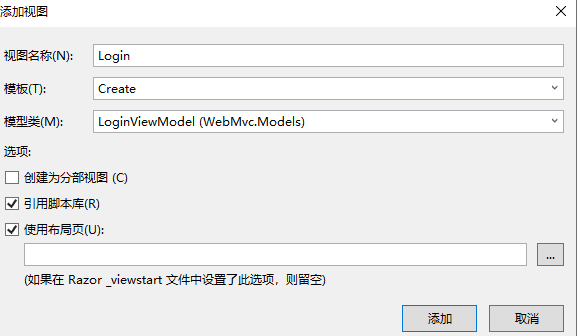
会根据模型生成Html代码加上验证。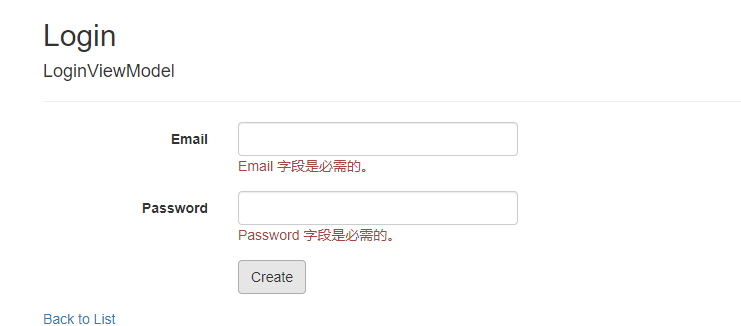
我们发现,这个Email和Password是属性的名字,但我们想要中文的。则取Model类中修改,给字段加上特性[Display]。
添加电子邮箱验证[EmailAddress]
密码框是明文的,需要修改为密码框[DataType]。
using System.ComponentModel.DataAnnotations;namespace WebMvc.Models{public class LoginViewModel{[Display(Name = "电子邮箱")][EmailAddress][Required, StringLength(20, MinimumLength = 2)]public string Email { get; set; }[Display(Name = "密码")][DataType(DataType.Password)][Required, MinLength(2)]public string Password { get; set; }}}
然后再把生成的前端代码登录按钮文字从Create修改为登录。
这个时候我们再看,就已经改变了。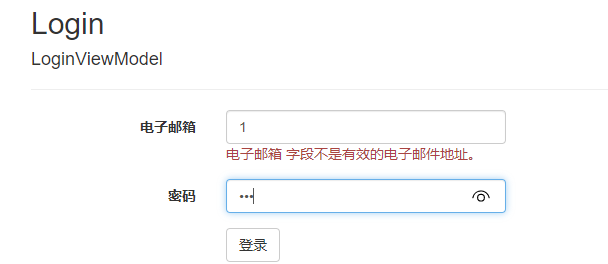
Html
Html.BeginForm()
在上面生成的前端代码中,@using (Html.BeginForm())。
代表开始生成一个表单。有12个重载,一般指使用默认的。
Html.AntiForgeryToken()
这个方法是生成一个防伪标记,用于防止仿照页面去访问。
对应的后端接口需要添加上[ValidateAntiForgeryToken]特性。
使用上面创建的ShowForm页面去访问测试。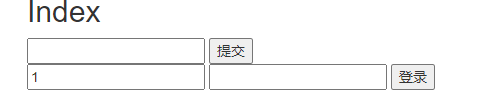

Html.ValidationSummary()
将LoginAction修改为如下
[HttpPost][ValidateAntiForgeryToken]public ActionResult Login(LoginViewModel model){if (!ModelState.IsValid){ModelState.AddModelError("", "输入有误!");return View();}if (model.Email == "admin" && model.Password == "123"){return Json("Success");}else{ModelState.AddModelError("","账号或密码错误!");return View();}}
ModelState.AddModelError("","账号或密码错误!");ValidationSummary方法将模型错误按无序列表形式显示。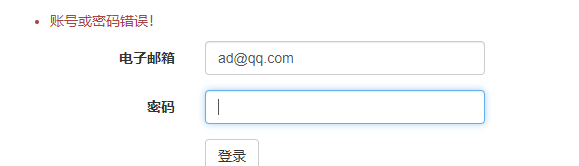
Html.LabelFor()

Html.EditorFor()

Html.ValidationMessageFor()
错误消息

若有收获,就点个赞吧
0 人点赞
