1、通过请求访问POJO类:
package work.huacai.pojo;/*** @author mycomputer*/public class LoginAction {public void execute(){System.out.println("LoginAction execute method!!!");}}
1. servlet方式:
package work.huacai.servlet;import work.huacai.pojo.LoginAction;import javax.servlet.ServletException;import javax.servlet.annotation.WebServlet;import javax.servlet.http.HttpServlet;import javax.servlet.http.HttpServletRequest;import javax.servlet.http.HttpServletResponse;import java.io.IOException;/*** @author mycomputer*/@WebServlet("/login")public class LoginServlet extends HttpServlet {@Overrideprotected void doPost(HttpServletRequest req, HttpServletResponse resp)throws ServletException, IOException {//当请求为/login时,进入到LoginServlet的doPost方法里,创建POJO类对象,执行相应方法new LoginAction().execute();}}
2. filter方式:
package work.huacai.filter;import work.huacai.pojo.LoginAction;import javax.servlet.*;import javax.servlet.annotation.WebFilter;import java.io.IOException;/*** @author mycomputer*/@WebFilter("/login")public class LoginFilter implements Filter {@Overridepublic void init(FilterConfig filterConfig) throws ServletException {}@Overridepublic void doFilter(ServletRequest servletRequest, ServletResponse servletResponse, FilterChain filterChain) throws IOException, ServletException {//当请求为/login时,拦截请求,进入到LoginFilter的doFilter方法里,//创建POJO类对象,执行相应方法new LoginAction().execute();}@Overridepublic void destroy() {}}
上面的代码存在一些问题,请求与页面跳转没有进行绑定;一个请求对应一个servlet或者Filter,灵活性不高
package work.huacai.pojo;/*** @author mycomputer*/public class LoginAction {public String execute(){System.out.println("LoginAction execute method!!!");return "success";}}
package work.huacai.filter;import javax.servlet.*;import javax.servlet.annotation.WebFilter;import javax.servlet.http.HttpServletRequest;import javax.servlet.http.HttpServletResponse;import java.io.IOException;import java.lang.reflect.InvocationTargetException;import java.util.HashMap;import java.util.Map;/*** @author mycomputer*/@WebFilter("/login")public class LoginFilter implements Filter {@Overridepublic void init(FilterConfig filterConfig) throws ServletException {}@Overridepublic void doFilter(ServletRequest servletRequest, ServletResponse servletResponse, FilterChain filterChain) throws IOException, ServletException {HttpServletResponse response = (HttpServletResponse)servletResponse;HttpServletRequest request = (HttpServletRequest)servletRequest;Map<String,String> map = new HashMap<>(10);map.put("/login","work.huacai.pojo.LoginAction");map.put("/list","work.huacai.pojo.ListAction");map.put("success","/index.jsp");map.put("error","/login.jsp");try {Class c1 = Class.forName(map.get(request.getServletPath()));//实例化对象Object obj = c1.newInstance();//调用方法Object result = c1.getMethod("execute").invoke(obj);//获取页面路径String path = map.get(result);//页面跳转response.sendRedirect(path);} catch (ClassNotFoundException | InstantiationException | IllegalAccessException | NoSuchMethodException | InvocationTargetException e) {e.printStackTrace();}}@Overridepublic void destroy() {}}
上方代码还是存在一个问题,每次绑定请求都需要向map集合中添加,需要不断地更改源代码,再重新编译;解决的方式便是通过配置文件的形式去绑定,请求与servlet或者filter的关系,当配置文件修改,不需要再去重新编译,只需要重新加载配置文件
2、MVC与三层架构
3、struts2框架
- 下载地址:https://struts.apache.org/
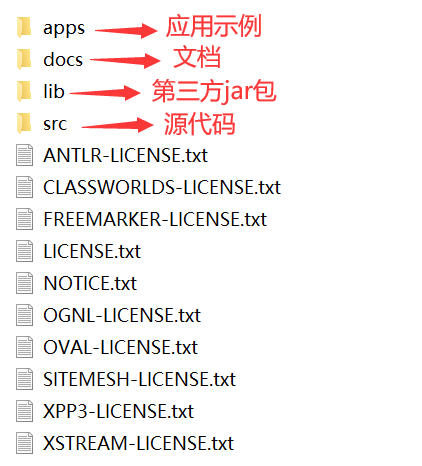
- 目录结构
- 特点:
非侵入式设计,struts2的Action类是一个POJO类,不依赖于Servlet API和Struts API
提供拦截器,可以实现AOP编程
提供类型转换器,将特殊的请求参数转换为需要的类型
输入验证,对指定方法进行验证
提供了全局范围、包范围和 Action范围的国际化资源文件管理实现
1. 搭建struts2的运行环境
- 添加struts2运行所需的最基本jar(在路径:struts-2.3.37\apps\struts2-blank\WEB-INF\lib下复制)
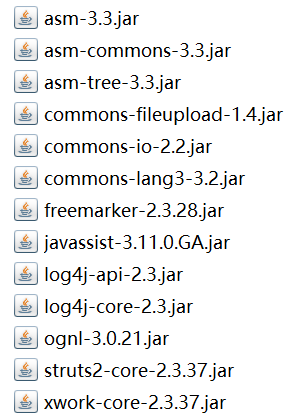
上面图中,1、2、3、8这四个jar包是用于代理的;4、5用于文件上传;6是对java.lang包的一个扩展;7是模板引擎,一个基于模板生成文本输出的通用工具;9、10是通用日志记录包;11是支持ognl表达式;12是struts2的核心包;13是xwork的核心包(Struts 2以WebWork为核心)
- 注册启动项
<filter><filter-name>struts2</filter-name><!--1.从示例中的web.xml拷贝2.在struts2-core-2.3.37.jar包下,找org\apache\struts2\dispatcher\ng\filter包的StrutsPrepareAndExecuteFilter类--><filter-class>org.apache.struts2.dispatcher.ng.filter.StrutsPrepareAndExecuteFilter</filter-class></filter><filter-mapping><filter-name>struts2</filter-name><url-pattern>/*</url-pattern></filter-mapping>
- struts.xml文件
<!--1.从示例中的src下的struts.xml拷贝2.在struts2-core-2.3.37.jar包下找.dtd文件--><!DOCTYPE struts PUBLIC"-//Apache Software Foundation//DTD Struts Configuration 2.3//EN""http://struts.apache.org/dtds/struts-2.3.dtd">
2. 实现第一个struts2程序
- 编写Action类(包名需是xxx.actions、xxx.action、xxx.struts、xxx.struts2四个中的一种,因为在注解开发时存在这么一个约定)
package work.huacai.actions;/*** @author mycomputer*/public class LoginAction {public String execute(){return "success";}}
<?xml version="1.0" encoding="UTF-8" ?><!DOCTYPE struts PUBLIC"-//Apache Software Foundation//DTD Struts Configuration 2.3//EN""http://struts.apache.org/dtds/struts-2.3.dtd"><struts><!-- namespace可以理解为是一个请求的公共前缀的提取 --><package name="user" namespace="/" extends="struts-default"><!-- 当请求地址为/login.action时,执行的work.huacai.actions.LoginAction类的execute方法 --><action name="login" class="work.huacai.actions.LoginAction"><!-- name:execute方法返回的字符串内容 --><result name="success">/success.jsp</result></action></package></struts>
3. Struts2执行流程
4. tomcat的应用管理配置
- 解决get请求的中文乱码问题(在server.xml文件如下位置,添加URIEncoding="UTF-8")
<ConnectorconnectionTimeout="20000"port="8080"protocol="HTTP/1.1"redirectPort="8443"URIEncoding="UTF-8"/>
- 找到tomcat的tomcat-users.xml文件,添加一个用户,username、password可以自定义
<role rolename="manager-gui"/><user roles="manager-gui" password="s3cret" username="tomcat"/>
- 在浏览器上输入该网址:[http://localhost:8080/manager/](http://localhost:8080/manager/),输入用户名和密码即可进入下方的页面
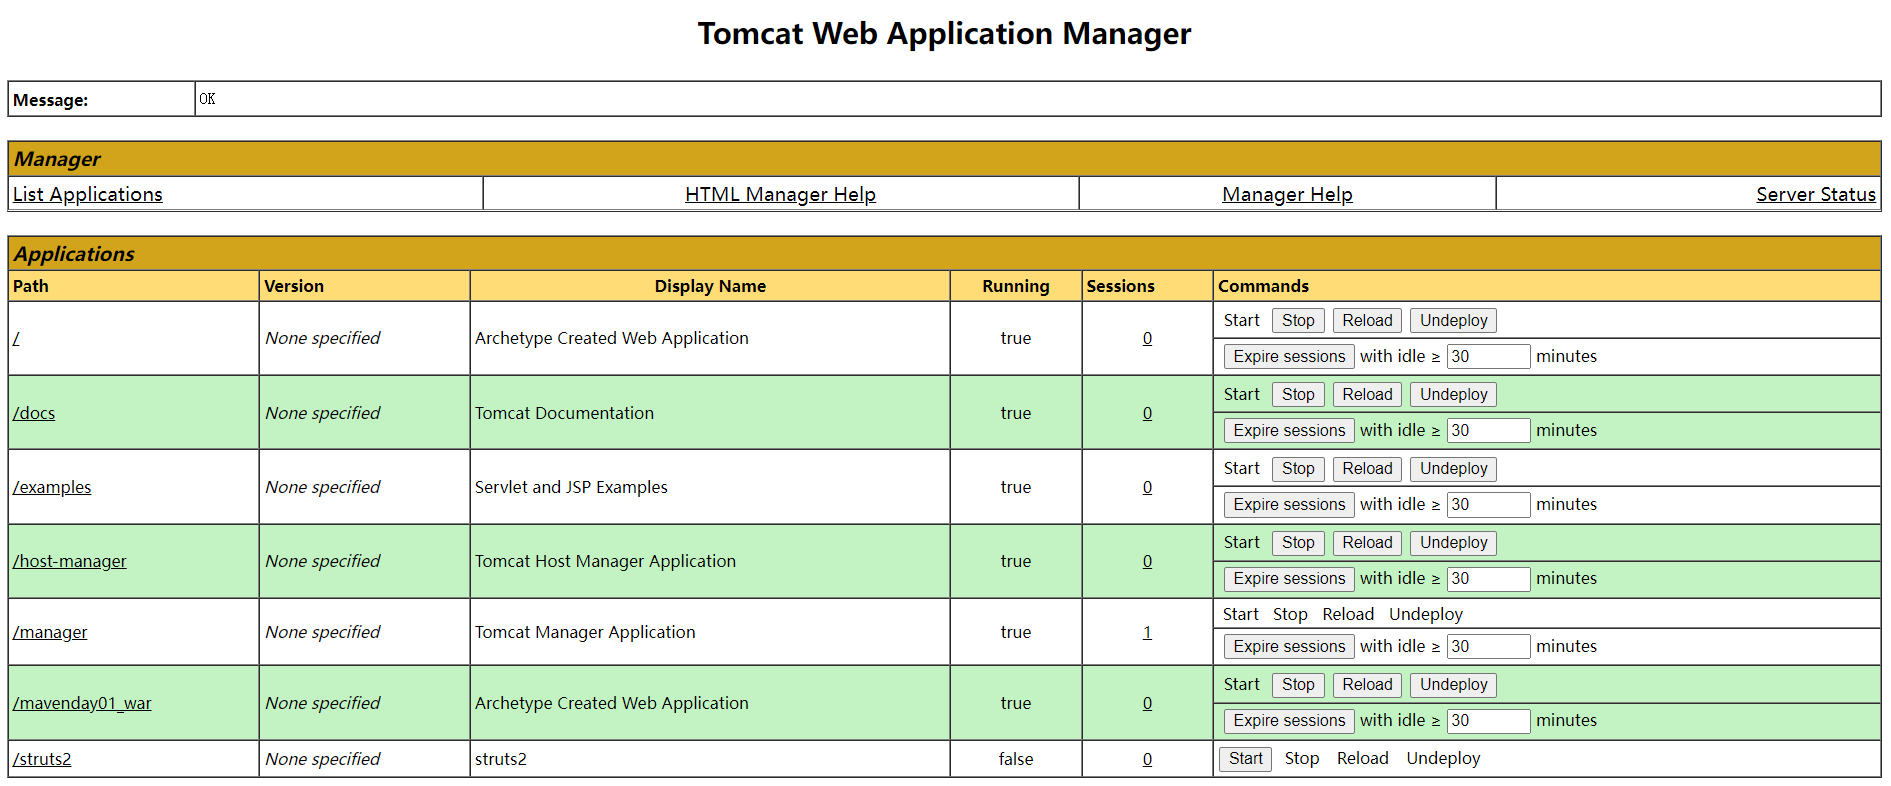
- server.xml的8080端口号修改为为80,即可输入地址时,省略8080端口号- 通过将项目部署到路径:apache-tomcat-8.0.43\webapps\ROOT,可以**在地址栏上省去项目名**
5. 路径问题
- 以斜杠开头的相对路径,前台相对路径的参照是web服务器的根路径:http://127.0.0.1:8080/;后台相对路径的参照web应用的根路径:http://127.0.0.1:8080/manager/- 不以斜杠开头的相对路径,无论前台、后台路径,其参照都是当前资源的访问路径(/test/index.jsp的访问路径是/test/,/test/index.jsp是资源路径),而不是当前资源的保存路径
jsp前台页面跳转路径建议前面加上${pageContext.request.contextPath},相当于前面加上了“/项目名” jsp使用base标签: 1、添加脚本: <% //相当于:http://localhost:8080/manager/ String base = request.getContextPath()+”/“; String url = request.getScheme()+”://“+request.getServerName()+”:” +request.getServerPort()+base; %> 2、标签中添加
标签
4、struts-default.xml
struts-default.xml是Struts 2 框架的基础配置文件,为框架提供默认设置,这个文件包含在Struts2-core-2.0.11.jar中,由框架自动加载
5、default.properties
该文件对struts2框架进行了默认配置,开发者想要修改某些属性值得话,可以在src目录下新建一个文件struts.properties然后写入想修改的属性和值
default.properties中的信息可以在struts.xml中使用元素constant来进行配置,一般我们选择其一就行,不推荐交叉使用,对于上传文件属性maxsize而言,constant优先级高于default.properties,即如果两处都配置的话,constant配置的生效
6、struts-plugin.xml
struts2与第三方插件的整合配置文件,如果不是开发插件的话,是不需要编写这个配置文件的,一般是使用插件
7、struts.properties
可以通过 struts.properties 来管理 Struts2框架中定义的大量常量。struts.properties文件是一个标准的properties文件,其格式是 key-value ,key表示的是Struts2框架中的常量,而value则是其常量值
struts.properties文件必须放在 Web 应用下的类加载路径下才能使用,即 WEB-INF/classes 路径下(在 eclipse 中,通常直接将其放在 src 路径下就可以)
struts.properties文件中的属性同样也可以在struts.xml文件中配置,只是源于struts配置文件模块化管理思路,将其分文件管理,增加了程序的可读性,以及降低了后期维护的难度。小型的项目可以将属性直接配置在struts.xml文件中
8、配置文件优先级
web.xml > struts.properties > struts.xml > default.properties
9、struts.xml属性
1. package
<!-- package的name属性和namespace属性存在一定的命名规范 --><package name="xxx-ooo-user" namespace="/xxx/ooo/user" extends="struts-default"></package>
2. action-class属性
<!--package work.huacai.actions;/*** @author mycomputer*/public class LoginAction {public String execute(){return "success";}}如果name为“login”的action所绑定的类的代码与上方类似,只是跳转到name = success 所绑定的页面,没有其他作用时,class属性可以直接省略,省略之后,访问xxx/ooo/user/login请求时,会调用com.opensymphony.xwork2.ActionSupport类的execute方法--><package name="xxx-ooo-user" namespace="/xxx/ooo/user" extends="struts-default"><action name="login"><result name="success">/success.jsp</result></action></package>
3. action-method属性
<package name="xxx-ooo-user" namespace="/xxx/ooo/user" extends="struts-default"><!-- method属性可以修改action方法的名字,即方法名可以是除execute外的其他名称 --><action name="login" class="work.huacai.actions.LoginAction" method="test"><result name="success">/success.jsp</result></action></package>
4. result-name属性
<package name="xxx-ooo-user" namespace="/xxx/ooo/user" extends="struts-default"><action name="login" class="work.huacai.actions.LoginAction" method="execute"><!-- 如果name="success"可以省略不写 --><result>/success.jsp</result></action></package>
5. result-请求转发与重定向
<package name="xxx-ooo-user" namespace="/xxx/ooo/user" extends="struts-default"><action name="login" class="work.huacai.actions.LoginAction"><!-- type默认就是dispatcher(请求转发) --><result type="dispatcher">/success.jsp</result></action></package>
<package name="xxx-ooo-user" namespace="/xxx/ooo/user" extends="struts-default"><action name="login" class="work.huacai.actions.LoginAction"><result type="redirect">/success.jsp</result><!-- 通过向地址栏中放入参数来获取数据,jsp通过 param.地址的参数名称 获取参数值 --><result type="redirect">/success.jsp?uname=${name}&uage=${age}</result><!--上方跳转传参方式建议替换为以下方式 --><result type="redirect"><param name="location">/success.jsp</param><param name="uname">${name}</param><!-- ${xx}ognl表达式 --><param name="uage">${age}</param></result></action></package>
<package name="xxx-ooo-user" namespace="/xxx/ooo/user" extends="struts-default"><action name="login" class="work.huacai.actions.LoginAction"><result type="redirectAction"><!-- actionName后面不用加.action或者其他后缀 --><param name="actionName">list</param><param name="uname">${name}</param><param name="uage">${age}</param></result></action><action name="list" class="work.huacai.actions.ListAction"><result>/list.jsp</result></action></package>
<package name="xxx-ooo-user" namespace="/xxx/ooo/user" extends="struts-default"><action name="login" class="work.huacai.actions.LoginAction"><!-- 后面不用加.action或者其他后缀 --><result type="chain">list</result></action><action name="list" class="work.huacai.actions.ListAction"><result>/list.jsp</result></action></package>
6. 全局视图配置
<package name="xxx-ooo-user" namespace="/xxx/ooo/user" extends="struts-default"><!--包范围全局视图,用于提取公共的result,需在action的前面--><global-results><result name="test">/test.jsp</result></global-results><action name="login" class="work.huacai.actions.LoginAction"><result type="chain">list</result></action><action name="list" class="work.huacai.actions.ListAction"><result>/list.jsp</result></action></package>
<!-- 该包仅作为一个全局视图包,不需要action则可以将namespace属性去除,将其定义为abstract --><package name="basepackage" extends="struts-default" abstract="true"><!--包范围全局视图,用于提取公共的result,需在action的前面--><global-results><result name="test">/test.jsp</result></global-results></package><!-- 让其他的包继承上面的全局视图包 --><package name="xxx-ooo-user" namespace="/xxx/ooo/user" extends="basepackage"><action name="login" class="work.huacai.actions.LoginAction"><result type="chain">list</result></action><action name="list" class="work.huacai.actions.ListAction"><result>/list.jsp</result></action></package>
7. 为应用指定多个配置文件
- 随着应用规模的增加,系统中Action的数量也会大量增加,导致struts.xml配置文件变得非常臃肿,为了避免struts.xml文件过于庞大、臃肿,提高Struts.xml文件的可读性,我们可以将一个struts.xml配置文件分解成多个配置文件,然后再通过struts.xml文件中包含其他配置文件
<struts><!--这种包含其实是struts2框架会自动地将这些文件拷贝到struts.xml文件中,所以每个xml文件的package的name、action是不可以重复的--><include file="department.xml"/> 一个模块使用一个配置文件<include file="employee.xml"/><!-- 当文件名前缀相同,可以通过通配符包含这些文件 --><include file="manager-*.xml"/><!-- 不需要在resources前面加上classpath: --><include file="classpath:resources/manager-*.xml"/></struts>
10、在Action中获取servletAPI
1. 通过ActionContext获取
package work.huacai.actions;import com.opensymphony.xwork2.ActionContext;/*** @author mycomputer*/public class ListAction {public String execute(){//这种方式获取到的仅是servletAPI的域属性空间,不是真正的API,且无法获取responseActionContext.getContext().getSession().put("session","session_value");ActionContext.getContext().put("req","req_value");ActionContext.getContext().getApplication().put("Application","Application_value");return "success";}}
2. 通过ServletActionContext获取
ServletActionContext.getRequest().setAttribute("req","req_value");ServletActionContext.getRequest().getSession().setAttribute("session","session_value");ServletActionContext.getServletContext().setAttribute("Application","Application_value");
3. 通过实现特定的接口获取
package work.huacai.actions;import org.apache.struts2.interceptor.ApplicationAware;import org.apache.struts2.interceptor.RequestAware;import org.apache.struts2.interceptor.SessionAware;import java.util.Map;/*** 不建议,这种方式污染了代码,不是一个POJO类了* @author mycomputer*/public class ListAction implements RequestAware, SessionAware, ApplicationAware {private Map<String, Object> request;private Map<String, Object> session;private Map<String, Object> application;public String execute(){request.put("req","req_value");session.put("session","session_value");application.put("app","app_value");return "success";}@Overridepublic void setRequest(Map<String, Object> map) {this.request = map;}@Overridepublic void setApplication(Map<String, Object> map) {this.session = map;}@Overridepublic void setSession(Map<String, Object> map) {this.application = map;}}
11、OGNL与值栈
OGNL是Object-Graph Navigation Language的缩写,一种功能强大的表达式语言,是一个第三方开源项目,struts框架用OGNL进行表达式的计算,可以存取对象的任意属性,调用对象的方法,遍历整个对象的结构图,实现字段类型转化
相对于其它表达式语言,它提供了更加丰富的功能:
- 支持对象方法调用
- 支持静态方法调用(需要通过在struts2的配置文件struts.xml中设置常量struts.xml中设置常量struts.ognl.allowStaticMethodAccess的值为true进行开启)和常量访问,表达式的格式为:@[全限定类名]@[方法名 | 常量名]
- 可以操作集合对象
- 可以直接创建对象
<constant name="struts.ognl.allowStaticMethodAccess" value="true"/>
<%@ page contentType="text/html;charset=UTF-8" language="java" %><%@taglib uri="/struts-tags" prefix="s"%><html><head><title>success</title></head><body>PI = <s:property value="@java.lang.Math@PI"/>random = <s:property value="@java.lang.Math@random() * 100"/></body></html>
在struts2框架里面,ognl的上下文是ActionText,ognl的根对象是是值栈;在ActionText对象之中还有application、session、request、parameters、attr(page、request、session、then application scopes),对于根对象的访问可以直接访问,对于非根对象的访问需要加#
1. 值栈(valueStack)
- ValueStack是一个接口,它的实现只有一个OgnlValueStack,在OgnlValueStack之中有一个属性root,类型是CompoundRoot,而CompoundRoot其实是一个栈结构,且继承了ArrayList;还有一个属性context,类型是Map<String, Object>,当OgnlValueStack的构造方法调用后,会构建一个CompoundRoot类型的对象应用赋给属性root,并且会将Ognl构建的context对象的引用赋给属性context,从而将Ognl的context与OgnlValueStack的context属性联系
2. 值栈的获取
- 当一个 Action请求到来时,不仅会创建一个 Action 实例,还会创建一个 ValueStack对象,用于存放当前Action运行过程中的相关数据。当该请求结束,Action实例消失,用于记录其运行期间数据的栈也就没有了意义。所以,当请求结束时,同时需要将值栈对象销毁,即值栈的生命周期与请求Request的相同。为了保证这一点,就将值栈对象通过setAttribute()方法,将其放入到了 request域属性中,并将该属性的key以常量的形式保存在ServletActionContext 中。所以,为了获取值栈对象,首先需要获取到Request对象,然后再获取到其 key,这样才能获取到值栈对象。这个过程相对是比较麻烦的- 值栈的实质是**request中的一个属性值**,这个属性的名称为:struts.valueStack,保存在ServletActionContext的**常量 STRUTS_ VALUESTACK_KEY **中
package work.huacai.actions;import com.opensymphony.xwork2.util.ValueStack;import org.apache.struts2.ServletActionContext;/*** @author mycomputer*/public class ListAction {public String execute(){ValueStack valueStack = (ValueStack) ServletActionContext.getRequest().getAttribute(ServletActionContext.STRUTS_VALUESTACK_KEY);return "success";}}
3. context属性的别名ActionContext
- 在 Struts2中,值栈的context属性所起的作用是比较大的,且在代码中需要经常访问。但从以上分析可知,要想获取到context 属性,首先要获取到值栈对象,而获取值栈对象本身就是个比较麻烦的过程,这就导致获取值栈的 context属性会更加麻烦。- 为了方便获取值恚的context属性Struts2专门为其又起了个别名---- ActionContext,通过ActionContext的getContext()就可以直接获取到值栈的context属性。- 无论是 ActionContext中存放的非根对象,还是值栈中 context 中存放的非根对象,它们均使用了同一个Map。即它们是同一个对象。
package actions;import com.opensymphony.xwork2.ActionContext;import com.opensymphony.xwork2.util.ValueStack;import org.apache.struts2.ServletActionContext;import java.util.Map;/*** @author mycomputer*/public class VauleStackTest {public String execute(){//获取ActionContext的context属性ActionContext actionContext = ActionContext.getContext();actionContext.put("key","ActionContext");//获取ValueStack的context属性String key = ServletActionContext.STRUTS_VALUESTACK_KEY;ValueStack valueStack = (ValueStack)ServletActionContext.getRequest().getAttribute(key);Map<String, Object> context = valueStack.getContext();context.put("key","context");return "success";}}
4. 值栈获取第二种方式
package actions;import com.opensymphony.xwork2.ActionContext;import com.opensymphony.xwork2.util.ValueStack;/*** @author mycomputer*/public class VauleStackTest {public String execute(){//通过ActionContext获取值栈对象ValueStack valueStack = ActionContext.getContext().getValueStack();return "success";}}
查看OgnlValueStack类中的peek()、pop()、push()方法可知,对valueStack对象的栈的操作,本质是对root栈对象的操作;从宏观上可以直接说值栈就是根对象。但,其实根对象指的是值栈的root对象,而非根对象是值栈的context对象。
5. 值栈操作
5.1 向root中添加无名参数(显示放入)
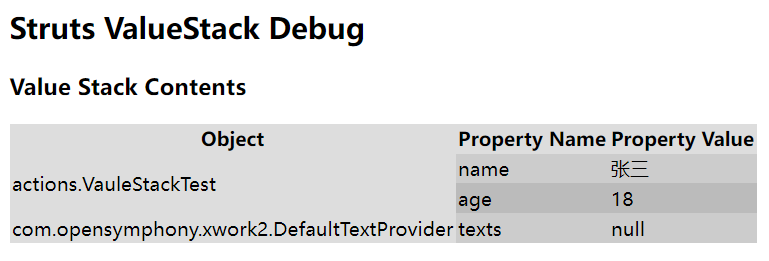
package actions;import com.opensymphony.xwork2.ActionContext;import com.opensymphony.xwork2.util.ValueStack;import entity.Student;/*** @author mycomputer*/public class VauleStackTest {public String execute(){ValueStack valueStack = ActionContext.getContext().getValueStack();Student student = new Student("张三",18);Student student1 = new Student("李四",20);valueStack.push(student);valueStack.getRoot().push(student1);return "success";}}
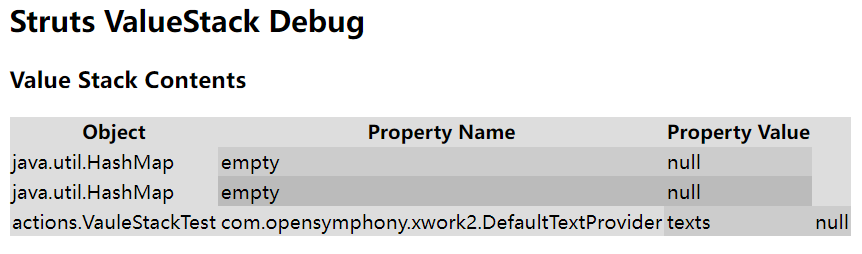
<%@ page contentType="text/html;charset=UTF-8" language="java" %><%@taglib uri="/struts-tags" prefix="s"%><html><head><title>success</title></head><body><s:debug/><s:property value="name"/><s:property value="age"/></body></html>

5.2 向root添加有名对象(显示放入)
package actions;import com.opensymphony.xwork2.ActionContext;import com.opensymphony.xwork2.util.ValueStack;import entity.Student;import java.util.HashMap;import java.util.Map;/*** @author mycomputer*/public class VauleStackTest {public String execute(){ValueStack valueStack = ActionContext.getContext().getValueStack();Map<String,Student> map = new HashMap<>(10);Student student = new Student("张三",18);map.put("student",student);//向值栈中添加mapvalueStack.push(map);Student student1 = new Student("李四",20);//通过set方法添加,会判断栈顶是否为map,如果不是,则会创建一个mapvalueStack.set("student1",student1);return "success";}}
<%@ page contentType="text/html;charset=UTF-8" language="java" %><%@taglib uri="/struts-tags" prefix="s"%><html><head><title>success</title></head><body><s:debug/><s:property value="name"/><s:property value="age"/><s:property value="student.age"/><s:property value="student1.age"/></body></html>
5.3 将root作为ArrayList放入数据(显示放入)
package actions;import com.opensymphony.xwork2.ActionContext;import com.opensymphony.xwork2.util.ValueStack;import entity.Student;import java.util.HashMap;import java.util.Map;/*** @author mycomputer*/public class VauleStackTest {public String execute(){ValueStack valueStack = ActionContext.getContext().getValueStack();Map<String,Student> map = new HashMap<>(10);Student student = new Student("张三",18);map.put("student",student);Student student1 = new Student("李四",20);Student student3 = new Student("王五",22);//向值栈中添加mapvalueStack.push(map);//通过set方法添加valueStack.set("student1",student1);//将root作为ArrayList放入数据valueStack.getRoot().add(student3);return "success";}}

5.4 向root隐式放入数据
package actions;/*** @author mycomputer*/public class VauleStackTest {private String name;private int age;public String getName() {return name;}public void setName(String name) {this.name = name;}public int getAge() {return age;}public void setAge(int age) {this.age = age;}public String execute(){name = "张三";age = 18;return "success";}}
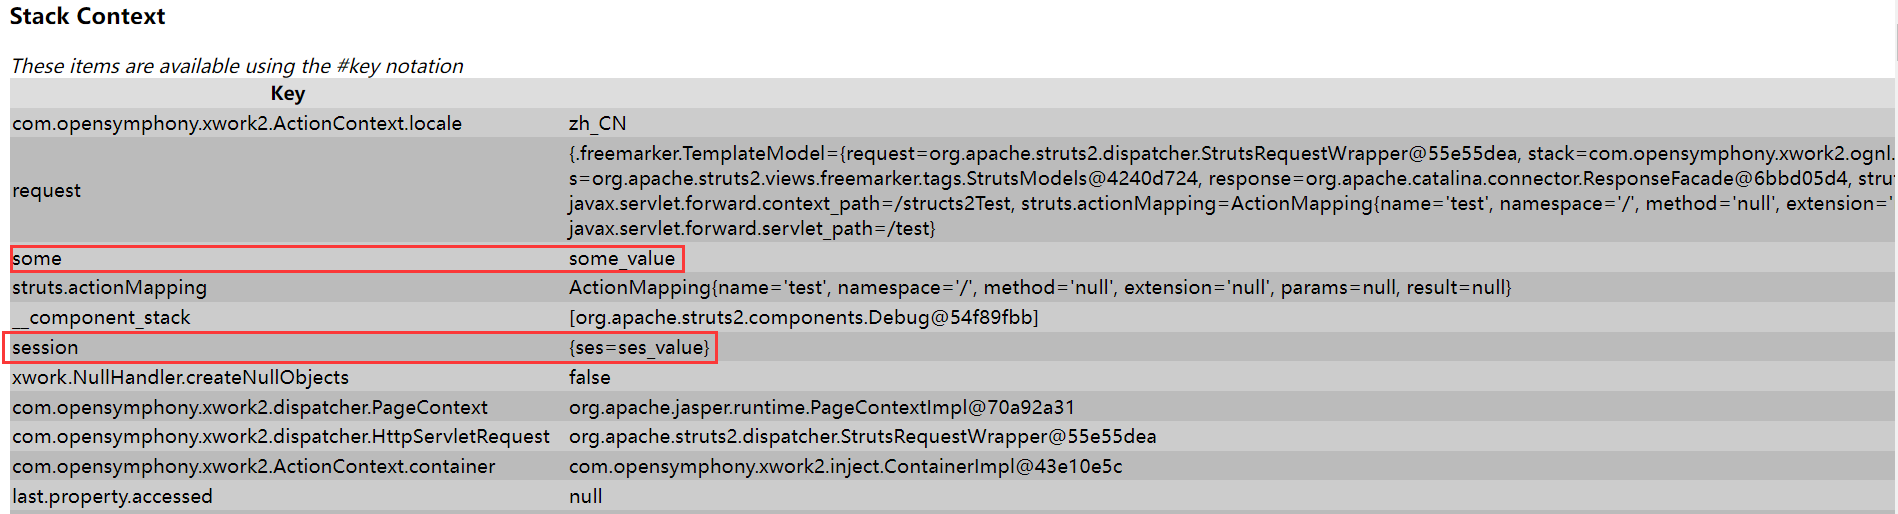
5.5 向context中显式放入数据
package actions;import com.opensymphony.xwork2.ActionContext;/*** @author mycomputer*/public class VauleStackTest {private String name;private int age;public String getName() {return name;}public void setName(String name) {this.name = name;}public int getAge() {return age;}public void setAge(int age) {this.age = age;}public String execute(){ActionContext context = ActionContext.getContext();context.put("some","some_value");context.put("req","req_value");context.getSession().put("ses","ses_value");context.getApplication().put("app","app_value");return "success";}}
<%@ page contentType="text/html;charset=UTF-8" language="java" %><%@taglib uri="/struts-tags" prefix="s"%><html><head><title>success</title></head><body><s:debug/><s:property value="#request.req"/><s:property value="#session.ses"/><s:property value="#application.app"/><s:property value="#some"/></body></html>
5.6 向context中隐式放入数据
package actions;import com.opensymphony.xwork2.ActionContext;/*** @author mycomputer*/public class LoginAction {private String name;private int age;public String getName() {return name;}public void setName(String name) {this.name = name;}public int getAge() {return age;}public void setAge(int age) {this.age = age;}public String zhuce(){name = "张三";age = 18;ActionContext context = ActionContext.getContext();context.put("name","赵六");context.put("age",20);return "success";}}
<%@ page contentType="text/html;charset=UTF-8" language="java" %><%@taglib uri="/struts-tags" prefix="s"%><html><head><title>success</title></head><body><s:debug/><!-- 底层执行的是request.getAttribute("key"); --><s:property value="#name"/><s:property value="#age"/><!-- 隐式的放入数据有以下两种 --><s:property value="#parameters.name"/><!-- 底层执行的是request.getParameter("name"); --><s:property value="#parameters.age"/><s:property value="#action.name"/><s:property value="#action.age"/></body></html>
<%@ page contentType="text/html;charset=UTF-8" language="java" %><html><head><title>注册页面</title></head><body><form action="zhuce" method="post">名字:<input type="text" name="name"><br>年龄:<input type="password" name="age"><br><input type="submit" value="注册"></form></body></html>
5.7 root中数据的加载顺序
package actions;import com.opensymphony.xwork2.ActionContext;/*** @author mycomputer*/public class VauleStackTest {private String name;private int age;public String getName() {return name;}public void setName(String name) {this.name = name;}public int getAge() {return age;}public void setAge(int age) {this.age = age;}public String execute(){ActionContext.getContext().put("value","context_value");return "success";}}
<%@ page contentType="text/html;charset=UTF-8" language="java" %><%@taglib uri="/struts-tags" prefix="s"%><html><head><title>success</title></head><body><%--在 Action中仅向context放入某数据value后,页面无论是通过#从context中读取数据,--%><%--还是不使用#直接从 root中读取数据,均可得到放入的值。会先去root中找,再去context中找--%><s:property value="value"/><br><s:property value="#value"/><br></body></html>
5.8 request中数据的加载顺序
package actions;import com.opensymphony.xwork2.ActionContext;import org.apache.struts2.ServletActionContext;/*** @author mycomputer*/public class VauleStackTest {private String name;private int age;public String getName() {return name;}public void setName(String name) {this.name = name;}public int getAge() {return age;}public void setAge(int age) {this.age = age;}public String execute(){ActionContext.getContext().put("value","context_value");ActionContext.getContext().getValueStack().set("value","request_value");ServletActionContext.getRequest().setAttribute("value","req_value");return "success";}}
<%@ page contentType="text/html;charset=UTF-8" language="java" %><%@taglib uri="/struts-tags" prefix="s"%><html><head><title>success</title></head><body><%--当前的request并不是servletAPI中的request,而是struts2封装后的request;--%><%--request.value底层执行的是request.getAttribute("some") --%><%--request.some被Struts2包装后的查找顺序是:--%><%--1、request域空间--%><%--2、root--%><%--3、context--%><s:property value="value"/><br><s:property value="#request.value"/><br><%--运行结果:--%><%--request_value--%><%--req_value--%></body></html>
5.9 创建和遍历list
<%@ page contentType="text/html;charset=UTF-8" language="java" %><%@taglib uri="/struts-tags" prefix="s"%><html><head><title>success</title></head><body><%-- set标签定义的对象均存于context中 --%><s:set name="list" value="{'张三','李四','王五'}"/><%-- iterator标签默认会将当前的迭代对象放入到值栈栈顶 --%><s:iterator value="#list"><%-- property标签默认会输出值栈栈顶元素 --%><s:property/><br></s:iterator></body></html>
5.10 创建和遍历Map
<s:set name="map" value="#{'phone':'123456','email':'234567'}"/><s:iterator value="#map"><s:property/><br></s:iterator><s:iterator value="#map" var="entry"><s:property value="entry"/><br></s:iterator><s:iterator value="#map"><s:property value="key"/> = <s:property value="value"/><br></s:iterator>
5.11 集合元素的判断
<s:set name="list" value="{'张三','李四','王五'}"/><s:property value="'张三' in #list"/><s:property value="'张三' not in #list"/>
5.12 集合投影
<%-- 创建三个对象 --%><s:bean name="entity.Student" id="student1"><%--字符串需要加上单引号--%><s:param name="name" value="'张三'"/><s:param name="age" value="18"/></s:bean><s:bean name="entity.Student" id="student2"><s:param name="name" value="'李四'"/><s:param name="age" value="20"/></s:bean><s:bean name="entity.Student" id="student3"><s:param name="name" value="'王五'"/><s:param name="age" value="22"/></s:bean><s:set name="students" value="{#student1,#student2,#student3}"/><s:iterator value="#students"><%-- 调用的是对象的toString方法 --%><s:property/><br></s:iterator><%-- 集合投影 --%><s:set name="students1" value="#students.{name}"/><s:iterator value="#students1"><s:property/><br></s:iterator>
5.13 集合查询
<%-- 获取满足条件的所有元素 --%><s:iterator value="#students.{?#this.age > 18}"><s:property/><br></s:iterator><br><%-- 获取满足条件的第一个元素 --%><s:iterator value="#students.{^#this.age > 18}"><s:property/><br></s:iterator><br><%-- 获取满足条件的最后一个元素 --%><s:iterator value="#students.{$#this.age > 18}"><s:property/><br></s:iterator>
6. 动态调用方法
6.1 第一种方式
<?xml version="1.0" encoding="UTF-8" ?><!DOCTYPE struts PUBLIC"-//Apache Software Foundation//DTD Struts Configuration 2.3//EN""http://struts.apache.org/dtds/struts-2.3.dtd"><struts><!-- 设置动态方法调用为开启状态 --><constant name="struts.enable.DynamicMethodInvocation" value="true"/><package name="zhuce" namespace="/" extends="struts-default"><!-- 在浏览器/test后面加上 “!方法名”便可以动态的执行相应的方法 --><action name="test" class="actions.VauleStackTest"><result>/success.jsp</result></action></package></struts>
6.2 第二种方式(建议)
<?xml version="1.0" encoding="UTF-8" ?><!DOCTYPE struts PUBLIC"-//Apache Software Foundation//DTD Struts Configuration 2.3//EN""http://struts.apache.org/dtds/struts-2.3.dtd"><struts><package name="zhuce" namespace="/" extends="struts-default"><!-- 在浏览器/test后面加上 “_方法名”便可以动态的执行相应的方法,_也可以是!或者不写,建议是_;1表示第一个*的位置 --><action name="test_*" class="actions.VauleStackTest" method="{1}"><result>/success.jsp</result></action></package></struts>
7. 接受请求参数
7.1 属性驱动
package actions;/*** @author mycomputer*/public class LoginAction {private String name;private int age;public String getName() {return name;}public void setName(String name) {this.name = name;}public int getAge() {return age;}public void setAge(int age) {this.age = age;}public String zhuce(){//通过getter、setter方法接收参数,适用于表单数据接收name = "张三";age = 18;return "success";}}
7.2 域驱动
package actions;import entity.Student;/*** @author mycomputer*/public class LoginAction {//域属性private Student student;public Student getStudent() {return student;}public void setStudent(Student student) {this.student = student;}public String zhuce(){System.out.println(student);return "success";}}
<%@ page contentType="text/html;charset=UTF-8" language="java" %><html><head><title>注册页面</title></head><body><%--<s:set name="student" value=""/>--%><form action="zhuce" method="post">名字:<input type="text" name="student.name"><br>年龄:<input type="password" name="student.age"><br><input type="submit" value="注册"></form></body></html>
<%@ page contentType="text/html;charset=UTF-8" language="java" %><%@taglib uri="/struts-tags" prefix="s"%><html><head><title>success</title></head><body><s:property value="student.name"/><s:property value="student.age"/></body></html>
7.3 模型驱动
package actions;import com.opensymphony.xwork2.ModelDriven;import entity.Student;/*** @author mycomputer*/public class LoginAction implements ModelDriven<Student> {private Student student;@Overridepublic Student getModel() {if (student == null){student = new Student();}return student;}public String zhuce(){System.out.println(student);return "success";}}
<%@ page contentType="text/html;charset=UTF-8" language="java" %><html><head><title>注册页面</title></head><body><%--<s:set name="student" value=""/>--%><form action="zhuce" method="post">名字:<input type="text" name="name"><br>年龄:<input type="password" name="age"><br><input type="submit" value="注册"></form></body></html>
<%@ page contentType="text/html;charset=UTF-8" language="java" %><%@taglib uri="/struts-tags" prefix="s"%><html><head><title>success</title></head><body><s:property value="name"/><s:property value="age"/></body></html>
7.4 集合数据接收(域属性的扩展)
package actions;import entity.Student;import java.util.List;/*** @author mycomputer*/public class LoginAction {/*** 多个对象数据使用集合*/private List<Student> student;public List<Student> getStudent() {return student;}public void setStudent(List<Student> student) {this.student = student;}public String zhuce(){System.out.println(student);return "success";}}
<%@ page contentType="text/html;charset=UTF-8" language="java" %><html><head><title>注册页面</title></head><body><%--<s:set name="student" value=""/>--%><form action="zhuce" method="post">名字1:<input type="text" name="student[0].name"><br>年龄1:<input type="password" name="student[0].age"><br>名字2:<input type="text" name="student[1].name"><br>年龄2:<input type="password" name="student[1].age"><br><input type="submit" value="注册"></form></body></html>
<%@ page contentType="text/html;charset=UTF-8" language="java" %><%@taglib uri="/struts-tags" prefix="s"%><html><head><title>success</title></head><body><s:property value="student[0].name"/><s:property value="student[0].age"/><s:property value="student[1].name"/><s:property value="student[1].age"/></body></html>
Action是多例的,在web中多个用户同时进行访问,会为每个用户创建一个Action实例,接受来自不同用户的内容,各个用户之间的Action互不相干,所以Action是线程安全的
回顾: servlet是单实例的,对于同一个业务web容器只会创建一个Servlet实例,是线程共享的,所以对于Servlet的使用,定义成员变量可能会导致线程安全问题

若有收获,就点个赞吧
0 人点赞
