WSL概要
适用于 Linux 的 Windows 子系统【WSL】可让开发人员按原样运行 GNU/Linux 环境 - 包括大多数命令行工具、实用工具和应用程序 - 且不会产生传统虚拟机或双启动设置开销。
WSL1架构
This layer implements Linux syscalls on top of the Windows kernel and is what enables Linux binaries to run without modifcation; when a Linux binary runs and makes syscalls, it is the WSL translation layer that it is invoking and that makes the conversion into calls to the Windows kernel. 
WSL2架构
Te big differences come with the use of what the documentation refers to as a Lightweight utility virtual machine (see https://docs.microsoft.com/en-us/windows/wsl/wsl2-about ). This virtual machine has a rapid startup that only consumes a small amount of memory. As you run processes that require memory, the virtual machine dynamically grows its memory usage. Better still, as that memory is freed within the virtual machine, it is returned to the host!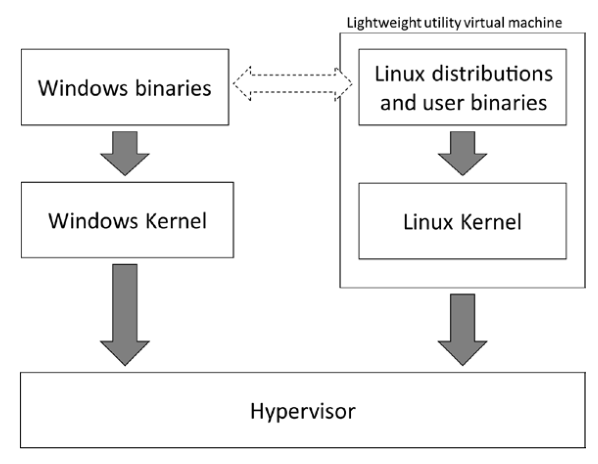
最新版本的 WSL 使用 Hyper-V 体系结构来实现其虚拟化。 此体系结构将在“虚拟机平台”可选组件中提供。
LINUX内核开源地址https://github.com/microsoft/WSL2-Linux-Kernel
安装
Pre条件
To run WSL 2, you need to be on version 1903 or higher with OS build 18362 or higher.【winver可查看】
- 方式1:
- wsl. exe —install
- 有的还不支持
方式2:
- dism.exe /online /enable-feature /featurename:Microsoft-Windows-Subsystem-Linux /all /norestart
- dism.exe /online /enable-feature /featurename:VirtualMachinePlatform /all /norestart
Linux Distribution
http://aka.ms/wsl2kernel 分发版的列表选择安装
或者在Microsof Store选择安装配置文件
wsl.conf:每个linux运行环境的配置,which provides a per-distro confguration
- wsl. conf fle is located in the /etc/wsl.conf fle in each distro
- . wslconfig :全局的配置,which provides global confguration options.
wsl.conf
[automount]
enabled = true # control host drive mounting (e. g. /mnt/c)
mountFsTab = true # process /etc/fstab for additional mounts
root = /mnt/ # control where drives are mounted
[interop]
enabled = true # allow WSl to launch Windows processes
appendWindowsPath = true # add Windows PATH to $PATH in WSL
[network]
generateHosts = true
generateResolvConf = true
[user]
default=stuart
详细参考地址
https://docs.microsoft.com/en-us/windows/wsl/wsl-config#configure-per-distro-launch-settings-with-wslconf
. wslconfig
C: \Users\
[wsl2]
memory=4GB
processors=2
localhostForwarding=true
swap=6GB
swapFile=D: \Temp\WslSwap. Vhdx
详细参考地址
https://docs.microsoft.com/en-us/windows/wsl/wsl-config#configure-global-options-with-wslconfig
参考
https://docs.microsoft.com/zh-cn/windows/wsl/install-manual 命令行安装
https://docs.microsoft.com/zh-cn/windows/wsl/wsl2-faq 常见问题
https://docs.microsoft.com/en-us/windows/wsl/wsl-config
https://hub.fastgit.org/PacktPublishing/Windows-Subsystem-for-Linux-2-WSL-2-Tips-Tricks-and-Techniques/tree/main/chapter-10
Windows LINUX互操作性
Windows查看Linux的文件内容
资源管理器中输入这个可以直接查看运行的linux实例的内容 \wsl$\
管道互操作性例子
PS C: > Get-Childitem $env: SystemRoot | ForEach-Object {$_. Name. Substring(0, 1) . ToUpper() } | wsl bash -c “sort | uniq -c”
PS C: > wsl bash -c “ls /usr/bin | cut -c1-1” | Group-Object
Linux下
默认挂载/mnt/,如c盘/mnt/c
cat /mnt/c/example. Txt
Windows的PATH变量在linux可见
$ powershell. exe -C “Get-Content . /wsl. ps1” | wc -l
echo $PWD > clip.exe
WSL使用windows ssh KEY
SSH KEY登录,使用一个证书的方法如下
OpenSSH Authentication Agent in Windows and then confgure the WSL distros to use that to get the keys. Tis means that you only have one place to manage your SSH keys and one place to enter SSH key passphrases (assuming you are using them).
To install npiperelay , get the latest release from GitHub ( https://github.com/j starks/npiperelay/releases/latest ) and extract npiperelay. exe to a location in your path. To install socat , run sudo apt install socat .
To start forwarding SSH key requests, run the following commands in WSL:
export SSH_AUTH_SOCK=$HOME/. ssh/agent. sock
socat UNIX-LISTEN: $SSH_AUTH_SOCK, fork EXEC: “npiperelay. exe -ei
-s //. /pipe/openssh-ssh-agent”, nofork &
或者在.bash_profile 中添加:
export SSH_AUTH_SOCK=$HOME/. ssh/agent. sock
ALREADY_RUNNING=$(ps -auxww | grep -q “[n] piperelay. exe -ei -s
//. /pipe/openssh-ssh-agent”; echo $?)
if [[ $ALREADY_RUNNING ! = “0” ] ] ; then
if [[ -S $SSH_AUTH_SOCK ] ] ; then
(http: //www. tldp. org/LDP/abs/html/fto. html)
echo “removing previous socket. . . “
rm $SSH_AUTH_SOCK
fi
echo “Starting SSH-Agent relay. . . “
(setsid socat UNIX-LISTEN: $SSH_AUTH_SOCK, fork
EXEC: “npiperelay. exe -ei -s //. /pipe/openssh-ssh-agent”, nofork
&) /dev/null 2>&1
fi
WSL distro导入导出
wsl导入导出
Before we export a distro, we want to make sure that the default user for the distro is set in the /etc/wsl. conf fle inside the distro
sudo bash -c “echo -e ‘ \n[user] \ndefault=$(whoami) ‘ >> /etc/wsl. conf”
wsl —export Ubuntu-18. 04 c: \temp\Ubuntu-18. 04. tar
wsl —import Ubuntu-18. 04-Copy C: \wsl-distros\Ubuntu-18. 04-Copy C: \temp\Ubuntu-18. 04. tar
docker导入导出
FROM mcr. microsoft. com/dotnet/sdk: 5. 0
ARG USERNAME
ARG PASSWORD
RUN useradd -m ${USERNAME}
RUN bash -c ‘ echo -e “${PASSWORD}\n${PASSWORD}\n” | passwd ${USERNAME}’
RUN bash -c ‘ echo -e “[user] \ndefault=${USERNAME}” > /etc/wsl.conf’
RUN usermod -aG sudo ${USERNAME}
RUN apt-get update && apt-get -y install sudo
docker build -t dotnet-test -f Dockerfile —build-arg USERNAME=stuart —build-arg PASSWORD=ticONUDavE .
docker run —name dotnet-test-instance dotnet-test
docker export -o c: \temp\chapter-08-dotnet. tar dotnet-test-instance
docker rm dotnet-test-instance
WSL Linux GUI
https://docs.microsoft.com/zh-cn/windows/wsl/tutorials/gui-apps
https://www.cnblogs.com/zbseoag/p/13851439.html
WSL 不支持 systemd 而 Gnome 桌面又是基于 systemd,所以先解决这个问题。
(参考:https://github.com/DamionGans/ubuntu-wsl2-systemd-script)
sudo apt update
sudo apt install git
git clone https://hub.fastgit.org/DamionGans/ubuntu-wsl2-systemd-script.git
cd ubuntu-wsl2-systemd-script/
bash ubuntu-wsl2-systemd-script.sh重新启动子系统,或者重启电脑也行。
开始操作(参考:https://developer.aliyun.com/article/764492)
安装 Gnome 桌面 Xrdp
sudo apt update
sudo apt install -y ubuntu-desktop xrdp
sudo systemctl status xrdp
优化安装如下工具
sudo apt install gnome-software
sudo apt install gnome-tweaks
sudo apt install gnome-shell-extensions
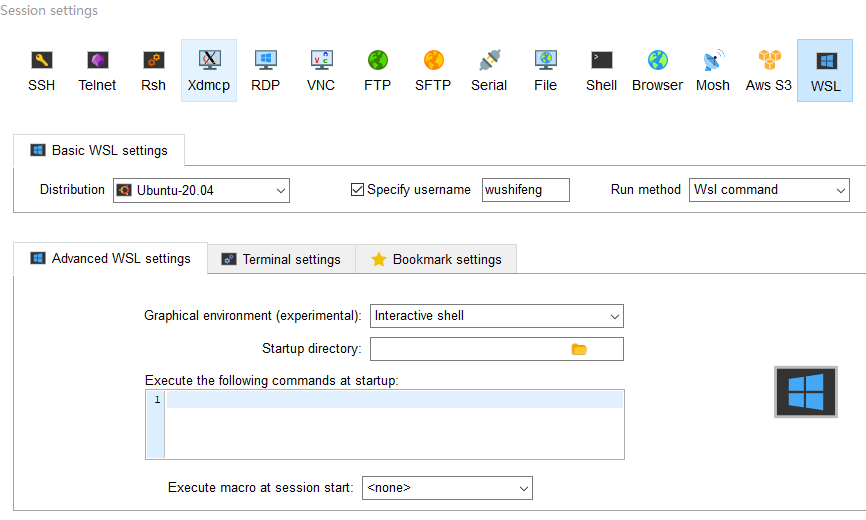
远程方式使用WSL UI
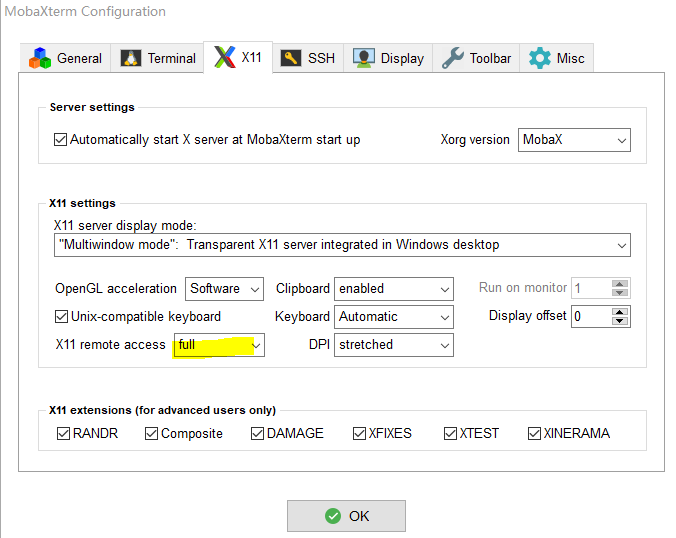
X11方式使用WSL UI

若有收获,就点个赞吧
0 人点赞
