Infrastructure As Code [ IaC ]
https://www.ibexlabs.com/top-7-infrastructure-as-code-tools/
- Terraform: This open-source declarative tool offers pre-written modules that you populate with parameters to build and manage an infrastructure.
- Pulumi: The main advantage of Pulumi is that users can rely on their favorite language to describe the desired infrastructure.
- Puppet: Using Puppet’s Ruby-based DSL, you define the desired state of the infrastructure, and the tool automatically creates the environment.
- Ansible: Ansible enables you to model the infrastructure by describing how the components and systems relate to one another.
- Chef: Chef is the most popular imperative tool on the market. Chef allows users to make “recipes” and “cookbooks” using its Ruby-based DSL. These files specify the exact steps needed to achieve the desired environment.
- SaltStack: What sets SaltStack apart is the simplicity of provisioning and configuring infrastructure components.
Vagrant vs. Terraform
https://www.vagrantup.com/intro/vs/terraform
Vagrant and Terraform are both projects from HashiCorp. Vagrant is a tool focused for managing development environments and Terraform is a tool for building infrastructure.
Terraform is designed to be able to manage extremely large infrastructures that span multiple cloud providers. Vagrant is designed primarily for local development environments that use only a handful of virtual machines at most.Terraform
Terraform的意义在于,通过同一套规则和命令来操作不同的云平台(包括私有云)。
HashiCorp Terraform 是一个IT基础架构自动化编排工具,可以用代码来管理维护 IT 资源。Terraform的命令行接口(CLI)提供一种简单机制,用于将配置文件部署到阿里云或其他任意支持的云上,并对其进行版本控制。它编写了描述云资源拓扑的配置文件中的基础结构,例如虚拟机、存储帐户和网络接口。
https://github.com/hashicorp/terraform 代码
https://www.terraform.io/downloads.html 执行文件
https://releases.hashicorp.com/terraform/0.14.7/terraform_0.14.7_linux_amd64.zip
BASH自动提示
terraform -install-autocomplete
我们写好了 .tf 文件后可以调用 terraform fmt 对配置文件进行格式化,
terraform init 之后会在当前目录中生成 .terraform 目录,并依照 .tf 文件中的配置下载相应的插件。
terraform plan预览执行计划的机会
terraform apply
terraform destroy 命令,把 *.tf 文件中配置的所有资源从 AWS 上清理掉
terraform state show
核心文件有2个,一个是编排文件,一个是状态文件
main.tf文件:是业务编排的主文件,定制了一系列的编排规则,后面会有详细介绍。
terraform.tfstate:本地状态文件,相当于本地的云服务状态的备份,会影响terraform的执行计划。
如果本地状态与云服务状态不一样时会怎样?
https://blog.csdn.net/yejingtao703/article/details/80574363
Terraform 工作目录中文件命名
Terraform 运行时会读取工作目录中所有的 .tf, .tfvars 文件,所以我们不必把所有的东西都写在单个文件中去,应按职责分列在不同的文件中,例如:
provider.tf — provider 配置
terraform.tfvars — 配置 provider 要用到的变量
varable.tf — 通用变量
resource.tf — 资源定义
data.tf — 包文件定义
output.tf — 输出
【Terraform 配置的语法是该公司 HashiCorp 独创的 HCL(HashiCorp configuration language), 它可以兼容 JSON 格式 tf文件】
术语
module
https://www.terraform.io/docs/language/providers/index.html#
A module is a container for multiple resources that are used together. Modules can be used to create lightweight abstractions, so that you can describe your infrastructure in terms of its architecture, rather than directly in terms of physical objects.
The .tf files in your working directory when you run terraform plan or terraform apply together form the root module. That module may call other modules and connect them together by passing output values from one to input values of another.
provide
https://www.terraform.io/docs/language/providers/index.html
Terraform relies on plugins called “providers” to interact with remote systems.
Terraform configurations must declare which providers they require so that Terraform can install and use them. Additionally, some providers require configuration (like endpoint URLs or cloud regions) before they can be used.
各种providers
https://registry.terraform.io/browse/providers
Terraform部署vSphere虚拟机
VMware vSphere模板
https://blog.csdn.net/snow1128/article/details/109196918
Vagrant
Vagrant相关知识脑图https://www.cnblogs.com/2018/p/13862033.html
Vagrant能够支持Amazon AWS、Rackspace进而支持新的应用场景:它能够管理位于云端而不是开发者桌面上的虚拟机。
https://github.com/hashicorp/vagrant/wiki/Available-Vagrant-Plugins#providers
vagrant-aws
vagrant-azure
vagrant-bhyve
vagrant-brightbox
vagrant-cloudstack
vagrant-cloudsigma (Requires CloudSigma account)
vagrant-digitalocean
vagrant-ganeti
vagrant-google
vagrant-hp
vagrant-joyent
…
Tip
- 同步目录
- config.vm.synced_folder
- 禁用 config.vm.synced_folder “.” , “/vagrant” , disabled:true
- 磁盘
- Vagrant doesn’t provide any out-of-the-box option to configure or to change the disk size. The disk size of a VM totally depends on the base image used for the VM. There are base images with a 10 GB disk, some with a 20 GB disk and some other with a 40 GB disk.
- 网卡
- eth0这个网卡是供虚拟机和主机通讯使用的,一般不能修改,有的应用如果特别依赖这个网卡需要注意
- https://github.com/hashicorp/vagrant/issues/2093
Ansible
Ansible 是一款简单的运维自动化工具,只需要使用 ssh 协议连接就可以来进行系统管理,自动化执行命令,部署等任务。
Ansible 的特点
- ansible 不需要单独安装客户端,也不需要启动任何服务
- 2、ansible 是 python 中的一套完整的自动化执行任务模块
- 3、ansible playbook 采用 yaml 配置,对于自动化任务执行过一目了然Ansible 组成结构
Ansible是 Ansible 的命令工具,核心执行工具;一次性或临时执行的操作都是通过该命令执行。
Ansible Playbook任务剧本(又称任务集),编排定义 Ansible 任务集的配置文件,由 Ansible 顺序依次执行,yaml 格式。
Inventory Ansible 管理主机的清单,默认是/etc/ansible/hosts 文件。
Modules Ansible 执行命令的功能模块,Ansible2.3 版本为止,共有 1039 个模块。还可以自定义模块。Plugins插件,模块功能的补充,常有连接类型插件,循环插件,变量插件,过滤插件,插件功能用的较少。API提供给第三方程序调用的应用程序编程接口。
被管理主机只要配置并启动 SSH,且 python>2.4 即可
配置文件查找顺序
[https://github.com/ansible/ansible/blob/devel/examples/ansible.cfg]
1 ANSIBLE_CONFIG 变量指定
2 当前目录的 ansible.cfg
3 当前用户的~/.ansible.cfg
4 /etc/ansible/ansible.cfg
https://github.com/ansible/ansible-examples
inventory
主机定义支持变量,正则等批量的方式,比较方便
ansible HOST -m MODULE -a ‘args’ -e “K=V” -b -vvvv
临时的任务,单一命令行
HOST: all host文件中所有; Host Name/Ip; -i host
-b:权限问题
-v: -v 0~4个,越多输出越详细
host:
这个文件中可以指定ansible_之类的连接端口、用户、密码、私钥等信息
主机可以分组管理
-f: 默认5个,主机很多时,调整这个可以加速
ansible-doc -l|wc -l
查看当前版本内置的模块
ansible-doc ping
直接查看某个模块的语法文档
虚拟机玩转vSphere
vSphere是vmware的虚拟化产品
其中esxi server是管理虚拟机的
vcenter server可以管理esxi server群
试用安装包在vmware官网注册可下载
以6.7为例
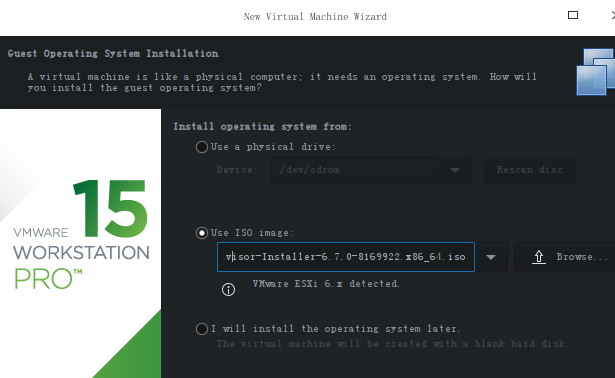
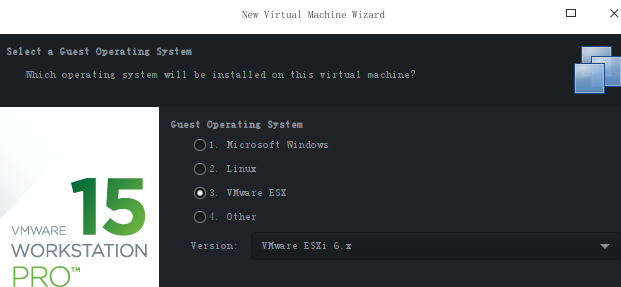
esxi server:下载这个安装VMware-VMvisor-Installer-6.7.0-8169922.x86_64.iso
vcenter server:下载这个安装VMware-VCSA-all-6.7.0-17138064.iso
vCenter Server
有多种安装方式,此处我们只关注linux上的安装
1 VMware-VCSA-all-6.7.0-17138064/vcsa-ui-installer/lin64/ LINUX桌面下执行installer这个GUI形式安装,这个是将虚拟机安装到esxi server上
2 VMware-VCSA-all-6.7.0-17138064/vcsa 直接导入ova文件形成虚拟机完成安装
3 VMware-VCSA-all-6.7.0-17138064/vcsa-cli-installer/lin64【命令行方式,不关注】
如下是方式2的安装为例说明
导入虚拟机
vcsa/VMware-vCenter-Server-Appliance-6.7.0.46000-17138064_OVF10.ova 镜像文件
至少保证导入时有10G内存、2cpu以上的资源可用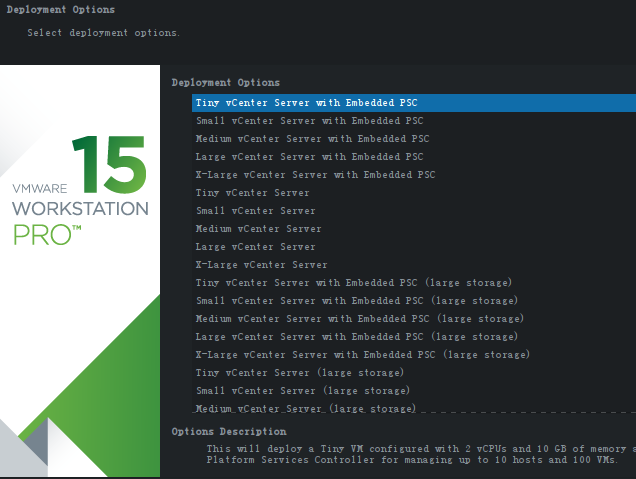
最好固定IP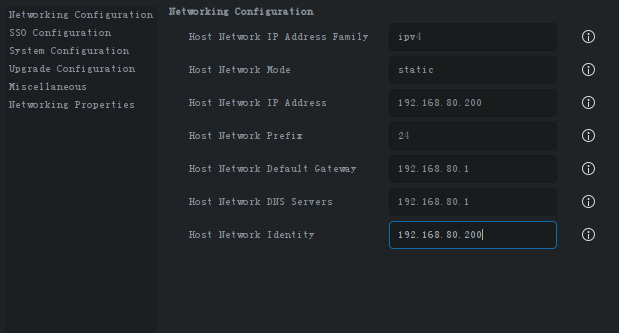
vcenter的root账号密码设置,必须设置,否则web进不去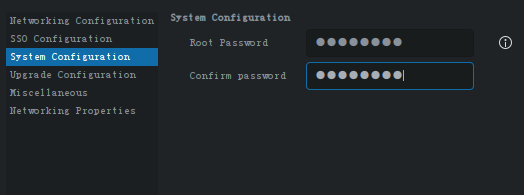
直到出现如下的信息后再进行其他操作,过程中界面会不断的刷新和变化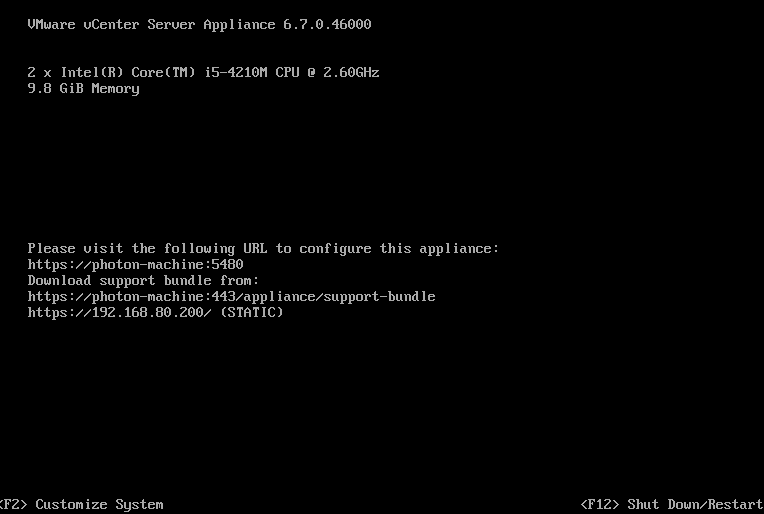
设置

由于没有配置自己的DNS服务器,sso域名就使用默认vsphere.local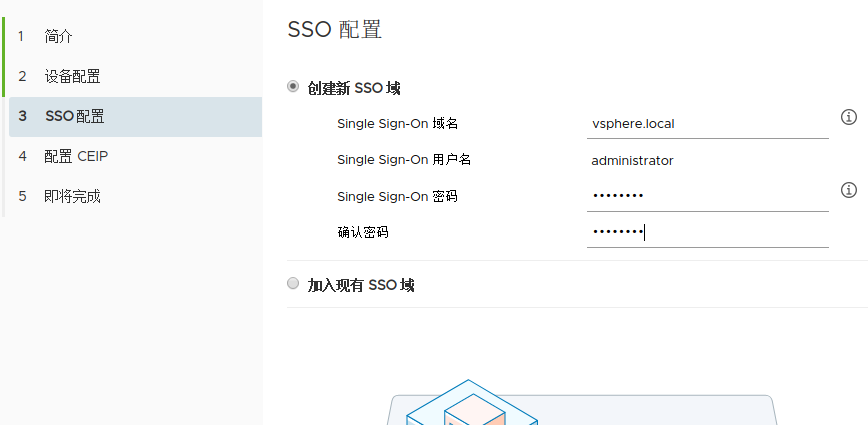
其他的选项选择默认,一直等待,直到出现提示成功,https://192.168.80.200:443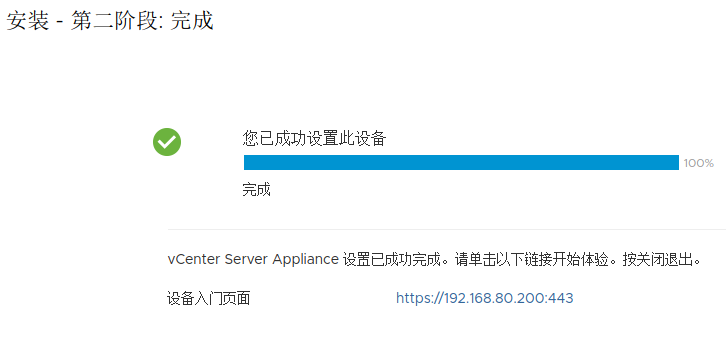
WEB管理
administrator@vpshere.local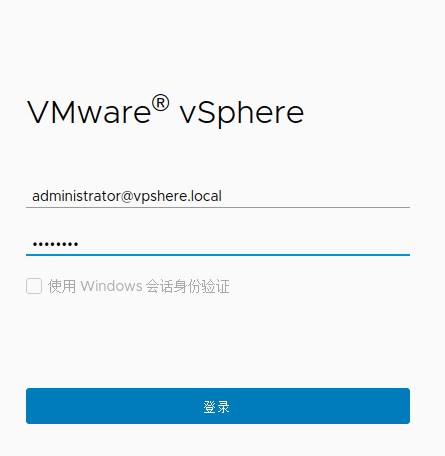
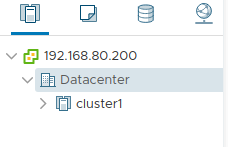
新建“数据中心”“集群”分别为 Datacenter cluster1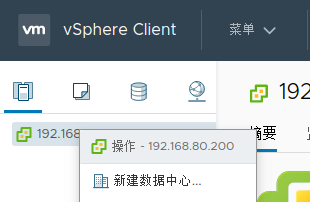
诊断后台
可以开启vcenter的ssh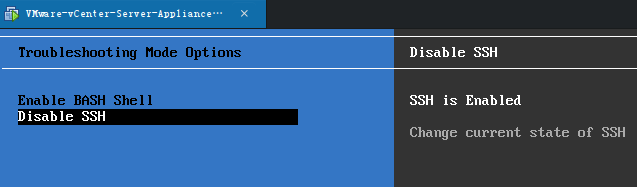
SSH可以登录到系统后台
$ ssh root@192.168.80.200
VMware vCenter Server Appliance 6.7.0.46000
Type: vCenter Server with an embedded Platform Services Controller
root@192.168.80.200’s password:
Last login: Mon Feb 22 10:25:32 2021 from 192.168.80.110
Connected to service
* List APIs: "help api list"<br /> * List Plugins: "help pi list"<br /> * Launch BASH: "shell"
Command> shell
Shell access is granted to root
root@192 [ ~ ]# cat /etc/issue
VMware vCenter Server Appliance 6.7.0.46000
Type: vCenter Server with an embedded Platform Services Controller
ESXi Server
安装虚拟机
硬盘空间设置大一些
最少分配 2cpu 4G内存
按照界面的提示,按键Enter和F11,一直安装等待,直到出现如下界面完成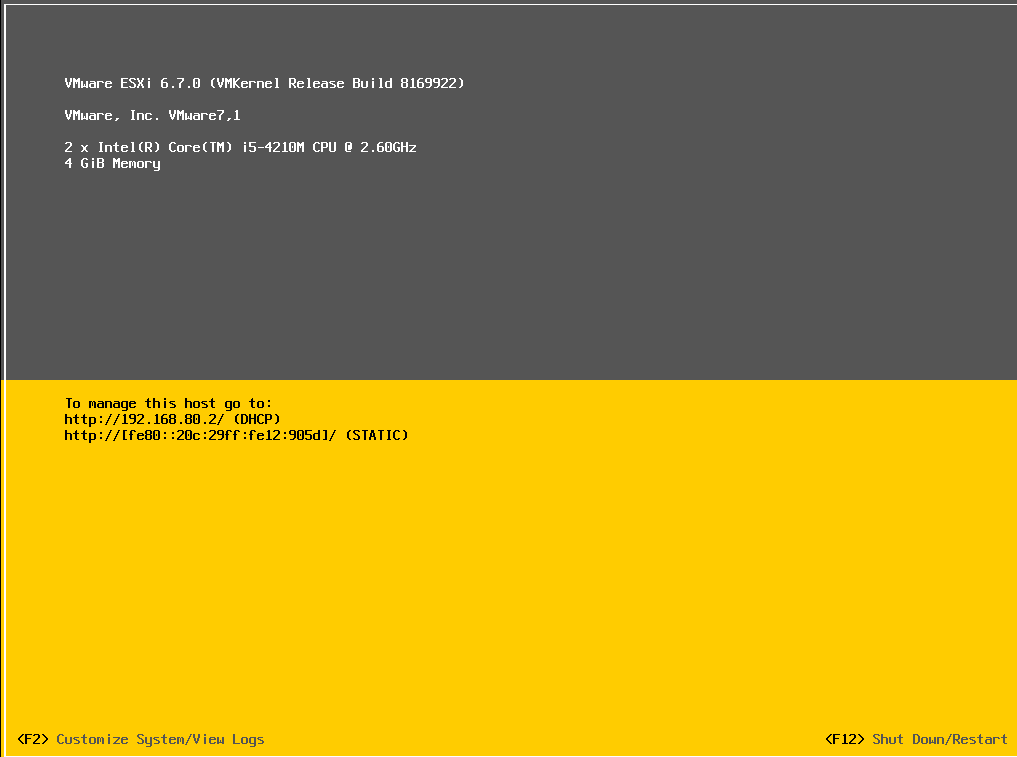
设置
如上的界面F2进入可以进行设置,可以设置固定IP、打开SSH、配置新网卡等等
此处将地址设置为 192.168.80.201
可以进入这个页面 https://192.168.80.201/ui/ 进行管理
vCenter在添加ESXi主机时,锁定模式选择“正常”,导致无法直接登陆ESXI宿主机
ESXi的后台操作和设置和vCenter Server的类似
vCenter统一管理ESXi Server
如果物理的资源比较紧张,可以如下设置:
vCenter的内容设置为6G
【windows上的方式】
虚拟机的.vmx文件,设置 mainMem.useNamedFile = “FALSE”
【linux的方式】
https://communities.vmware.com/t5/VMware-Workstation-Pro/Is-mainMem-useNamedFile-available-in-Linux-Workstation-7-0-1/m-p/1630168
The new parameters for Linux are:
mainmem.backing = “swap”
this only works on 64 bit Linux hosts and it produces a similar behaviour as on Windows hosts with mainmem.useNamedFile = “false”
mainmem.backing = “named”
this uses a mainmem-file in the same directory as the vmx-file
this is the equivalent to mainmem.useNamedFile = “true” used with earlier versions on Linux hosts
mainmem.backing = “unnamed” this uses a mainmem-file in /tmp
上例的操作方法如下
vCenter上 cluster1在增加esxi主机
几种模式
禁用:vcenter连接esxi,默认是维护模式;esxi web可以自己登录
正常: esxi web无权限登录,管理只能通过vcenter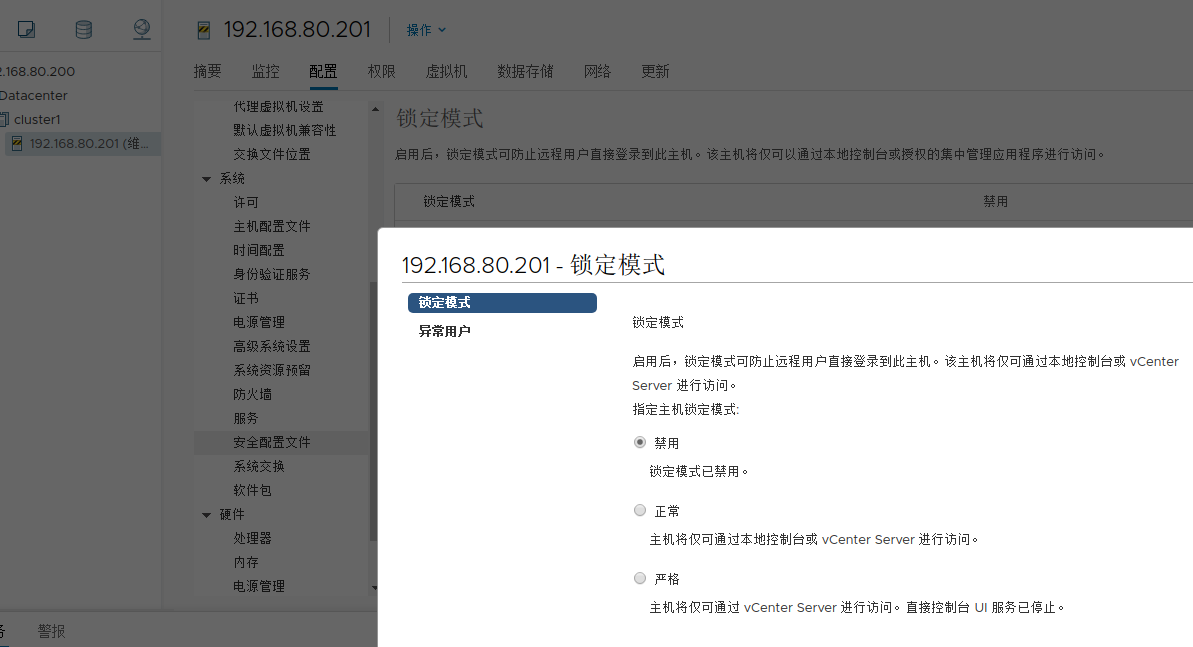
自动化主机部署
OVF导出
WEB中导出时,文件太大,直接中断
[Deepin OS 下]
$ ovftool —noImageFiles ‘vi://root:Root123!@192.168.80.201:443/c7’ .
Opening VI source: vi://root@192.168.80.201:443/c7
Opening OVF target: .
Writing OVF package: ./c7/c7.ovf
Transfer Completed
段错误
奇怪的问题,如下这个就OK
ovftool ‘vi://root:Root123!@192.168.80.201:443/c7’ .
Linux的安装好的虚拟机,这个站点很牛
https://www.linuxvmimages.com/images/centos-7/
OVF部署
Error: error while importing ovf/ova template, error while uploading the disk c7-disk1.vmdk error while uploading the file c7/c7-disk1.vmdk Post “https://*/ha-nfc/52e97f6c-36af-52e6-18f7-1f3b27f8af46/disk-1.vmdk“: dial tcp: lookup : no such host
Error: error while importing ovf/ova template, error while uploading the disk Nested_ESXi6.7_Appliance_Template_v1-disk1.vmdk error while uploading the file Nested_ESXi6.7_Appliance_Template_v1-disk1.vmdk Post “https:///ha-nfc/52f8e26a-4890-74a9-32a5-8d13e47392e1/disk-0.vmdk”: dial tcp: lookup *: no such host
https://github.com/hashicorp/terraform-provider-vsphere/issues/1096
ESXi直接部署
https://hub.fastgit.org/josenk/terraform-provider-esxi
/boot/grub2/grub.cfg timeout=2
curl -o /etc/yum.repos.d/CentOS-Base.repo https://mirrors.aliyun.com/repo/Centos-7.repo
yum install -y perl gcc
类似如下,在esxi后台中,找到对应的vmware tool iso文件,放到数据卷上供下载
[root@localhost:~] find / -name “*.iso”
/vmfs/volumes/60338943-f1de6128-ebef-000c2912905d/packages/vmtoolsRepo/vmtools/linux.iso
/vmfs/volumes/60338943-f1de6128-ebef-000c2912905d/packages/vmtoolsRepo/vmtools/windows.iso
/vmfs/volumes/60338943-f1de6128-ebef-000c2912905d/packages/vmtoolsRepo/vmtools/winPreVista.iso
/vmfs/volumes/60338949-ae93bfe0-42e0-000c2912905d/CentOS-7-x86_64-Minimal-1908.iso
[root@localhost:~] cp /vmfs/volumes/60338943-f1de6128-ebef-000c2912905d/packages/vmtoolsRepo/vmtools/linux.iso
下载上面的linux.iso这个文件,vmware tools安装好
郁闷

若有收获,就点个赞吧
0 人点赞
