1、JSP107
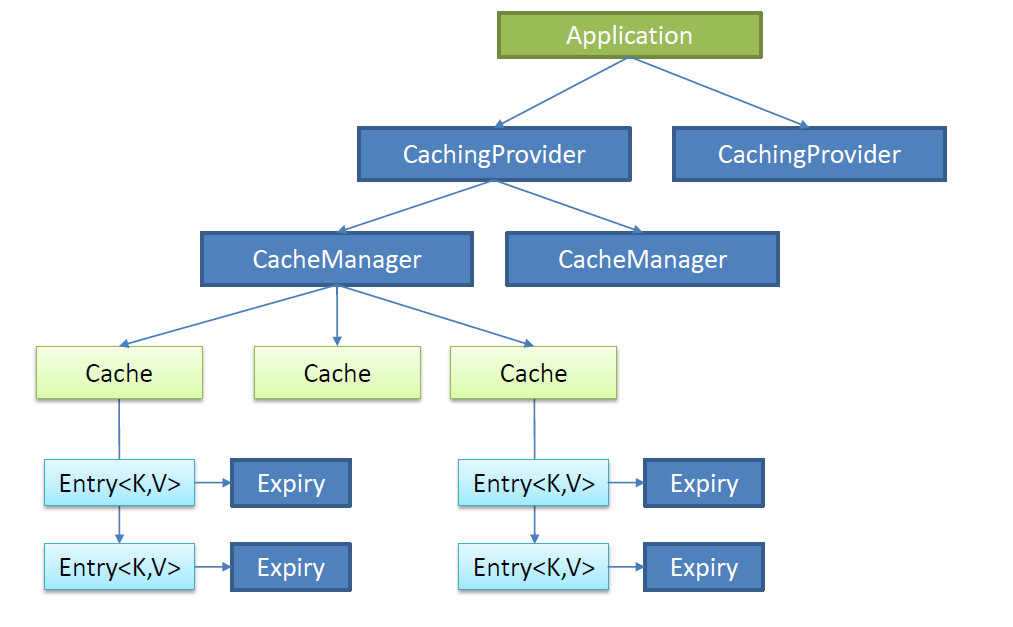
java Caching定义了5个核心接口,分别是 CachingProvider, CacheManager,Cache,Entry,Expiry
- CachingProvider:定义了创建、配置、获取、管理和控制多个ChacheManager。一个应用可以在运行期间访问多个CachingProvider。
- CacheManager:定义了创建、配置、获取和管理、控制多个唯一命名的Cahce。这些Cache存在于CacheManager的上下文中,一个CacheManager仅被一个CachingProvider所拥有。
- Cache:是一个类似Map的数据结构并临时村吃以key为索引的值。一个Cache仅被一个CacheManager所拥有。
- Entry:是一个存储在Cache中的key-value对。
- Expiry:每一个存储在Cache中的条目有一个定义的有效期。一旦超过这个时间,条目为过期的状态。一旦过期,条目将不可访问、更新和删除。缓存有效期可以通过ExpiryPolicy设置。
2、Spring 缓存抽象
Spring3.1 开始定义了
org.springframework.cache.Cache
org.springframework.cacche.CacheManager 接口来统一不同的缓存技术;
并支持使用JCache(JSR-107)注解简化我们开发;
Cache接口为缓存的组件规范定义,包含缓存的各种操作集合;
- Cache接口下Spring提供了各种xxxCache的实现;如RedisCache,EhCacheCache , ConcurrentMapCache等;
- 每次调用需要缓存功能的方法时,Spring会检查检查指定参数的指定的目标方法是否已经被调用过;如果有就直接从缓存中获取方法调用后的结果,如果没有就调用方法并缓存结果后返回给用户。下次调用直接从缓存中获取。
- 使用Spring缓存抽象时我们需要关注以下两点;
1、确定方法需要被缓存以及他们的缓存策略
2、从缓存中读取之前缓存存储的数据
3、几个重要概念&缓存注解
| Cache | 缓存接口,定义缓存操作。实现有:RedisCache、EhCacheCaChe、ConcurrentMapCache等 |
|---|---|
| CacheManager | 缓存管理器,管理各种缓存(Cache)组件 |
| @Cacheable | 主要针对方法配置,能够根据方法的请求参数对其结果进行缓存 |
| @CacheEvict | 清空缓存 |
| @EnableCaching | 开启基于注解的缓存 |
| @CachePut | 保证方法被调用,又希望结果被缓存。 |
| keyGenerator | 缓存数据时key生成策略 |
| serialize | 缓存数据时value序列化策略 |
/*** 搭建基本环境* 1、导入数据库文件 创建出 department 和 employee表* 2、创建 javaBean 封装数据* 3、整合 Mybatis 操作数据库* 1.配置数据源信息* 2.使用注解版的 MyBatis* 1)、@MapperScan 指定需要扫描的 mapper 接口所在的包*/@MapperScan("com.atguigu.springboot.mapper")@SpringBootApplicationpublic class Springboot01CacheApplication {public static void main(String[] args) {SpringApplication.run(Springboot01CacheApplication.class, args);}}
4.环境配置
配置文件 application.properties
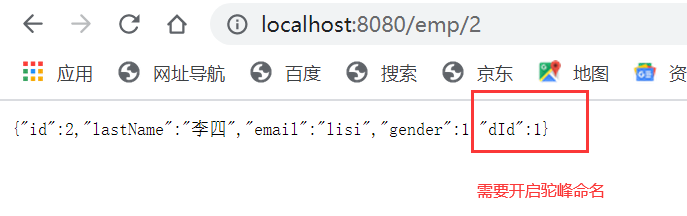
spring.datasource.url=jdbc:mysql://localhost:3306/spring_cachespring.datasource.username=rootspring.datasource.password=000823#spring.datasource.driver-class-name=com.mysql.cj.jdbc.Driver#开启驼峰命名匹配规则mybatis.configuration.map-underscore-to-camel-case=true
两个javaBean department employee
package com.atguigu.springboot.bean;public class Department {private Integer id;private String departmentName;public Department() {super();// TODO Auto-generated constructor stub}public Department(Integer id, String departmentName) {super();this.id = id;this.departmentName = departmentName;}public Integer getId() {return id;}public void setId(Integer id) {this.id = id;}public String getDepartmentName() {return departmentName;}public void setDepartmentName(String departmentName) {this.departmentName = departmentName;}@Overridepublic String toString() {return "Department [id=" + id + ", departmentName=" + departmentName + "]";}}
package com.atguigu.springboot.bean;public class Employee {private Integer id;private String lastName;private String email;private Integer gender; //性别 1男 0女private Integer dId;public Employee() {super();}public Employee(Integer id, String lastName, String email, Integer gender, Integer dId) {super();this.id = id;this.lastName = lastName;this.email = email;this.gender = gender;this.dId = dId;}public Integer getId() {return id;}public void setId(Integer id) {this.id = id;}public String getLastName() {return lastName;}public void setLastName(String lastName) {this.lastName = lastName;}public String getEmail() {return email;}public void setEmail(String email) {this.email = email;}public Integer getGender() {return gender;}public void setGender(Integer gender) {this.gender = gender;}public Integer getdId() {return dId;}public void setdId(Integer dId) {this.dId = dId;}@Overridepublic String toString() {return "Employee [id=" + id + ", lastName=" + lastName + ", email=" + email + ", gender=" + gender + ", dId="+ dId + "]";}}
EmployeeMapper接口
@Mapperpublic interface EmployeeMapper {@Select("select * from employee where id = #{id}")public Employee getEmpById(Integer id);@Update("update employee set lastName=#{lastName},email=#{email},gender=#{gender},d_id=#{dId} where id=#{id}")public void updateEmp(Employee employee);@Delete("delete from employee where id=#{id}")public void deleteEmpById(Integer id);@Insert("insert into employee(lastName,email,gender,d_id) values(#{lastName},#{email},#{gender},#{dId})")public void insertEmp(Employee employee);}
测试EmployeeMapper
@SpringBootTestclass Springboot01CacheApplicationTests {@AutowiredEmployeeMapper employeeMapper;@Testvoid contextLoads() {Employee empById = employeeMapper.getEmpById(1);System.out.println(empById);}}
EmployeeService.java
@Servicepublic class EmployeeService {@AutowiredEmployeeMapper employeeMapper;public Employee getEmp(Integer id){System.out.println("查询"+id+"号员工:");Employee emp = employeeMapper.getEmpById(id);return emp;}}
EmoloyeeController.java
@RestControllerpublic class EmployeeController {@AutowiredEmployeeService employeeService;@GetMapping("/emp/{id}")public Employee getEmployee(@PathVariable("id") Integer id){Employee emp = employeeService.getEmp(id);return emp;}}
5.@cacheable注解
* 二、快速体验缓存* 步骤:* 1.开启基于注解的缓存* 2.标注缓存注解即可* @Cacheables* @CacheEvict* @CachePut*/@MapperScan("com.atguigu.springboot.mapper")@SpringBootApplication@EnableCaching
/*** 将方法的运行结果进行缓存:以后再要相同的数据直接从缓存中获取不用调用方法** CacheManager管理多个Cache组件的,对缓存真正的crud操作在缓存组件中,每一个缓存组件有自己唯一一个名字;* 几个属性:* cacheName/value:指定缓存的名字;* key:缓存数据时用的 key ;可以用它指定。默认是使用方法参数的值 1-方法的返回值* 编写 Spel表达式:#id;参数id的值 == #a0,#p0,#root.args[0]* keyGenerator:key的生成器,可以自己指定key的生成器组件id* key 和 keyGenerator 二选一* CacheManager:指定缓存管理器;或者cacheResolver 缓存解析器 二选一* condition:指定符合条件的情况下才缓存;* unless:否定缓存;当unless指定的条件为true,方法的返回值不会被缓存;可以获取到结果进行判断* sync:是否使用异步模式* @param id* @return*/@Cacheable(cacheNames = "emp")public Employee getEmp(Integer id){System.out.println("查询"+id+"号员工:");Employee emp = employeeMapper.getEmpById(id);return emp;}
当第二次查找id=1的用户时,不会从数据库进行查找,而是从缓存中进行查找
5.1.缓存工作原理 和 @Cacheable 运行流程
* 原理:* 1.自动配置类;* 2.缓存的配置类:* 0 = "org.springframework.boot.autoconfigure.cache.GenericCacheConfiguration"* 1 = "org.springframework.boot.autoconfigure.cache.JCacheCacheConfiguration"* 2 = "org.springframework.boot.autoconfigure.cache.EhCacheCacheConfiguration"* 3 = "org.springframework.boot.autoconfigure.cache.HazelcastCacheConfiguration"* 4 = "org.springframework.boot.autoconfigure.cache.InfinispanCacheConfiguration"* 5 = "org.springframework.boot.autoconfigure.cache.CouchbaseCacheConfiguration"* 6 = "org.springframework.boot.autoconfigure.cache.RedisCacheConfiguration"* 7 = "org.springframework.boot.autoconfigure.cache.CaffeineCacheConfiguration"* 8 = "org.springframework.boot.autoconfigure.cache.SimpleCacheConfiguration"* 9 = "org.springframework.boot.autoconfigure.cache.NoOpCacheConfiguration"* 3.哪个配置类默认生效:SimpleCacheConfiguration** 4.给容器中注册了一个CacheManager: CacheManager ==> ConcurrentMapCacheManager* 5.可以获取和创建 ConcurrentMapCacheManager 类型的 缓存组件;他的作用是将数据保存在 ConcurrentMap 里面;** 运行流程:* 1.方法运行之前,先去查询Cache(缓存组件),按照 cacheName指定的名字获取;* (CacheManager先获取相应的缓存),第一次获取缓存如果没有 cache 组件会先创建出来* 2.去 Cache 中查找缓存的内容,使用一个 key ,默认方法的参数;* key 是按照某种策略生成的;默认是使用 keyGenerator 生成的,默认使用 SimpleKeyGenerator 生成 key* SimpleKeyGenerator 生成 key 的默认策略:* 如果没有参数,key=new SimpleKey();* 如果有一个参数:key=参数的值* 如果有多个参数:key=new SimpleKey(params);* 3.没有查到缓存调用目标方法;* 4.将目标方法缓存的结果放到缓存里面** @Cacheable标注的方法执行之前,先来检查缓存中有没有数据,按照参数的值作为 key 去查询缓存* 如果没有就运行,并将结果放入缓存;以后再来调用就可以直接使用缓存中的数据** 核心:* 1.使用 CacheManager【ConcurrentMapCacheMapper】按照名字得到 Cache【ConcurrentMapCache】组件* 2.key 使用 KeyGenerator生成的,默认是 SimpleKeyGenerator
5.2.@Cacheable的其他属性
5.2.1 sepl 表达式

5.2.3 属性详解
cacheName/value:指定缓存的名字;将方法的缓存结果放在哪个缓存中,数组的方式可以指定多个缓存
key:缓存数据时用的 key ;可以用它指定。默认是使用方法参数的值 1-方法的返回值
编写 Spel表达式:#id;参数id的值 == #a0,#p0,#root.args[0]
* getEmp[2] =====> key = “#root.methodName+’[‘+#id+’]’”
keyGenerator:key的生成器,可以自己指定key的生成器组件id
key 和 keyGenerator 二选一
@Configurationpublic class MyCacheConfig {@Bean("myKeyGenerator")public KeyGenerator keyGenerator(){return new KeyGenerator(){@Overridepublic Object generate(Object o, Method method, Object... objects) {return method.getName()+"["+ Arrays.asList(objects) +"]";}};}}
CacheManager:指定缓存管理器;或者cacheResolver 缓存解析器 二选一
condition:指定符合条件的情况下才缓存;
condition = “#id > 0”:具体参数的值条件
condition = “#a0 > 0”:第一个参数的值大于 1 进行缓存
unless:否定缓存;当unless指定的条件为true,方法的返回值不会被缓存;可以获取到结果进行判断
unless = “#a0 == 2”:如果第一个参数的值等于 2 ,结果不缓存
* sync:是否使用异步模式
6.其他属性
6.1 @CachePut注解
/*** @CachePut: 既调用缓存,又更新缓存数据;同步更新缓存* 修改了数据库的某个是数据,同时更新缓存;* 运行时机:* 1.先调用目标方法,* 2.将目标方法的结果缓存起来** 测试步骤:* 1.查询 1 号员工,查到的结果会放在缓存中* 2.以后查询还是之前的结果* 3.更新 1 号员工* 将方法的返回值,放入缓存* key:传入的employee对象 value:返回的employee对象* 4.查询 1 号员工?* 应该是更新后的员工【1号员工没有在缓存中更新】,* key = "#employee" 使用传入的参数员工id* key = "#result.id"* @Cacheable的 key 不能用result取结果** 为什么是更新之前的员工信息?**/@CachePut(value = "emp",key = "#employee.id")public Employee updateEmp(Employee employee){System.out.println("update emp"+employee);employeeMapper.updateEmp(employee);return employee;}
6.2 @CacheEvict
/*** @CacheEvict:缓存清除* key:指定要删除的数据* allEntries = true 删除所有缓存数据* beforeInvocation = false :缓存的清除是否在方法之前执行* 默认是在方法执行之后执行,如果方法出现异常,不会清除缓存* beforeInvocation = true:* 代表清除缓存实在方法执行之前进行的,无论方法是否出现异常缓存都会清除*/@CacheEvict(value = "emp" ,key = "#id",allEntries = true)public void deleteEmp(Integer id){System.out.println("删除员工");//employeeMapper.deleteEmpById(id);}
6.3 @Caching&@CacheConfig
/*** 定义复杂的缓存规则* @param lastName* @return*/@Caching(cacheable = {@Cacheable(value = "emp",key = "#lastName")},put = {@CachePut(value = "emp",key = "#result.id"),@CachePut(value = "emp",key = "#result.email")})public Employee getEmpByLastName(String lastName){Employee empByLastName = employeeMapper.getEmpByLastName(lastName);return empByLastName;}
@CacheConfig(cacheNames = {"emp"})//抽取缓存的公共配置
7.整合redis
Redis 是一个开源(BSD许可)的,内存中的数据结构存储系统,它可以用作数据库、缓存和消息中间件。
1.安装 redis ,使用 docker;
2.引入 redis 的 starter
3.配置 redis
7.1 docker命令
[root@192 ~]# sudo systemctl start docker[root@192 ~]# docker imagesREPOSITORY TAG IMAGE ID CREATED SIZEredis latest ddcca4b8a6f0 11 days ago 105MBhello-world latest d1165f221234 5 months ago 13.3kB[root@192 ~]# docker run -d -p 6379:6379 --name myredis redis[root@192 ~]# docker restart b8f9871d4cbb
7.2 整合测试
引入starter
<dependency><groupId>org.springframework.boot</groupId><artifactId>spring-boot-starter-data-redis</artifactId></dependency>
配置文件 application.roperties
spring.redis.host=192.168.75.137
@AutowiredStringRedisTemplate stringRedisTemplate;//操作 kv 字符串@AutowiredRedisTemplate redisTemplate;// kv 都是对象的@AutowiredRedisTemplate<Object,Employee> empRedisTemplate;// kv 都是对象的/*** Redis 常见的五大数据类型* String(字符串)、List(列表)、set(集合)、Hash(散列)、zSet(有序集合)* stringRedisTemplate.opsForValue();简化操作string* stringRedisTemplate.opsForList();[List(列表)]* stringRedisTemplate.opsForSet();[set(集合)]* stringRedisTemplate.opsForHash();[Hash(散列)]* stringRedisTemplate.opsForZSet();[zSet(有序集合)]* */@Testpublic void test01(){//给 redis 保存一个数据//stringRedisTemplate.opsForValue().append("msg","hello");//读取 key 的值String msg = stringRedisTemplate.opsForValue().get("msg");System.out.println(msg);stringRedisTemplate.opsForList().leftPushAll("mylist","1","2","3");}/*** 测试保存对象*/@Testpublic void t2(){Employee empById = employeeMapper.getEmpById(1);//默认保存对象,使用 jdk 序列化机制,序列化后的数据保存到数据库中//redisTemplate.opsForValue().set("emp-01",empById);
解决redis显示数据问题
@Configurationpublic class MyRedisConfig {@Beanpublic RedisTemplate<Object, Employee> empRedisTemplate(RedisConnectionFactory redisConnectionFactory){RedisTemplate<Object,Employee> template = new RedisTemplate<Object,Employee>();template.setConnectionFactory(redisConnectionFactory);Jackson2JsonRedisSerializer<Employee> serializer = new Jackson2JsonRedisSerializer<Employee>(Employee.class);template.setDefaultSerializer(serializer);return template;}}
@Testpublic void t2(){Employee empById = employeeMapper.getEmpById(1);//默认保存对象,使用 jdk 序列化机制,序列化后的数据保存到数据库中//redisTemplate.opsForValue().set("emp-01",empById);//1.将数据以json的方式保存//自己将对象转为 json//默认的序列化规则;改变默认的序列化规则empRedisTemplate.opsForValue().set("emp-01",empById);}
7.3 测试缓存
解决存取对象序列化问题
/*** 基于SpringBoot2 对 RedisCacheManager 的自定义配置* @param redisConnectionFactory* @return*/@Primary//将某个缓存管理器作为默认使用的@Beanpublic RedisCacheManager employeeCacheManager(RedisConnectionFactory redisConnectionFactory) {//初始化一个RedisCacheWriterRedisCacheWriter redisCacheWriter = RedisCacheWriter.nonLockingRedisCacheWriter(redisConnectionFactory);//设置CacheManager的值序列化方式为json序列化RedisSerializer<Object> jsonSerializer = new GenericJackson2JsonRedisSerializer();RedisSerializationContext.SerializationPair<Object> pair = RedisSerializationContext.SerializationPair.fromSerializer(jsonSerializer);RedisCacheConfiguration defaultCacheConfig = RedisCacheConfiguration.defaultCacheConfig().serializeValuesWith(pair);//设置默认超过时期是1天defaultCacheConfig.entryTtl(Duration.ofDays(1));//初始化RedisCacheManagerreturn new RedisCacheManager(redisCacheWriter, defaultCacheConfig);}}
编码方式进行缓存操作
@AutowiredDepartmentMapper departmentMapper;@Qualifier("employeeCacheManager")@AutowiredRedisCacheManager deptCacheManager;/*** 使用缓存管理器得到缓存,进行api调用* @param id* @return*/public Department getDeptById(Integer id){System.out.println("查询部门");Department department = departmentMapper.getDeptById(id);//获取某个缓存Cache dept = deptCacheManager.getCache("dept");dept.put("dept:1",department);return department;}

若有收获,就点个赞吧
0 人点赞
