以vue3+vite项目为例
项目地址
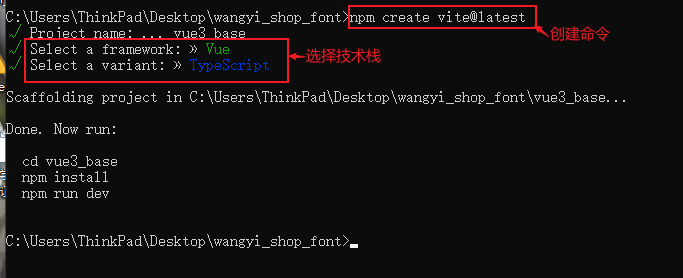
1.使用npm 创建(npm只是以个创建工具,你也可以使用yarn、pnpm、cnpm去创建)
npm create vite@latest

清除App.vue中的文件,新建自己的模板,
清除components里面的文件,创建自己所需文件
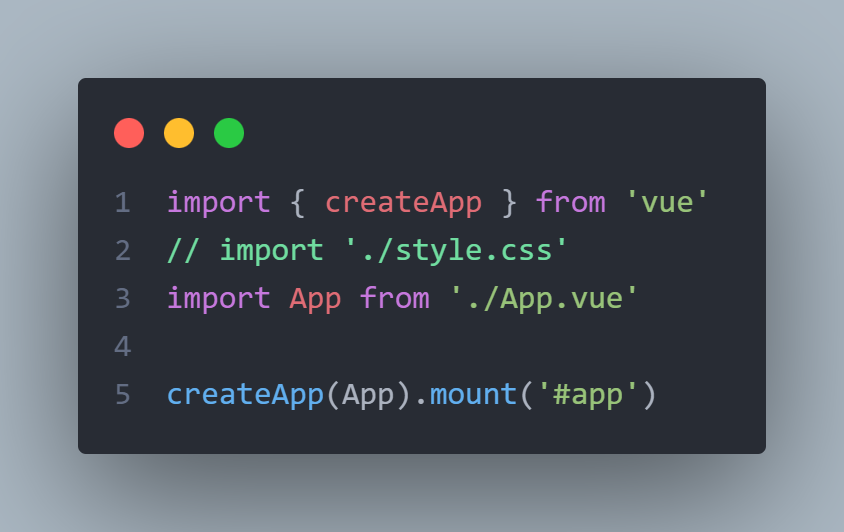
清除main.ts里面的style样式文件,如图所示
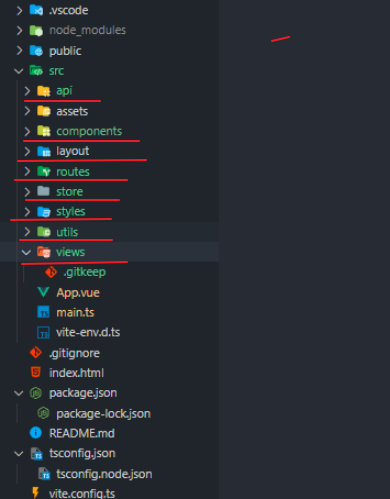
在src下创建以下文档

api 用于存放发请求的接口 components 存放全局公共组件 layout 布局页面的左侧菜单栏、右侧的头部tabbar和主内容区,菜单的实现可以通过递归组件来实现 routes 存放路由相关的信息,如配置路由、设置页面的滚动行为等 store 用于存放公共数据,例如用户登录的唯一标识、用户信息等 styles 存放全局样式 utils 用于设置发请求的工具,如axios的二次封装,获取本地存储函数的封装 views 用于存放路由相关的文件和组件 空文件里面必须创建一个.gitkeep文件,防止代码提交到远程仓库显示此文件,(git提交到远程仓库,默认会忽略空文件,别人在拉去项目是会获取不到这些空文件,对后期开发很不友好)
重置样式表
地址https://www.npmjs.com/package/reset.scss?activeTab=code
可以去npm官网搜索reset.scss样式文件,在styles文件中引入即可,新建一个index.scss文件,用于汇总
配置scss的运行环境,在vite.config.ts文件中
import { defineConfig } from 'vite'import vue from '@vitejs/plugin-vue'// https://vitejs.dev/config/export default defineConfig( {plugins: [vue()],// 样式全局变量的配置css: {preprocessorOptions: {scss: {javascriptEnabled: true,additionalData: '@import "./src/styles/variable.scss";',},},},}})
给文件夹起别名
import path from 'path'import { defineConfig } from 'vite'import vue from '@vitejs/plugin-vue'// https://vitejs.dev/config/export default defineConfig( {plugins: [vue()],resolve: {alias: {'@': path.resolve(__dirname, 'src'), // 相对路径别名配置,使用 @ 代替 src},},}})
在tsconfig.json文件中输入以下代码
"baseUrl": "./", // 解析非相对模块的基地址,默认是当前目录"paths": {//路径映射,相对于baseUrl"@/*": ["src/*"]}
配置路由
安装路由
npm i vue-router
在router文件中进行使用
新建两个文件router.ts和index.ts
// index.ts文件// 通过vue-router插件实现模板路由配置import { createRouter, createWebHashHistory } from 'vue-router'import { constantRoute } from './router'// 创建路由器const router = createRouter({// 设置路由模式history: createWebHashHistory(),routes: constantRoute,// 滚动行为scrollBehavior() {return {left: 0,top: 0,}},})export default router// router.ts文件的配置主要的路由为首页、登录页、404页面、任意路由页面四个// 对外暴露配置路由(常量路由)export const constantRoute = [{// 登录path: '/login',component: () => import('@/views/login/index.vue'),name: 'Login',meta: {title: '登录',hidden: true, // true为隐藏,false为不隐藏},},{// 首页path: '/',component: () => import('@/layout/index.vue'),name: 'Home',meta: {title: '用户首页',hidden: false,},children: [{path: '/home',component: () => import('@/views/home/index.vue'),meta: {title: '首页',hidden: false,},}],},{// 404页面path: '/404',component: () => import('@/views/404/index.vue'),name: '404',meta: {title: '404',hidden: true,},},{// 任意路由path: '/:pathMatch(.*)*',redirect: '/404',name: 'Any',meta: {title: '任意路由',hidden: true,},},]// 在main.ts中注册路由// 引入路由import router from '@/router/index.ts'app.use(router)// 在app.vue文件中使用<template><div><router-view></router-view></div></template>
安装仓库
npm i pinia
在store中新建一个index.ts文件,给文件为总store
// 整个项目的大仓库import { createPinia } from 'pinia'// 创建大仓库const pinia = createPinia()// 对外暴漏,入口文件需要安装仓库export default pinia// 在mian.ts中进行注册// 引入pinia仓库import pinia from './store'app.use(pinia)
其他小store仓库
// 创建用户相关的小仓库import { defineStore } from 'pinia'// 创建用户小仓库const useUserStore = defineStore('User', {// 存储数据的state: () => {return {}},// 异步逻辑actions: {},getters: {},})// 对外暴漏获取小仓库的方法export default useUserStore// 在其他组件使用// 引入用户相关的小仓库import useUserStore from '@/store/user'const userStore = useUserStore()
axios的二次封装
安装axios
npm i axios
使用:
// 引入axiosimport axios from 'axios'import { ElMessage } from 'element-plus'// 第一步:利用axios对象的create方法,去创建axios实例(其他的配置:基础路径、超时时间)const request = axios.create({// 基础路径// baseURL: 'https://zzdj.zunzhongdj.cn/',baseURL: import.meta.env.VITE_APP_BASE_API,// 设置超时时间timeout: 5000,})// // 第二步:给request实例添加请求拦截器request.interceptors.request.use((config) => {// 返回配置对象return config})// 第三步:给request实例添加响应拦截器request.interceptors.response.use((response) => {// 成功的回调// 简化数据return response.data},(error) => {// 失败的回调:处理http网络错误// 定义一个变量,存储网络错误信息let message = ''// http状态码const status = error.response.statusswitch (status) {case 401:message = 'TOKEN过期'breakcase 403:message = '无权访问'breakcase 404:message = '请求地址错误'breakcase 500:message = '服务器出现问题'breakdefault:message = '网络出现错误'break}// 提示错误信息ElMessage({type: 'error',message,})return Promise.reject(error)},)// 对外暴露export default request
安装element-plus组件库
npm install element-plus --save// 安装图标npm install @element-plus/icons-vue// 国际化处理,显示中文import ElementPlus from 'element-plus'import zhCn from 'element-plus/dist/locale/zh-cn.mjs'app.use(ElementPlus, {locale: zhCn,})
vite.config.ts文件的配置
import { defineConfig, loadEnv } from 'vite'import vue from '@vitejs/plugin-vue'import path from 'path'//引入svg需要用到插件import { createSvgIconsPlugin } from 'vite-plugin-svg-icons'//mock插件提供方法import { viteMockServe } from 'vite-plugin-mock'// https://vitejs.dev/config/export default defineConfig(({ command, mode }) => {//获取各种环境下的对应的变量let env = loadEnv(mode, process.cwd())return {plugins: [vue(),// 配置svg图标createSvgIconsPlugin({iconDirs: [path.resolve(process.cwd(), 'src/assets/icons')],symbolId: 'icon-[dir]-[name]',}),viteMockServe({// @ts-expect-errorlocalEnabled: (command === 'build') | 'serve', //保证开发阶段可以使用mock接口}),],resolve: {alias: {'@': path.resolve(__dirname, 'src'), // 相对路径别名配置,使用 @ 代替 src},},// 样式全局变量的配置css: {preprocessorOptions: {scss: {javascriptEnabled: true,additionalData: '@import "./src/styles/variable.scss";',},},},// 配置代理服务器//代理跨域server: {proxy: {[env.VITE_APP_BASE_API]: {//获取数据的服务器地址设置target: env.VITE_SERVE,//需要代理跨域changeOrigin: true,//路径重写rewrite: (path) => path.replace(/^\/api/, ''),},},},}})
环境的配置
在项目的更目录创建以下三个文件
.env.development 开发环境.env.production 生产环境.env.test 测试环境
.env.development 开发环境
# 变量必须以 VITE_ 为前缀才能暴露给外部读取NODE_ENV = 'development'VITE_APP_TITLE = 'Vue3 + Ts + Vite 后台管理'VITE_APP_BASE_API = '/api' //接口api前缀VITE_SERVE = "http://xxxxx"
.env.production 生产环境
NODE_ENV = 'production'VITE_APP_TITLE = 'Vue3 + Ts + Vite 后台管理'VITE_APP_BASE_API = 'http://XXXX'VITE_SERVE="http://xxxxx"
.env.test 测试环境
NODE_ENV = 'test'VITE_APP_TITLE = 'Vue3 + Ts + Vite 后台管理'VITE_APP_BASE_API = '/test-api'VITE_SERVE="http://xxxx"
集成svg图标
安装svg依赖
npm install vite-plugin-svg-icons -D
在assets文件中新建一个icons文件夹,用来存放svg图标,使用方式:在组件中写入以下代码
<!--图标的大小可以在svg上写style来控制 --><svg><use xlink:href="#icon-图标名称" fill="颜色名字"></use></svg>
安装mock
npm install -D vite-plugin-mock mockjs

