演示仓库地址(可以翻 commit 记录):https://github.com/wangpeng1994/webpack-demo
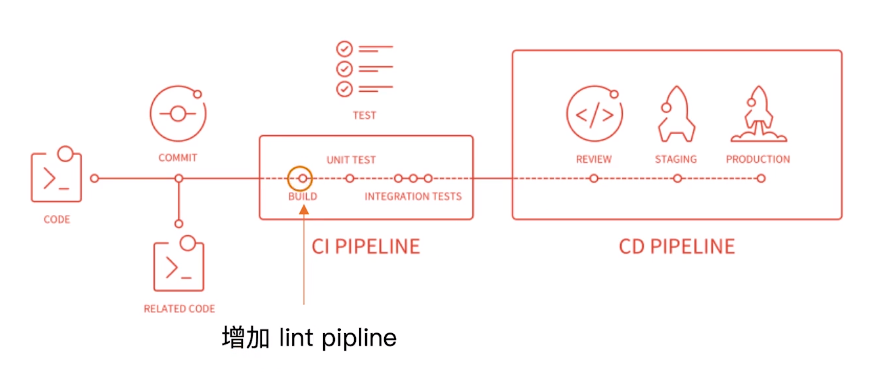
2. 在webpack中使用ESLint
行业里面优秀的 ESLint 规范实践:
- Airbnb:eslint-config-airbnb、eslint-config-airbnb-base(前者是后者超集,包含了 React 相关的检查)
- 腾讯:alloyteam团队的 eslint-config-alloy、ivweb 团队的 eslint-config-ivweb
也可以自己制定团队的 ESLint 规范,基本原则如下(参见 http://eslint.cn/docs/rules/):
- 不重复造轮子,基于 eslint:recommend 配置并改进
- 能够帮助发现代码错误的规则,全部开启
- 帮助保持团队的代码风格统一,而不是限制开发体验
2.1 方案一:ESLint 与 CI/CD 集成
本地开发阶段增加 precommit 钩子。
安装 husky:
npm install husky -D
增加 npm script,通过 lint-staged 增量检查修改的文件:
"scripts": {"precommit": "lint-staged"},"lint-staged": {"linters": {"*.{js,scss}": ["eslint --fix", "git add"]}}
2.2 方案二:ESLint 与 webpack 集成
该方案比较推荐新的项目,从一开始就使用 ESLint,因为 webpack 构建时默认会检查所有 require 进来的文件。
先安装(或者 ./node_modules/.bin/eslint --init ):
npm install eslint eslint-plugin-import eslint-plugin-react eslint-plugin-jsx-a11y eslint-config-airbnb babel-eslint eslint-loader -D
eslint 配置文件,这里使用 .eslintrc.js :
module.exports = {"parser": "babel-eslint","extends": "airbnb","env": {"browser": true,"node": true},// 可以继续自定义规则进行覆盖// "rules": {// "semi": "error"// },};
webpack 中使用 eslint-loader,构建时检查 js 规范:
// ...{test: /\.js$/,use: ['babel-loader','eslint-loader']},// ...
接下来使用 webpack 构建时就会触发 eslint。
3. webpack打包组件和基础库
虽然使用 Rollup 打包组件库更纯粹,但因为 webpack 很强大,所以也是很常见的需求。
这里实现一个安全的整数加法库,打包分为压缩版和未压缩版,支持 AMD/CommonJS/ESModule 模块引入。
最终文件结构:

npm init -ynpm install webpack webpack-cli terser-webpack-plugin --save-dev
package.json:
{"name": "xiaofeng-large-number","version": "0.0.1","description": "Tool for large numbers calculation in JavaScript","main": "index.js", // 这个库的入口文件"scripts": {"test": "echo \"Error: no test specified\" && exit 1","build": "webpack","prepublish": "webpack" // npm publish发布我们的库时会自动执行该npm script,也可以手动构建后再发布},"keywords": ["calculation","addition"],"author": "","license": "ISC","devDependencies": {"terser-webpack-plugin": "^2.3.1","webpack": "^4.41.3","webpack-cli": "^3.3.10"}}
webpack.config.js:
const TerserPlugin = require('terser-webpack-plugin');module.exports = {mode: 'none',entry: {'large-number': './src/index.js','large-number.min': './src/index.js'},output: { // 默认输出路径就在dist目录filename: '[name].js',library: 'largeNumber', // 导出的// libraryExport: 'default' // 如果使用了默认导出,则可以增加该字段libraryTarget: 'umd'},optimization: {minimize: true,minimizer: [new TerserPlugin({ // 由于production模式会自动开启该插件,这里使用none模式,手动控制该压缩什么include: /\.min\.js$/})]}};
设置入口文件:
if (process.env.NODE_ENV === 'production') {module.exports = require('./dist/large-number.min.js');} else {module.exports = require('./dist/large-number.js');}
支持 umd,使用时如:
import * as largeNumber from 'xiaofeng-large-number';var sum = largeNumber.add('1', '999');console.log(sum); // '1000'
4. 服务端渲染(SSR)
SSR 标题较大、细节较多,这里仅仅简单了解一下,网上有更好的文章。
通常访问页面时加载过程如下:

服务端渲染(SSR):
**渲染: HTML + CSS + JS + Data -> 渲染后的 HTML
服务端:
- 所有模板等资源都存储在服务端
- 内⽹网机器器拉取数据更快
- ⼀一个 HTML 返回所有数据


对于 react 服务端渲染主要思路如下:
- 使⽤ react-dom/server 的 renderToString ⽅法将 React 组件渲染成字符串
- 服务端路由返回对应的模板
主要就是在服务端提前拼接 html 字符串,组件编写时要使用 CommonJS 模块规范而不再是 ES6 Module。
5. 优化构建时命令行的显示日志
webpack 有个 stats 统计信息字段,可以接受预设或者自定义,看自己需求,比如我选择 errors-only 则当错误发生时才在控制台输出信息(对于 webpack-dev-server,这个属性要放在 devServer 对象里)。

但这还不够好,配合 friendly-errors-webpack-plugin 插件使用更佳:
module.exports = {//...stats: 'errors-only' // object | stringplugins: [// ...new FriendlyErrorsWebpackPlugin(),],};
完成、等待、错误和警告都会给出彩色高亮的提示。

6. 构建异常和中断处理
在 CI/CD 的 流程中或者发布系统需要知道当前构建状态,每次构建完可以执行 echo $? ,显示最后命令的退出状态,0表示没有错误,其他表示有错误,但这样太原始。
Node.js 中的 process.exit 规范:
- 0 表示成功完成,回调函数中,err 为 null
- 非 0 表示执行失败,回调函数中,err 不为 null,err.code 就是传给 exit 的数字
如何主动捕获并处理构建错误?
webpack4 在构建失败时已经会抛出错误码(2)了 ,但我们仍然可以在 compiler 每次构建结束后会触发的 done 这个 hook 中增加自己想做的事情,比如上报错误信息等,也可以顺便修改错误码:
module.exports = {//...stats: 'errors-only' // object | stringplugins: [// ...new FriendlyErrorsWebpackPlugin(),function () {this.hooks.done.tap('done', stats => { // this 就是当前构建时的 compiler 对象if (stats.compilation.errors &&stats.compilation.errors.length &&process.argv.indexOf('---watch') === -1) {console.log('---build error---');process.exit(1); // webpack 中错误码本身是 2,现在手动修改为 1}});},],};

若有收获,就点个赞吧
0 人点赞
