一、Mybatis的引入
- MyBatis是一款优秀的持久层框架;
- 它支持自定义SQL、存储过程以及高级映射。MyBatis免除了几乎所有的JDBC代码以及设置参数和获取结果集的工作。
- MyBatis可以通过简单的XML或注解来配置和映射原始类型、接口和Java POJO (Plain OldJava Objects,普通老式Java对象)为数据库中的记录。
MyBatis本是apache的一个开源项目ibatis, 2010年这个项目i山apache迁移到了googlecode,并且改名为MyBatis ORM对象关系映射
Mybatis就是帮助程序猿将数据存入数据库中,和从数据库中取数据、
- 传统的jdbc操作,有很多重复代码块.比如:数据取出时的封装,数据库的建立连接等,通过框架可以减少重复代码,提高开发效率.
MyBatis是一 个半自动化的ORM框架(ObjectRelationshipMapping)
—>对象关系映射(半自动化需要自己写sql语句)
优势:MyBatis的真正强大在于它的映射语句,这是它的优势所在。由于它的异常强大,映射器的XML文件就显得相对简单。如果拿它跟具有相同功能的JDBC代码进行对比,会立即发现省掉了将近95%的代码。MyBatis为聚焦于SQL而构建,以尽可能地为你减少麻烦
二、MyBatis使用
2.1 基于XML配置
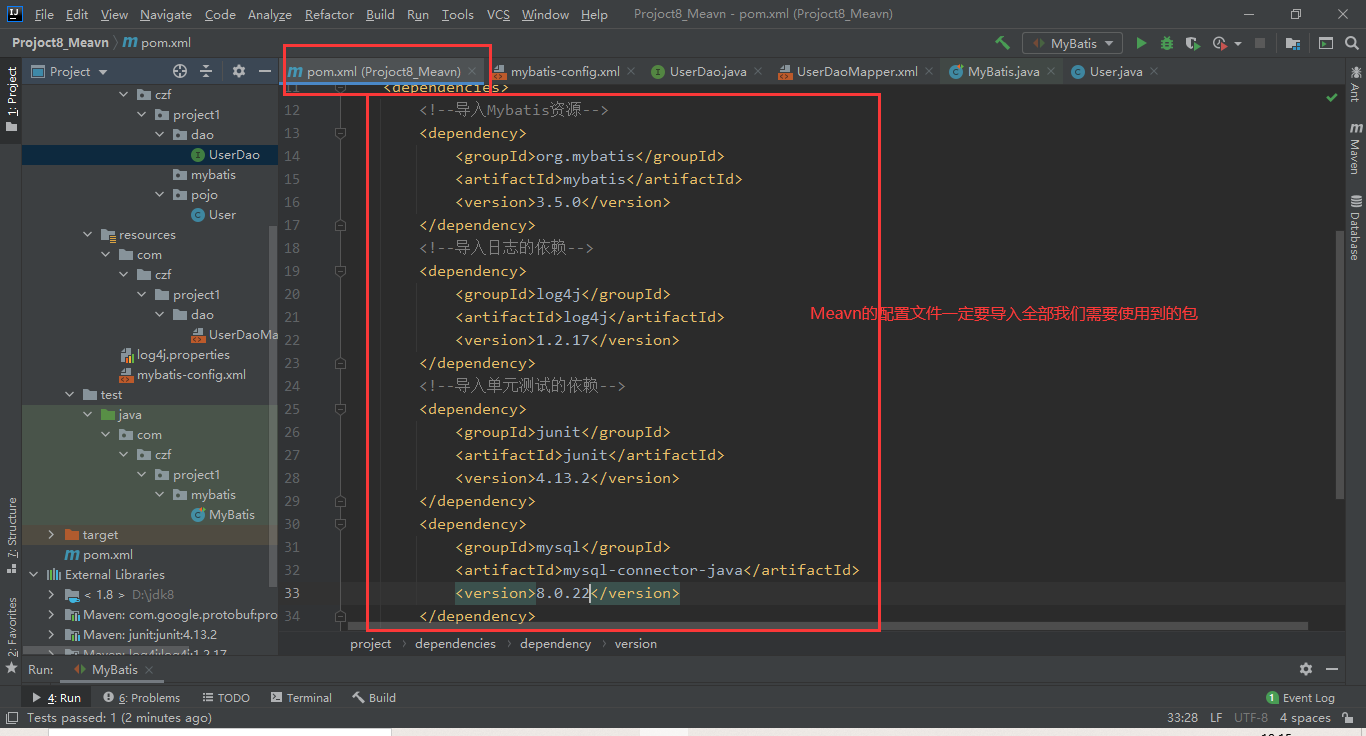
2.1.1 配置Meavn文件,导入所有可能用到的资源
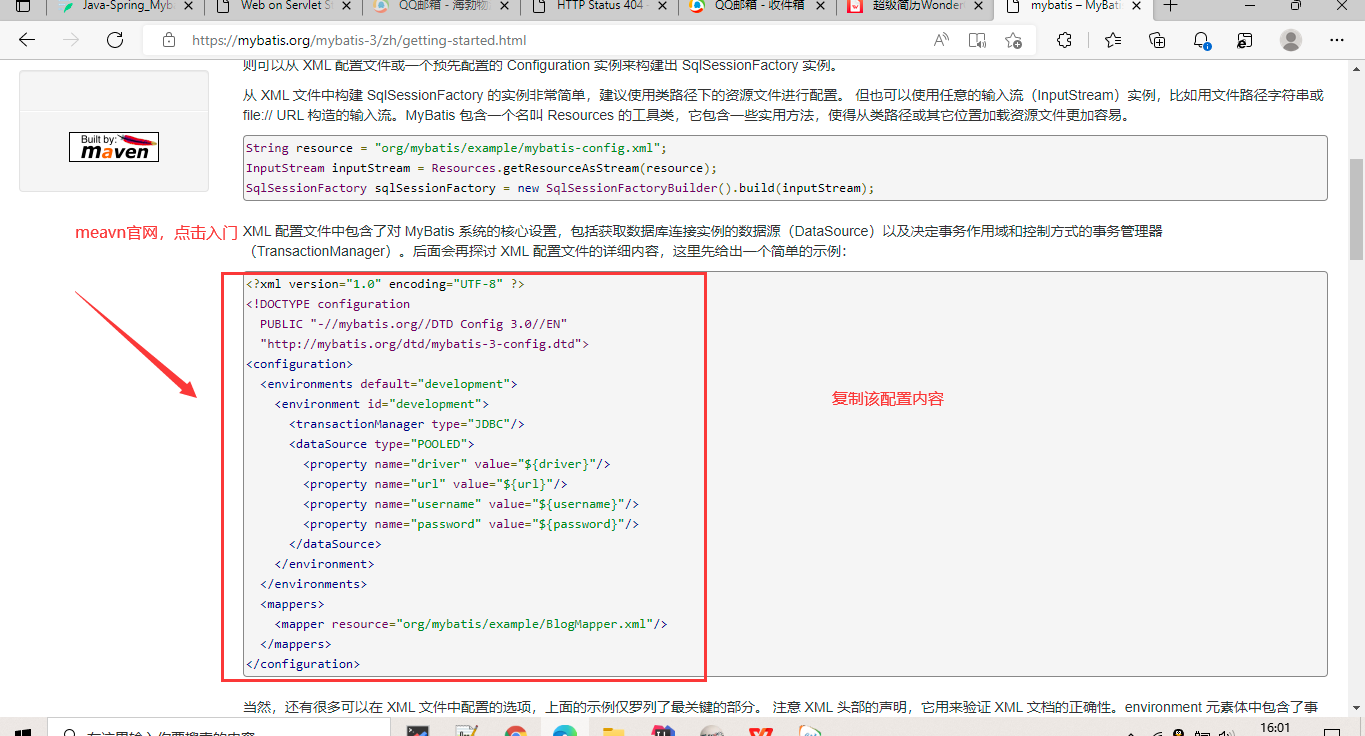
2.1.2 xml文件配置流程
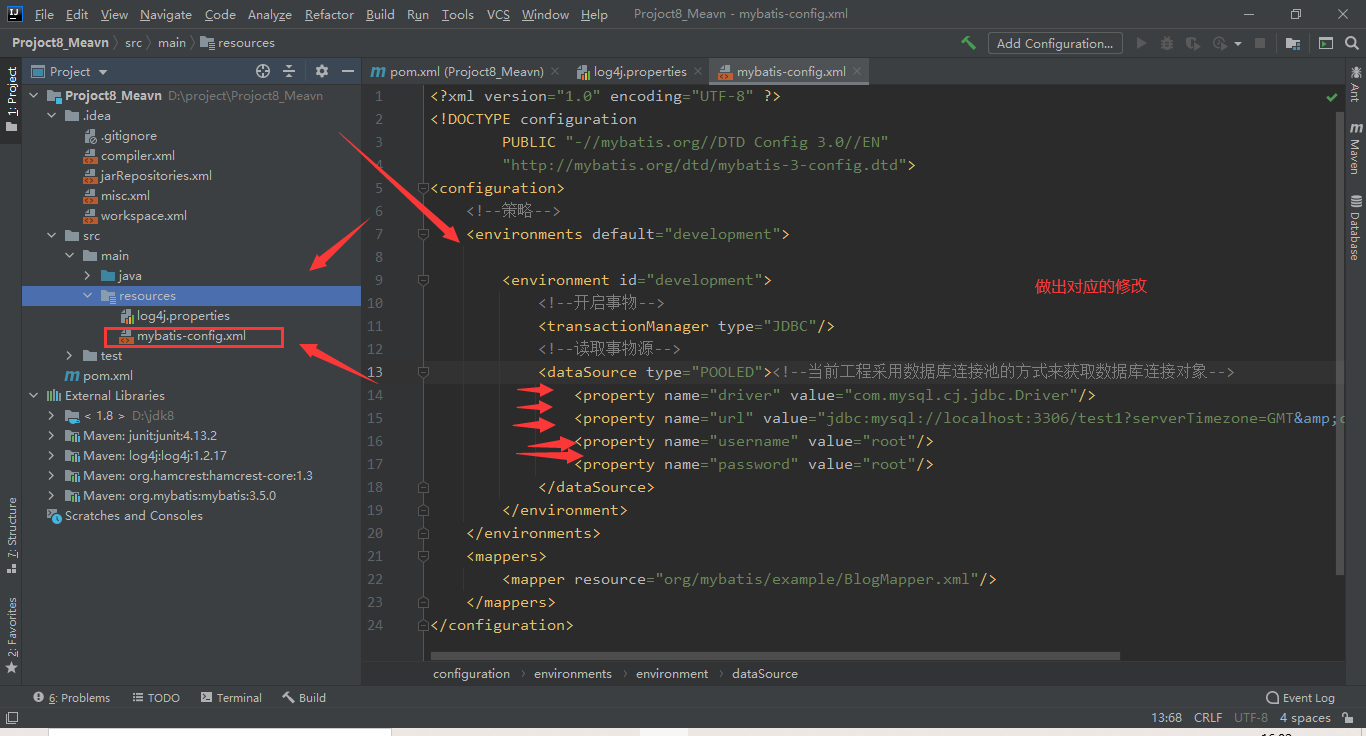
数据库连接池:池中存储数据库连接对象,可以避免每次使用数据库连接对象都要重新创建,导致内存浪费。
单例的,只存储一份。
在java文件夹下配置的的包结构一定要在资源包下一样的设置。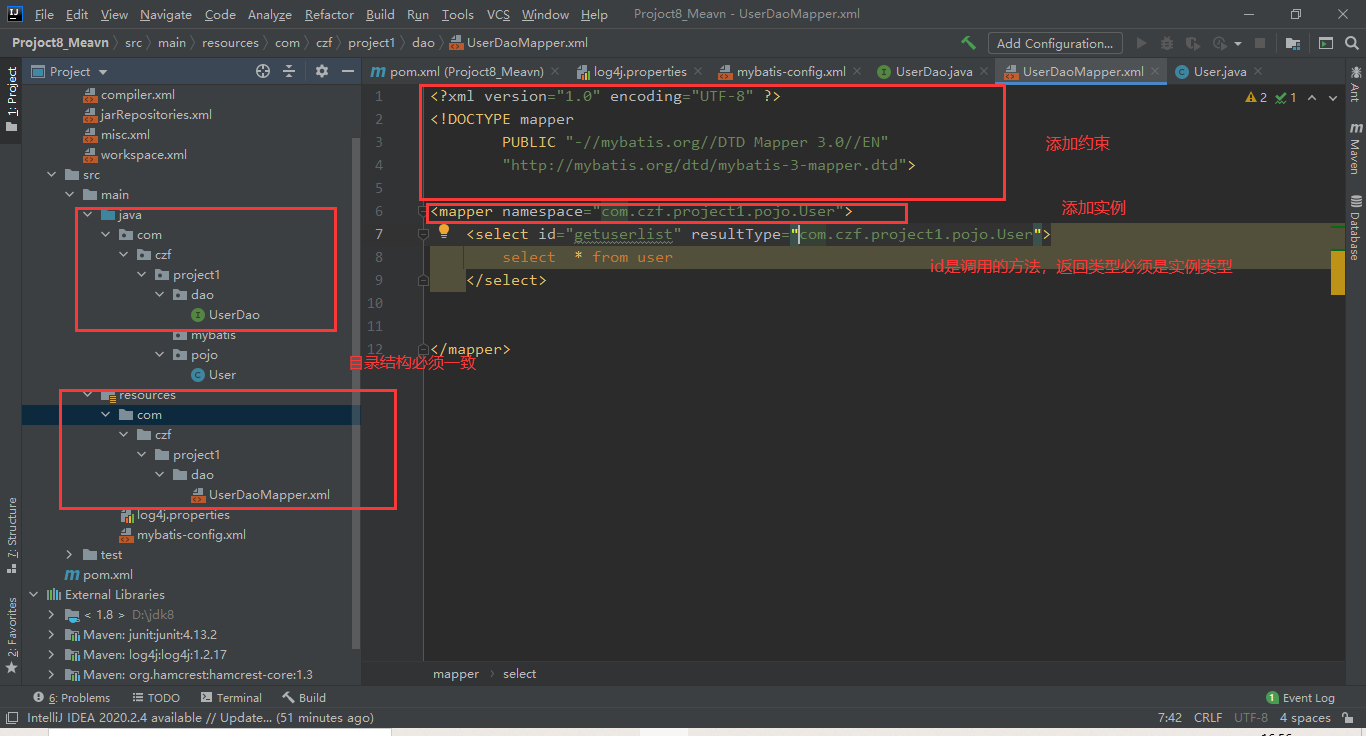
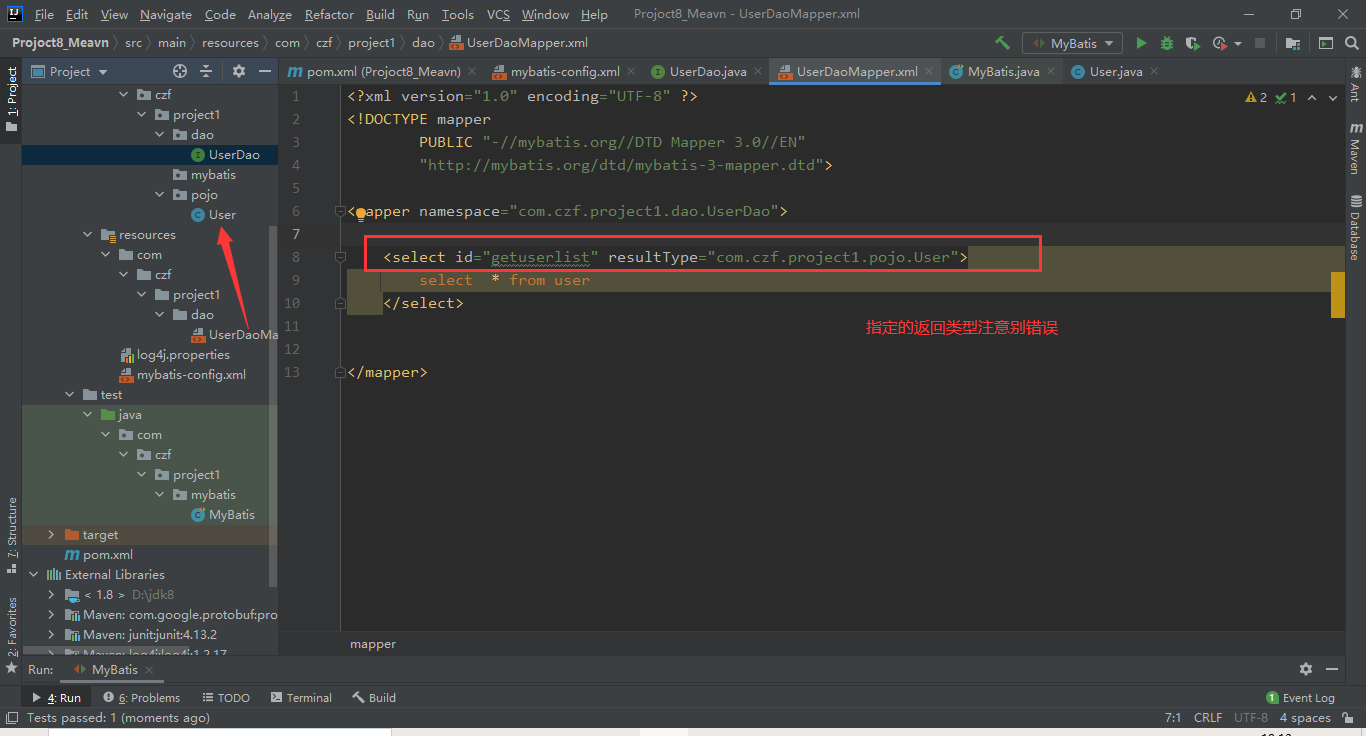
2.1.3在xml文件下编写sql语句。
2.1.4 在test文件夹下创建测试类,注意写法
public class MyBatis {@Testpublic void test01(){try {//根据流来读取mybatis核心配置文件,然后再读取相关数据InputStream resourceAsStream = Resources.getResourceAsStream("mybatis-config.xml");//创建sqlSessionFactory对象SqlSessionFactory sqlSessionFactoryBuilder = new SqlSessionFactoryBuilder().build(resourceAsStream);//sqlSession从工厂中取出来。SqlSession sqlSession = sqlSessionFactoryBuilder.openSession();//maybatis会在底层通过动态代理的方式为持久层创建对应的实现类。UserDao userdao = sqlSession.getMapper(UserDao.class);List<User> userlist = userdao.getuserlist();for (User user : userlist) {System.out.println(user);}//关闭资源sqlSession.close();resourceAsStream.close();} catch (IOException e) {e.printStackTrace();}}}
2.2 底层原理
mybatis不需要实现类只需要接口,直接只用接口就行,mybatis底层通过例如。
- mybatis注解方式是怎样通过没有实现类的dao接口进行数据库操作 解答: 1)原理上:JDK动态动态代理的原理是根据 InvocationHandler 中的invoke()方法,由jdk为你的接口手动生成了一个实现了对应接口的类,因此,你的接口可以调用,这是理解mybatis接口没有实现类能被调用的关键。
2)功能上:可以看出mybatis中的接口就是XML文件的描述,一方面这样做的目的是和spring集成,将接口交给spring管理;另一方面是为了更加方便的管理XML文件(使用接口的package+interface作为namespace,method作为ID。
public class MyBatisTest {SqlSession sqlSession = null;InputStream resourceAsStream = null;/*** @Before 在所有测试单元执行之前执行*/@Beforepublic void mybatisBefore(){try {//根据流来读取mybatis的核心配置文件,然后读取相关数据resourceAsStream = Resources.getResourceAsStream("mybatis-config.xml");} catch (IOException ioException) {ioException.printStackTrace();}//创建sqlSessionFactory对象SqlSessionFactory sqlSessionFactory = new SqlSessionFactoryBuilder().build(resourceAsStream);//将sqlSession从工厂中取出来sqlSession = sqlSessionFactory.openSession();}/*** @After在所有测试单元执行之后执行*/@Afterpublic void mybatisAfter(){//关闭资源if (sqlSession != null){sqlSession.close();}if (resourceAsStream != null){try {resourceAsStream.close();} catch (IOException ioException) {ioException.printStackTrace();}}}@Testpublic void test01(){//mybatis会在底层通过动态代理的方式来为持久层接口创建对应的实现类UserDao userDao = sqlSession.getMapper(UserDao.class);//查询用户信息List<User> userList = userDao.getUserList();//遍历集合for (User user : userList) {System.out.println(user);}}@Testpublic void test02(){//创建持久层的实例UserDao userDao = new UserDaoImpl(sqlSession);//查询用户信息List<User> userList = userDao.getUserList();//遍历集合for (User user : userList) {System.out.println(user);}}@Testpublic void test03(){//获取代理对象UserDao userDao = (UserDao)getProxy();List<User> userList = userDao.getUserList();for (User user : userList) {System.out.println(user);}}/*** 模拟mybatis底层通过动态代理来创建持久层的实现类* @return*/public Object getProxy(){return Proxy.newProxyInstance(UserDao.class.getClassLoader(), new Class[]{UserDao.class}, new InvocationHandler() {public Object invoke(Object proxy, Method method, Object[] args) throws Throwable {Object invoke = method.invoke(new UserDao() {public List<User> getUserList() {List<User> users = sqlSession.selectList("com.eagleslab.dao.UserDao.getUserList");return users;}});return invoke;}});}}
2.3 使用流程
- 在java文件夹下:创建实体类(也是接受类);
- 在java文件夹下:写一个接口,包含我们要使用到的方法;
在资源文件夹下:创建映射的xml文件:命名空间换为接口的全类名;
id为方法的全局变量、以及返回类型使用对应的实体类的全类名
<!--建立起实体属性和表字段的对应关系--><resultType id="getstudentlist" type="com.eagleslab.pojo.Student">
- 在资源文件夹下:核心配置文件对上面的xml文件进行声明
- 在test文件夹下:
首先先建立使用的框架:主要就是使用
@Before
- 根据流来读取mybatis的核心配置文件,然后读取相关数据
- 创建sqlSessionFactory对象
- 将sqlSession从工厂中取出来
@After
- 提交事务
关闭资源 ```java public class MyBatisTest02 { SqlSession sqlSession = null;
InputStream resourceAsStream = null;
/**
- @Before 在所有测试单元执行之前执行 */ @Before public void mybatisBefore(){
try {//根据流来读取mybatis的核心配置文件,然后读取相关数据resourceAsStream = Resources.getResourceAsStream("mybatis-config.xml");} catch (IOException ioException) {ioException.printStackTrace();}//创建sqlSessionFactory对象SqlSessionFactory sqlSessionFactory = new SqlSessionFactoryBuilder().build(resourceAsStream);//将sqlSession从工厂中取出来sqlSession = sqlSessionFactory.openSession();}/*** @After在所有测试单元执行之后执行*/@Afterpublic void mybatisAfter(){//提交事务sqlSession.commit();//关闭资源if (sqlSession != null){sqlSession.close();}if (resourceAsStream != null){try {resourceAsStream.close();} catch (IOException ioException) {ioException.printStackTrace();}}}
```java@Testpublic void test01(){//获取代理对象StudentDao studentDao = sqlSession.getMapper(StudentDao.class);//查询所有的学生数据List<Student> studentList = studentDao.getStudentList();//遍历集合for (Student student : studentList) {System.out.println(student);}}
- 补充
当我们使用到的实体类字段与数据库中的表的字段名字不符合时,可以使用到如下标签进行解决
<!--建立起实体属性和表字段的对应关系--><resultMap id="studentVo" type="com.eagleslab.pojo.Student"><!--注意后面使用方法的全类名可以使用studentVo来替代--><!--匹配主键字段--><id property="sid" column="id"></id><!--匹配非主键字段--><result property="stuName" column="name"></result><result property="age" column="age"></result><result property="sex" column="sex"></result><result property="birthday" column="birthday"></result><result property="address" column="address"></result></resultMap>
其他操作:
{} OGM表达式 : 可以防止sql注入,但是不能进行字符串拼接
${} el表达式
<!--添加学生--><!--#{} OGM表达式 : 可以防止sql注入${} el表达式--><insert id="addStudent" parameterType="com.eagleslab.pojo.Student">insert into tb_student(name,age,sex,birthday,address) values (#{stuName},#{age},#{sex},#{birthday},#{address})</insert><!--根据id来修改学生数据--><update id="updateStudentById" parameterType="com.eagleslab.pojo.Student">update tb_student set name = #{stuName},age = #{age},sex = #{sex},birthday = #{birthday},address = #{address} where id = #{sid}</update><!--根据id来删除学生数据--><delete id="deleteStudentById" parameterType="int">delete from tb_student where id = #{sid}</delete><!--根据学生姓名来模糊查询--><select id="findStudentLikeByName" parameterType="java.lang.String" resultMap="studentVo">select * from tb_student where name like #{ewfeferefew}</select><!--求学生的总个数--><select id="getStudentCount" resultType="int">select count(*) from tb_student</select>
三、动态sql
3.1 定义:
3.2 分类:
- if
- choose (when, otherwise)
- trim (where, set)
- foreach
3.3 :动态sql的使用方法
使用动态sql需要使用到对应的动态标签
<!--根据指定的条件来查询对应的学生数据--><select id="getStudentList" resultMap="studentVo" parameterType="hashmap">select * from tb_student<where><if test="name != null">and name = #{name}</if><!--如果符合条件就对查询语句进行拼接--><if test="sex != null">and sex = #{sex}</if><if test="id != null">and id = #{id}</if></where></select>
@Testpublic void test01(){//创建代理对象StudentMapper studentMapper = sqlSession.getMapper(StudentMapper.class);HashMap hashMap = new HashMap();hashMap.put("sex","男");hashMap.put("id","5");List<Student> studentList = studentMapper.getStudentList(hashMap);for (Student student : studentList) {System.out.println(student);}
四、mybatis其他
4.1延迟加载和立即加载
- 什么是延迟加载?
真正在使用数据的时候才发起查询,不用的时候不查询,按需加载(懒加载)
- 什么是立即加载?
不管用不用,一调用方法,马上发起查询:
- 针对一对多和多对多:通常情况下使用延迟加载
- 针对多对和一对:通常情况下使用立即加载
4.2 n对n
4.2.1 一对一、一对多、客对一、多对多
- 一对一:账单对用户一个账中只能对应一个用户
- 一对多:用户对账单一个用户可以对应多个账单
- 多对一:多个学生可以对应一个班级
- 多对多:用户和角色:一个用户可以对应多个角色,一个角色也可以对应多个用户。多对多我们一般会指定中间表:用来建立两张表之间的联系
例如:张三是一个用户:在家庭中,张三则一个父亲(角色),在企业中,足一个项目经理(角色)
多对多我们一般会指定中间表:用来建立两张表之间的联系
2,在mybatis中:
4.2.2 配置一对一
首先创建账户与用户两个类,账户类中聚合了用户类。
接下来在xml配置文件中进行如下操作:
注意:配置方式
聚合一个用户的字段的配置内容
<?xml version="1.0" encoding="UTF-8" ?><!DOCTYPE mapperPUBLIC "-//mybatis.org//DTD Mapper 3.0//EN""http://mybatis.org/dtd/mybatis-3-mapper.dtd"><mapper namespace="com.eagleslab.mapper.AccountMapper"><!--建立起实体属性和表字段的对应关系--><resultMap id="accountVo" type="com.eagleslab.pojo.Account"><!--匹配主键字段--><id property="tid" column="tid"></id><!--匹配非主键字段--><result property="money" column="money"></result><result property="uid" column="uid"></result><!--配置一对一的关系--><association property="user" javaType="com.eagleslab.pojo.User"><!--配置用户的字段--><id column="id" property="uid"></id><result column="username" property="username"></result><result column="password" property="password"></result></association></resultMap><!--根据指定的条件来查询对应的学生数据--><select id="findAccountByAll" resultMap="accountVo">select * from ts_account a inner join user u on u.id = a.uid</select></mapper>
配置完成后,注意将改配置文件在核心配置文件中进行注册。
4.2.3 配置一对多
首先创建账户与用户两个类,用户类中聚合了账户类。一个用户对应多个账户
接下来在xml配置文件中进行如下操作:
注意:配置方式
聚合一个账户的字段的配置内容
<?xml version="1.0" encoding="UTF-8" ?><!DOCTYPE mapperPUBLIC "-//mybatis.org//DTD Mapper 3.0//EN""http://mybatis.org/dtd/mybatis-3-mapper.dtd"><mapper namespace="com.eagleslab.mapper.UserMapper"><resultMap id="userVo" type="com.eagleslab.pojo.User"><id column="id" property="uid"></id><result column="username" property="username"></result><result column="password" property="password"></result><!--配置一对多--><collection property="accounts" ofType="com.eagleslab.pojo.Account"><!--匹配主键字段--><id property="tid" column="tid"></id><!--匹配非主键字段--><result property="money" column="money"></result><result property="uid" column="uid"></result></collection></resultMap><select id="getUserList" resultMap="userVo">select * from user u left join ts_account a on u.id = a.uid</select></mapper>
4.2.4 多对多
案例:一个用户可以对应多个角色,一个角色也可以对应多个用户
- 首先创建:用户表、角色表、中间表(多对多一定要有中间表)
- 创建表对应的实体类,每个类里聚合对方类型的list,封装。
- 创建每个类对应的接口,接口内定义方法。
- 创建xml文件:
<collection property="userList" ofType="com.eagleslab.pojo.User"><id column="id" property="uid"></id><result column="username" property="username"></result><result column="password" property="password"></result></collection>
<?xml version="1.0" encoding="UTF-8" ?><!DOCTYPE mapperPUBLIC "-//mybatis.org//DTD Mapper 3.0//EN""http://mybatis.org/dtd/mybatis-3-mapper.dtd"><mapper namespace="com.eagleslab.mapper.RoleMapper"><!--建立起实体属性和表字段的对应关系--><resultMap id="roleVo" type="com.eagleslab.pojo.Role"><!--匹配主键字段--><id property="rid" column="rid"></id><!--匹配非主键字段--><result property="roleName" column="role_name"></result><!--配置多对多的关系--><collection property="userList" ofType="com.eagleslab.pojo.User"><id column="id" property="uid"></id><result column="username" property="username"></result><result column="password" property="password"></result></collection></resultMap><!--查询所有的角色数据--><select id="getRoleList" resultMap="roleVo">select u.*,r.*from user uleft join user_role uron u.id = ur.uidleft join tb_role ron r.rid = ur.rid</select></mapper>
注意三表联查:需要两次连接,前一次作为后一次查询的子表。

若有收获,就点个赞吧
0 人点赞
