Use the Device Mapper storage driver
From https://docs.docker.com/storage/storagedriver/device-mapper-driver/
Device Mapper is a kernel-based framework that underpins many advanced volume management technologies on Linux. Docker’s devicemapper storage driver leverages the thin provisioning and snapshotting capabilities of this framework for image and container management. This article refers to the Device Mapper storage driver as devicemapper, and the kernel framework as Device Mapper.
For the systems where it is supported, devicemapper support is included in the Linux kernel. However, specific configuration is required to use it with Docker.
The devicemapper driver uses block devices dedicated to Docker and operates at the block level, rather than the file level. These devices can be extended by adding physical storage to your Docker host, and they perform better than using a filesystem at the operating system (OS) level.
Device Mapper 是基于内核的框架,支持 Linux 上的许多高级卷管理技术。 Docker 的 devicemapper 存储驱动程序利用此框架的精简配置和快照功能进行镜像和容器管理。本文将 Device Mapper 存储驱动程序称为 devicemapper,将内核框架称为 Device Mapper。
在支持这个特性的系统中,对 devicemapper 的支持包含在 Linux 内核中。然而,要想在 Docker 中使用还需要特殊配置。例如,在 RHEL 或 CentOS 的原始安装的 Docker 默认使用 overlay,但无法支持这个配置。
devicemapper__ 驱动程序使用专用于 Docker 的块设备,并在块级而不是文件级运行。可以通过将物理存储添加到 Docker 主机来扩展这些设备,并且它们比在操作系统级别使用文件系统要更好。
Prerequisites
- devicemapper storage driver is a supported storage driver for Docker EE on many OS distribution. See the Product compatibility matrix for details.
- devicemapper is also supported on Docker CE running on CentOS, Fedora, Ubuntu, or Debian.
- Changing the storage driver makes any containers you have already created inaccessible on the local system. Use docker saveto save containers, and push existing images to Docker Hub or a private repository, so you do not need to recreate them later.
- devicemapper__ 存储驱动程序是在 RHEL、CentOS 和 Oracle Linux 上运行的 Docker EE 和 Commercially Supported Docker Engine (CS-Engine) 唯一支持的存储驱动程序。
- devicemapper__ 也可以用于在 CentOS、Fedora、Ubuntu 和 Debian 上运行的 Docker CE。
- 改变存储驱动程序会使在本地创建的容器无法访问。通过 docker save 来保存容器,并将已有镜像上传到 Docker Hub 或私有仓库,以便后面需要时再次创建。
Configure Docker with the devicemapper storage driver
Before following these procedures, you must first meet all the prerequisites.
Configure loop-lvm mode for testing
This configuration is only appropriate for testing. Loopback devices are slow and resource-intensive, and they require you to create file on disk at specific sizes. They can also introduce race conditions. They are available for testing because the setup is easier.
For production systems, see Configure direct-lvm mode for production.
1、Stop Docker.
$ sudo systemctl stop docker
2、Edit /etc/docker/daemon.json. If it does not yet exist, create it. Assuming that the file was empty, add the following contents.
{
“storage-driver”: “devicemapper”
}
See all storage options for each storage driver:
Stable
Edge
Docker does not start if the daemon.json file contains badly-formed JSON.
3、Start Docker.
$ sudo systemctl start docker
4、Verify that the daemon is using the devicemapper storage driver. Use the docker info command and look for Storage Driver.
$ docker info
Containers: 0
Running: 0
Paused: 0
Stopped: 0
Images: 0
Server Version: 17.03.1-ce
Storage Driver: devicemapper
Pool Name: docker-202:1-8413957-pool
Pool Blocksize: 65.54 kB
Base Device Size: 10.74 GB
Backing Filesystem: xfs
Data file: /dev/loop0
Metadata file: /dev/loop1
Data Space Used: 11.8 MB
Data Space Total: 107.4 GB
Data Space Available: 7.44 GB
Metadata Space Used: 581.6 kB
Metadata Space Total: 2.147 GB
Metadata Space Available: 2.147 GB
Thin Pool Minimum Free Space: 10.74 GB
Udev Sync Supported: true
Deferred Removal Enabled: false
Deferred Deletion Enabled: false
Deferred Deleted Device Count: 0
Data loop file: /var/lib/docker/devicemapper/data
Metadata loop file: /var/lib/docker/devicemapper/metadata
Library Version: 1.02.135-RHEL7 (2016-11-16)
Configure direct-lvm mode for production
Production hosts using the devicemapper storage driver must use direct-lvm mode. This mode uses block devices to create the thin pool. This is faster than using loopback devices, uses system resources more efficiently, and block devices can grow as needed. However, more set-up is required than loop-lvm mode.
After you have satisfied the prerequisites, follow the steps below to configure Docker to use the devicemapper storage driver indirect-lvm mode.
Warning: Changing the storage driver makes any containers you have already created inaccessible on the local system. Use docker save to save containers, and push existing images to Docker Hub or a private repository, so you do not need to recreate them later.
使用 devicemapper 存储驱动程序的生产环境中的主机必须使用 direct-lvm 模式。该模式使用块设备来创建精简池。这比使用回环设备更快,更有效地使用系统资源,并且块设备可以按需增长。然而,比 loop-lvm 模式需要更多的设置。
满足前面的先决条件后,按照下面的步骤来配置 Docker 使用 direct-lvm 模式下的 devicemapper 存储驱动程序。
警告:改变存储驱动程序会使在本地创建的容器无法访问。通过 docker save 来保存容器,并将已有镜像上传到 Docker Hub 或私有仓库,以便后面需要时再次创建。
ALLOW DOCKER TO CONFIGURE DIRECT-LVM MODE
With Docker 17.06 and higher, Docker can manage the block device for you, simplifying configuration of direct-lvm mode. This is appropriate for fresh Docker setups only. You can only use a single block device. If you need to use multiple block devices, configure direct-lvm mode manually instead. The following new configuration options have been added:
在 Docker 17.06 或更高版本,Docker 可以替你管理块设备,简化 direct-lvm 模式的配置。这仅适用于 Docker 的首次设置。只能使用一个块设备。如果需要使用多个块设备,请手动配置 direct-lvm 模式。添加了以下新的配置选项:
| Option | Description | Required? | Default | Example |
|---|---|---|---|---|
| dm.directlvm_device | The path to the block device to configure for direct-lvm. 用于 direct-lvm配置的块设备的路径 |
Yes | dm.directlvm_device=”/dev/xvdf” | |
| dm.thinp_percent | The percentage of space to use for storage from the passed in block device. 从传入的块设备中用于存储的空间百分比 |
No | 95 | dm.thinp_percent=95 |
| dm.thinp_metapercent | The percentage of space to for metadata storage from the passed-in block device. 从传入的块设备中用于元数据存储的空间百分比 |
No | 1 | dm.thinp_metapercent=1 |
| dm.thinp_autoextend_threshold | The threshold for when lvm should automatically extend the thin pool as a percentage of the total storage space. lvm 应该自动扩展精简池的阈值,总存储空间百分比的形式 |
No | 80 | dm.thinp_autoextend_threshold=80 |
| dm.thinp_autoextend_percent | The percentage to increase the thin pool by when an autoextend is triggered. 每次触发自动扩展时增加精简池的大小,总存储空间百分比的形式 |
No | 20 | dm.thinp_autoextend_percent=20 |
| dm.directlvm_device_force | Whether to format the block device even if a filesystem already exists on it. If set to false and a filesystem is present, an error is logged and the filesystem is left intact. 即使文件系统已经存在,是否格式化块设备。如果设置为 false 并且存在文件系统,则会记录错误并保持文件系统不变 |
No | false | dm.directlvm_device_force=true |
Edit the daemon.json file and set the appropriate options, then restart Docker for the changes to take effect. The following daemon.json configuration sets all of the options in the table above.
{
“storage-driver”: “devicemapper”,
“storage-opts”: [
“dm.directlvm_device=/dev/xdf”,
“dm.thinp_percent=95”,
“dm.thinp_metapercent=1”,
“dm.thinp_autoextend_threshold=80”,
“dm.thinp_autoextend_percent=20”,
“dm.directlvm_device_force=false”
]
}
See all storage options for each storage driver:
Stable
Edge
Restart Docker for the changes to take effect. Docker invokes the commands to configure the block device for you.
Warning: Changing these values after Docker has prepared the block device for you is not supported and causes an error.
You still need to perform periodic maintenance tasks.
CONFIGURE DIRECT-LVM MODE MANUALLY
The procedure below creates a logical volume configured as a thin pool to use as backing for the storage pool. It assumes that you have a spare block device at /dev/xvdf with enough free space to complete the task. The device identifier and volume sizes may be different in your environment and you should substitute your own values throughout the procedure. The procedure also assumes that the Docker daemon is in the stopped state.
下面的步骤创建了一个配置为精简池的逻辑卷,以用作存储池的备份。它假定你在 /dev/xvdf 有一个备用块设备,并具有足够的可用空间来完成任务。设备标识符和卷大小在你的环境中可能不同,你应该在整个过程中替换自己的值。该过程还假定 Docker 守护程序处于停止状态。
1、Identify the block device you want to use. The device is located under /dev/ (such as /dev/xvdf) and needs enough free space to store the images and container layers for the workloads that host runs. A solid state drive is ideal.
确定要使用的块设备。该设备位于 /dev/ 下(如 /dev/xvdf),并且需要足够的可用空间来存储主机运行的工作负载的镜像和容器层。固态硬盘是最理想的
2、Stop Docker.
$ sudo systemctl stop docker
3、Install the following packages:
RHEL / CentOS: device-mapper-persistent-data, lvm2, and all dependencies
Ubuntu / Debian: thin-provisioning-tools, lvm2, and all dependencies
4、Create a physical volume on your block device from step 1, using the pvcreate command. Substitute your device name for /dev/xvdf.
Warning: The next few steps are destructive, so be sure that you have specified the correct device!
$ sudo pvcreate /dev/xvdf
Physical volume “/dev/xvdf” successfully created.
5、Create a docker volume group on the same device, using the vgcreate command.
$ sudo vgcreate docker /dev/xvdf
Volume group “docker” successfully created
6、Create two logical volumes named thinpool and thinpoolmeta using the lvcreate command. The last parameter specifies the amount of free space to allow for automatic expanding of the data or metadata if space runs low, as a temporary stop-gap. These are the recommended values.
通过 lvcreate 命令创建两个名为 thinpool 和 thinpoolmeta 的逻辑卷。最后一个参数指定可用空间的大小,以便在空间不足时自动扩展数据或元数据。这些是推荐值。
$ sudo lvcreate —wipesignatures y -n thinpool docker -l 95%VG
Logical volume “thinpool” created.
$ sudo lvcreate —wipesignatures y -n thinpoolmeta docker -l 1%VG
Logical volume “thinpoolmeta” created.
7、Convert the volumes to a thin pool and a storage location for metadata for the thin pool, using the lvconvert command.
$ sudo lvconvert -y \
—zero n \
-c 512K \
—thinpool docker/thinpool \
—poolmetadata docker/thinpoolmeta
WARNING: Converting logical volume docker/thinpool and docker/thinpoolmeta to
thin pool’s data and metadata volumes with metadata wiping.
THIS WILL DESTROY CONTENT OF LOGICAL VOLUME (filesystem etc.)
Converted docker/thinpool to thin pool.
8、Configure autoextension of thin pools via an lvm profile.
$ sudo vi /etc/lvm/profile/docker-thinpool.profile
9、Specify thinpool_autoextend_threshold and thin_pool_autoextend_percent values.
thin_pool_autoextend_threshold is the percentage of space used before lvm attempts to autoextend the available space (100 = disabled, not recommended).
thin_pool_autoextend_percent is the amount of space to add to the device when automatically extending (0 = disabled).
The example below adds 20% more capacity when the disk usage reaches 80%.
指定 thinpool_autoextend_threshold 和 thin_pool_autoextend_percent 的值
thin_pool_autoextend_threshold 是触发 lvm 尝试自动扩展可用空间的空间使用率百分比(100 = 禁用,不推荐)。
thin_pool_autoextend_percent 是触发自动扩展时会扩展的大小(0 = 禁用)。
下面的例子在磁盘使用率达到 80% 时自动增加 20% 的容量:
activation {
thin_pool_autoextend_threshold=80
thin_pool_autoextend_percent=20
}
Save the file.
10、Apply the LVM profile, using the lvchange command.
$ sudo lvchange —metadataprofile docker-thinpool docker/thinpool
Logical volume docker/thinpool changed.
11、Enable monitoring for logical volumes on your host. Without this step, automatic extension does not occur even in the presence of the LVM profile.
$ sudo lvs -o+seg_monitor
LV VG Attr LSize Pool Origin Data% Meta% Move Log Cpy%Sync Convert Monitor
thinpool docker twi-a-t—- 95.00g 0.00 0.01 monitored
12、If you have ever run Docker on this host before, or if /var/lib/docker/ exists, move it out of the way so that Docker can use the new LVM pool to store the contents of image and containers.
如果之前在这个主机上运行过 Docker,或 /var/lib/docker/ 文件已经存在,移除文件以便让 Docker 使用新的 LVM pool 来存储镜像和容器
$ mkdir /var/lib/docker.bk
$ mv /var/lib/docker/* /var/lib/docker.bk
If any of the following steps fail and you need to restore, you can remove /var/lib/docker and replace it with /var/lib/docker.bk.
如果以下任何步骤失败并且需要恢复,则可以删除 /var/lib/docker 并将其替换为 __/var/lib/docker.bk
13、Edit /etc/docker/daemon.json and configure the options needed for the devicemapper storage driver. If the file was previously empty, it should now contain the following contents:
编辑 /etc/docker/daemon.json 并配置 devicemapper存储驱动程序所需的选择。增加下面的内容:
{
“storage-driver”: “devicemapper”,
“storage-opts”: [
“dm.thinpooldev=/dev/mapper/docker-thinpool”,
“dm.use_deferred_removal=true”,
“dm.use_deferred_deletion=true”
]
}
14、Start Docker.
systemd:
$ sudo systemctl start docker
service:
$ sudo service docker start
15、Verify that Docker is using the new configuration using docker info.
$ docker info
Containers: 0
Running: 0
Paused: 0
Stopped: 0
Images: 0
Server Version: 17.03.1-ce
Storage Driver: devicemapper
Pool Name: docker-thinpool
Pool Blocksize: 524.3 kB
Base Device Size: 10.74 GB
Backing Filesystem: xfs
Data file:
Metadata file:
Data Space Used: 19.92 MB
Data Space Total: 102 GB
Data Space Available: 102 GB
Metadata Space Used: 147.5 kB
Metadata Space Total: 1.07 GB
Metadata Space Available: 1.069 GB
Thin Pool Minimum Free Space: 10.2 GB
Udev Sync Supported: true
Deferred Removal Enabled: true
Deferred Deletion Enabled: true
Deferred Deleted Device Count: 0
Library Version: 1.02.135-RHEL7 (2016-11-16)
Manage devicemapper
Monitor the thin pool
Do not rely on LVM auto-extension alone. The volume group automatically extends, but the volume can still fill up. You can monitor free space on the volume using lvs or lvs -a. Consider using a monitoring tool at the OS level, such a Nagios.
To view the LVM logs, you can use journalctl:
不要单独依靠 LVM 自动扩展。因为虽然卷组会自动扩展,但卷仍可能被填满。可以使用 lvs 或lvs -a 监视卷上的可用空间。最好在操作系统级别使用监控工具,例如 Nagios。
通过 journalctl 查看 LVM 的日志:
$ journalctl -fu dm-event.service
If you run into repeated problems with thin pool, you can set the storage option dm.minfree_space to a value (representing a percentage) in /etc/docker.daemon.json. For instance, setting it to 10 ensures that operations fail with a warning when the free space is at or near 10%. See the storage driver options in the Engine daemon reference.
如果遇到精简池的重复问题,可以将存储选项 dm.min_free_space 设置为 /etc/docker.daemon.json 中的值(表示百分比)。例如,将其设置为 10 可确保当可用空间达到或接近 10% 时操作失败并发出警告。请参阅 Engine守护程序参考中的存储驱动程序选项。_
Increase capacity on a running device
You can increase the capacity of the pool on a running thin-pool device. This is useful if the data’s logical volume is full and the volume group is at full capacity. The specific procedure depends on whether you are using a loop-lvm thin pool or a direct-lvm thin pool.
可以增加正在运行的精简池设备上的池的容量。这对于数据的逻辑卷已满并且卷组处于满负荷状态时很有用。具体过程取决于使用的是 loop-lvm 精简池还是 direct-lvm 精简池。
RESIZE A LOOP-LVM THIN POOL
The easiest way to resize a loop-lvm thin pool is to use the device_tool utility, but you can use operating system utilities instead.
最简单的调整 loop-lvm 精简池的方法是使用 device_tool 工具,当然你也可以使用操作系统的工具
Use the device_tool utility
A community-contributed script called devicetool.go is available in the moby/moby Github repository. You can use this tool to resize a loop-lvm thin pool, avoiding the long process above. This tool is not guaranteed to work, but you should only be using loop-lvm on non-production systems.
If you do not want to use device_tool, you can resize the thin pool manually instead.
Docker Github 仓库的 contrib/ 目录中提供了一个名为 device_tool.go 的社区维护脚本。可以使用此工具调整 loop-lvm 精简池的大小,避免冗长的过程。这个工具不能保证能正常工作,但你只能在非生产系统上使用 loop-lvm。
如果不想使用 device_tool 工具,可以手动调整精简池。_
1、To use the tool, clone the Github repository, change to the contrib/docker-device-tool, and follow the instructions in the README.md to compile the tool.
从 Github 仓库下载项目后,切换到 contrib/docker-device-tool 目录,按照 README.md 文件中的指示编译这个工具
2、Use the tool. The following example resizes the thin pool to 200GB.
使用工具。下面例子中将精简池调整为 200 GB
$ ./device_tool resize 200GB
Use operating system utilities
If you do not want to use the device-tool utility, you can resize a loop-lvm thin pool manually using the following procedure.
In loop-lvm mode, a loopback device is used to store the data, and another to store the metadata. loop-lvm mode is only supported for testing, because it has significant performance and stability drawbacks.
如果不想使用 device_tool 工具,可以按照下面的步骤手动调整 loop-lvm 精简池。
在 loop-lvm 模式下,使用一个回环设备来存储数据,另一个回环设备来存储元数据。loop-lvm 模式仅支持用于测试,因为它具有显着的性能和稳定性缺点。
If you are using loop-lvm mode, the output of docker info shows file paths for Data loop file and Metadata loop file:
如果你正在使用 loop-lvm 模式,docker info 命令会显示 Data loop file 和 Metadata loop file 文件的路径:
$ docker info |grep ‘loop file’
Data loop file: /var/lib/docker/devicemapper/data
Metadata loop file: /var/lib/docker/devicemapper/metadata
Follow these steps to increase the size of the thin pool. In this example, the thin pool is 100 GB, and is increased to 200 GB.
按照下面的步骤来增加精简池的大小。在这个例子中,精简池由 100GB 调整为 200GB
1、List the sizes of the devices.
$ sudo ls -lh /var/lib/docker/devicemapper/
total 1175492
-rw———- 1 root root 100G Mar 30 05:22 data
-rw———- 1 root root 2.0G Mar 31 11:17 metadata
2、Increase the size of the data file to 200 G using the truncate command, which is used to increase or decrease the size of a file. Note that decreasing the size is a destructive operation.
truncate__ 命令用于增大或减小指定文件的体积。注意,减小体积是一种破坏性操作。
$ sudo truncate -s 200G /var/lib/docker/devicemapper/data
3、Verify the file size changed.
$ sudo ls -lh /var/lib/docker/devicemapper/
total 1.2G
-rw———- 1 root root 200G Apr 14 08:47 data
-rw———- 1 root root 2.0G Apr 19 13:27 metadata
4、The loopback file has changed on disk but not in memory. List the size of the loopback device in memory, in GB. Reload it, then list the size again. After the reload, the size is 200 GB.
磁盘上的回环文件已经变了,但内存中的还没有。以 GB 为单位列出内存中的回环设备。重新加载后再次列出,会发现重新加载后变化生效。
$ echo $[ $(sudo blockdev —getsize64 /dev/loop0) / 1024 / 1024 / 1024 ]
100
$ sudo losetup -c /dev/loop0
$ echo $[ $(sudo blockdev —getsize64 /dev/loop0) / 1024 / 1024 / 1024 ]
200
5、Reload the devicemapper thin pool.
a. Get the pool name first. The pool name is the first field, delimited by :. This command extracts it.
首先获取精简池名称。名字是由:__分隔的第一个字段。这个命令提取:
$ sudo dmsetup status | grep ‘ thin-pool ‘ | awk -F ‘: ‘ {‘print $1’}
docker-8:1-123141-pool<br />b. Dump the device mapper table for the thin pool.<br />_ __转储精简池的设备映射表。_<br /> $ sudo dmsetup table docker-8:1-123141-pool0 209715200 thin-pool 7:1 7:0 128 32768 1 skip_block_zeroing<br />c. Calculate the total sectors of the thin pool using the second field of the output. The number is expressed in 512-k sectors. A 100G file has 209715200 512-k sectors. If you double this number to 200G, you get 419430400 512-k sectors.<br />_使用输出的第二个字段计算精简池的总扇区。该数字以 512-k 扇区表示。一个 100G 文件有 209715200 个 512-k 扇区。如果你把这个数字加倍到200G,会得到 419430400 个 512-k 扇区。_<br />d. Reload the thin pool with the new sector number, using the following three dmsetup commands.<br />_ __使用以下三个 __dmsetup__ 命令重新加载具有新扇区号的精简池_<br /> $ sudo dmsetup suspend docker-8:1-123141-pool$ sudo dmsetup reload docker-8:1-123141-pool --table '0 419430400 thin-pool 7:1 7:0 128 32768 1 skip_block_zeroing'$ sudo dmsetup resume docker-8:1-123141-pool
RESIZE A DIRECT-LVM THIN POOL
To extend a direct-lvm thin pool, you need to first attach a new block device to the Docker host, and make note of the name assigned to it by the kernel. In this example, the new block device is /dev/xvdg.
Follow this procedure to extend a direct-lvm thin pool, substituting your block device and other parameters to suit your situation.
要调整 direct-lvm 精简池,需要先将新的块设备连接到 Docker 主机,并留言内核给它指定的名称。在这个例子中,新的块设备是 /dev/xvdg。
按照下面的步骤来调整 direct-lvm 精简池,将块设备和其他参数改为适合你的情况
1、Gather information about your volume group.
Use the pvdisplay command to find the physical block devices currently in use by your thin pool, and the volume group’s name.
通过 pvdisplay 命令找出当前正被你的精简池使用的物理块设备,已经卷组的名称。
$ sudo pvdisplay |grep ‘VG Name’
PV Name /dev/xvdf
VG Name docker
In the following steps, substitute your block device or volume group name as appropriate.
2、Extend the volume group, using the vgextend command with the VG Name from the previous step, and the name of your newblock device.
$ sudo vgextend docker /dev/xvdg
Physical volume “/dev/xvdg” successfully created.
Volume group “docker” successfully extended
3、Extend the docker/thinpool logical volume. This command uses 100% of the volume right away, without auto-extend. To extend the metadata thinpool instead, use docker/thinpooltmeta.
扩展 docker/thinpool 逻辑卷。该命令立即使用 100% 的卷,而不会自动扩展。如果要扩展元数据精简池,使用 docker/thinpooltmeta
$ sudo lvextend -l+100%FREE -n docker/thinpool
Size of logical volume docker/thinpooltdata changed from 95.00 GiB (24319 extents) to 198.00 GiB (50688 extents).
Logical volume docker/thinpool_tdata successfully resized.
4、Verify the new thin pool size using the Data Space Available field in the output of docker info. If you extended the docker/thinpool_tmeta logical volume instead, look for Metadata Space Available.
在 docker info 的输出中查看 Data Space Available 字段验证精简池新尺寸。对于 docker/thinpooltmeta 逻辑卷,查看 Metadata Space Available 字段。
Storage Driver: devicemapper
Pool Name: docker-thinpool
Pool Blocksize: 524.3 kB
Base Device Size: 10.74 GB
Backing Filesystem: xfs
Data file:
Metadata file:
Data Space Used: 212.3 MB
Data Space Total: 212.6 GB
Data Space Available: 212.4 GB
Metadata Space Used: 286.7 kB
Metadata Space Total: 1.07 GB
Metadata Space Available: 1.069 GB
Activate the devicemapper after reboot
If you reboot the host and find that the docker service failed to start, look for the error, “Non existing device”. You need to re-activate the logical volumes with this command:
如果重启主机时发现 docker 服务无法启动,并报错“Non existing device”。需要用下面的命令重新激活逻辑卷:
sudo lvchange -ay docker/thinpool
How the devicemapper storage driver works
Warning: Do not directly manipulate any files or directories within /var/lib/docker/. These files and directories are managed by Docker.
警告:不要直接操作 /var/lib/docker/ 中的任何文件或目录。这些文件和目录由 Docker 管理。
Use the lsblk command to see the devices and their pools, from the operating system’s point of view:
通过 lsblk 命令从操作系统角度查看设备和对应的池。
$ sudo lsblk
NAME MAJ:MIN RM SIZE RO TYPE MOUNTPOINT
xvda 202:0 0 8G 0 disk
└─xvda1 202:1 0 8G 0 part /
xvdf 202:80 0 100G 0 disk
├─docker-thinpooltmeta 253:0 0 1020M 0 lvm
│ └─docker-thinpool 253:2 0 95G 0 lvm
└─docker-thinpool_tdata 253:1 0 95G 0 lvm
└─docker-thinpool 253:2 0 95G 0 lvm
Use the mount command to see the mount-point Docker is using:
$ mount |grep devicemapper
/dev/xvda1 on /var/lib/docker/devicemapper type xfs (rw,relatime,seclabel,attr2,inode64,noquota)
When you use devicemapper, Docker stores image and layer contents in the thinpool, and exposes them to containers by mounting them under subdirectories of /var/lib/docker/devicemapper/.
在使用 devicemapper 时,Docker 将镜像和层中的内容存储到精简池,并通过将其挂载到 /var/lib/docker/devicemapper/ 的子目录暴露给容器。_
Image and container layers on-disk
The /var/lib/docker/devicemapper/metadata/ directory contains metadata about the Devicemapper configuration itself and about each image and container layer that exist. The devicemapper storage driver uses snapshots, and this metadata include information about those snapshots. These files are in JSON format.
/var/lib/docker/devicemapper/metadata/ 目录包含 Devicemapper 自身配置和已经存在的容器层的元数据。devicemapper__ 存储驱动程序使用快照(snapshot),而这个元数据包含这些快照的信息。这些文件是 JSON 格式。
The /var/lib/devicemapper/mnt/ directory contains a mount point for each image and container layer that exists. Image layer mount points are empty, but a container’s mount point shows the container’s filesystem as it appears from within the container.
/var/lib/devicemapper/mnt/__ 目录包含每个镜像和已有容器的挂载点。镜像层挂载点是空的,但容器的挂载点显示容器的文件系统,因为它显示在容器内。
Image layering and sharing
The devicemapper storage driver uses dedicated block devices rather than formatted filesystems, and operates on files at the block level for maximum performance during copy-on-write (CoW) operations.
devicemapper__ 存储驱动程序使用专用块设备而不是格式化的文件系统,并在块级别上对文件进行操作,以便在写时复制(CoW)操作期间实现最高性能。
SNAPSHOTS
Another feature of devicemapper is its use of snapshots (also sometimes called thin devices or virtual devices), which store the differences introduced in each layer as very small, lightweight thin pools. Snapshots provide many benefits:
devicemapper__ 的另一个特性是使用快照(也会叫做精简设备或虚拟设备),快照将每层中引入的差异存储为非常小的轻量级精简池。快照提供许多好处:
- Layers which are shared in common between containers are only stored on disk once, unless they are writable. For instance, if you have 10 different images which are all based on alpine, the alpine image and all its parent images are only stored once each on disk.
- Snapshots are an implementation of a copy-on-write (CoW) strategy. This means that a given file or directory is only copied to the container’s writable layer when it is modified or deleted by that container.
- Because devicemapper operates at the block level, multiple blocks in a writable layer can be modified simultaneously.
- Snapshots can be backed up using standard OS-level backup utilities. Just make a copy of /var/lib/docker/devicemapper/.
- 容器中共享的层只会在磁盘上存储一次,除非是可写层。例如,如果有 10 个基于 alpine 的镜像,alpine 镜像及其父镜像之会在磁盘上存储一次。
- 快照是写时复制(CoW)策略的实现。这意味着给定的文件或目录只有在容器被修改或删除时才会被复制到容器的可写层。
- 因为 devicemapper 在块级别上对文件进行操作,一个可写层的多个块可以同时修改。
- 快照可以通过标准的操作系统级备份工具进行备份。只要复制 /var/lib/docker/devicemapper/ 即可。
DEVICEMAPPER WORKFLOW
When you start Docker with the devicemapper storage driver, all objects related to image and container layers are stored in/var/lib/docker/devicemapper/, which is backed by one or more block-level devices, either loopback devices (testing only) or physical disks.
通过 devicemapper 存储驱动程序启动 Docker 时,所有和镜像及容器层相关的对象都保存在 /var/lib/docker/devicemapper/,它由一个或多个块级设备(环回设备(仅用于测试)或物理磁盘)支持。
The base device is the lowest-level object. This is the thin pool itself. You can examine it using docker info. It contains a filesystem. This base device is the starting point for every image and container layer. The base device is a Device Mapper implementation detail, rather than a Docker layer.
Metadata about the base device and each image or container layer is stored in /var/lib/docker/devicemapper/metadata/ in JSON format. These layers are copy-on-write snapshots, which means that they are empty until they diverge from their parent layers.
Each container’s writable layer is mounted on a mountpoint in /var/lib/docker/devicemapper/mnt/. An empty directory exists for each read-only image layer and each stopped container.
base device 是最低级别的对象。这就是精简池本身。可以使用 docker info 来检查。它包含一个文件系统。 这个 base device 是每个镜像和容器层的起点。base device 是 Device Mapper 的实现细节,而不是 Docker 层。
base device 的元数据和所有的镜像及容器层都以 JSON 格式存储在 /var/lib/docker/devicemapper/metadata/ 中。这些层是写时复制的快照,意味着它们都是空的,直到和它们的依赖层产生差异。
每个容器的可写层都挂载到 /var/lib/docker/devicemapper/mnt/ 中的一个挂载点。对每个只读镜像层和每个停止状态的容器,对应有一个空目录。
Each image layer is a snapshot of the layer below it. The lowest layer of each image is a snapshot of the base device that exists in the pool. When you run a container, it is a snapshot of the image the container is based on. The following example shows a Docker host with two running containers. The first is a ubuntu container and the second is a busybox container.
每个镜像层都是下面层的快照。每个镜像的最底层是池中的 _base device 的快照。在运行容器时,容器是它所依赖的镜像的快照。下面例子中的 Docker 主机上有两个容器在运行,分别是 ubuntu 和 busybox。_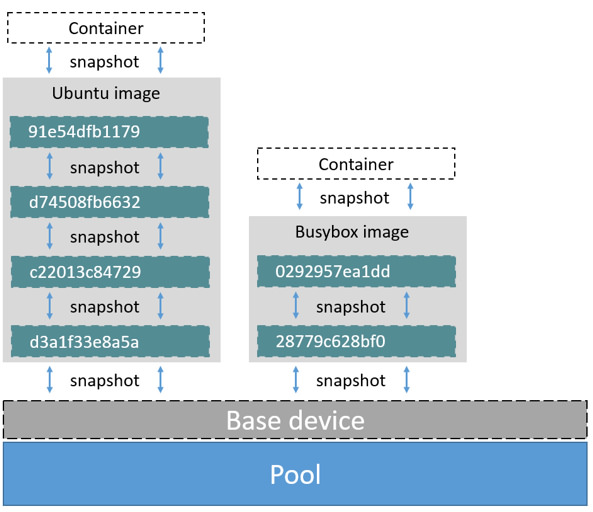
How container reads and writes work with devicemapper
Reading files
With devicemapper, reads happen at the block level. The diagram below shows the high level process for reading a single block (0x44f) in an example container.
通过 devicemapper,读操作发生在块级别。下图显示了在示例容器中对单独块(0x44f)的读操作的高层级的处理。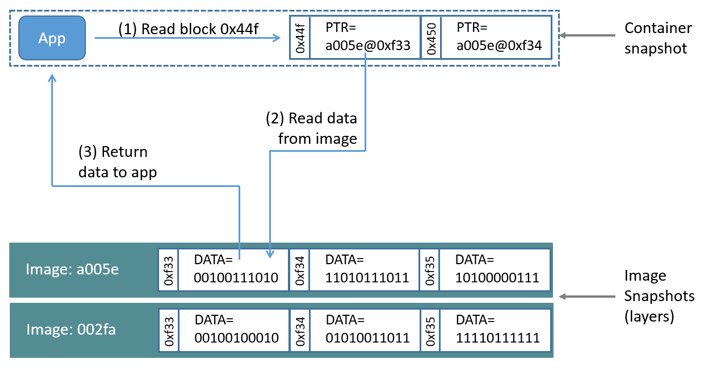
An application makes a read request for block 0x44f in the container. Because the container is a thin snapshot of an image, it doesn’t have the block, but it has a pointer to the block on the nearest parent image where it does exist, and it reads the block from there. The block now exists in the container’s memory.
应用程序向容器中的块 0x44f 发出读取请求。由于容器是镜像的精简快照,它没有该块,但它具有一个指向最接近的包含这个块的父镜像的指针,并从那里读取块。该块现在存在于容器的内存中。
Writing files
Writing a new file: With the devicemapper driver, writing new data to a container is accomplished by an allocate-on-demand operation. Each block of the new file is allocated in the container’s writable layer and the block is written there.
Updating an existing file: The relevant block of the file is read from the nearest layer where it exists. When the container writes the file, only the modified blocks are written to the container’s writable layer.
Deleting a file or directory: When you delete a file or directory in a container’s writable layer, or when an image layer deletes a file that exists in its parent layer, the devicemapper storage driver intercepts further read attempts on that file or directory and responds that the file or directory does not exist.
Writing and then deleting a file: If a container writes to a file and later deletes the file, all of those operations happen in the container’s writable layer. In that case, if you are using direct-lvm, the blocks are freed. If you use loop-lvm, the blocks may not be freed. This is another reason not to use loop-lvm in production.
写新文件:通过 devicemapper__ 驱动程序,通过 allocate-on-demand 操作实现将新数据写到容器中。新文件的每个块都分配到容器的可写层,并且块写入那里。(Each block of the new file is allocated in the container’s writable layer and the block is written there.)
改文件__:文件的相关块从最近的包含这些块的层中读取。当容器写入文件时,只有修改后的块被写入容器的可写层。
删除文件或目录:当删除容器可写层中的文件或目录时,或者镜像层删除其父层中存在的文件时,devicemapper__ 存储驱动程序会截获对该文件或目录的进一步读取尝试,并回应文件或目录不存在。不会真的删除,但在读的时候告诉你不存在。
写然后删除文件:如果容器写入文件并稍后删除文件,则所有这些操作都发生在容器的可写层中。在这种情况下,如果使用 direct-lvm,块将被释放。如果使用loop-lvm,块可能不会被释放。这是不在生产环境中使用 loop-lvm__ 的另一个原因。
Device Mapper and Docker performance
- allocate-on demand performance impact: The devicemapper storage driver uses an allocate-on-demand operation to allocate new blocks from the thin pool into a container’s writable layer. Each block is 64KB, so this is the minimum amount of space that is used for a write.
- Copy-on-write performance impact: The first time a container modifies a specific block, that block is written to the container’s writable layer. Because these writes happen at the level of the block rather than the file, performance impact is minimized. However, writing a large number of blocks can still negatively impact performance, and the devicemapper storage driver may actually perform worse than other storage drivers in this scenario. For write-heavy workloads, you should use data volumes, which bypass the storage driver completely.
- 按需分配(allocate-on demand)性能影响: devicemapper 存储驱动程序使用按需分配操作将精简池中的新块分配到容器的可写层。每个块都是 64KB,所以这是用于写入的最小大小。
- 写时复制(Copy-on-write)性能影响: 容器第一次修改特定块时,该块将写入容器的可写层。因为这些写操作发生在块的级别而不是文件,所以性能影响最小化。但是,编写大量数据块仍然会对性能产生负面影响,并且设备映射程序存储驱动程序实际上可能在此方案中的性能比其他存储驱动程序差。对于写入繁重的工作负载,应使用完全绕过存储驱动程序的数据卷。
Performance best practices
Keep these things in mind to maximize performance when using the devicemapper storage driver.
- Use direct-lvm: The loop-lvm mode is not performant and should never be used in production.
- Use fast storage: Solid-state drives (SSDs) provide faster reads and writes than spinning disks.
- Memory usage: the devicemapper uses more memory than some other storage drivers. Each launched container loads one or more copies of its files into memory, depending on how many blocks of the same file are being modified at the same time. Due to the memory pressure, the devicemapper storage driver may not be the right choice for certain workloads in high-density use cases.
- Use volumes for write-heavy workloads: Volumes provide the best and most predictable performance for write-heavy workloads. This is because they bypass the storage driver and do not incur any of the potential overheads introduced by thin provisioning and copy-on-write. Volumes have other benefits, such as allowing you to share data among containers and persisting even when no running container is using them.
- 使用 direct-lvm:生产环境中不要使用 loop-lvm。
- 使用高速存储:固态存储设备(SSD)读写性能更好。
- 内存使用情况:devicemapper 比一些其他存储驱动程序使用更多的内存。每个启动的容器都会将其文件的一个或多个副本加载到内存中,具体取决于同时修改同一文件的块数。由于内存压力,devicemapper 存储驱动程序可能不是高密度用例中某些工作负载的正确选择。
- 对于频繁写入的工作负载使用卷:卷为写入繁重的工作负载提供了最佳和最可预测的性能。这是因为它们绕过了存储驱动程序,并且不会产生精简配置和写入时复制引入的任何潜在开销。卷还有其他好处,例如允许在容器之间共享数据,并且即使在没有正在运行的容器正在使用它们时也会持续存在。

若有收获,就点个赞吧
0 人点赞
