- dockerFile
- 5.使用Dockerfile生成容器镜像优化
- 网络与通信原理
- 2.4 跨Docker Host容器间通信实现
- 2.5 Flannel
- 2.6 ETCD
- 2.7 ETCD部署
- Flannel部署
- 修改后的flannel内容
- Flanneld configuration options
- etcd url location. Point this to the server where etcd runs
- etcd config key. This is the configuration key that flannel queries
- For address range assignment
- Any additional options that you want to pass
- FLANNEL_OPTIONS=””
- Docker网络配置
- 跨Docker Host容器间通信验证
- 容器数据持久化存储机制
dockerFile
1. Dockerfile介绍
Dockerfile是一种能够被Docker程序解释的剧本。Dockerfile由一条一条的指令组成,并且有自己的书写格式和支持的命令。当我们需要在容器镜像中指定自己额外的需求时,只需在Dockerfile上添加或修改指令,然后通过docker build生成我们自定义的容器镜像(image)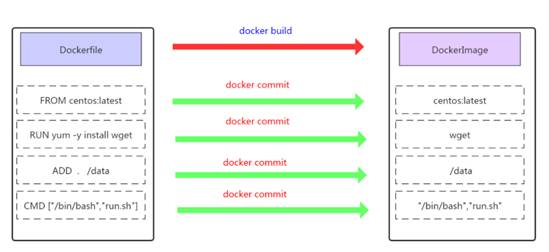
2. Dockerfile指令
构建指令
- 用于构建Image
其指定的操作不会在运行image容器上执行(FROM、MAINTAINER、RUN、ENV、ADD、COPY)
设置类指令
用于设置image的属性
- 其指定的操作将在运行image的容器中执行(CMD、ENTRYPOINT、USER 、EXPOSE、VOLUME、WORKDIR、ONBUILD)
指令说明
| 指令 | 描述 | | —- | —- | | FROM | 构建新镜像基于的基础镜像 | | LABEL | 标签 | | RUN | 构建镜像时运行的Shell命令 | | COPY | 拷贝文件或目录到镜像中 | | ADD | 解压压缩包并拷贝 | | ENV | 设置环境变量 | | USER | 为RUN、CMD和ENTRYPOINT执行命令指定运行用户 | | EXPOSE | 声明容器运行的服务端口 | | WORKDIR | 为RUN、CMD、ENTRYPOINT、COPY和ADD设置工作目录 | | CMD | 运行容器时默认执行,如果有多个CMD指令,最后一个生效 |
指令详细解释
1, FROM
FROM指令用于指定其后构建新镜像所使用的基础镜像。
FROM指令必是Dockerfile文件中的首条命令。
FROM指令指定的基础image可以是官方远程仓库中的,也可以位于本地仓库,优先本地仓库。
格式:FROM :
例:FROM centos:latest
2, RUN
RUN指令用于在构建镜像中执行命令,有以下两种格式:
- shell格式
格式:RUN <命令>
例:RUN echo ‘kubemsb’ > /var/www/html/index.html
- exec格式
格式:RUN [“可执行文件”, “参数1”, “参数2”]
例:RUN [“/bin/bash”, “-c”, “echo kubemsb > /var/www/html/index.html”]
注意: 按优化的角度来讲:当有多条要执行的命令,不要使用多条RUN,尽量使用&&符号与\符号连接成一行。因为多条RUN命令会让镜像建立多层(总之就是会变得臃肿了😃)。
RUN yum install httpd httpd-devel -y
RUN echo test > /var/www/html/index.html
可以改成
RUN yum install httpd httpd-devel -y && echo test > /var/www/html/index.html
或者改成
RUN yum install httpd httpd-devel -y \
&& echo test > /var/www/html/index.html
3, CMD
CMD不同于RUN,CMD用于指定在容器启动时所要执行的命令,而RUN用于指定镜像构建时所要执行的命令。
格式有三种:
CMD [“executable”,”param1”,”param2”]
CMD [“param1”,”param2”]
CMD command param1 param2
每个Dockerfile只能有一条CMD命令。如果指定了多条命令,只有最后一条会被执行。
如果用户启动容器时候指定了运行的命令,则会覆盖掉CMD指定的命令。
什么是启动容器时指定运行的命令?
# docker run -d -p 80:80 镜像名 运行的命令
4, EXPOSE
EXPOSE指令用于指定容器在运行时监听的端口
格式:EXPOSE
例:EXPOSE 80 3306 8080
上述运行的端口还需要使用docker run运行容器时通过-p参数映射到宿主机的端口.
5, ENV
ENV指令用于指定一个环境变量.
格式:ENV
例:ENV JAVA_HOME /usr/local/jdkxxxx/
6, ADD
ADD指令用于把宿主机上的文件拷贝到镜像中
格式:ADD
如果把
7, COPY
COPY指令与ADD指令类似,但COPY的源文件只能是本地文件
格式:COPY
8, ENTRYPOINT
ENTRYPOINT与CMD非常类似
相同点:一个Dockerfile只写一条,如果写了多条,那么只有最后一条生效都是容器启动时才运行
不同点:如果用户启动容器时候指定了运行的命令,ENTRYPOINT不会被运行的命令覆盖,而CMD则会被覆盖
格式有两种:
ENTRYPOINT [“executable”, “param1”, “param2”]
ENTRYPOINT command param1 param2
9, VOLUME
VOLUME指令用于把宿主机里的目录与容器里的目录映射.
只指定挂载点,docker宿主机映射的目录为自动生成的。
格式:VOLUME [“
10, USER
USER指令设置启动容器的用户(像hadoop需要hadoop用户操作,oracle需要oracle用户操作),可以是用户名或UID
USER daemon
USER 1001
注意:如果设置了容器以daemon用户去运行,那么RUN,CMD和ENTRYPOINT都会以这个用户去运行镜像构建完成后,通过docker run运行容器时,可以通过-u参数来覆盖所指定的用户
11, WORKDIR
WORKDIR指令设置工作目录,类似于cd命令。不建议使用RUN cd /root ,建议使用WORKDIR
WORKDIR /root
3.Dockerfile基本构成
- 基础镜像信息
- 维护者信息
- 镜像操作指令
- 容器启动时执行指令
4. Dockerfile生成容器镜像方法
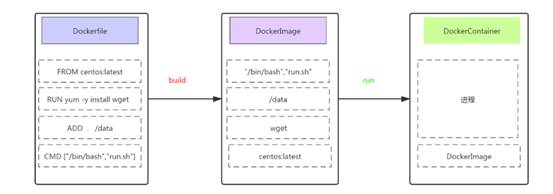
4. Dockerfile生成容器镜像案例
4.1 使用Dockerfile生成容器镜像步骤
```shell 第一步:创建一个文件夹(目录)
第二步:在文件夹(目录)中创建Dockerfile文件(并编写)及其它文件
第三步:使用docker build命令构建镜像
第四步:使用构建的镜像启动容器
<a name="xIuzw"></a>#### 4.2 使用Dockerfile生成Nginx容器镜像```shellmkdir -p /opt/dockerfile/nginxcd /opt/dockerfile/nginx## 创建index.htmlecho "nginx's running" >> index.htmlvim Dockefile## 文件内容如下FROM centos:centos7MAINTAINER "<776172520@qq.com>"RUN yum -y install wgetRUN wget -O /etc/yum.repos.d/epel.repo http://mirrors.aliyun.com/repo/epel-7.repoRUN yum -y install nginxADD index.html /usr/share/nginx/html/RUN echo "daemon off;" >> /etc/nginx/nginx.confEXPOSE 80CMD /usr/sbin/nginx## 执行build命令docker build -t centos7-nginx:v1 .## 文件输出Step 1/9 : FROM centos:centos7---> eeb6ee3f44bdStep 2/9 : MAINTAINER "<776172520@qq.com>"---> Using cache---> 8f605a9e3abcStep 3/9 : RUN yum -y install wget---> Using cache---> da91c1029113Step 4/9 : RUN wget -O /etc/yum.repos.d/epel.repo http://mirrors.aliyun.com/repo/epel-7.repo---> Using cache---> 9c47cc585081Step 5/9 : RUN yum -y install nginx---> Using cache---> b6a4c6183caeStep 6/9 : ADD index.html /usr/share/nginx/html/---> 5287d59afcf3Step 7/9 : RUN echo "daemon off;" >> /etc/nginx/nginx.conf---> Running in 5e9121f07f9cRemoving intermediate container 5e9121f07f9c---> a49f3a0025b0Step 8/9 : EXPOSE 80---> Running in 61ac268cf8e5Removing intermediate container 61ac268cf8e5---> e489c2c5ca81Step 9/9 : CMD /usr/sbin/nginx---> Running in 2fd98c75d529Removing intermediate container 2fd98c75d529---> 54e4e2b908d9Successfully built 54e4e2b908d9Successfully tagged centos7-nginx:v1## 启动容器docker run -d -p 8082:80 centos7-nginx:v1
浏览器访问 http://10.0.0.10:8082
4.3使用dockerfile生成tomcat容器
mkdir -p /opt/dockerfile/tomcatcd /opt/dockerfile/tomcat## 创建index.htmlecho "tomcat's running" >> index.htmlvim Dockefile## dockerfile内容FROM centos:centos7MAINTAINER "<776172520@qq.com>"ENV VERSION=8.5.79ENV JAVA_HOME=/usr/local/jdkENV TOMCAT_HOME=/usr/local/tomcatRUN yum -y install wgetRUN wget https://dlcdn.apache.org/tomcat/tomcat-8/v${VERSION}/bin/apache-tomcat-${VERSION}.tar.gzRUN tar xf apache-tomcat-${VERSION}.tar.gzRUN mv apache-tomcat-${VERSION} /usr/local/tomcatRUN rm -rf apache-tomcat-${VERSION}.tar.gz /usr/local/tomcat/webapps/*RUN mkdir /usr/local/tomcat/webapps/ROOTADD ./index.html /usr/local/tomcat/webapps/ROOT/ADD ./jdk /usr/local/jdkRUN echo "export TOMCAT_HOME=/usr/local/tomcat" >> /etc/profileRUN echo "export JAVA_HOME=/usr/local/jdk" >> /etc/profileRUN echo "export PATH=${TOMCAT_HOME}/bin:${JAVA_HOME}/bin:$PATH" >> /etc/profileRUN echo "export CLASSPATH=.:${JAVA_HOME}/lib/dt.jar:${JAVA_HOME}/lib/tools.jar" >> /etc/profileRUN source /etc/profileEXPOSE 8080CMD ["/usr/local/tomcat/bin/catalina.sh","run"]## 创建镜像docker build -t centos-tomcat:v1 .docker images## 启动镜像docker run -d -p 8083:8080 centos-tomcat:v1
浏览器访问 http://10.0.0.10:8083
5.使用Dockerfile生成容器镜像优化
5.1减少镜像分层
Dockerfile中包含多种指令,如果涉及到部署最多使用的算是RUN命令了,使用RUN命令时,不建议每次安装都使用一条单独的RUN命令,可以把能够合并安装指令合并为一条,这样就可以减少镜像分层。
FROM centos:latestMAINTAINER www.kubemsb.comRUN yum install epel-release -yRUN yum install -y gcc gcc-c++ make -yRUN wget http://docs.php.net/distributions/php-5.6.36.tar.gzRUN tar zxf php-5.6.36.tar.gzRUN cd php-5.6.36RUN ./configure --prefix=/usr/local/phpRUN make -j 4RUN make installEXPOSE 9000CMD ["php-fpm"]
优化后
FROM centos:latestMAINTAINER www.kubemsb.comRUN yum install epel-release -y && \yum install -y gcc gcc-c++ makeRUN wget http://docs.php.net/distributions/php-5.6.36.tar.gz && \tar zxf php-5.6.36.tar.gz && \cd php-5.6.36 && \./configure --prefix=/usr/local/php && \make -j 4 && make installEXPOSE 9000CMD ["php-fpm"]
5.2 清理无用数据
- 一次RUN形成新的一层,如果没有在同一层删除,无论文件是否最后删除,都会带到下一层,所以要在每一层清理对应的残留数据,减小镜像大小。
- 把生成容器镜像过程中部署的应用软件包做删除处理 ```shell FROM centos:latest MAINTAINER www.kubemsb.com RUN yum install epel-release -y && \ yum install -y gcc gcc-c++ make gd-devel libxml2-devel \ libcurl-devel libjpeg-devel libpng-devel openssl-devel \ libmcrypt-devel libxslt-devel libtidy-devel autoconf \ iproute net-tools telnet wget curl && \ yum clean all && \ rm -rf /var/cache/yum/*
RUN wget http://docs.php.net/distributions/php-5.6.36.tar.gz && \ tar zxf php-5.6.36.tar.gz && \ cd php-5.6.36 && \ ./configure —prefix=/usr/local/php \ make -j 4 && make install && \ cd / && rm -rf php*
<a name="hXMc3"></a>#### 5.2 多阶段构建镜像项目容器镜像有两种,一种直接把项目代码复制到容器镜像中,下次使用容器镜像时即可直接启动;另一种把需要对项目源码进行编译,再复制到容器镜像中使用。<br />不论是哪种方法都会让制作镜像复杂了些,并也会让容器镜像比较大,建议采用分阶段构建镜像的方法实现。```shell$ git clone https://github.com/kubemsb/tomcat-java-demo$ cd tomcat-java-demo$ vi DockerfileFROM maven AS buildADD ./pom.xml pom.xmlADD ./src src/RUN mvn clean packageFROM kubemsb/tomcatRUN rm -rf /usr/local/tomcat/webapps/ROOTCOPY --from=build target/*.war /usr/local/tomcat/webapps/ROOT.war$ docker build -t demo:v1 .$ docker container run -d -v demo:v1
第一个 FROM 后边多了个 AS 关键字,可以给这个阶段起个名字第二个 FROM 使用上面构建的 Tomcat 镜像,COPY 关键字增加了 —from 参数,用于拷贝某个阶段的文件到当前阶段。
网络与通信原理
2.1 容器默认网络模型
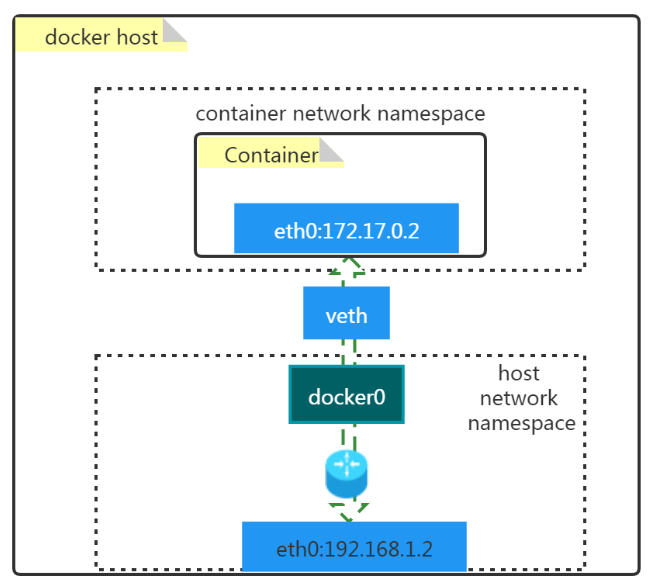
- docker0
- 是一个二层网络设备,即网桥
- 通过网桥可以将Linux支持的不同的端口连接起来
- 实现类交换机多对多的通信
- veth pair

docker run -d --name web1 -p 8085:80 nginx:latestiptables -t nat -vnL POSTROUTING#输出Chain POSTROUTING (policy ACCEPT 0 packets, 0 bytes)pkts bytes target prot opt in out source destination0 0 MASQUERADE all -- * !docker0 172.17.0.0/16 0.0.0.0/00 0 MASQUERADE tcp -- * * 172.17.0.2 172.17.0.2 tcp dpt:80
外网容器访问

iptables -t nat -vnL DOCKER#输出Chain DOCKER (2 references)pkts bytes target prot opt in out source destination0 0 RETURN all -- docker0 * 0.0.0.0/0 0.0.0.0/00 0 DNAT tcp -- !docker0 * 0.0.0.0/0 0.0.0.0/0 tcp dpt:8085 to:172.17.0.2:80
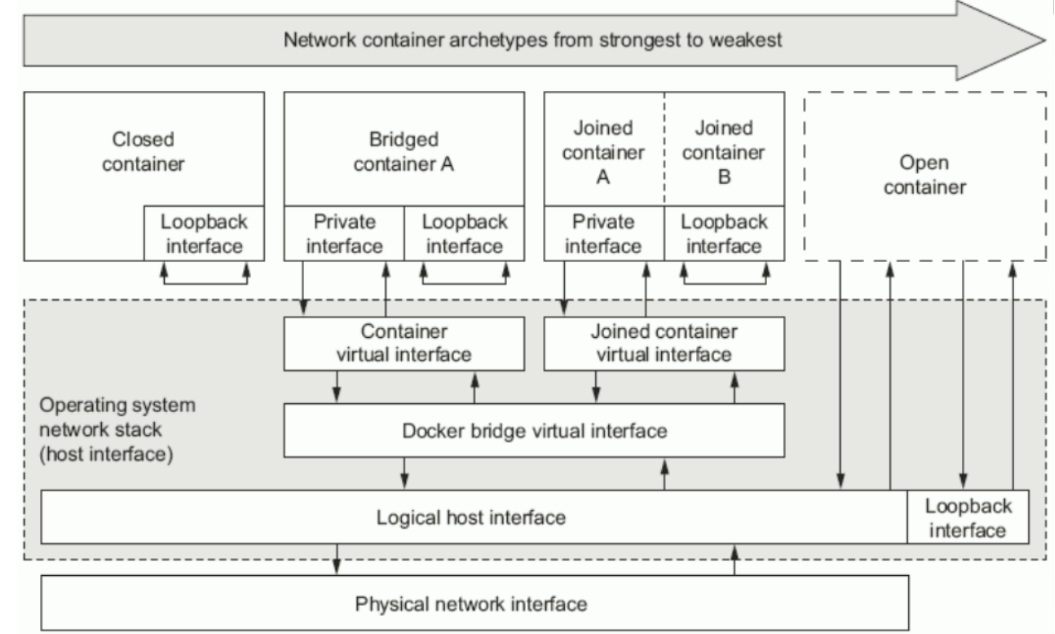
2.3 Docker容器四种网络模型
查看已有的网络
docker network ls## 输出NETWORK ID NAME DRIVER SCOPE6918e664b646 bridge bridge local724b9c2a701c host host local968a94b5a0b7 none null local#查看已有网络模型详细信息[root@localhost tomcat]# docker network inspect bridge[{"Name": "bridge","Id": "6918e664b646b83122307fd6ca625ef8956bb6e6c099e07e16ea7cdaa99b1edc","Created": "2022-06-12T05:13:21.215256676-04:00","Scope": "local","Driver": "bridge","EnableIPv6": false,"IPAM": {"Driver": "default","Options": null,"Config": [{"Subnet": "172.17.0.0/16","Gateway": "172.17.0.1"}]},"Internal": false,"Attachable": false,"Ingress": false,"ConfigFrom": {"Network": ""},"ConfigOnly": false,"Containers": {"e50d5675f757b6a1f16aaaafb9c1ec1c3590ad0084c81ae96dbdd2d9cf6be370": {"Name": "web1","EndpointID": "3f190a13701ec8382d47188f4b4f471ae527d316b5d625d372610aa79440a832","MacAddress": "02:42:ac:11:00:02","IPv4Address": "172.17.0.2/16","IPv6Address": ""}},"Options": {"com.docker.network.bridge.default_bridge": "true","com.docker.network.bridge.enable_icc": "true","com.docker.network.bridge.enable_ip_masquerade": "true","com.docker.network.bridge.host_binding_ipv4": "0.0.0.0","com.docker.network.bridge.name": "docker0","com.docker.network.driver.mtu": "1500"},"Labels": {}}]查看docker支持的网络模型# docker info | grep NetworkNetwork: bridge host ipvlan macvlan null overlay
创建指定类型的网络模型
bridge
#创建一个名称为mybr0的网络docker network create -d bridge --subnet "192.168.100.0/24" --gateway "192.168.100.1" -o com.docker.network.bridge.name=docker1 mybr0#查看已创建网络docker network ls## 查看NETWORK ID NAME DRIVER SCOPE6918e664b646 bridge bridge local724b9c2a701c host host local6c949f0e4671 mybr0 bridge local968a94b5a0b7 none null local## 启动一个容器并连接到已创建mybr0网络ocker run -it --network mybr0 --rm busyboxUnable to find image 'busybox:latest' locallylatest: Pulling from library/busybox5cc84ad355aa: Pull completeDigest: sha256:5acba83a746c7608ed544dc1533b87c737a0b0fb730301639a0179f9344b1678Status: Downloaded newer image for busybox:latest/ # ifconfigeth0 Link encap:Ethernet HWaddr 02:42:C0:A8:64:02inet addr:192.168.100.2 Bcast:192.168.100.255 Mask:255.255.255.0UP BROADCAST RUNNING MULTICAST MTU:1500 Metric:1RX packets:12 errors:0 dropped:0 overruns:0 frame:0TX packets:0 errors:0 dropped:0 overruns:0 carrier:0collisions:0 txqueuelen:0RX bytes:1032 (1.0 KiB) TX bytes:0 (0.0 B)lo Link encap:Local Loopbackinet addr:127.0.0.1 Mask:255.0.0.0UP LOOPBACK RUNNING MTU:65536 Metric:1RX packets:0 errors:0 dropped:0 overruns:0 frame:0TX packets:0 errors:0 dropped:0 overruns:0 carrier:0collisions:0 txqueuelen:1000RX bytes:0 (0.0 B) TX bytes:0 (0.0 B)/ #
host
#查看host网络模型的详细信息docker network inspect host## 输出[{"Name": "host","Id": "724b9c2a701cc6840537eeeb0caf30282b0f016c4493a32c72dc4135fa499596","Created": "2022-06-11T03:45:01.729475801-04:00","Scope": "local","Driver": "host","EnableIPv6": false,"IPAM": {"Driver": "default","Options": null,"Config": []},"Internal": false,"Attachable": false,"Ingress": false,"ConfigFrom": {"Network": ""},"ConfigOnly": false,"Containers": {},"Options": {},"Labels": {}}]#创建容器使用host网络模型,并查看其网络信息docker run -it --network host --rm busybox## 输出/ # ifconfigdocker0 Link encap:Ethernet HWaddr 02:42:93:A6:9C:60inet addr:172.17.0.1 Bcast:172.17.255.255 Mask:255.255.0.0inet6 addr: fe80::42:93ff:fea6:9c60/64 Scope:LinkUP BROADCAST RUNNING MULTICAST MTU:1500 Metric:1RX packets:5984180 errors:0 dropped:0 overruns:0 frame:0TX packets:6165023 errors:0 dropped:0 overruns:0 carrier:0collisions:0 txqueuelen:0RX bytes:1383940963 (1.2 GiB) TX bytes:1659580303 (1.5 GiB)docker1 Link encap:Ethernet HWaddr 02:42:F0:D2:59:10inet addr:192.168.100.1 Bcast:192.168.100.255 Mask:255.255.255.0inet6 addr: fe80::42:f0ff:fed2:5910/64 Scope:LinkUP BROADCAST RUNNING MULTICAST MTU:1500 Metric:1RX packets:0 errors:0 dropped:0 overruns:0 frame:0TX packets:5 errors:0 dropped:0 overruns:0 carrier:0collisions:0 txqueuelen:0RX bytes:0 (0.0 B) TX bytes:446 (446.0 B)ens33 Link encap:Ethernet HWaddr 00:0C:29:D9:4D:57inet addr:10.0.0.10 Bcast:10.0.0.255 Mask:255.255.255.0inet6 addr: fe80::8177:edd2:29e5:e005/64 Scope:LinkUP BROADCAST RUNNING MULTICAST MTU:1500 Metric:1RX packets:1700192 errors:0 dropped:0 overruns:0 frame:0TX packets:202787 errors:0 dropped:0 overruns:0 carrier:0collisions:0 txqueuelen:1000RX bytes:2418047588 (2.2 GiB) TX bytes:39141361 (37.3 MiB)lo Link encap:Local Loopbackinet addr:127.0.0.1 Mask:255.0.0.0inet6 addr: ::1/128 Scope:HostUP LOOPBACK RUNNING MTU:65536 Metric:1RX packets:8 errors:0 dropped:0 overruns:0 frame:0TX packets:8 errors:0 dropped:0 overruns:0 carrier:0collisions:0 txqueuelen:1000RX bytes:656 (656.0 B) TX bytes:656 (656.0 B)veth6bba319 Link encap:Ethernet HWaddr AA:29:EA:47:82:CAinet6 addr: fe80::a829:eaff:fe47:82ca/64 Scope:LinkUP BROADCAST RUNNING MULTICAST MTU:1500 Metric:1RX packets:0 errors:0 dropped:0 overruns:0 frame:0TX packets:8 errors:0 dropped:0 overruns:0 carrier:0collisions:0 txqueuelen:0RX bytes:0 (0.0 B) TX bytes:656 (656.0 B)veth83e2c83 Link encap:Ethernet HWaddr 4A:3D:0F:00:20:73inet6 addr: fe80::483d:fff:fe00:2073/64 Scope:LinkUP BROADCAST RUNNING MULTICAST MTU:1500 Metric:1RX packets:0 errors:0 dropped:0 overruns:0 frame:0TX packets:13 errors:0 dropped:0 overruns:0 carrier:0collisions:0 txqueuelen:0RX bytes:0 (0.0 B) TX bytes:1102 (1.0 KiB)veth9986df3 Link encap:Ethernet HWaddr CE:07:3E:CA:12:43inet6 addr: fe80::cc07:3eff:feca:1243/64 Scope:LinkUP BROADCAST RUNNING MULTICAST MTU:1500 Metric:1RX packets:0 errors:0 dropped:0 overruns:0 frame:0TX packets:8 errors:0 dropped:0 overruns:0 carrier:0collisions:0 txqueuelen:0RX bytes:0 (0.0 B) TX bytes:656 (656.0 B)
none
##查看none网络模型详细信息docker network inspect none## 输出[{"Name": "none","Id": "968a94b5a0b7ec56228e4c406b5f5268ce578c821942cd4a060ea7b54dae2741","Created": "2022-06-11T03:45:01.722740307-04:00","Scope": "local","Driver": "null","EnableIPv6": false,"IPAM": {"Driver": "default","Options": null,"Config": []},"Internal": false,"Attachable": false,"Ingress": false,"ConfigFrom": {"Network": ""},"ConfigOnly": false,"Containers": {},"Options": {},"Labels": {}}## 创建容器docker run -it --network none --rm busybox:latest## 输出/ # ifconfiglo Link encap:Local Loopbackinet addr:127.0.0.1 Mask:255.0.0.0UP LOOPBACK RUNNING MTU:65536 Metric:1RX packets:0 errors:0 dropped:0 overruns:0 frame:0TX packets:0 errors:0 dropped:0 overruns:0 carrier:0collisions:0 txqueuelen:1000RX bytes:0 (0.0 B) TX bytes:0 (0.0 B)/ #
联盟网络
docker run -it --name c1 --rm busybox:latest/ # ifconfigeth0 Link encap:Ethernet HWaddr 02:42:AC:11:00:03inet addr:172.17.0.3 Bcast:172.17.255.255 Mask:255.255.0.0UP BROADCAST RUNNING MULTICAST MTU:1500 Metric:1RX packets:8 errors:0 dropped:0 overruns:0 frame:0TX packets:0 errors:0 dropped:0 overruns:0 carrier:0collisions:0 txqueuelen:0RX bytes:656 (656.0 B) TX bytes:0 (0.0 B)lo Link encap:Local Loopbackinet addr:127.0.0.1 Mask:255.0.0.0UP LOOPBACK RUNNING MTU:65536 Metric:1RX packets:0 errors:0 dropped:0 overruns:0 frame:0TX packets:0 errors:0 dropped:0 overruns:0 carrier:0collisions:0 txqueuelen:1000RX bytes:0 (0.0 B) TX bytes:0 (0.0 B)/[root@localhost tomcat]# docker run -it --name c2 --network container:c1 --rm busybox:latest/ # ifconfigeth0 Link encap:Ethernet HWaddr 02:42:AC:11:00:03inet addr:172.17.0.3 Bcast:172.17.255.255 Mask:255.255.0.0UP BROADCAST RUNNING MULTICAST MTU:1500 Metric:1RX packets:8 errors:0 dropped:0 overruns:0 frame:0TX packets:0 errors:0 dropped:0 overruns:0 carrier:0collisions:0 txqueuelen:0RX bytes:656 (656.0 B) TX bytes:0 (0.0 B)lo Link encap:Local Loopbackinet addr:127.0.0.1 Mask:255.0.0.0UP LOOPBACK RUNNING MTU:65536 Metric:1RX packets:0 errors:0 dropped:0 overruns:0 frame:0TX packets:0 errors:0 dropped:0 overruns:0 carrier:0collisions:0 txqueuelen:1000RX bytes:0 (0.0 B) TX bytes:0 (0.0 B)/ #在c2容器中创建文件并开启httpd服务/ # echo "hello world" >> /tmp/index.html/ # ls /tmpindex.html/ # httpd -h /tmp验证80端口是否打开/ # netstat -nplActive Internet connections (only servers)Proto Recv-Q Send-Q Local Address Foreign Address State PID/Program nametcp 0 0 :::80 :::* LISTEN 10/httpdActive UNIX domain sockets (only servers)Proto RefCnt Flags Type State I-Node PID/Program name Path在c1容器中进行访问验证docker exec c1 wget -O - -q 127.0.0.1#查看c1容器/tmp目录,发现没有在c2容器中创建的文件,说明c1与c2仅共享了网络命名空间,没有共享文件系统docker exec c1 ls /tmp[root@localhost tomcat]# docker exec c1 ls /tmp[root@localhost tomcat]#
2.4 跨Docker Host容器间通信实现
跨Docker Host容器间通信必要性
- 由于Docker容器运行的环境类似于在局域网中运行服务一样,无法直接被外界访问,如果采用在Docker Host利用端口映射方式会导致端口被严重消耗。
能够实现不同的Docker Host方便访问其它Docker Host之上的容器提供的服务
跨Docker Host容器间通信实现方案
Docker原生方案
overlay
- 基于VXLAN封装实现Docker原生overlay网络
- macvlan
- Docker主机网卡接口逻辑上分为多个子接口,每个子接口标识一个VLAN,容器接口直接连接Docker Host
网卡接口
Flannel
- 支持UDP和VLAN封装传输方式
- Weave
- 支持UDP和VXLAN
-
路由方案
Calico
- 支持BGP协议和IPIP隧道
- 每台宿主机作为虚拟路由,通过BGP协议实现不同主机容器间通信。
2.5 Flannel
overlay network介绍
Overlay网络是指在不改变现有网络基础设施的前提下,通过某种约定通信协议,把二层报文封装在IP报文之上的新的数据格式。这样不但能够充分利用成熟的IP路由协议进程数据分发;而且在Overlay技术中采用扩展的隔离标识位数,能够突破VLAN的4000数量限制支持高达16M的用户,并在必要时可将广播流量转化为组播流量,避免广播数据泛滥。
因此,Overlay网络实际上是目前最主流的容器跨节点数据传输和路由方案。Flannel介绍
Flannel是 CoreOS 团队针对 Kubernetes 设计的一个覆盖网络(Overlay Network)工具,其目的在于帮助每一个使用 Kuberentes 的 CoreOS 主机拥有一个完整的子网。 Flannel通过给每台宿主机分配一个子网的方式为容器提供虚拟网络,它基于Linux TUN/TAP,使用UDP封装IP包来创建overlay网络,并借助etcd维护网络的分配情况。 Flannel is a simple and easy way to configure a layer 3 network fabric designed for Kubernetes.Flannel工作原理
Flannel是CoreOS团队针对Kubernetes设计的一个网络规划服务,简单来说,它的功能是让集群中的不同节点主机创建的Docker容器都具有全集群唯一的虚拟IP地址。但在默认的Docker配置中,每个Node的Docker服务会分别负责所在节点容器的IP分配。Node内部的容器之间可以相互访问,但是跨主机(Node)网络相互间是不能通信。Flannel设计目的就是为集群中所有节点重新规划IP地址的使用规则,从而使得不同节点上的容器能够获得”同属一个内网”且”不重复的”IP地址,并让属于不同节点上的容器能够直接通过内网IP通信。 Flannel 使用etcd存储配置数据和子网分配信息。flannel 启动之后,后台进程首先检索配置和正在使用的子网列表,然后选择一个可用的子网,然后尝试去注册它。etcd也存储这个每个主机对应的ip。flannel 使用etcd的watch机制监视/coreos.com/network/subnets下面所有元素的变化信息,并且根据它来维护一个路由表。为了提高性能,flannel优化了Universal TAP/TUN设备,对TUN和UDP之间的ip分片做了代理。 如下原理图: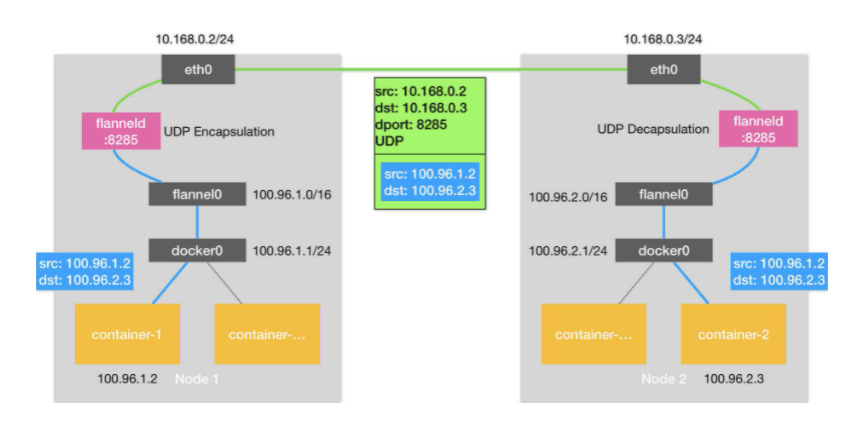
1、数据从源容器中发出后,经由所在主机的docker0虚拟网卡转发到flannel0虚拟网卡,这是个P2P的虚拟网卡,flanneld服务监听在网卡的另外一端。2、Flannel通过Etcd服务维护了一张节点间的路由表,该张表里保存了各个节点主机的子网网段信息。3、源主机的flanneld服务将原本的数据内容UDP封装后根据自己的路由表投递给目的节点的flanneld服务,数据到达以后被解包,然后直接进入目的节点的flannel0虚拟网卡,然后被转发到目的主机的docker0虚拟网卡,最后就像本机容器通信一样的由docker0路由到达目标容器。
2.6 ETCD
etcd是CoreOS团队于2013年6月发起的开源项目,它的目标是构建一个高可用的分布式键值(key-value)数据库。etcd内部采用raft协议作为一致性算法,etcd基于Go语言实现。
etcd作为服务发现系统,特点:
简单:安装配置简单,而且提供了HTTP API进行交互,使用也很简单
- 安全:支持SSL证书验证
- 快速:根据官方提供的benchmark数据,单实例支持每秒2k+读操作
- 可靠:采用raft算法,实现分布式系统数据的可用性和一致性
2.7 ETCD部署
10.0.0.20 和10.0.0.21 两个环境
主机防火墙及SELINUX均关闭。主机名称配置
hostnamectl set-hostname node1hostnamectl set-hostname node2
主机名与IP地址解析(两个环境都需要配置)
vim /etc/hosts[root@node1 ~]# cat /etc/hosts127.0.0.1 localhost localhost.localdomain localhost4 localhost4.localdomain4::1 localhost localhost.localdomain localhost6 localhost6.localdomain610.0.0.20 node110.0.0.21 node2
开启内核转发
## 所有的Docker Host 内核都需要# vim /etc/sysctl.conf[root@node1 ~]# cat /etc/sysctl.conf......net.ipv4.ip_forward=1##sysctl -p
etcd安装
## 两个环境都需要安装yum -y install etcd
etcd配置
#[Member]#ETCD_CORS=""ETCD_DATA_DIR="/var/lib/etcd/node1.etcd"#ETCD_WAL_DIR=""ETCD_LISTEN_PEER_URLS="http://0.0.0.0:2380"ETCD_LISTEN_CLIENT_URLS="http://0.0.0.0:2379,http://0.0.0.0:4001"#ETCD_MAX_SNAPSHOTS="5"#ETCD_MAX_WALS="5"ETCD_NAME="node1"#ETCD_SNAPSHOT_COUNT="100000"#ETCD_HEARTBEAT_INTERVAL="100"#ETCD_ELECTION_TIMEOUT="1000"#ETCD_QUOTA_BACKEND_BYTES="0"#ETCD_MAX_REQUEST_BYTES="1572864"#ETCD_GRPC_KEEPALIVE_MIN_TIME="5s"#ETCD_GRPC_KEEPALIVE_INTERVAL="2h0m0s"#ETCD_GRPC_KEEPALIVE_TIMEOUT="20s"##[Clustering]ETCD_INITIAL_ADVERTISE_PEER_URLS="http://10.0.0.20:2380"ETCD_ADVERTISE_CLIENT_URLS="http://10.0.0.20:2379,http://10.0.0.20:4001"#ETCD_DISCOVERY=""#ETCD_DISCOVERY_FALLBACK="proxy"#ETCD_DISCOVERY_PROXY=""#ETCD_DISCOVERY_SRV=""ETCD_INITIAL_CLUSTER="node1=http://10.0.0.20:2380,node2=http://10.0.0.21:2380"#ETCD_INITIAL_CLUSTER_TOKEN="etcd-cluster"#ETCD_INITIAL_CLUSTER_STATE="new"#ETCD_STRICT_RECONFIG_CHECK="true"#ETCD_ENABLE_V2="true"##[Proxy]#ETCD_PROXY="off"#ETCD_PROXY_FAILURE_WAIT="5000"#ETCD_PROXY_REFRESH_INTERVAL="30000"#ETCD_PROXY_DIAL_TIMEOUT="1000"#ETCD_PROXY_WRITE_TIMEOUT="5000"#ETCD_PROXY_READ_TIMEOUT="0"##[Security]#ETCD_CERT_FILE=""#ETCD_KEY_FILE=""#ETCD_CLIENT_CERT_AUTH="false"#ETCD_TRUSTED_CA_FILE=""#ETCD_AUTO_TLS="false"#ETCD_PEER_CERT_FILE=""#ETCD_PEER_KEY_FILE=""#ETCD_PEER_CLIENT_CERT_AUTH="false"#ETCD_PEER_TRUSTED_CA_FILE=""#ETCD_PEER_AUTO_TLS="false"##[Logging]#ETCD_DEBUG="false"#ETCD_LOG_PACKAGE_LEVELS=""#ETCD_LOG_OUTPUT="default"##[Unsafe]#ETCD_FORCE_NEW_CLUSTER="false"##[Version]#ETCD_VERSION="false"#ETCD_AUTO_COMPACTION_RETENTION="0"##[Profiling]#ETCD_ENABLE_PPROF="false"#ETCD_METRICS="basic"##[Auth]#ETCD_AUTH_TOKEN="simple"
#[Member]#ETCD_CORS=""ETCD_DATA_DIR="/var/lib/etcd/node2.etcd"#ETCD_WAL_DIR=""ETCD_LISTEN_PEER_URLS="http://0.0.0.0:2380"ETCD_LISTEN_CLIENT_URLS="http://0.0.0.0:2379,http://0.0.0.0:4001"#ETCD_MAX_SNAPSHOTS="5"#ETCD_MAX_WALS="5"ETCD_NAME="node2"#ETCD_SNAPSHOT_COUNT="100000"#ETCD_HEARTBEAT_INTERVAL="100"#ETCD_ELECTION_TIMEOUT="1000"#ETCD_QUOTA_BACKEND_BYTES="0"#ETCD_MAX_REQUEST_BYTES="1572864"#ETCD_GRPC_KEEPALIVE_MIN_TIME="5s"#ETCD_GRPC_KEEPALIVE_INTERVAL="2h0m0s"#ETCD_GRPC_KEEPALIVE_TIMEOUT="20s"##[Clustering]ETCD_INITIAL_ADVERTISE_PEER_URLS="http://10.0.0.21:2380"ETCD_ADVERTISE_CLIENT_URLS="http://10.0.0.21:2379,http://10.0.0.21:4001"#ETCD_DISCOVERY=""#ETCD_DISCOVERY_FALLBACK="proxy"#ETCD_DISCOVERY_PROXY=""#ETCD_DISCOVERY_SRV=""ETCD_INITIAL_CLUSTER="node1=http://10.0.0.20:2380,node2=http://10.0.0.21:2380"#ETCD_INITIAL_CLUSTER_TOKEN="etcd-cluster"#ETCD_INITIAL_CLUSTER_STATE="new"#ETCD_STRICT_RECONFIG_CHECK="true"#ETCD_ENABLE_V2="true"##[Proxy]#ETCD_PROXY="off"#ETCD_PROXY_FAILURE_WAIT="5000"#ETCD_PROXY_REFRESH_INTERVAL="30000"#ETCD_PROXY_DIAL_TIMEOUT="1000"#ETCD_PROXY_WRITE_TIMEOUT="5000"#ETCD_PROXY_READ_TIMEOUT="0"##[Security]#ETCD_CERT_FILE=""#ETCD_KEY_FILE=""#ETCD_CLIENT_CERT_AUTH="false"#ETCD_TRUSTED_CA_FILE=""#ETCD_AUTO_TLS="false"#ETCD_PEER_CERT_FILE=""#ETCD_PEER_KEY_FILE=""#ETCD_PEER_CLIENT_CERT_AUTH="false"#ETCD_PEER_TRUSTED_CA_FILE=""#ETCD_PEER_AUTO_TLS="false"##[Logging]#ETCD_DEBUG="false"#ETCD_LOG_PACKAGE_LEVELS=""#ETCD_LOG_OUTPUT="default"##[Unsafe]#ETCD_FORCE_NEW_CLUSTER="false"##[Version]#ETCD_VERSION="false"#ETCD_AUTO_COMPACTION_RETENTION="0"##[Profiling]#ETCD_ENABLE_PPROF="false"#ETCD_METRICS="basic"##[Auth]#ETCD_AUTH_TOKEN="simple"
启动etcd服务(node1 和node2 都需要配置)
systemctl enable etcdsystemctl start etcd
检查端口状态
netstat -tnlp | grep -E "4001|2380"#输出结果:tcp6 0 0 :::2380 :::* LISTEN 19691/etcdtcp6 0 0 :::4001 :::* LISTEN 19691/etcd
检查etcd集群是否健康
etcdctl -C http://10.0.0.20:2379 cluster-health输出member 24c242139c616766 is healthy: got healthy result from http://10.0.0.20:2379member 7858c29df0af79b6 is healthy: got healthy result from http://10.0.0.21:2379cluster is healthy## 或者使用 etcdctl member listetcdctl member list24c242139c616766: name=node1 peerURLs=http://10.0.0.20:2380 clientURLs=http://10.0.0.20:2379,http://10.0.0.20:4001 isLeader=false7858c29df0af79b6: name=node2 peerURLs=http://10.0.0.21:2380 clientURLs=http://10.0.0.21:2379,http://10.0.0.21:4001 isLeader=true
Flannel部署
Flannel安装(node1 node2 全部安装)
yum -y install flannel
修改Flannel配置文件
```shell vim /etc/sysconfig/flanneld修改后的flannel内容
Flanneld configuration options
etcd url location. Point this to the server where etcd runs
FLANNEL_ETCD_ENDPOINTS=”http://10.0.0.20:2379,http://10.0.0.21:2379“
etcd config key. This is the configuration key that flannel queries
For address range assignment
FLANNEL_ETCD_PREFIX=”/atomic.io/network”
Any additional options that you want to pass
FLANNEL_OPTIONS=””
FLANNEL_OPTIONS=”—logtostderr=false —log_dir=/var/log/ —etcd-endpoints=http://10.0.0.20:2379,http ://10.0.0.21:2379 —iface=ens33”
```shellvim /etc/sysconfig/flanneld## 修改后的flannel内容# Flanneld configuration options# etcd url location. Point this to the server where etcd runsFLANNEL_ETCD_ENDPOINTS="http://10.0.0.20:2379,http://10.0.0.21:2379"# etcd config key. This is the configuration key that flannel queries# For address range assignmentFLANNEL_ETCD_PREFIX="/atomic.io/network"# Any additional options that you want to pass#FLANNEL_OPTIONS=""FLANNEL_OPTIONS="--logtostderr=false --log_dir=/var/log/ --etcd-endpoints=http://10.0.0.20:2379,http://10.0.0.21:2379 --iface=ens33"
配置etcd中关于flannel的key
Flannel使用Etcd进行配置,来保证多个Flannel实例之间的配置一致性,所以需要在etcd上进行如下配置(‘/http://atomic.io/network/config‘这个key与上面的/etc/sysconfig/flannel中的配置项FLANNEL_ETCD_PREFIX是相对应的,错误的话启动就会出错
该ip网段可以任意设定,随便设定一个网段都可以。容器的ip就是根据这个网段进行自动分配的,ip分配后,容器一般是可以对外联网的(网桥模式,只要Docker Host能上网即可。)
etcdctl mk /atomic.io/network/config '{"Network":"172.21.0.0/16"}'{"Network":"172.21.0.0/16"}
启动Flannel服务
systemctl enable flanneld;systemctl start flanneld启动Flannel服务
查看各node中flannel产生的配置信息
[root@node1 flannel]# cat /run/flannel/subnet.envFLANNEL_NETWORK=172.21.0.0/16FLANNEL_SUBNET=172.21.43.1/24FLANNEL_MTU=1472FLANNEL_IPMASQ=false
[root@node2 ~]# cat /run/flannel/subnet.envFLANNEL_NETWORK=172.21.0.0/16FLANNEL_SUBNET=172.21.51.1/24FLANNEL_MTU=1472FLANNEL_IPMASQ=false
Docker网络配置
—bip=172.21.51.1/24 —ip-masq=true —mtu=1472 放置于启动程序后
vim /usr/lib/systemd/system/docker.service[root@node1 flannel]# cat /usr/lib/systemd/system/docker.service[Unit]Description=Docker Application Container EngineDocumentation=https://docs.docker.comAfter=network-online.target docker.socket firewalld.service containerd.serviceWants=network-online.targetRequires=docker.socket containerd.service[Service]Type=notify# the default is not to use systemd for cgroups because the delegate issues still# exists and systemd currently does not support the cgroup feature set required# for containers run by dockerExecStart=/usr/bin/dockerd --bip=172.21.43.1/24 --ip-masq=true --mtu=1472ExecStartPost=/sbin/iptables -P FORWARD ACCEPTExecReload=/bin/kill -s HUP $MAINPIDTimeoutSec=0RestartSec=2Restart=always# Note that StartLimit* options were moved from "Service" to "Unit" in systemd 229.# Both the old, and new location are accepted by systemd 229 and up, so using the old location# to make them work for either version of systemd.StartLimitBurst=3# Note that StartLimitInterval was renamed to StartLimitIntervalSec in systemd 230.# Both the old, and new name are accepted by systemd 230 and up, so using the old name to make# this option work for either version of systemd.StartLimitInterval=60s# Having non-zero Limit*s causes performance problems due to accounting overhead# in the kernel. We recommend using cgroups to do container-local accounting.LimitNOFILE=infinityLimitNPROC=infinityLimitCORE=infinity# Comment TasksMax if your systemd version does not support it.# Only systemd 226 and above support this option.TasksMax=infinity# set delegate yes so that systemd does not reset the cgroups of docker containersDelegate=yes# kill only the docker process, not all processes in the cgroupKillMode=processOOMScoreAdjust=-500[Install]WantedBy=multi-user.target
[root@node2 ~]# cat /usr/lib/systemd/system/docker.service[Unit]Description=Docker Application Container EngineDocumentation=https://docs.docker.comAfter=network-online.target docker.socket firewalld.service containerd.serviceWants=network-online.targetRequires=docker.socket containerd.service[Service]Type=notify# the default is not to use systemd for cgroups because the delegate issues still# exists and systemd currently does not support the cgroup feature set required# for containers run by dockerExecStart=/usr/bin/dockerd --bip=172.21.51.1/24 --ip-masq=true --mtu=1472ExecStartPost=/sbin/iptables -P FORWARD ACCEPTExecReload=/bin/kill -s HUP $MAINPIDTimeoutSec=0RestartSec=2Restart=always# Note that StartLimit* options were moved from "Service" to "Unit" in systemd 229.# Both the old, and new location are accepted by systemd 229 and up, so using the old location# to make them work for either version of systemd.StartLimitBurst=3# Note that StartLimitInterval was renamed to StartLimitIntervalSec in systemd 230.# Both the old, and new name are accepted by systemd 230 and up, so using the old name to make# this option work for either version of systemd.StartLimitInterval=60s# Having non-zero Limit*s causes performance problems due to accounting overhead# in the kernel. We recommend using cgroups to do container-local accounting.LimitNOFILE=infinityLimitNPROC=infinityLimitCORE=infinity# Comment TasksMax if your systemd version does not support it.# Only systemd 226 and above support this option.TasksMax=infinity# set delegate yes so that systemd does not reset the cgroups of docker containersDelegate=yes# kill only the docker process, not all processes in the cgroupKillMode=processOOMScoreAdjust=-500[Install]WantedBy=multi-user.target
systemctl daemon-reloadsystemctl restart docker
跨Docker Host容器间通信验证
docker run -it --rm busybox:latest/ # ifconfigeth0 Link encap:Ethernet HWaddr 02:42:AC:15:2B:02inet addr:/ # ping 172.21.43.2PING 172.21.43.2 (172.21.43.2): 56 data bytes64 bytes from 172.21.43.2: seq=0 ttl=60 time=1.177 ms64 bytes from 172.21.43.2: seq=1 ttl=60 time=0.578 ms64 bytes from 172.21.43.2: seq=2 ttl=60 time=0.893 ms64 bytes from 172.21.43.2: seq=3 ttl=60 time=0.801 ms64 bytes from 172.21.43.2: seq=4 ttl=60 time=0.535 ms64 bytes from 172.21.43.2: seq=5 ttl=60 time=1.127 ms64 bytes from 172.21.43.2: seq=6 ttl=60 time=0.501 ms64 bytes from 172.21.43.2: seq=7 ttl=60 time=0.531 msBcast:172.21.43.255 Mask:255.255.255.0UP BROADCAST RUNNING MULTICAST MTU:1472 Metric:1RX packets:13 errors:0 dropped:0 overruns:0 frame:0TX packets:0 errors:0 dropped:0 overruns:0 carrier:0collisions:0 txqueuelen:0RX bytes:1102 (1.0 KiB) TX bytes:0 (0.0 B)lo Link encap:Local Loopbackinet addr:127.0.0.1 Mask:255.0.0.0UP LOOPBACK RUNNING MTU:65536 Metric:1RX packets:0 errors:0 dropped:0 overruns:0 frame:0TX packets:0 errors:0 dropped:0 overruns:0 carrier:0collisions:0 txqueuelen:1000RX bytes:0 (0.0 B) TX bytes:0 (0.0 B)/ #
docker run -it --rm busybox:latest/ # ifconfigeth0 Link encap:Ethernet HWaddr 02:42:AC:15:33:02inet addr:172.21.51.2 Bcast:172.21.51.255 Mask:255.255.255.0UP BROADCAST RUNNING MULTICAST MTU:1472 Metric:1RX packets:12 errors:0 dropped:0 overruns:0 frame:0TX packets:0 errors:0 dropped:0 overruns:0 carrier:0collisions:0 txqueuelen:0RX bytes:1032 (1.0 KiB) TX bytes:0 (0.0 B)lo Link encap:Local Loopbackinet addr:127.0.0.1 Mask:255.0.0.0UP LOOPBACK RUNNING MTU:65536 Metric:1RX packets:0 errors:0 dropped:0 overruns:0 frame:0TX packets:0 errors:0 dropped:0 overruns:0 carrier:0collisions:0 txqueuelen:1000RX bytes:0 (0.0 B) TX bytes:0 (0.0 B)## ping node1 中的busbox ip/ # ping 172.21.43.2PING 172.21.43.2 (172.21.43.2): 56 data bytes64 bytes from 172.21.43.2: seq=0 ttl=60 time=1.177 ms64 bytes from 172.21.43.2: seq=1 ttl=60 time=0.578 ms64 bytes from 172.21.43.2: seq=2 ttl=60 time=0.893 ms64 bytes from 172.21.43.2: seq=3 ttl=60 time=0.801 ms64 bytes from 172.21.43.2: seq=4 ttl=60 time=0.535 ms64 bytes from 172.21.43.2: seq=5 ttl=60 time=1.127 ms64 bytes from 172.21.43.2: seq=6 ttl=60 time=0.501 ms64 bytes from 172.21.43.2: seq=7 ttl=60 time=0.531 ms## 可以ping通 说明 跨docker host 容器间通信验证成功
容器数据持久化存储机制
Docker容器数据持久化存储介绍
- 物理机或虚拟机数据持久化存储
- 由于物理机或虚拟机本身就拥有大容量的磁盘,所以可以直接把数据存储在物理机或虚拟机本地文件系统中,亦或者也可以通过使用额外的存储系统(NFS、GlusterFS、Ceph等)来完成数据持久化存储。
Docker容器数据持久化存储
docker run -v
- 运行容器时,直接挂载本地目录至容器中
运行web3容器,挂载未创建的本地目录,启动容器时将自动创建本地目录docker run -d --name web3 -v /opt/web3root/:/usr/share/nginx/html/ nginx:latest往自动创建的目录中添加一个index.html文件# echo "kubemsb web3" > /opt/web3root/index.html在容器中执行查看文件命令# docker exec web3 cat /usr/share/nginx/html/index.htmlkubemsb web3
- 运行容器时,直接挂载本地目录至容器中
volumes
- Docker管理宿主机文件系统的一部分(/var/lib/docker/volumes)
- 是Docker默认存储数据方式
#创建一个名称为nginx-vol的数据卷docker volume create nginx-vol#使用数据卷docker run -d --name web4 -v nginx-vol:/usr/share/nginx/html/ nginx:latest或者docker run -d --name web4 --mount src=nginx-vol,dst=/usr/share/nginx/html nginx:latest
bind mounts
- 将宿主机上的任意位置文件或目录挂载到容器中
创建用于容器挂载的目录web5rootmkdir /opt/web5root#运行web5容器并使用bind mount方法实现本地任意目录挂载docker run -d --name web5 --mount type=bind,src=/opt/web5root,dst=/usr/share/nginx/html nginx:latest添加内容至/opt/web5root/index.html中# echo "web5" > /opt/web5root/index.html使用curl命令访问容器# curl http://172.17.0.3web5
- 将宿主机上的任意位置文件或目录挂载到容器中
