1 概述
- 是什么
在微服务架构中,业务都会被拆分成一个独立的服务,服务与服务的通讯是基于 http restful 的。Spring cloud 有两种服务调用方式,一种是 ribbon + restTemplate,另一种是 feign。在这一篇文章首先讲解下基于 ribbon + rest。
Spring Cloud Ribbon是基于Netflix Ribbon实现的一套客户端负载均衡的工具。
简单的说,Ribbon是Netflix发布的开源项目,主要功能是提供客户端的软件负载均衡算法,将Netflix的中间层服务连接在一起。Ribbon客户端组件提供一系列完善的配置项如连接超时,重试等。简单的说,就是在配置文件中列出Load Balancer(简称LB)后面所有的机器,Ribbon会自动的帮助你基于某种规则(如简单轮询,随机连接等)去连接这些机器。我们也很容易使用Ribbon实现自定义的负载均衡算法。
Ribbon 是一个负载均衡客户端,可以很好的控制 http 和 tcp 的一些行为
- 能做什么
LB,即负载均衡(Load Balance),在微服务或分布式集群中经常用的一种应用。负载均衡简单的说就是将用户的请求平摊的分配到多个服务上,从而达到系统的HA。常见的负载均衡有软件Nginx,LVS,硬件 F5等。相应的在中间件,例如:dubbo和SpringCloud中均给我们提供了负载均衡,SpringCloud的负载均衡算法可以自定义。
- 官网资料
2 Ribbon初步配置
1 修改cloud-consumer-dept-80工程pom.xml文件
<!-- Ribbon相关 --><dependency><groupId>org.springframework.cloud</groupId><artifactId>spring-cloud-starter-eureka</artifactId></dependency><dependency><groupId>org.springframework.cloud</groupId><artifactId>spring-cloud-starter-ribbon</artifactId></dependency><dependency><groupId>org.springframework.cloud</groupId><artifactId>spring-cloud-starter-config</artifactId></dependency>
@EnableDiscoveryClient 和@EurekaEurekaClient的区别
从Spring Cloud Edgware开始,
@EnableDiscoveryClient或@EnableEurekaClient可省略。只需加上相关依赖,并进行相应配置,即可将微服务注册到服务发现组件上。
@EnableDiscoveryClient和@EnableEurekaClient共同点就是:都是能够让注册中心能够发现,扫描到改服务。不同点:@EnableEurekaClient只适用于Eureka作为注册中心,@EnableDiscoveryClient 可以是其他注册中心。
@EnableDiscoveryClient 用于服务发现
 //获取一些配置信息,得到具体的微服务
    @Autowired
    private DiscoveryClient client;

    @GetMapping("/dept/discovery")
    //注册进来的微服务,获取一些信息
    public Object discovery() {
        //获得微服务列表的清单
        List<String> services = client.getServices();
        System.out.println("discovery=>services" + services);

        //得到一个具体的微服务信息
        List<ServiceInstance> instance = client.getInstances("SPRINGCLOUD-PROVIDER-DEPT");
        for (ServiceInstance serviceInstance : instance) {
            System.out.println(
                    serviceInstance.getHost()+"\t"+
                    serviceInstance.getPort()+"\t"+
                    serviceInstance.getUri()+"\t"+
                    serviceInstance.getServiceId()
            );
        }
        return  this.client;
    }
这里就不在过多叙述
2 修改application.yml 追加eureka的服务注册地址
server:
  port: 80

eureka:
  client:
    register-with-eureka: false
    service-url:
      defaultZone: http://eureka7001.com:7001/eureka/,http://eureka7002.com:7002/eureka/,http://eureka7003.com:7003/eureka/
3 对ConfigBean进行修改 加上@LoadBalanced 注解
@Configuration
public class ConfigBean
{
  @Bean
  @LoadBalanced
  public RestTemplate getRestTemplate()
  {
   return new RestTemplate();
  }
}
4 修改主启动类DeptConsumer80
@SpringBootApplication
@EnableEurekaClient  //加入这个注解
public class DeptConsumer80_App
{
  public static void main(String[] args)
  {
   SpringApplication.run(DeptConsumer80_App.class, args);
  }
}
在很多地方我们会看到 @EnableDiscoveryClient
5 修改DeptControllerConsumer类
@RestController
public class DeptController_Consumer
{
  //private static final String REST_URL_PREFIX = "http://localhost:8001";
  //改成服务名称
  private static final String REST_URL_PREFIX = "http://MICROSERVICECLOUD-DEPT";

  @Autowired
  private RestTemplate restTemplate;

  @RequestMapping(value="/consumer/dept/add")
  public boolean add(Dept dept)
  {
   return restTemplate.postForObject(REST_URL_PREFIX+"/dept/add", dept, Boolean.class);
  }

  @RequestMapping(value="/consumer/dept/get/{id}")
  public Dept get(@PathVariable("id") Long id)
  {
   return restTemplate.getForObject(REST_URL_PREFIX+"/dept/get/"+id, Dept.class);
  }

  @SuppressWarnings("unchecked")
  @RequestMapping(value="/consumer/dept/list")
  public List<Dept> list()
  {
   return restTemplate.getForObject(REST_URL_PREFIX+"/dept/list", List.class);
  }
}
6 先启动3个eureka集群后,再启动cloud-provider-dept-8001并注册进eureka
7 启动cloud-consumer-dept-80
8 测试 http://localhost/consumer/dept/get/1
总结:Ribbon和Eureka整合后Consumer可以直接调用服务而不用再关心地址和端口号
3 Ribbon负载均衡
1 架构说明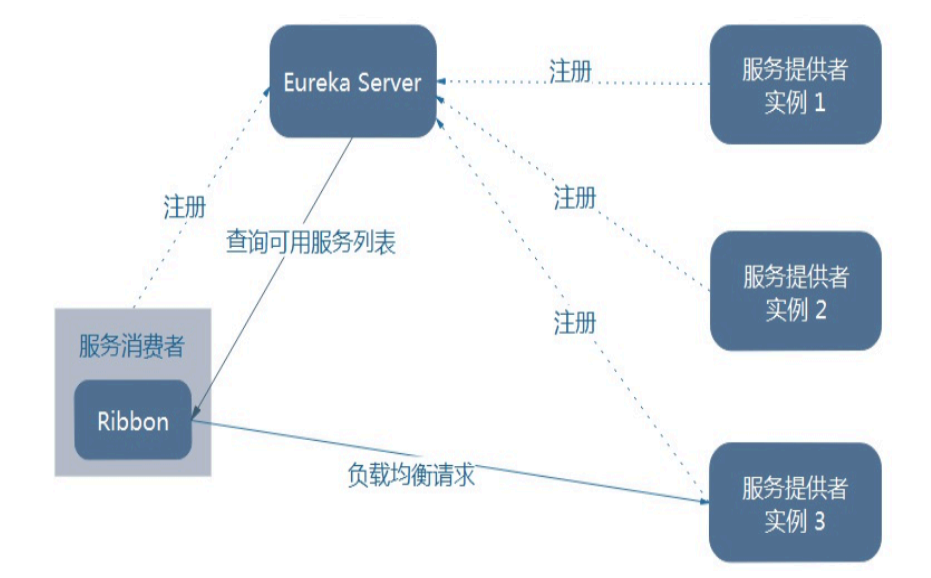
Ribbon在工作时分成两步
第一步先选择 EurekaServer ,它优先选择在同一个区域内负载较少的server.
第二步再根据用户指定的策略,在从server取到的服务注册列表中选择一个地址。其中Ribbon提供了多种策略:比如轮询、随机和根据响应时间加权。
2 新建两个Model cloud-provider-dept-8002 cloud-provider-dept-8003
3 为了后续演示LB 轮询、随机算法在每个服务提供者都新建一个数据库(同8001一样)
4 修改8002、8003 yml
server:
  port: 8002

mybatis:
  config-location: classpath:mybatis/mybatis.cfg.xml  #mybatis所在路径
  type-aliases-package: com.spiritmark.cloud.entity #entity别名类
  mapper-locations:
  - classpath:mybatis/mapper/**/*.xml #mapper映射文件

spring:
   application:
    name: microservicecloud-dept
   datasource:
    type: com.alibaba.druid.pool.DruidDataSource
    driver-class-name: org.gjt.mm.mysql.Driver
    url: jdbc:mysql://localhost:3306/cloudDB02
    username: root
    password: 123456
    dbcp2:
      min-idle: 5
      initial-size: 5
      max-total: 5
      max-wait-millis: 200

eureka:
  client: #客户端注册进eureka服务列表内
    service-url:
      defaultZone: http://eureka7001.com:7001/eureka/,http://eureka7002.com:7002/eureka/,http://eureka7003.com:7003/eureka/
  instance:
    instance-id: microservicecloud-dept8002   #自定义服务名称信息
    prefer-ip-address: true     #访问路径可以显示IP地址

info:
  app.name: microservicecloud
  company.name: www.spiritmark.com
  build.artifactId: $project.artifactId$
  build.version: $project.version$
server:
  port: 8003

mybatis:
  config-location: classpath:mybatis/mybatis.cfg.xml  #mybatis所在路径
  type-aliases-package: com.spiritmark.cloud.entity #entity别名类
  mapper-locations:
  - classpath:mybatis/mapper/**/*.xml #mapper映射文件

spring:
   application:
    name: microservicecloud-dept
   datasource:
    type: com.alibaba.druid.pool.DruidDataSource
    driver-class-name: org.gjt.mm.mysql.Driver
    url: jdbc:mysql://localhost:3306/cloudDB03
    username: root
    password: 123456
    dbcp2:
      min-idle: 5
      initial-size: 5
      max-total: 5
      max-wait-millis: 200

eureka:
  client: #客户端注册进eureka服务列表内
    service-url:
      defaultZone: http://eureka7001.com:7001/eureka/,http://eureka7002.com:7002/eureka/,http://eureka7003.com:7003/eureka/
  instance:
    instance-id: microservicecloud-dept8003   #自定义服务名称信息
    prefer-ip-address: true     #访问路径可以显示IP地址

info:
  app.name: microservicecloud
  company.name: www.spiritmark.com
  build.artifactId: $project.artifactId$
  build.version: $project.version$
5 启动3个eureka集群配置
6 启动3个服务提供者并测试 http://localhost:8001/dept/list http://localhost:8002/dept/list http://localhost:8003/dept/list
7 启动cloud-consumer-dept-80
8 客户端通过Ribbo完成负载均衡并访问上一步的Dept微服务
http://localhost/consumer/dept/list
注意观察看到返回的数据库名字,各不相同,负载均衡实现
4 Ribbon负载均衡算法
RandomRule(随机) RoundRobinRule(轮询) ClientConfigEnabledRoundRobinRule()
WeightedResponseTimeRule(返回时间权重规则) BestAvailableRule(最低并发规则) RetryRule(支持重试的规则)
如何切换负载均衡算法
修改ConfigBean类 加入下面的代码
@Bean
    public IRule myRule()
    {
        //return new RoundRobinRule();
        //return new RandomRule();//达到的目的,用我们重新选择的随机算法替代默认的轮询。
        return new RetryRule();
    }
5 自定义负载均衡算法
需求:当客户端请求时,每个微服务提供者请求五次后进行轮换
在客户端消费者新建MySelfRule类
@Configuration
public class MySelfRule
{
    @Bean
    public IRule myRule()
    {
        //return new RandomRule();// Ribbon默认是轮询,我自定义为随机
        //return new RoundRobinRule();// Ribbon默认是轮询,我自定义为随机

        return new RandomRule_ZY();// 我自定义为每台机器5次
    }
}
新建一个RandomRuleSk extends AbstractLoadBalancerRule 自定义算法类
下面的实例时通过修改Ribbon自带的随机算法来实现的
public class RandomRuleSK  extends AbstractLoadBalancerRule
{

    // total = 0 // 当total==5以后,我们指针才能往下走,
    // index = 0 // 当前对外提供服务的服务器地址,
    // total需要重新置为零,但是已经达到过一个5次,我们的index = 1
    // 分析:我们5次,但是微服务只有8001 8002 8003 三台,


    private int total = 0;             // 总共被调用的次数,目前要求每台被调用5次
    private int currentIndex = 0;    // 当前提供服务的机器号

    public Server choose(ILoadBalancer lb, Object key)
    {
        if (lb == null) {
            return null;
        }
        Server server = null;

        while (server == null) {
            if (Thread.interrupted()) {
                return null;
            }
            List<Server> upList = lb.getReachableServers();
            List<Server> allList = lb.getAllServers();

            int serverCount = allList.size();
            if (serverCount == 0) {
                /*
                 * No servers. End regardless of pass, because subsequent passes only get more
                 * restrictive.
                 */
                return null;
            }

//            int index = rand.nextInt(serverCount);// java.util.Random().nextInt(3);
//            server = upList.get(index);


//            private int total = 0;             // 总共被调用的次数,目前要求每台被调用5次
//            private int currentIndex = 0;    // 当前提供服务的机器号
            if(total < 5)
            {
                server = upList.get(currentIndex);
                total++;
            }else {
                total = 0;
                currentIndex++;
                if(currentIndex >= upList.size())
                {
                  currentIndex = 0;
                }
            }


            if (server == null) {
                /*
                 * The only time this should happen is if the server list were somehow trimmed.
                 * This is a transient condition. Retry after yielding.
                 */
                Thread.yield();
                continue;
            }

            if (server.isAlive()) {
                return (server);
            }

            // Shouldn't actually happen.. but must be transient or a bug.
            server = null;
            Thread.yield();
        }

        return server;

    }

    @Override
    public Server choose(Object key)
    {
        return choose(getLoadBalancer(), key);
    }

    @Override
    public void initWithNiwsConfig(IClientConfig clientConfig)
    {
        // TODO Auto-generated method stub
    }

}

若有收获,就点个赞吧
0 人点赞
