1. 系统架构说明
注意:如果请求客户端和认证服务器是同一个,则可以使用密码模式。(就是正常登录访问) 参考:https://juejin.cn/post/6844904095942180878?utm_source=gold_browser_extension#heading-0、https://juejin.cn/post/6844904096684589070
认证中心:oauth2-auth-server,OAuth2 主要实现端,Token 的生成、刷新、验证都在认证中心完成。
订单服务:oauth2-client-order-server,微服务之一,接收到请求后会到认证中心验证。(这里使用授权码模式)
用户服务:oauth2-client-user-server,微服务之二,接收到请求后会到认证中心验证。(这里使用密码模式)
客户端:例如 APP 端、web 端 等终端。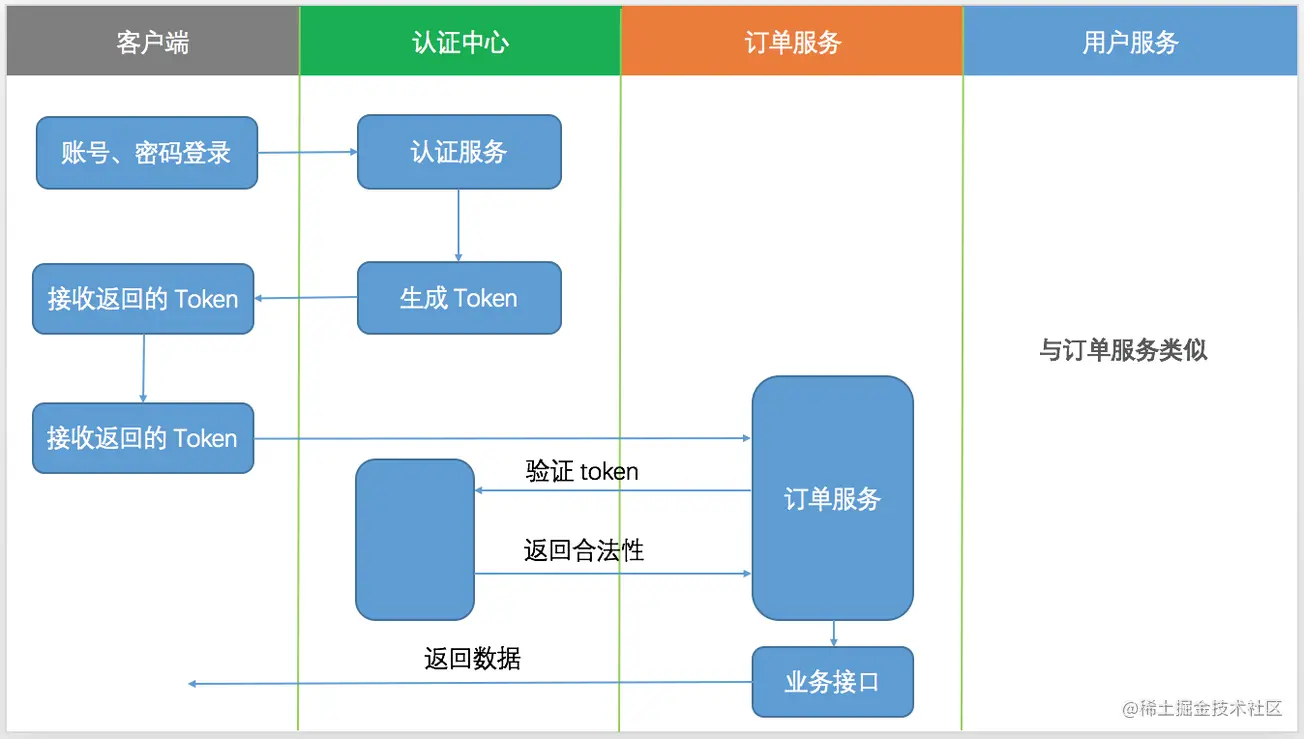
大致过程:客户端用用户名和密码到认证服务端换取 token,返回给客户端,客户端拿着 token 去各个微服务请求数据接口,一般这个 token 是放到 header 中的。当微服务接到请求后,先要拿着 token 去认证服务端检查 token 的合法性,如果合法,再根据用户所属的角色及具有的权限动态的返回数据。
2. 引入依赖及配置文件
2.1 父工程依赖
这里使用了 spring-cloud-starter-oauth2 的依赖,包含了 spring-cloud-starter-security 的依赖,所以不用单独引入。
<?xml version="1.0" encoding="UTF-8"?><project xmlns="http://maven.apache.org/POM/4.0.0" xmlns:xsi="http://www.w3.org/2001/XMLSchema-instance"xsi:schemaLocation="http://maven.apache.org/POM/4.0.0 https://maven.apache.org/xsd/maven-4.0.0.xsd"><modelVersion>4.0.0</modelVersion><packaging>pom</packaging><modules><module>oauth2-auth-server</module><module>oauth2-client-order-server</module><module>oauth2-client-user-server</module></modules><parent><groupId>org.springframework.boot</groupId><artifactId>spring-boot-starter-parent</artifactId><version>2.1.6.RELEASE</version><relativePath/> <!-- lookup parent from repository --></parent><groupId>com.xuwei</groupId><artifactId>springboot-oauth2</artifactId><version>0.0.1-SNAPSHOT</version><name>springboot-oauth2</name><description>Demo project for Spring Boot</description><properties><java.version>1.8</java.version></properties><dependencies><dependency><groupId>org.projectlombok</groupId><artifactId>lombok</artifactId><version>1.18.2</version><scope>provided</scope></dependency></dependencies><dependencyManagement><dependencies><dependency><groupId>org.springframework.cloud</groupId><artifactId>spring-cloud-dependencies</artifactId><version>Greenwich.SR2</version><type>pom</type><scope>import</scope></dependency></dependencies></dependencyManagement><build><plugins><plugin><groupId>org.springframework.boot</groupId><artifactId>spring-boot-maven-plugin</artifactId></plugin></plugins></build></project>
2.2 oauth2-auth-server依赖
依赖
<properties><project.build.sourceEncoding>UTF-8</project.build.sourceEncoding><maven.compiler.source>1.8</maven.compiler.source><maven.compiler.target>1.8</maven.compiler.target></properties><dependencies><dependency><groupId>org.springframework.boot</groupId><artifactId>spring-boot-starter-web</artifactId></dependency><dependency><groupId>org.springframework.cloud</groupId><artifactId>spring-cloud-starter-oauth2</artifactId></dependency><dependency><groupId>org.springframework.boot</groupId><artifactId>spring-boot-starter-data-redis</artifactId></dependency><dependency><groupId>org.springframework.boot</groupId><artifactId>spring-boot-starter-actuator</artifactId></dependency><dependency><groupId>mysql</groupId><artifactId>mysql-connector-java</artifactId><version>5.1.47</version></dependency><dependency><groupId>org.springframework.boot</groupId><artifactId>spring-boot-starter-jdbc</artifactId></dependency></dependencies>
配置文件 ```yaml spring: application: name: auth-server datasource: driver-class-name: com.mysql.jdbc.Driver url: jdbc:mysql://localhost:3306/springcloud_demo?characterEncoding=UTF-8&useSSL=false username: root password: 123456 hikari:
connection-timeout: 30000idle-timeout: 600000max-lifetime: 1800000maximum-pool-size: 9
redis: database: 2 host: localhost port: 6379 password: 12345 jedis:
pool:max-active: 8max-idle: 8min-idle: 0
timeout: 100ms
server: port: 8080
management: endpoint: health: enabled: true
<a name="rSMhd"></a>## 2.3 oauth2-client-authorization-code-server依赖(授权码模式)- 依赖```xml<dependencies><dependency><groupId>org.springframework.boot</groupId><artifactId>spring-boot-starter-web</artifactId></dependency><dependency><groupId>org.springframework.cloud</groupId><artifactId>spring-cloud-starter-oauth2</artifactId></dependency><dependency><groupId>org.springframework.boot</groupId><artifactId>spring-boot-starter-data-redis</artifactId></dependency><dependency><groupId>io.jsonwebtoken</groupId><artifactId>jjwt</artifactId><version>0.9.1</version></dependency><dependency><groupId>com.squareup.okhttp3</groupId><artifactId>okhttp</artifactId><version>3.14.2</version></dependency><dependency><groupId>org.springframework.boot</groupId><artifactId>spring-boot-starter-thymeleaf</artifactId></dependency></dependencies>
- 配置文件 ```yaml spring: application: name: client-authcode server: port: 8082 servlet: context-path: /client-authcode
security: oauth2: client: client-id: code-client client-secret: code-secret-8888 user-authorization-uri: http://localhost:8080/oauth/authorize access-token-uri: http://localhost:8080/oauth/token resource: jwt: key-uri: http://localhost:8080/oauth/token_key key-value: dev authorization: check-token-access: http://localhost:8080/oauth/check_token
<a name="WTnpR"></a>## 2.4 oauth2-client-user-server依赖(密码模式)- 依赖```xml<properties><project.build.sourceEncoding>UTF-8</project.build.sourceEncoding><maven.compiler.source>1.8</maven.compiler.source><maven.compiler.target>1.8</maven.compiler.target></properties><dependencies><dependency><groupId>org.springframework.boot</groupId><artifactId>spring-boot-starter-web</artifactId></dependency><dependency><groupId>org.springframework.cloud</groupId><artifactId>spring-cloud-starter-oauth2</artifactId></dependency><dependency><groupId>org.springframework.boot</groupId><artifactId>spring-boot-starter-data-redis</artifactId></dependency><dependency><groupId>io.jsonwebtoken</groupId><artifactId>jjwt</artifactId><version>0.9.1</version></dependency></dependencies>
- 配置文件
```yaml
spring:
application:
name: client-user
redis:
database: 2
host: localhost
port: 6379
password: 12345
jedis:
timeout: 100ms server: port: 8081 servlet: context-path: /client-userpool:max-active: 8max-idle: 8min-idle: 0
security: oauth2: client: client-id: user-client client-secret: user-secret-8888 user-authorization-uri: http://localhost:8080/oauth/authorize access-token-uri: http://localhost:8080/oauth/token
resource:
id: user-client
user-info-uri: user-info
authorization:check-token-access: http://localhost:8080/oauth/check_tokenresource:jwt:key-uri: http://localhost:8080/oauth/token_keykey-value: dev
<a name="jJcR0"></a>## 2.5 数据库配置[oauth_client_details.sql](https://www.yuque.com/attachments/yuque/0/2022/sql/446852/1646813216453-c54988fb-77c7-47d3-b151-712025fee025.sql?_lake_card=%7B%22src%22%3A%22https%3A%2F%2Fwww.yuque.com%2Fattachments%2Fyuque%2F0%2F2022%2Fsql%2F446852%2F1646813216453-c54988fb-77c7-47d3-b151-712025fee025.sql%22%2C%22name%22%3A%22oauth_client_details.sql%22%2C%22size%22%3A2442%2C%22type%22%3A%22%22%2C%22ext%22%3A%22sql%22%2C%22status%22%3A%22done%22%2C%22taskId%22%3A%22uc7def250-baf3-4732-8bb3-afc73cf4bff%22%2C%22taskType%22%3A%22upload%22%2C%22id%22%3A%22ue3a42a05%22%2C%22card%22%3A%22file%22%7D)<a name="xZ5r3"></a># 3. 密码模式<a name="WtDLh"></a>## 3.1 了解密码模式密码模式(Resource Owner Password Credentials Grant)中,用户向客户端提供自己的用户名和密码。客户端使用这些信息,向"服务商提供商"索要授权。在这种模式中,用户必须把自己的密码给客户端,但是客户端不得储存密码。这通常用在用户对客户端高度信任的情况下。一般不支持 refresh token。1. 用户向客户端提供用户名和密码。1. 客户端将用户名和密码发给认证服务器,向后者请求令牌。1. 认证服务器确认无误后,向客户端提供访问令牌。<a name="w1kje"></a>## 3.2 配置oauth2-auth-server<a name="bYCmr"></a>### 3.2.1 定义JWT token存储配置类```java@Configurationpublic class JwtTokenConfig {private static final String SIGNING_KEY = "dev";@Beanpublic TokenStore jwtTokenStore() {return new JwtTokenStore(jwtAccessTokenConverter());}/*** 配置jwt令牌服务,生成jwt格式的令牌* @return*/@Beanpublic JwtAccessTokenConverter jwtAccessTokenConverter() {JwtAccessTokenConverter converter = new JwtAccessTokenConverter();converter.setSigningKey(SIGNING_KEY); // 对称秘钥,资源服务器使用该秘钥来验证return converter;}/*** token增强器* @return*/@Beanpublic TokenEnhancer jwtTokenEnhancer(){return new JWTokenEnhancer();}}
3.2.2 声明token增强器
声明一个 token 增强器,可以在这里查询数据库或者缓存获取更多的信息,而这些信息都可以作为 JWT 扩展信息加入其中。
public class JWTokenEnhancer implements TokenEnhancer {@Overridepublic OAuth2AccessToken enhance(OAuth2AccessToken oAuth2AccessToken, OAuth2Authentication oAuth2Authentication) {Map<String, Object> info = new HashMap<>();info.put("jwt-ext", "JWT 扩展信息");info.put("jwt-date", new Date());((DefaultOAuth2AccessToken) oAuth2AccessToken).setAdditionalInformation(info);return oAuth2AccessToken;}}
3.2.3 配置SecurityConfig
1、定义 userDetailsService 实现类,实现用户认证。
@Slf4j@Component(value = "kiteUserDetailsService")public class KiteUserDetailsService implements UserDetailsService {@Autowiredprivate PasswordEncoder passwordEncoder;private RedisTokenStoreSerializationStrategy serializationStrategy = new JdkSerializationStrategy();@Autowiredprivate TokenStore redisTokenStore;@Overridepublic UserDetails loadUserByUsername(String username) throws UsernameNotFoundException {log.info("usernameis:" + username);// 查询数据库操作if(!username.equals("admin")){throw new UsernameNotFoundException("the user is not found");}else{// 用户角色也应在数据库中获取String role = "ROLE_ADMIN";List<SimpleGrantedAuthority> authorities = new ArrayList<>();authorities.add(new SimpleGrantedAuthority(role));// 线上环境应该通过用户名查询数据库获取加密后的密码String password = passwordEncoder.encode("123456");// 返回默认的 User// return new org.springframework.security.core.userdetails.User(username,password, authorities);// 返回自定义的 KiteUserDetailsUser user = new User(username,password,authorities);return user;}}}
2、定义 SecurityConfig 配置类。
@EnableWebSecurity // 已经包含了@configuration注解public class WebSecurityConfig extends WebSecurityConfigurerAdapter {@Beanpublic PasswordEncoder passwordEncoder() {return new BCryptPasswordEncoder();}/*** 密码模式才需要注入安全管理器bean* @return* @throws Exception*/@Bean@Overridepublic AuthenticationManager authenticationManagerBean() throws Exception {return super.authenticationManagerBean();}/*** 允许匿名访问所有接口 主要是 oauth 接口* @param http* @throws Exception*/@Overrideprotected void configure(HttpSecurity http) throws Exception {http.formLogin().and().authorizeRequests().antMatchers("/**").permitAll();}}
3.3 授权服务器配置
3.3.1 定义 Oauth2Config 配置类
这里就是在 oauth2-auth-server 服务下配置。
@Configuration@EnableAuthorizationServerpublic class OAuth2Config extends AuthorizationServerConfigurerAdapter {@Autowiredpublic PasswordEncoder passwordEncoder;@Autowiredpublic UserDetailsService kiteUserDetailsService;@Autowiredprivate AuthenticationManager authenticationManager;//@Autowired//private TokenStore redisTokenStore;@Autowiredprivate DataSource dataSource;@Autowiredprivate TokenStore jwtTokenStore;@Autowiredprivate JwtAccessTokenConverter jwtAccessTokenConverter;/*** 注入token增强器*/@Autowiredprivate TokenEnhancer jwtTokenEnhancer;/*** 配置令牌访问端点* @param endpoints* @throws Exception*/@Overridepublic void configure(final AuthorizationServerEndpointsConfigurer endpoints) throws Exception {/*** redis token 方式*///endpoints.authenticationManager(authenticationManager)// .tokenStore(redisTokenStore)// .userDetailsService(kiteUserDetailsService);/*** 普通jwt模式*///endpoints.tokenStore(jwtTokenStore)// .accessTokenConverter(jwtAccessTokenConverter)// .userDetailsService(kiteUserDetailsService)// // 设置authenticationManager支持password模式// .authenticationManager(authenticationManager);/*** 增强jwt模式*/TokenEnhancerChain enhancerChain = new TokenEnhancerChain();List<TokenEnhancer> enhancerList = new ArrayList<>();enhancerList.add(jwtTokenEnhancer);enhancerList.add(jwtAccessTokenConverter);enhancerChain.setTokenEnhancers(enhancerList);endpoints.tokenStore(jwtTokenStore).userDetailsService(kiteUserDetailsService).authenticationManager(authenticationManager) // 这一步支持password模式.tokenEnhancer(enhancerChain).accessTokenConverter(jwtAccessTokenConverter);}/*** 配置客户端详细信息* @param clients* @throws Exception*/@Overridepublic void configure(ClientDetailsServiceConfigurer clients) throws Exception {clients.jdbc(dataSource);//clients.inMemory()// .withClient("order-client")// .secret(passwordEncoder.encode("order-secret-8888"))// .authorizedGrantTypes("refresh_token", "authorization_code", "password")// .scopes("all")// .and()// .withClient("user-client")// .secret(passwordEncoder.encode("user-secret-8888"))// .authorizedGrantTypes("refresh_token", "authorization_code", "password")// .scopes("all");}/*** 令牌端点的安全约束* @param security* @throws Exception*/@Overridepublic void configure(AuthorizationServerSecurityConfigurer security) throws Exception {security.allowFormAuthenticationForClients();security.checkTokenAccess("isAuthenticated()");security.tokenKeyAccess("isAuthenticated()");}}
3.3.2 EnableAuthorizationServer
@EnableAuthorizationServer:表示开启授权服务器,可以用 @EnableAuthorizationServer 注解并继承 AuthorizationServerConfigurerAdapter 来配置OAuth2.0 授权服务器。
AuthorizationServerConfigurerAdapter要求配置以下几个类,这几个类是由 Spring 创建的独立的配置对象,它们会被 Spring 传入 AuthorizationServerConfigurer中进行配置。
public class AuthorizationServerConfigurerAdapter implements AuthorizationServerConfigurer {public void configure(AuthorizationServerSecurityConfigurer security) throws Exception {}public void configure(ClientDetailsServiceConfigurer clients) throws Exception {}public void configure(AuthorizationServerEndpointsConfigurer endpoints) throws Exception {}}
ClientDetailsServiceConfigurer:用来配置客户端详情服务(ClientDetailsService),客户端详情信息在这里进行初始化,你能够把客户端详情信息写死在这里或者是通过数据库来存储调取详情信息。AuthorizationServerEndpointsConfigurer:用来配置令牌(token)的访问端点和令牌服务(token services)。AuthorizationServerSecurityConfigurer:用来配置令牌端点的安全约束。3.3.3 配置客户端详细信息
ClientDetailsServiceConfigurer能够使用内存或者 JDBC 来实现客户端详情服务(ClientDetailsService),ClientDetailsService 负责查找 ClientDetails,而 ClientDetails 有几个重要的属性如下列表:clientId:(必须的)用来标识客户的Id。
- secret:(需要值得信任的客户端)客户端安全码,如果有的话。
- scope:用来限制客户端的访问范围,如果为空(默认)的话,那么客户端拥有全部的访问范围。
- authorizedGrantTypes:此客户端可以使用的授权类型,默认为空。
- authorities:此客户端可以使用的权限(基于Spring Security authorities)。
客户端详情(Client Details)能够在应用程序运行的时候进行更新,可以通过访问底层的存储服务(例如将客户端详情存储在一个关系数据库的表中,就可以使用 JdbcClientDetailsService)或者通过自己实现 ClientRegistrationService 接口(同时你也可以实现 ClientDetailsService 接口)来进行管理。配置如下:
/*** 配置客户端详细信息* @param clients* @throws Exception*/@Overridepublic void configure(ClientDetailsServiceConfigurer clients) throws Exception {clients.jdbc(dataSource);// clients.inMemory()// .withClient("order-client")// .secret(passwordEncoder.encode("order-secret-8888"))// .authorizedGrantTypes("refresh_token", "authorization_code", "password")// .accessTokenValiditySeconds(3600)// .scopes("all")// .and()// .withClient("user-client")// .secret(passwordEncoder.encode("user-secret-8888"))// .authorizedGrantTypes("refresh_token", "authorization_code", "password")// .accessTokenValiditySeconds(3600)// .scopes("all");}
3.3.4 管理令牌
AuthorizationServerTokenServices接口定义了一些操作使得你可以对令牌进行一些必要的管理,令牌可以被用来加载身份信息,里面包含了这个令牌的相关权限。
自己可以创建 AuthorizationServerTokenServices这个接口的实现,则需要继承 DefaultTokenServices这个类,里面包含了一些有用实现,你可以使用它来修改令牌的格式和令牌的存储。默认的,当它尝试创建一个令牌的时候,是使用随机值来进行填充的,除了持久化令牌是委托一个 TokenStore 接口来实现以外,这个类几乎帮你做了所有的事情。并且 TokenStore 这个接口有一个默认的实现,它就是 InMemoryTokenStore ,如其命名,所有的令牌是被保存在了内存中。除了使用这个类以外,你还可以使用一些其他的预定义实现,下面有几个版本,它们都实现了TokenStore接口:
InMemoryTokenStore:这个版本的实现是被默认采用的,它可以完美的工作在单服务器上(即访问并发量压力不大的情况下,并且它在失败的时候不会进行备份),大多数的项目都可以使用这个版本的实现来进行尝试,你可以在开发的时候使用它来进行管理,因为不会被保存到磁盘中,所以更易于调试。JdbcTokenStore:这是一个基于 JDBC 的实现版本,令牌会被保存进关系型数据库。使用这个版本的实现时,你可以在不同的服务器之间共享令牌信息,使用这个版本的时候请注意把”spring-jdbc”这个依赖加入到你的 classpath 当中。JwtTokenStore:这个版本的全称是 JSON Web Token(JWT),它可以把令牌相关的数据进行编码(因此对于后端服务来说,它不需要进行存储,这将是一个重大优势),但是它有一个缺点,那就是撤销一个已经授权令牌将会非常困难,所以它通常用来处理一个生命周期较短的令牌以及撤销刷新令牌(refresh_token)。另外一个缺点就是这个令牌占用的空间会比较大,如果你加入了比较多用户凭证信息。JwtTokenStore不会保存任何数据,但是它在转换令牌值以及授权信息方面与DefaultTokenServices所扮演的角色是一样的。
1、定义 TokenConfig,生成一个普通的令牌。
@Configurationpublic class JwtTokenConfig {private static final String SIGNING_KEY = "dev";@Beanpublic TokenStore jwtTokenStore() {return new JwtTokenStore(jwtAccessTokenConverter());}/*** 配置jwt令牌服务,生成jwt格式的令牌* @return*/@Beanpublic JwtAccessTokenConverter jwtAccessTokenConverter() {JwtAccessTokenConverter converter = new JwtAccessTokenConverter();converter.setSigningKey(SIGNING_KEY); // 对称秘钥,资源服务器使用该秘钥来验证return converter;}/*** token增强器* @return*/@Beanpublic TokenEnhancer jwtTokenEnhancer(){return new JWTokenEnhancer();}}
2、设置令牌的其他信息,比如过期时间、刷新时间。
这里是在客户端详细信息里配置了令牌的过期时间和刷新时间,数据库中查询出来的,代码如上。
@Autowiredprivate TokenStore jwtTokenStore;@Autowiredprivate ClientDetailsService clientDetailsService;@Beanpublic AuthorizationServerTokenServices tokenServices() {DefaultTokenServices services = new DefaultTokenServices();services.setClientDetailsService(clientDetailsService);services.setSupportRefreshToken(true);services.setTokenStore(jwtTokenStore);services.setAccessTokenValiditySeconds(7200); // 令牌默认有效期2小时services.setRefreshTokenValiditySeconds(259200); // 刷新令牌默认有效期3天return services;}
3.3.5 令牌访问端点配置
AuthorizationServerEndpointsConfigurer这个对象的实例可以完成令牌服务以及令牌 endpoint 配置。
配置授权类型:AuthorizationServerEndpointsConfigurer通过设定以下属性决定支持的授权类型(Grant Types)。
**authenticationManager**:认证管理器,当你选择了资源所有者密码(password)授权类型的时候,请设置这个属性注入一个AuthenticationManager对象。**userDetailsService**:如果你设置了这个属性的话,那说明你有一个自己的 UserDetailsService 接口的实现,或者你可以把这个东西设置到全局域上面去(例如GlobalAuthenticationManagerConfigurer这个配置对象),当你设置了这个之后,那么 “refresh_token” 即刷新令牌授权类型模式的流程中就会包含一个检查,用来确保这个账号是否仍然有效。**authorizationCodeServices**:这个属性是用来设置授权码服务的(即AuthorizationCodeServices的实例对象),主要用于 “authorization_code” 授权码类型模式。mplicitGrantService:这个属性用于设置隐式授权模式,用来管理隐式授权模式的状态。tokenGranter:当你设置了这个东西(即 TokenGranter 接口实现),那么授权将会交由你来完全掌控,并且会忽略掉上面的这几个属性,这个属性一般是用作拓展用途的,即标准的四种授权模式已经满足不了你的需求的时候,才会考虑使用这个。
配置授权端点的 **URL:**AuthorizationServerEndpointsConfigurer这个配置对象有一个叫做 pathMapping() 的方法用来配置端点 URL 链接,它有两个参数:
- 第一个参数:String 类型的,这个端点 URL 的默认链接。
- 第二个参数:String 类型的,你要进行替代的URL链接。
以上的参数都将以 “/“ 字符为开始的字符串,框架的默认URL链接如下列表,可以作为这个 pathMapping() 方法的第一个参数:
- /oauth/authorize:授权端点。
- /oauth/token:令牌端点。
- /oauth/confirm_access:用户确认授权提交端点。
- /oauth/error:授权服务错误信息端点。
- /oauth/check_token:用于资源服务访问的令牌解析端点。
- /oauth/token_key:提供公有密匙的端点,如果你使用JWT令牌的话。
在 AuthorizationServer 配置令牌访问端点:
@Autowiredprivate AuthorizationCodeServices authorizationCodeServices;@Autowiredprivate AuthenticationManager authenticationManager;@Overridepublic void configure(AuthorizationServerEndpointsConfigurer endpoints) {endpoints.authenticationManager(authenticationManager).authorizationCodeServices(authorizationCodeServices).tokenServices(tokenService()).allowedTokenEndpointRequestMethods(HttpMethod.POST);}@Beanpublic AuthorizationCodeServices authorizationCodeServices() { //设置授权码模式的授权码如何存取,暂时采用内存方式return new InMemoryAuthorizationCodeServices();}
3.3.6 令牌端点的安全约束
AuthorizationServerSecurityConfigurer:用来配置令牌端点(Token Endpoint)的安全约束,在 AuthorizationServer 中配置如下.
- tokenkey 这个 endpoint 当使用 JwtToken 且使用非对称加密时,资源服务用于获取公钥而开放的,这里指这个endpoint 完全公开。
- checkToken 这个 endpoint 完全公开。
- 允许表单认证。
@Overridepublic void configure(AuthorizationServerSecurityConfigurer security){security.tokenKeyAccess("permitAll()") (1).checkTokenAccess("permitAll()") (2).allowFormAuthenticationForClients() (3);}
3.3.7 授权服务配置总结
授权服务配置分为三大块:
- 既然要完成认证,首先得知道客户端信息从哪儿读取,因此需要进行客户端详情配置。
- 既然要颁发 token,那必须定义 token 相关的 endpoint,以及 token 如何存取,以及客户端支持哪些类型的 token。
既然暴露除了一些 endpoint,那对这些 endpoint 可以定义一些安全上的约束等。
3.4 资源服务器配置
1、定义 ResourceServerConfig。
@Configuration@EnableResourceServer@EnableGlobalMethodSecurity(prePostEnabled = true)public class ResourceServerConfig extends ResourceServerConfigurerAdapter {@Value("${security.oauth2.client.client-id}")private String clientId;@Value("${security.oauth2.client.client-secret}")private String secret;@Value("${security.oauth2.authorization.check-token-access}")private String checkTokenEndpointUrl;//@Autowired//private RedisConnectionFactory redisConnectionFactory;////@Bean//public TokenStore redisTokenStore (){// return new RedisTokenStore(redisConnectionFactory);//}////@Bean//public RemoteTokenServices tokenService() {// RemoteTokenServices tokenService = new RemoteTokenServices();// tokenService.setClientId(clientId);// tokenService.setClientSecret(secret);// tokenService.setCheckTokenEndpointUrl(checkTokenEndpointUrl);// return tokenService;//}////@Override//public void configure(ResourceServerSecurityConfigurer resources) throws Exception {// resources.tokenServices(tokenService());//}/***************************** 以上是 RedisToken 方式的配置* --------------------------* 以下是 JWT 方式配置****************************/@Beanpublic TokenStore jwtTokenStore() {return new JwtTokenStore(jwtAccessTokenConverter());}@Beanpublic JwtAccessTokenConverter jwtAccessTokenConverter() {JwtAccessTokenConverter accessTokenConverter = new JwtAccessTokenConverter();accessTokenConverter.setSigningKey("dev");accessTokenConverter.setVerifierKey("dev");return accessTokenConverter;}@Autowiredprivate TokenStore jwtTokenStore;@Overridepublic void configure(ResourceServerSecurityConfigurer resources) throws Exception {resources.tokenStore(jwtTokenStore);}}
2、定义控制器。
@Slf4j@RestControllerpublic class UserController {@GetMapping(value = "get")//@PreAuthorize("hasAuthority('ROLE_ADMIN')")@PreAuthorize("hasAnyRole('ROLE_ADMIN')")public String get(Authentication authentication){//Authentication authentication = SecurityContextHolder.getContext().getAuthentication();authentication.getCredentials();OAuth2AuthenticationDetails details = (OAuth2AuthenticationDetails)authentication.getDetails();String redisToken = details.getTokenValue();System.out.println("请求资源接口:" + redisToken);return redisToken;}@GetMapping(value = "jwt")@PreAuthorize("hasAnyRole('ROLE_ADMIN')")public Object jwtParser(Authentication authentication){authentication.getCredentials();OAuth2AuthenticationDetails details = (OAuth2AuthenticationDetails)authentication.getDetails();String jwtToken = details.getTokenValue();Claims claims = Jwts.parser().setSigningKey("dev".getBytes(StandardCharsets.UTF_8)).parseClaimsJws(jwtToken).getBody();System.out.println("请求资源接口:" + claims);return claims;}}
3.5 测试认证功能
1、启动认证服务器,端口 8080。
2、启动资源服务器,端口 8081。
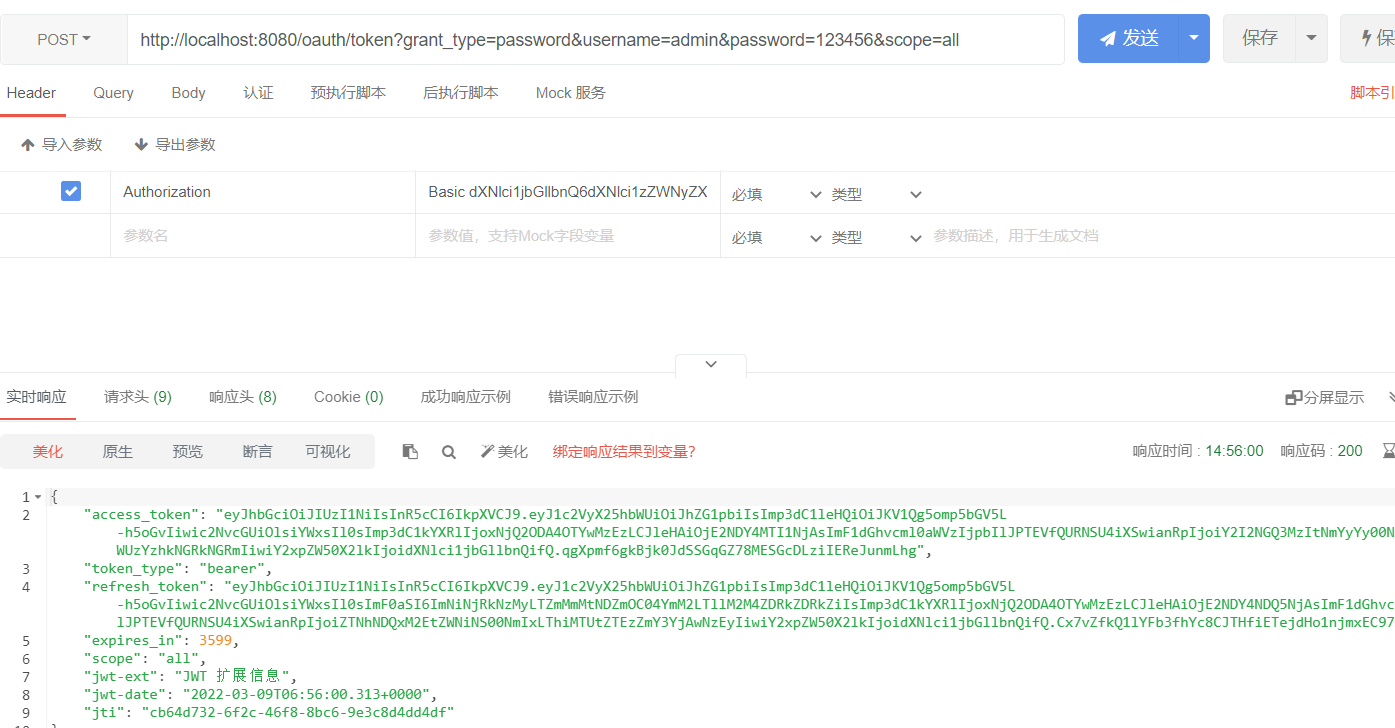
3、请求认证服务端获取 token,具体 URL 为http://localhost:8080/oauth/token?grant_type=password&username=admin&password=123456&scope=allAuthorization 要加在请求头中,格式为 Basic 空格 base64(clientId:clientSecret),这个微服务客户端的 client-id 是 user-client,client-secret 是 user-secret-8888,将这两个值通过冒号连接,并使用 base64 编码(user-client:user-secret-8888)之后的值为
dXNlci1jbGllbnQ6dXNlci1zZWNyZXQtODg4OA==。
4、用获取到的 token 请求资源接口。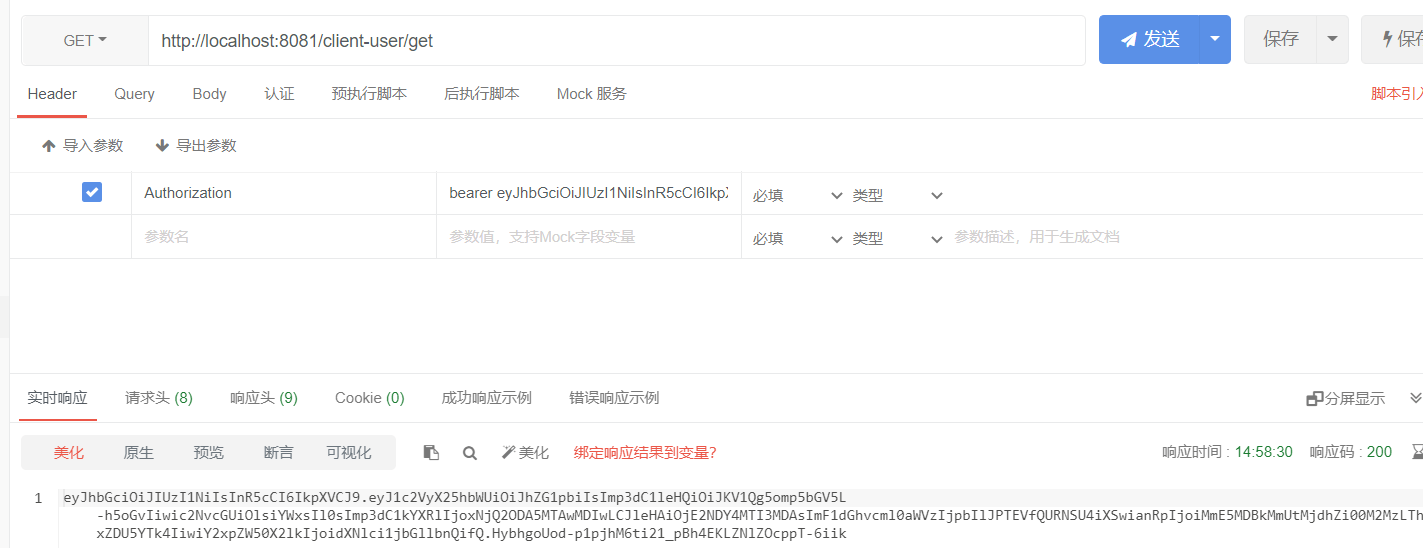
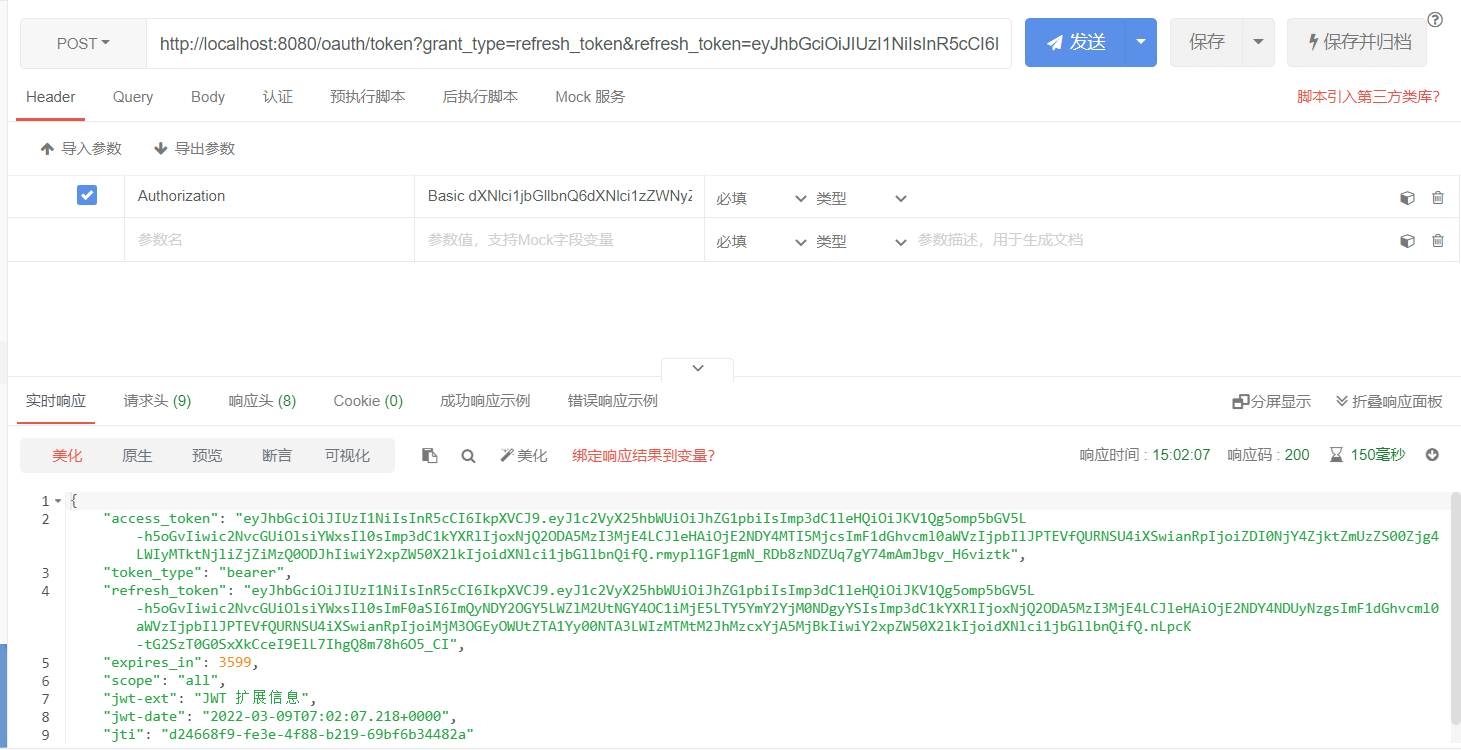
5、token 过期后,用 refresh_token 换取 access_token。
一般都会设置 access_token 的过期时间小于 refresh_token 的过期时间,以便在 access_token 过期后,不用用户再次登录的情况下,获取新的 access_token。
4. 授权码模式
4.1 了解授权码模式
授权码模式的认证过程是这样的:
1、用户客户端请求认证服务器的认证接口,并附上回调地址;
2、认证服务接口接收到认证请求后跳转到自身的登录界面;
3、用户输入用户名和密码,点击确认,跳转到授权、拒绝提示页面(也可省略);
4、用户点击授权或者默认授权后,跳转到微服务客户端的回调地址,并传入参数 code;
5、回调地址一般是一个 RESTful 接口,此接口拿到 code 参数后,再次请求认证服务器的 token 获取接口,用来换取 access_token 等信息;
6、获取到 access_token 后,拿着 token 去请求各个微服务客户端的接口。
注意上面所说的用户客户端可以理解为浏览器、app 端,微服务客户端就是我们系统中的例如订单服务、用户服务等微服务,认证服务端就是用来做认证授权的服务,相对于认证服务端来说,各个业务微服务也可以称作是它的客户端。
4.2 添加资源服务器配置
@Configuration@EnableResourceServer@EnableGlobalMethodSecurity(prePostEnabled = true)public class ResourceServerConfig extends ResourceServerConfigurerAdapter {@Beanpublic TokenStore jwtTokenStore() {return new JwtTokenStore(jwtAccessTokenConverter());}@Beanpublic JwtAccessTokenConverter jwtAccessTokenConverter() {JwtAccessTokenConverter accessTokenConverter = new JwtAccessTokenConverter();accessTokenConverter.setSigningKey("dev");accessTokenConverter.setVerifierKey("dev");return accessTokenConverter;}@Autowiredprivate TokenStore jwtTokenStore;@Overridepublic void configure(ResourceServerSecurityConfigurer resources) throws Exception {resources.tokenStore(jwtTokenStore);}@Overridepublic void configure(HttpSecurity http) throws Exception {http.authorizeRequests().antMatchers("/login").permitAll();}}
4.3 定义控制器
@Slf4j@Controllerpublic class CodeClientController {/*** 用来展示index.html 模板* @return*/@GetMapping(value = "index")public String index(){return "index";}@GetMapping(value = "login")public Object login(String code,Model model) {String tokenUrl = "http://localhost:8080/oauth/token";OkHttpClient httpClient = new OkHttpClient();RequestBody body = new FormBody.Builder().add("grant_type", "authorization_code").add("client", "code-client").add("redirect_uri","http://localhost:8082/client-authcode/login").add("code", code).build();Request request = new Request.Builder().url(tokenUrl).post(body).addHeader("Authorization", "Basic Y29kZS1jbGllbnQ6Y29kZS1zZWNyZXQtODg4OA==").build();try {Response response = httpClient.newCall(request).execute();String result = response.body().string();ObjectMapper objectMapper = new ObjectMapper();Map tokenMap = objectMapper.readValue(result,Map.class);String accessToken = tokenMap.get("access_token").toString();Claims claims = Jwts.parser().setSigningKey("dev".getBytes(StandardCharsets.UTF_8)).parseClaimsJws(accessToken).getBody();String userName = claims.get("user_name").toString();model.addAttribute("username", userName);model.addAttribute("accessToken", result);return "index";} catch (Exception e) {e.printStackTrace();}return null;}@org.springframework.web.bind.annotation.ResponseBody@GetMapping(value = "get")@PreAuthorize("hasAnyRole('ROLE_ADMIN')")public Object get(Authentication authentication) {//Authentication authentication = SecurityContextHolder.getContext().getAuthentication();authentication.getCredentials();OAuth2AuthenticationDetails details = (OAuth2AuthenticationDetails) authentication.getDetails();String token = details.getTokenValue();return token;}}
4.4 定义template模板文件
在 resource 目录下 templates 目录下新建 index.html 文件。
<!DOCTYPE html><html lang="en" xmlns:th="http://www.thymeleaf.org"><head><meta charset="UTF-8"><title>古时的风筝-OAuth2 Client</title></head><body><div><a href="http://localhost:8080/oauth/authorize?client_id=code-client&response_type=code&redirect_uri=http://localhost:8082/client-authcode/login">登录</a><span th:text="'当前认证用户:' + ${username}"></span><span th:text="${accessToken}"></span></div></body></html>
4.5 测试认证功能
1、访问授权接口,跳转到登录页面,url 为 http://localhost:8080/oauth/authorize?client_id=code-client&response_type=code&redirect_uri=http://localhost:8082/client-authcode/login。我这里定义了首页,通过首页跳转到登录页,url 为 http://localhost:8082/client-authcode/index。
2、跳转到 security 默认的登录页面,输入用户名密码,跳转到授权页面。页面上有 Authorize 和 Deny (授权和拒绝)两个按钮。可通过将 autoapprove 字段设置为 0 来取消此页面的展示,默认直接同意授权。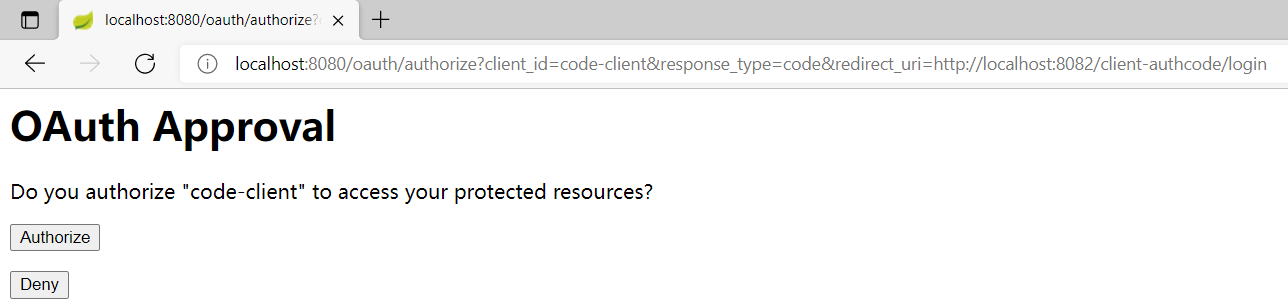
3、同意授权后,跳转到了回调地址,页面上显示 CODE 值。
4、拿这个 CODE 值向认证服务器获取 token。
- URL:
http://localhost:8080/oauth/token?grant_type=authorization_code&client=code-client&code=xSR7Bt&redirect_uri=http://localhost:8082/client-authcode/login- Authorization:code-client:code-secret-8888 通过 Base64 加密得到的。
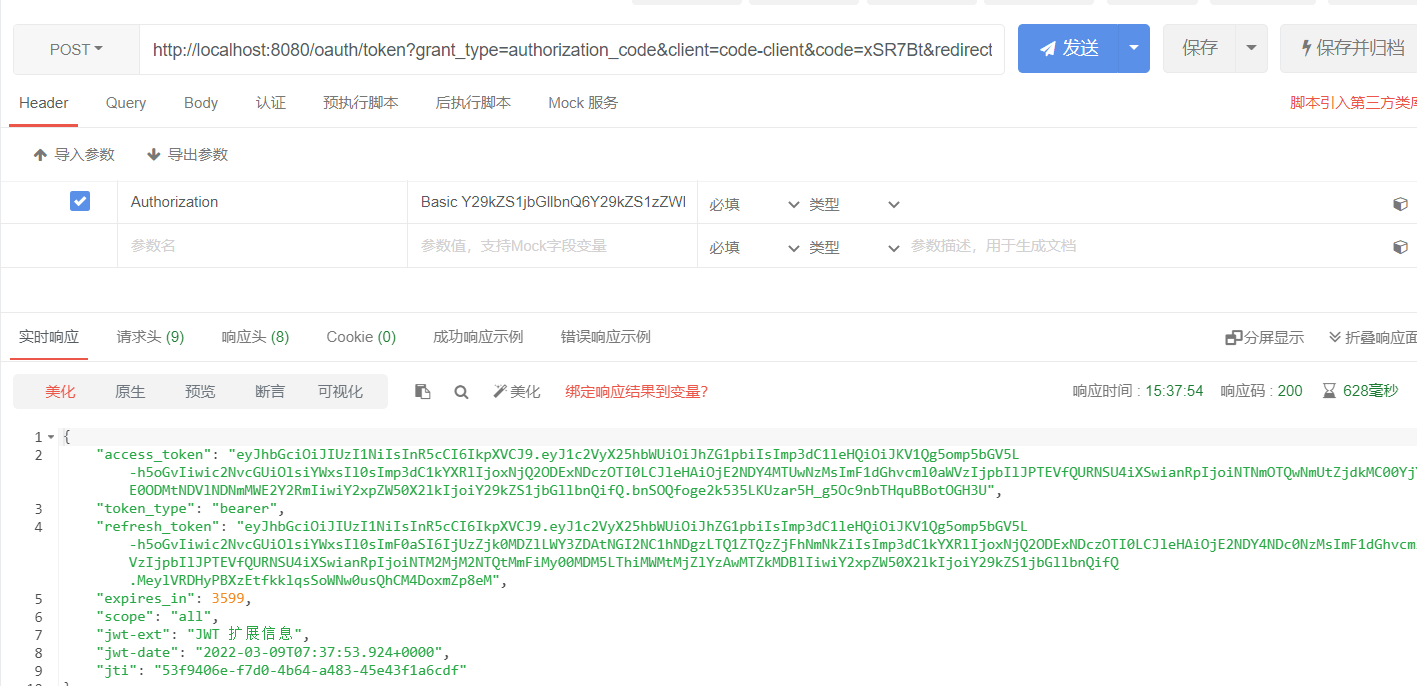
5、拿到 token 访问资源接口。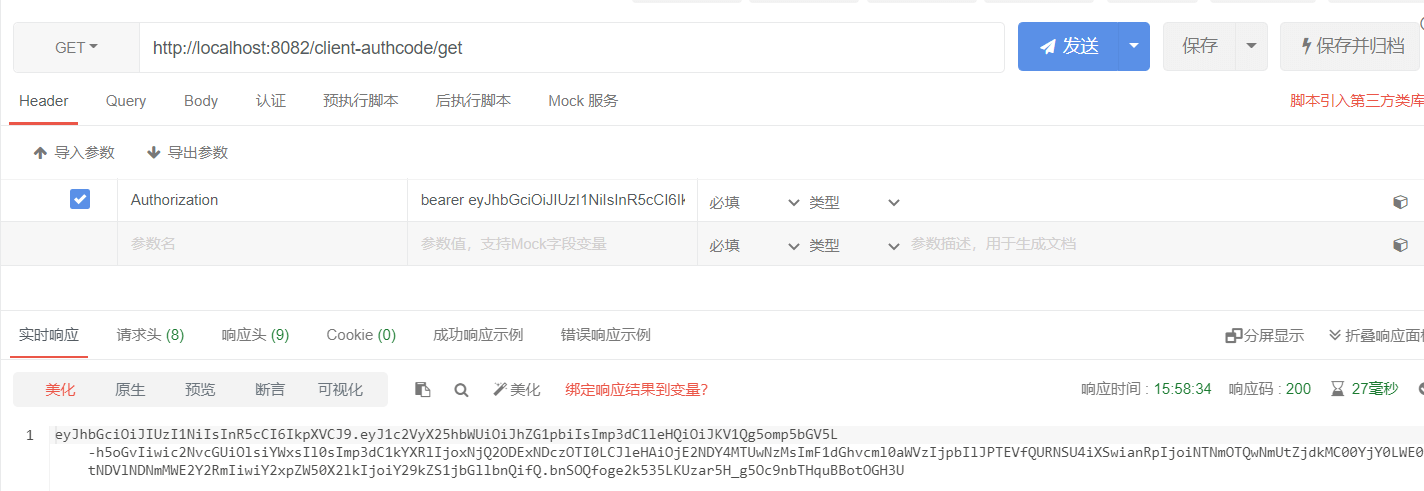
6、刷新 token。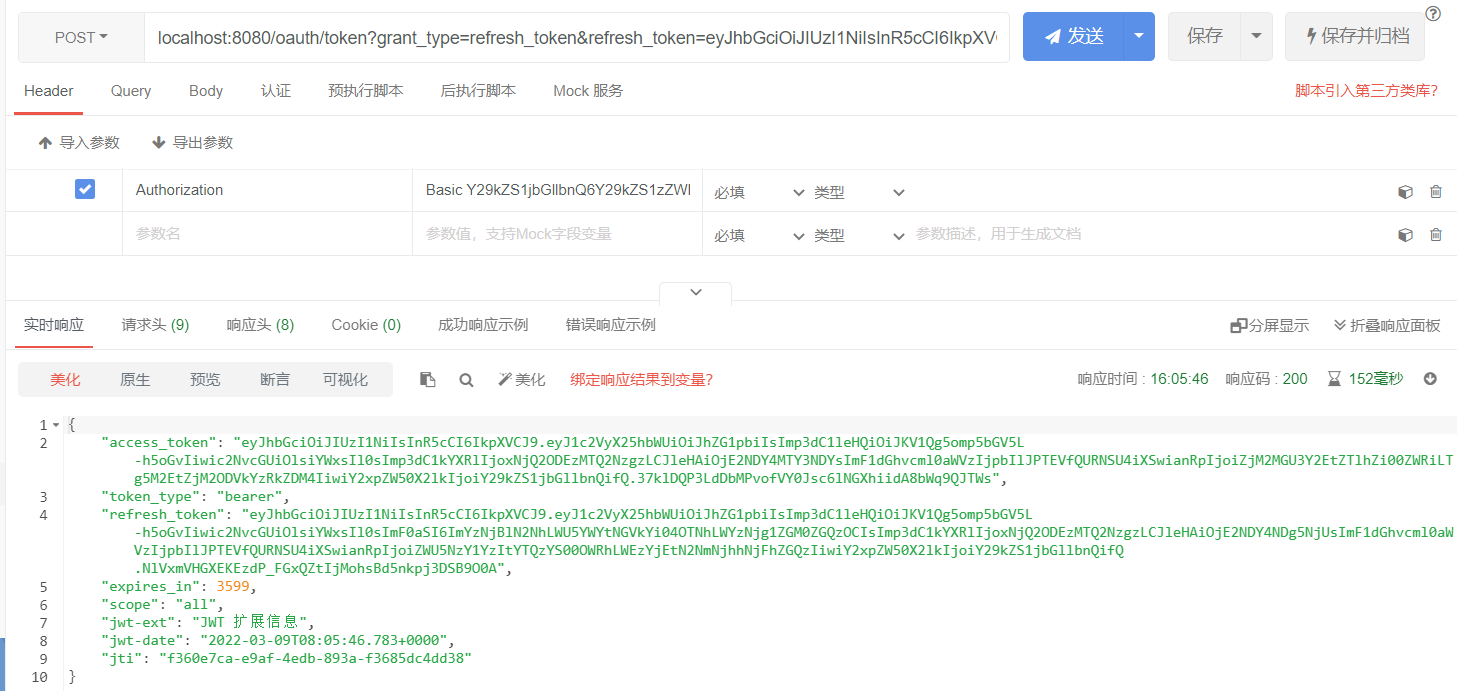

若有收获,就点个赞吧
0 人点赞
