s(struts)s(spring)h(hibernate)—》ssh servlet
s(struts2) s(spring) h(hibernate(jpa))—>ssh2 fiter
MyBatis-plus 源码解析(hibernate,jpa hql)
前言
MyBatis-plus是完全基于MyBatis开发的一个增强工具,是在MyBatis的基础上做增强的框架,为简化开发、提高效率而生。它在MyBatis原本的框架上增加了很多实用性功能,比如乐观锁插件、字段自动填充功能、分页插件、条件构造器、sql 注入器等等。使用 MyBatis-plus 可以完全不写任何 XML 文件,直接使用继承了BaseMapper 接口的类对象完成对数据库的映射操作
基于映射的原理,MyBatis-plus 必然要实现 Mapper中的方法与 SQL 语句的对应转化,以下即为 MyBatis-plus 重要流程图例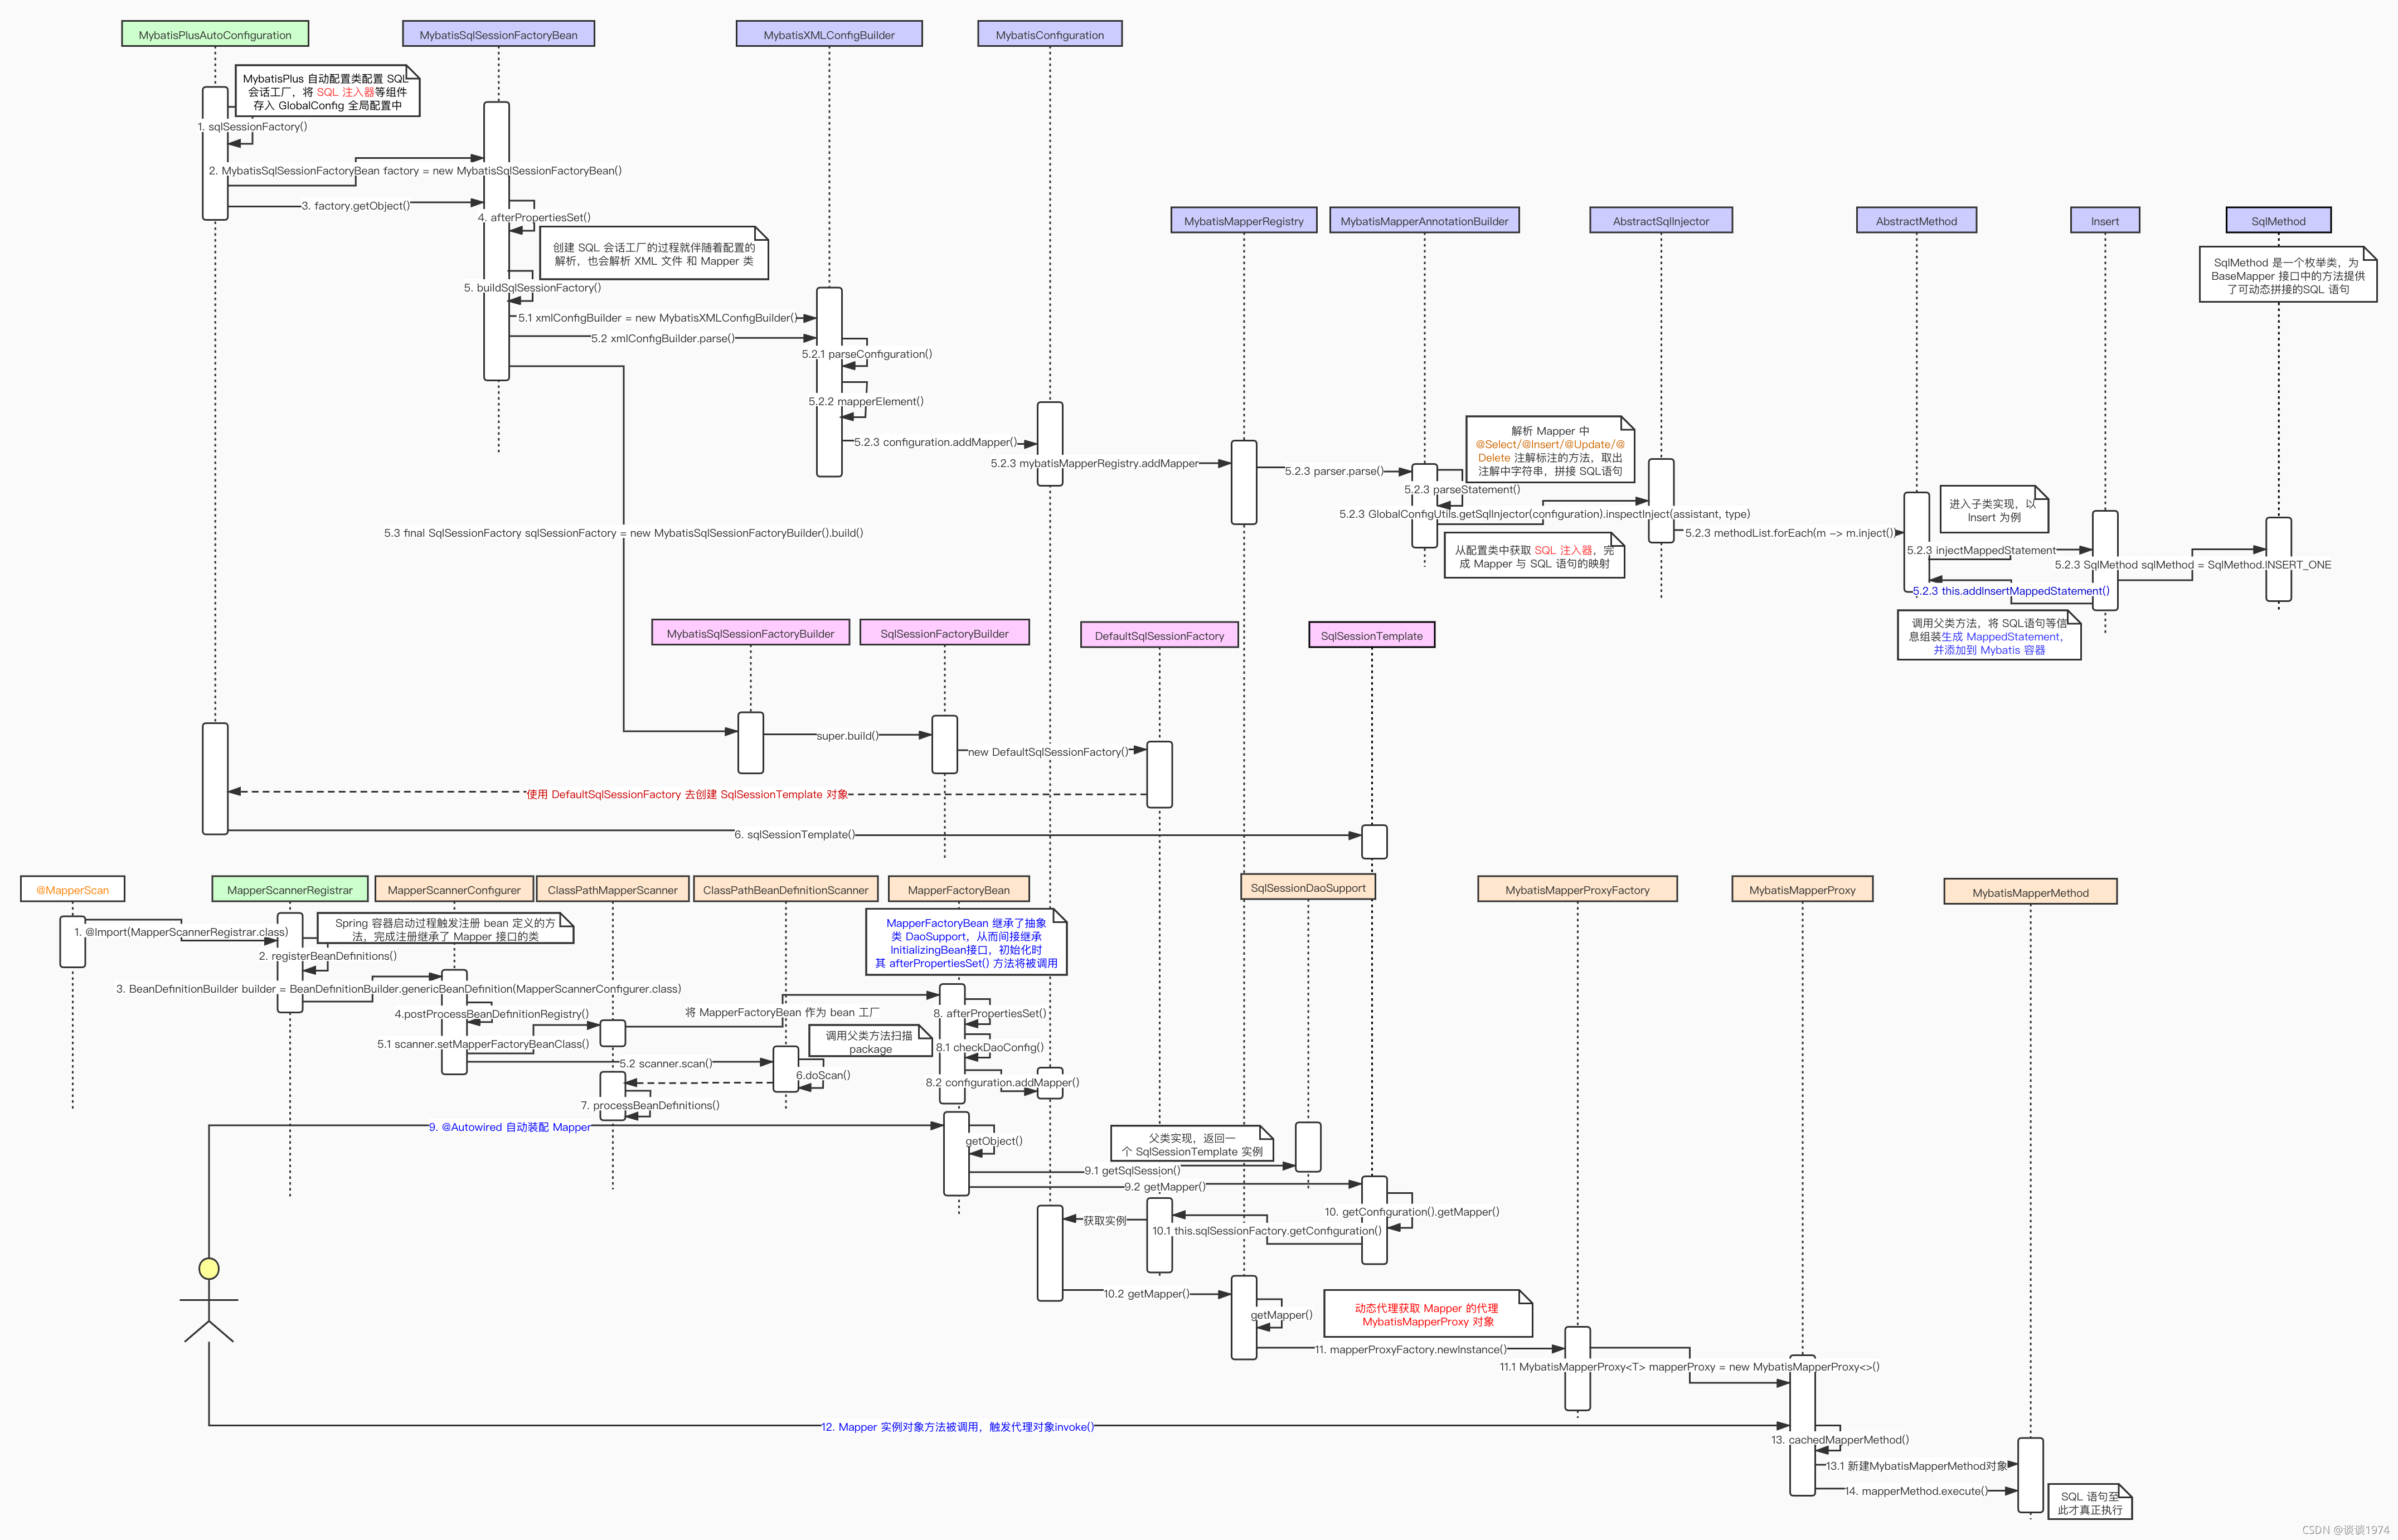
1. Mapper 对象方法映射为 SQL 语句
在 MyBatis-plus 中, MybatisPlusAutoConfiguration 自动配置类的 sqlSessionFactory()方法为 Spring提供创建 sqlSession的工厂类对象,对 sqlSessionFactory 进行定义的定义类变为了 MybatisSqlSessionFactoryBean。在 sqlSessionFactory()方法中,除了注入 MyBatis本身的组件,还会注入MyBatis-plus 的 主键生成器、SQL 注入器等组件,最后通过 MybatisSqlSessionFactoryBean#getObject() 方法获取到 sqlSessionFactory 对象
public SqlSessionFactory sqlSessionFactory(DataSource dataSource) throws Exception {// TODO 使用 MybatisSqlSessionFactoryBean 而不是 SqlSessionFactoryBeanMybatisSqlSessionFactoryBean factory = new MybatisSqlSessionFactoryBean();factory.setDataSource(dataSource);factory.setVfs(SpringBootVFS.class);if (StringUtils.hasText(this.properties.getConfigLocation())) {factory.setConfigLocation(this.resourceLoader.getResource(this.properties.getConfigLocation()));}applyConfiguration(factory);if (this.properties.getConfigurationProperties() != null) {factory.setConfigurationProperties(this.properties.getConfigurationProperties());}......// TODO 自定义枚举包if (StringUtils.hasLength(this.properties.getTypeEnumsPackage())) {factory.setTypeEnumsPackage(this.properties.getTypeEnumsPackage());}// TODO 此处必为非 NULLGlobalConfig globalConfig = this.properties.getGlobalConfig();// TODO 注入填充器if (this.applicationContext.getBeanNamesForType(MetaObjectHandler.class,false, false).length > 0) {MetaObjectHandler metaObjectHandler = this.applicationContext.getBean(MetaObjectHandler.class);globalConfig.setMetaObjectHandler(metaObjectHandler);}// TODO 注入主键生成器if (this.applicationContext.getBeanNamesForType(IKeyGenerator.class, false,false).length > 0) {IKeyGenerator keyGenerator = this.applicationContext.getBean(IKeyGenerator.class);globalConfig.getDbConfig().setKeyGenerator(keyGenerator);}// TODO 注入sql注入器if (this.applicationContext.getBeanNamesForType(ISqlInjector.class, false,false).length > 0) {ISqlInjector iSqlInjector = this.applicationContext.getBean(ISqlInjector.class);globalConfig.setSqlInjector(iSqlInjector);}// TODO 设置 GlobalConfig 到 MybatisSqlSessionFactoryBeanfactory.setGlobalConfig(globalConfig);return factory.getObject();}
2.MybatisSqlSessionFactoryBean#getObject() 执行懒加载策略,最后通过 buildSqlSessionFactory() 方法创建 SqlSessionFactory 工厂类对象。这个方法的流程很长,不过大致可以分为两个步骤:
1.创建 MybatisXMLConfigBuilder 对象,调用其 parse() 方法去解析 XML 配置文件及 Mapper
2.解析获得的信息存储在 targetConfiguration 对象中,根据其信息创建 SqlSessionFactory 对象
[
](https://blog.csdn.net/weixin_45505313/article/details/104855453)
protected SqlSessionFactory buildSqlSessionFactory() throws Exception {final MybatisConfiguration targetConfiguration;// TODO 使用 MybatisXmlConfigBuilder 而不是 XMLConfigBuilderMybatisXMLConfigBuilder xmlConfigBuilder = null;......} else if (this.configLocation != null) {// TODO 使用 MybatisXMLConfigBuilder// 1.1 创建 MybatisConfiguration 对象xmlConfigBuilder = new MybatisXMLConfigBuilder(this.configLocation.getInputStream(), null, this.configurationProperties);// 2.1 将解析获得的信息的引用传递给 targetConfiguration 对象targetConfiguration = xmlConfigBuilder.getConfiguration();} else {LOGGER.debug(() -> "Property 'configuration' or 'configLocation' not specified, using default MyBatis Configuration");// TODO 使用 MybatisConfigurationtargetConfiguration = new MybatisConfiguration();Optional.ofNullable(this.configurationProperties).ifPresent(targetConfiguration::setVariables);}// TODO 无配置启动所必须的this.globalConfig = Optional.ofNullable(this.globalConfig).orElseGet(GlobalConfigUtils::defaults);this.globalConfig.setDbConfig(Optional.ofNullable(this.globalConfig.getDbConfig()).orElseGet(GlobalConfig.DbConfig::new));// TODO 初始化 id-work 以及 打印骚东西targetConfiguration.setGlobalConfig(this.globalConfig);......// 1.2 开始解析 XML 配置文件 及 Mapper 接口if (xmlConfigBuilder != null) {try {xmlConfigBuilder.parse();LOGGER.debug(() -> "Parsed configuration file: '" + this.configLocation + "'");} catch (Exception ex) {throw new NestedIOException("Failed to parse config resource: " + this.configLocation, ex);} finally {ErrorContext.instance().reset();}}targetConfiguration.setEnvironment(new Environment(MybatisSqlSessionFactoryBean.class.getSimpleName(),this.transactionFactory == null ? new SpringManagedTransactionFactory() : this.transactionFactory,this.dataSource));if (this.mapperLocations != null) {if (this.mapperLocations.length == 0) {LOGGER.warn(() -> "Property 'mapperLocations' was specified but matching resources are not found.");} else {for (Resource mapperLocation : this.mapperLocations) {if (mapperLocation == null) {continue;}try {XMLMapperBuilder xmlMapperBuilder = new XMLMapperBuilder(mapperLocation.getInputStream(),targetConfiguration, mapperLocation.toString(), targetConfiguration.getSqlFragments());xmlMapperBuilder.parse();} catch (Exception e) {throw new NestedIOException("Failed to parse mapping resource: '" + mapperLocation + "'", e);} finally {ErrorContext.instance().reset();}LOGGER.debug(() -> "Parsed mapper file: '" + mapperLocation + "'");}}} else {LOGGER.debug(() -> "Property 'mapperLocations' was not specified.");}// 2.2 根据 targetConfiguration 对象中保存的信息创建 SqlSessionFactory 对象final SqlSessionFactory sqlSessionFactory = new MybatisSqlSessionFactoryBuilder().build(targetConfiguration);......return sqlSessionFactory;}
3.MybatisXMLConfigBuilder#parse() 会去解析配置文件,最后会调用到其内部方法 mapperElement()。这个方法完成解析 Mapper工作,并将其添加到配置类 MybatisConfiguration 中
private void mapperElement(XNode parent) throws Exception {/** 定义集合 用来分类放置mybatis的Mapper与XML 按顺序依次遍历*/if (parent != null) {//指定在classpath中的mapper文件Set<String> resources = new HashSet<>();//指向一个mapper接口Set<Class<?>> mapperClasses = new HashSet<>();setResource(parent, resources, mapperClasses);// 依次遍历 首先 resource 然后 mapperfor (String resource : resources) {ErrorContext.instance().resource(resource);InputStream inputStream = Resources.getResourceAsStream(resource);//TODOXMLMapperBuilder mapperParser = new XMLMapperBuilder(inputStream, configuration, resource,configuration.getSqlFragments());mapperParser.parse();}for (Class<?> mapper : mapperClasses) {// 主要关注此处configuration.addMapper(mapper);}}}
4.MybatisConfiguration#addMapper()方法其实是去调用 MybatisMapperRegistry#addMapper() 方法,其核心是MybatisMapperAnnotationBuilder#parse()
public <T> void addMapper(Class<T> type) {if (type.isInterface()) {if (hasMapper(type)) {// TODO 如果之前注入 直接返回return;// TODO 这里就不抛异常了// throw new BindingException("Type " + type + " is already known to the MapperRegistry.");}boolean loadCompleted = false;try {// TODO 这里也换成 MybatisMapperProxyFactory 而不是 MapperProxyFactoryknownMappers.put(type, new MybatisMapperProxyFactory<>(type));// It's important that the type is added before the parser is run// otherwise the binding may automatically be attempted by the// mapper parser. If the type is already known, it won't try.// TODO 这里也换成 MybatisMapperAnnotationBuilder 而不是 MapperAnnotationBuilderMybatisMapperAnnotationBuilder parser = new MybatisMapperAnnotationBuilder(config, type);parser.parse();loadCompleted = true;} finally {if (!loadCompleted) {knownMappers.remove(type);}}}}
5 MybatisMapperAnnotationBuilder#parse() 方法真正开始完成 Mapper 接口中的方法与 SQL 语句的映射,其中 parseStatement()方法是解析 @Select/@Update 等注解写入的 SQL语句,而代码 GlobalConfigUtils.getSqlInjector(configuration).inspectInject(assistant, type) 通过 MaBatis-plus的 SQL 注入器完成 Mapper 方法与 SQL 语句的转化
@Overridepublic void parse() {String resource = type.toString();if (!configuration.isResourceLoaded(resource)) {loadXmlResource();configuration.addLoadedResource(resource);final String typeName = type.getName();assistant.setCurrentNamespace(typeName);parseCache();parseCacheRef();SqlParserHelper.initSqlParserInfoCache(type);Method[] methods = type.getMethods();for (Method method : methods) {try {// issue #237if (!method.isBridge()) {// 解析 @Select 注解写入的 SQLparseStatement(method);SqlParserHelper.initSqlParserInfoCache(typeName, method);}} catch (IncompleteElementException e) {// TODO 使用 MybatisMethodResolver 而不是 MethodResolverconfiguration.addIncompleteMethod(new MybatisMethodResolver(this, method));}}// TODO 注入 CURD 动态 SQL , 放在在最后, because 可能会有人会用注解重写sqlif (GlobalConfigUtils.isSupperMapperChildren(configuration, type)) {GlobalConfigUtils.getSqlInjector(configuration).inspectInject(assistant, type);}}parsePendingMethods();}
6.AbstractSqlInjector#inspectInject() 会完成 BaseMapper 接口中提供的通用方法对应的 SQL 语句准备,这部分主要通过 AbstractMethod#inject()方法完成
@Overridepublic void inspectInject(MapperBuilderAssistant builderAssistant, Class<?> mapperClass) {Class<?> modelClass = extractModelClass(mapperClass);if (modelClass != null) {String className = mapperClass.toString();Set<String> mapperRegistryCache = GlobalConfigUtils.getMapperRegistryCache(builderAssistant.getConfiguration());if (!mapperRegistryCache.contains(className)) {List<AbstractMethod> methodList = this.getMethodList(mapperClass);if (CollectionUtils.isNotEmpty(methodList)) {TableInfo tableInfo = TableInfoHelper.initTableInfo(builderAssistant, modelClass);// 循环注入自定义方法methodList.forEach(m -> m.inject(builderAssistant, mapperClass, modelClass, tableInfo));} else {logger.debug(mapperClass.toString() + ", No effective injection method was found.");}mapperRegistryCache.add(className);}}}
7、AbstractMethod#inject()方法并没有什么特别的操作,只是调用其子类实现 injectMappedStatement()方法。以 SelectOne#injectMappedStatement() 为例,其 SQL 语句的核心在于 SqlMethod 类,这个枚举类中缓存了可以动态拼接的 SQL 语句脚本,只需要填上参数 format 就可以得到 SQL 语句的执行脚本。以上过程结束,只需要将所有信息通过 addInsertMappedStatement()方法封装成 MappedStatement对象并将其加入到容器中,这样 Mapper接口方法调用时,就可以通过 动态代理 的方式找到其对应执行的 SQL 脚本,至此 SQL 语句准备及配置解析就完成了。最后拼接的 SQL 语句 脚本形式如下示例,实际执行数据库操作时会解析这个脚本完成变量替换,从而得到可执行的 SQL 语句
<script><choose><when test="ew != null and ew.sqlFirst != null">${ew.sqlFirst}</when><otherwise></otherwise></choose>SELECT<choose><when test="ew != null and ew.sqlSelect != null">${ew.sqlSelect}</when><otherwise>id,name,type</otherwise></choose>FROM node<if test="ew != null"><where><if test="ew.entity != null"><if test="ew.entity.id != null">id=#{ew.entity.id}</if><if test="ew.entity['name'] != null">AND name=#{ew.entity.name}</if><if test="ew.entity['type'] != null">AND type=#{ew.entity.type}</if></if><if test="ew.sqlSegment != null and ew.sqlSegment != '' and ew.nonEmptyOfWhere"><if test="ew.nonEmptyOfEntity and ew.nonEmptyOfNormal">AND</if>${ew.sqlSegment}</if></where><if test="ew.sqlSegment != null and ew.sqlSegment != '' and ew.emptyOfWhere">${ew.sqlSegment}</if></if><choose><when test="ew != null and ew.sqlComment != null">${ew.sqlComment}</when><otherwise></otherwise></choose></script>
@Overridepublic MappedStatement injectMappedStatement(Class<?> mapperClass, Class<?> modelClass, TableInfo tableInfo) {SqlMethod sqlMethod = SqlMethod.SELECT_ONE;SqlSource sqlSource = languageDriver.createSqlSource(configuration, String.format(sqlMethod.getSql(),sqlFirst(), sqlSelectColumns(tableInfo, true), tableInfo.getTableName(),sqlWhereEntityWrapper(true, tableInfo), sqlComment()), modelClass);return this.addSelectMappedStatementForTable(mapperClass, getMethod(sqlMethod), sqlSource, tableInfo);}
8、SqlSessionFactory对象的创建需要回到 MybatisSqlSessionFactoryBean#buildSqlSessionFactory()方法中,很容易追踪到 MybatisSqlSessionFactoryBuilder#build()方法,最后其实是通过 SqlSessionFactoryBuilder#build()方法创建了一个 DefaultSqlSessionFactory 对象返回
public SqlSessionFactory build(Configuration config) {return new DefaultSqlSessionFactory(config);}
2. Mapper 操作数据库的流程
1、@MapperScan 注解通过 @Import(MapperScannerRegistrar.class) 引入扫描注册的类MapperScannerRegistrar,该类实现了ImportBeanDefinitionRegistrar接口并重写registerBeanDefinitions()方法,在该方法中注册了 MapperScannerConfigurer 类
void registerBeanDefinitions(AnnotationAttributes annoAttrs, BeanDefinitionRegistry registry, String beanName) {BeanDefinitionBuilder builder = BeanDefinitionBuilder.genericBeanDefinition(MapperScannerConfigurer.class);......registry.registerBeanDefinition(beanName, builder.getBeanDefinition());}
2、MapperScannerConfigurer 是 Mapper接口的扫描配置类,实现了 BeanDefinitionRegistryPostProcessor 接口,其 postProcessBeanDefinitionRegistry()方法会在容器启动过程中被回调,通过 ClassPathMapperScanner#scan()方法完成 Mapper 的扫描注册
public void postProcessBeanDefinitionRegistry(BeanDefinitionRegistry registry) {if (this.processPropertyPlaceHolders) {processPropertyPlaceHolders();}ClassPathMapperScanner scanner = new ClassPathMapperScanner(registry);scanner.setAddToConfig(this.addToConfig);scanner.setAnnotationClass(this.annotationClass);scanner.setMarkerInterface(this.markerInterface);scanner.setSqlSessionFactory(this.sqlSessionFactory);scanner.setSqlSessionTemplate(this.sqlSessionTemplate);scanner.setSqlSessionFactoryBeanName(this.sqlSessionFactoryBeanName);scanner.setSqlSessionTemplateBeanName(this.sqlSessionTemplateBeanName);scanner.setResourceLoader(this.applicationContext);scanner.setBeanNameGenerator(this.nameGenerator);scanner.setMapperFactoryBeanClass(this.mapperFactoryBeanClass);if (StringUtils.hasText(lazyInitialization)) {scanner.setLazyInitialization(Boolean.valueOf(lazyInitialization));}scanner.registerFilters();scanner.scan(StringUtils.tokenizeToStringArray(this.basePackage, ConfigurableApplicationContext.CONFIG_LOCATION_DELIMITERS));}
3、ClassPathMapperScanner#processBeanDefinitions() 将扫描到的 Mapper接口生成的对应 BeanDefinition 的 beanClass 属性替换为 MapperFactoryBean,这样每次获取 Mapper 实例实际是通过 MapperFactoryBean 的实例去获取
此处体现了 FactoryBean 的定位,即用于获取同一类 bean 的工厂 bean
private void processBeanDefinitions(Set<BeanDefinitionHolder> beanDefinitions) {GenericBeanDefinition definition;for (BeanDefinitionHolder holder : beanDefinitions) {definition = (GenericBeanDefinition) holder.getBeanDefinition();String beanClassName = definition.getBeanClassName();LOGGER.debug(() -> "Creating MapperFactoryBean with name '" + holder.getBeanName() + "' and '" + beanClassName+ "' mapperInterface");// the mapper interface is the original class of the bean// but, the actual class of the bean is MapperFactoryBeandefinition.getConstructorArgumentValues().addGenericArgumentValue(beanClassName); // issue #59definition.setBeanClass(this.mapperFactoryBeanClass);definition.getPropertyValues().add("addToConfig", this.addToConfig);boolean explicitFactoryUsed = false;if (StringUtils.hasText(this.sqlSessionFactoryBeanName)) {definition.getPropertyValues().add("sqlSessionFactory",new RuntimeBeanReference(this.sqlSessionFactoryBeanName));explicitFactoryUsed = true;} else if (this.sqlSessionFactory != null) {definition.getPropertyValues().add("sqlSessionFactory", this.sqlSessionFactory);explicitFactoryUsed = true;}if (StringUtils.hasText(this.sqlSessionTemplateBeanName)) {if (explicitFactoryUsed) {LOGGER.warn(() -> "Cannot use both: sqlSessionTemplate and sqlSessionFactory together. sqlSessionFactory is ignored.");}definition.getPropertyValues().add("sqlSessionTemplate",new RuntimeBeanReference(this.sqlSessionTemplateBeanName));explicitFactoryUsed = true;} else if (this.sqlSessionTemplate != null) {if (explicitFactoryUsed) {LOGGER.warn(() -> "Cannot use both: sqlSessionTemplate and sqlSessionFactory together. sqlSessionFactory is ignored.");}definition.getPropertyValues().add("sqlSessionTemplate", this.sqlSessionTemplate);explicitFactoryUsed = true;}if (!explicitFactoryUsed) {LOGGER.debug(() -> "Enabling autowire by type for MapperFactoryBean with name '" + holder.getBeanName() + "'.");definition.setAutowireMode(AbstractBeanDefinition.AUTOWIRE_BY_TYPE);}definition.setLazyInit(lazyInitialization);}}
- @Autowired 自动注入 Mapper 触发容器获取 bean 的方法,调用到 MapperFactoryBean#getObject()方法,最终调用到 sqlSessionTemplate#getMapper()方法
5.MyBatis-plus 使用的配置类是MybatisConfiguration,最终调用到 MybatisMapperRegistry#getMapper()方法,这里就进入了动态代理获取 MapperProxy 实例的流程@Overridepublic <T> T getMapper(Class<T> type) {return getConfiguration().getMapper(type, this);}
@Overridepublic <T> T getMapper(Class<T> type, SqlSession sqlSession) {// TODO 这里换成 MybatisMapperProxyFactory 而不是 MapperProxyFactoryfinal MybatisMapperProxyFactory<T> mapperProxyFactory = (MybatisMapperProxyFactory<T>) knownMappers.get(type);if (mapperProxyFactory == null) {throw new BindingException("Type " + type + " is not known to the MybatisPlusMapperRegistry.");}try {return mapperProxyFactory.newInstance(sqlSession);} catch (Exception e) {throw new BindingException("Error getting mapper instance. Cause: " + e, e);}}
6.MybatisMapperProxyFactory#newInstance()方法给自动注入返回一个 MybatisMapperProxy 代理对象
protected T newInstance(MybatisMapperProxy<T> mapperProxy) {return (T) Proxy.newProxyInstance(mapperInterface.getClassLoader(), new Class[]{mapperInterface}, mapperProxy);}
7.调用 Mapper 接口的方法触发代理对象的 MybatisMapperProxy#invoke(),此时根据 Mapper 对象被调用的方法生成 MybatisMapperMethod 对象,通过MybatisMapperMethod#execute()去真正地执行 SQL 语句,从而完成数据库操作。此后的流程本文就不再分析,具体可参考文章 MyBatis Mapper 简要总结
@Overridepublic Object invoke(Object proxy, Method method, Object[] args) throws Throwable {try {if (Object.class.equals(method.getDeclaringClass())) {return method.invoke(this, args);} else if (method.isDefault()) {return invokeDefaultMethod(proxy, method, args);}} catch (Throwable t) {throw ExceptionUtil.unwrapThrowable(t);}final MybatisMapperMethod mapperMethod = cachedMapperMethod(method);return mapperMethod.execute(sqlSession, args);}
Spring5源码分析
https://gitee.com/whtznb/spring-framework-analysis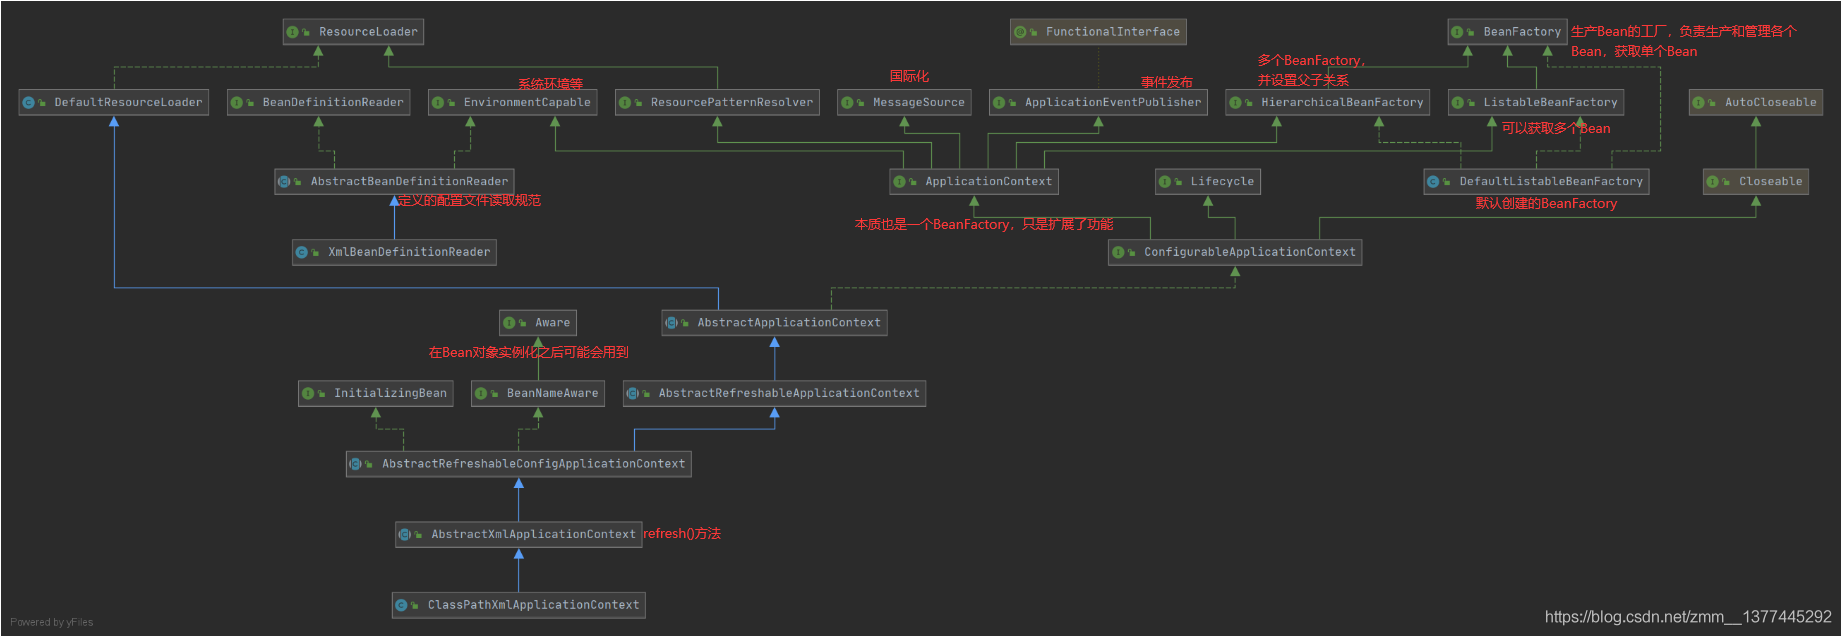
bean执行流程
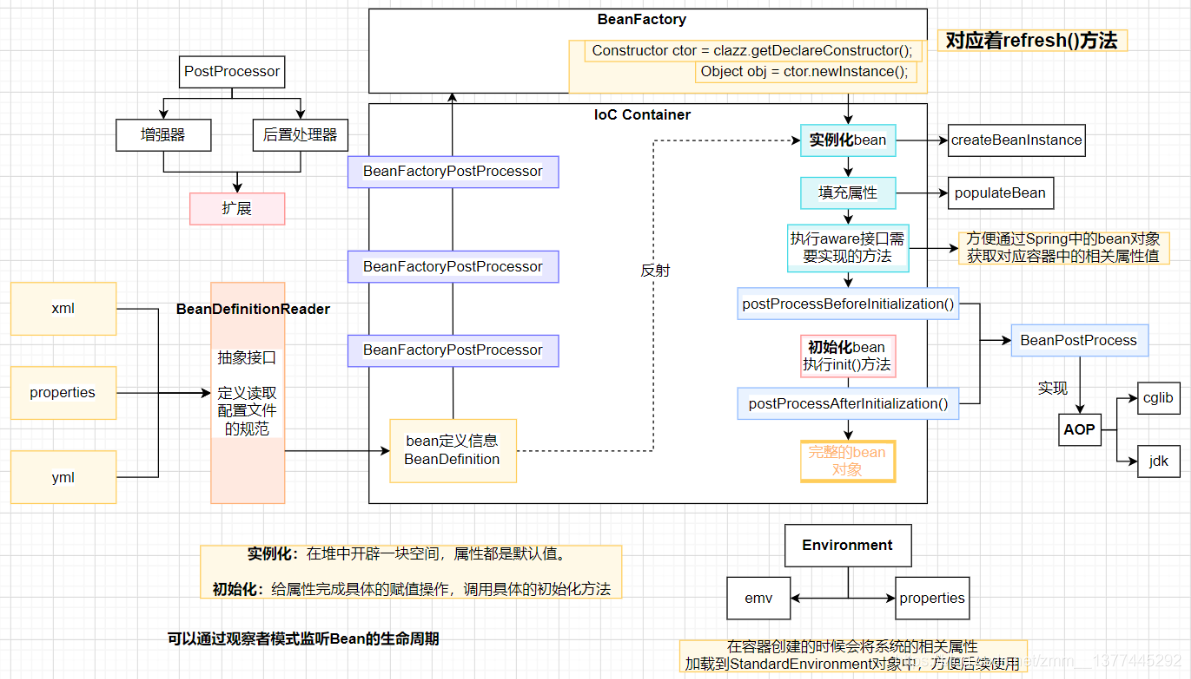
首先,一个IoC容器应创建一个工厂(DefaultListableBeanFactory),可以使我们读取的资源文件可以存放。
然后,将配置文件通过一个规范(BeanDefinitionReader)加载出来。
接着,是bean对象实例化之前的一些准备(初始化啊、事件处理器、注册组件等);例如上图中的BeanFactoryPostProcessor、多播器等。
重要的地方来了,创建一个个的非懒加载的成品Bean对象(finishBeanFactoryInitialization方法)。
最后,是一些事件的发布、缓存、销毁等。
源码分析
从ClassPathXmlApplicationContext开始分析。在它的构造方法中,我们可以看见调用了父类(AbstractApplicationContext类)的构造方法、设置配置文件的加载路径以及核心方法refresh()方法。

父类AbstractApplicationContext的构造方法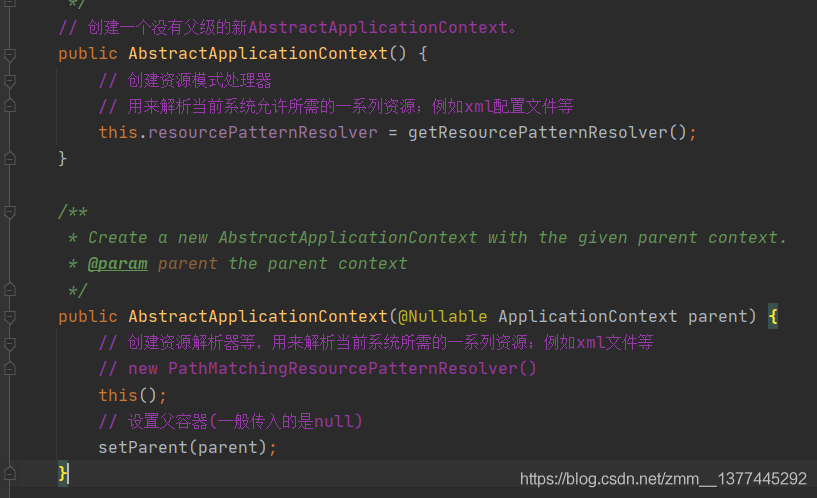
setConfigLocations()方法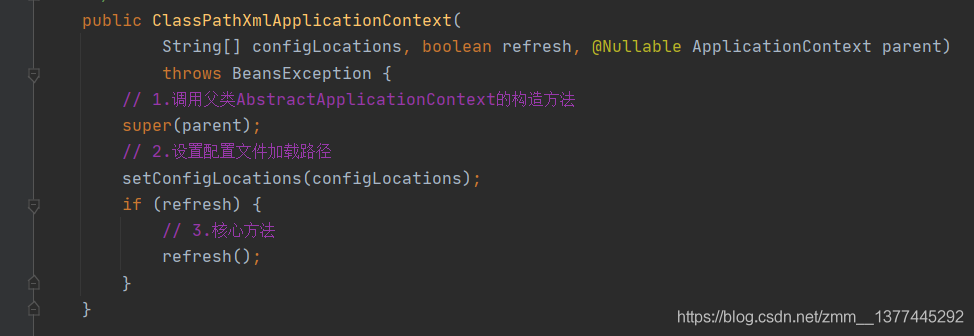
接下来,我们进入核心方法refresh()。
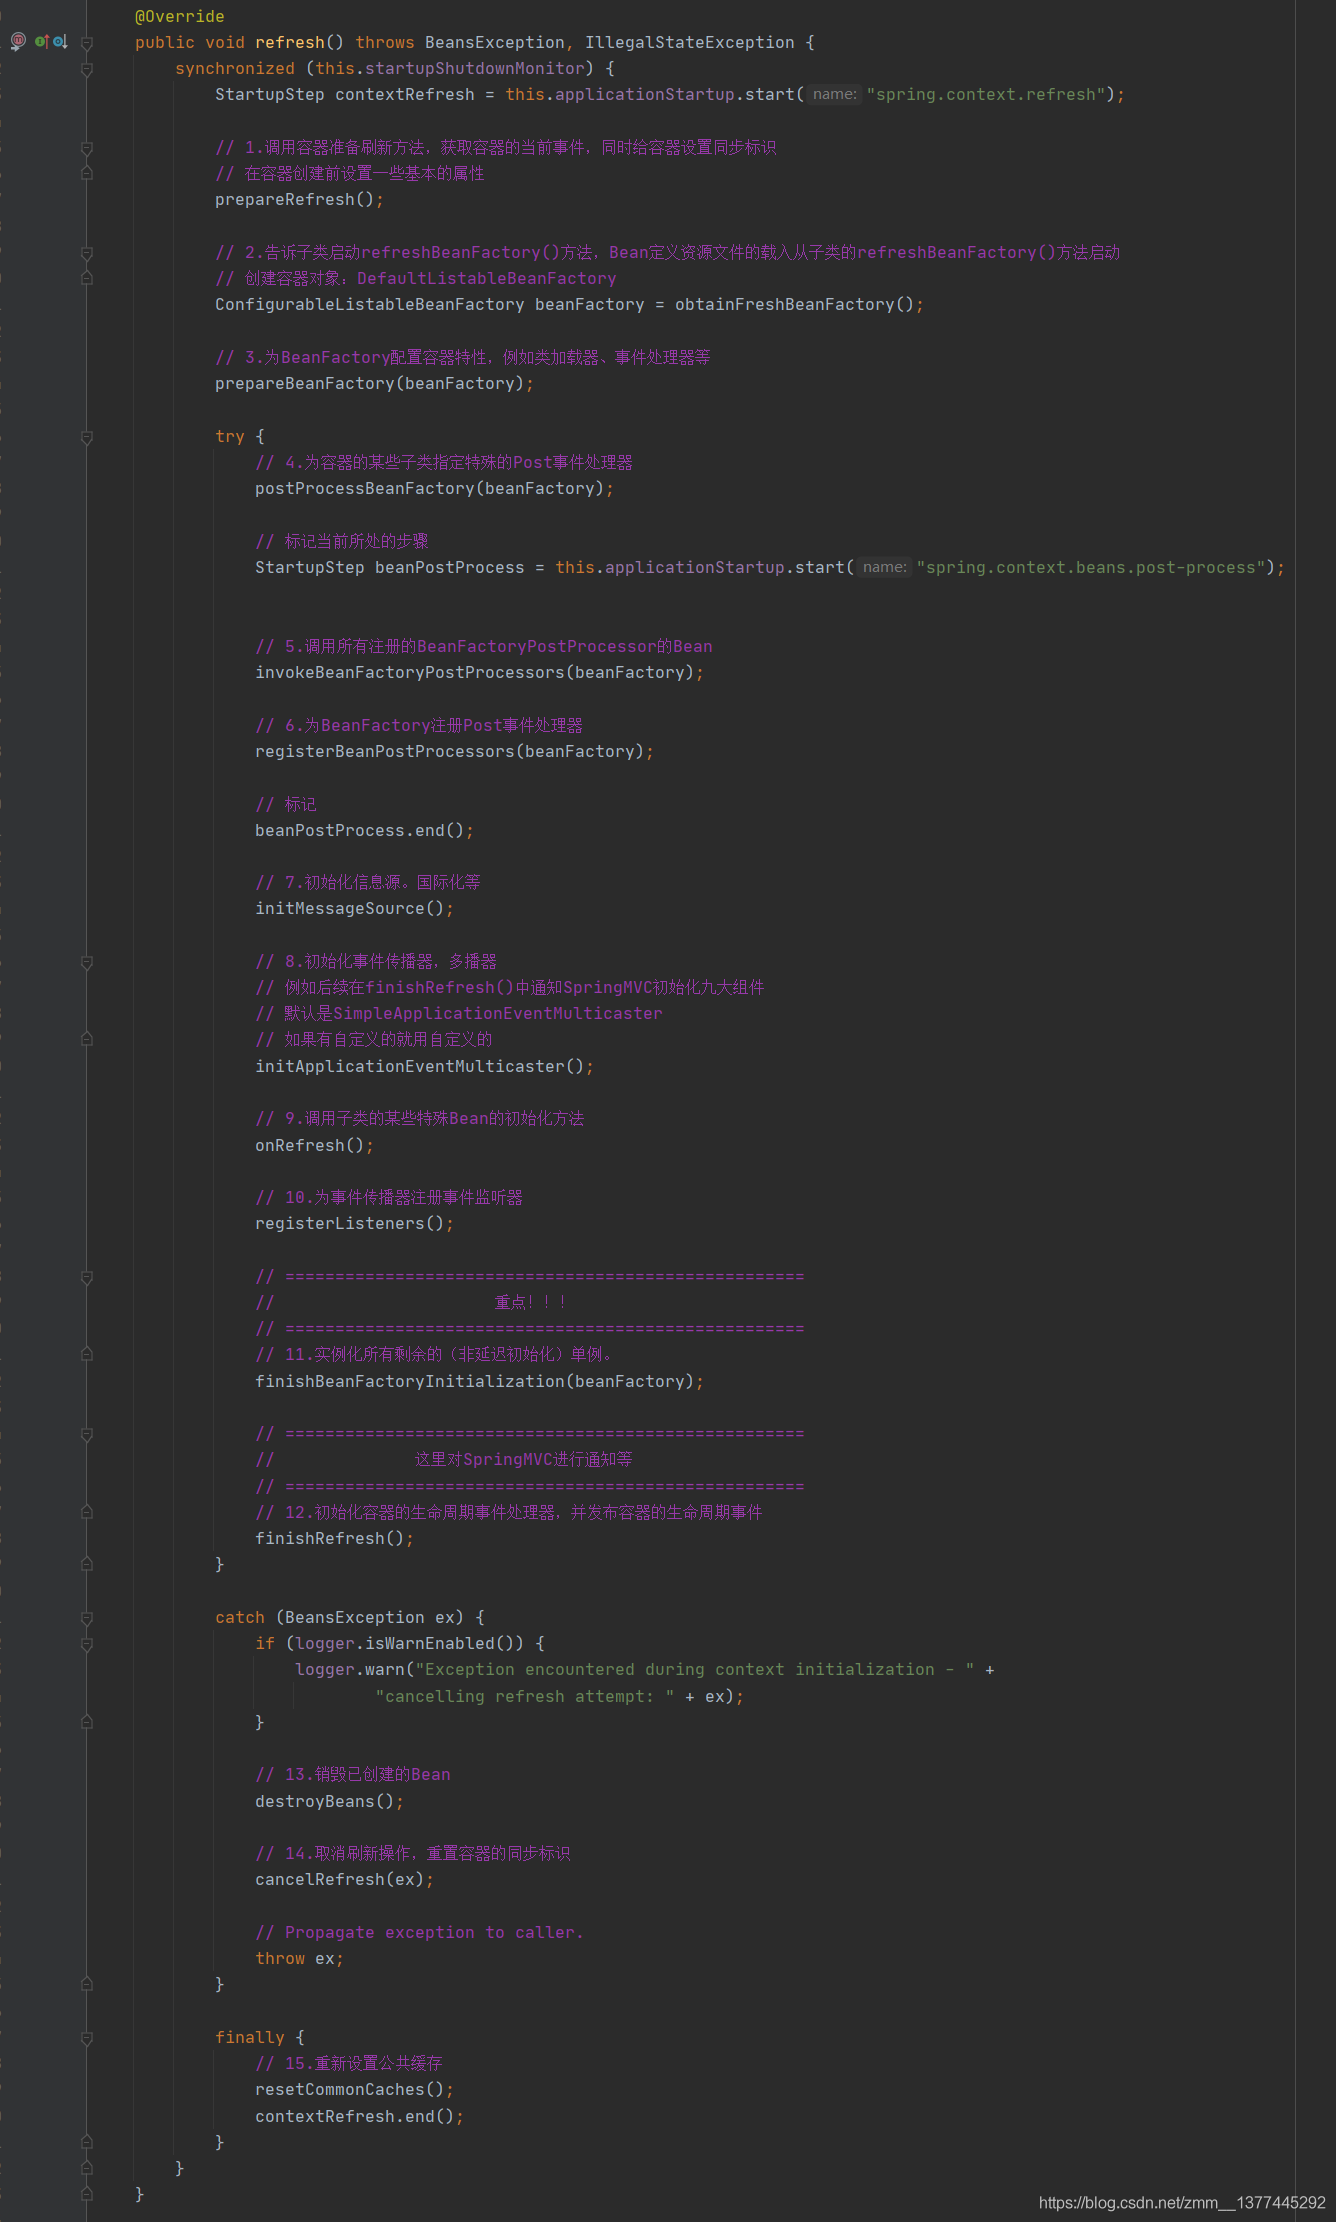
我们重点看序号2和序号11,其他有兴趣可以自己点进去看看。
obtainFreshBeanFactory()方法
跟进refreshBeanFactory()方法,在AbstractRefreshableApplicationContext类中可以找到refreshBeanFactory()这个方法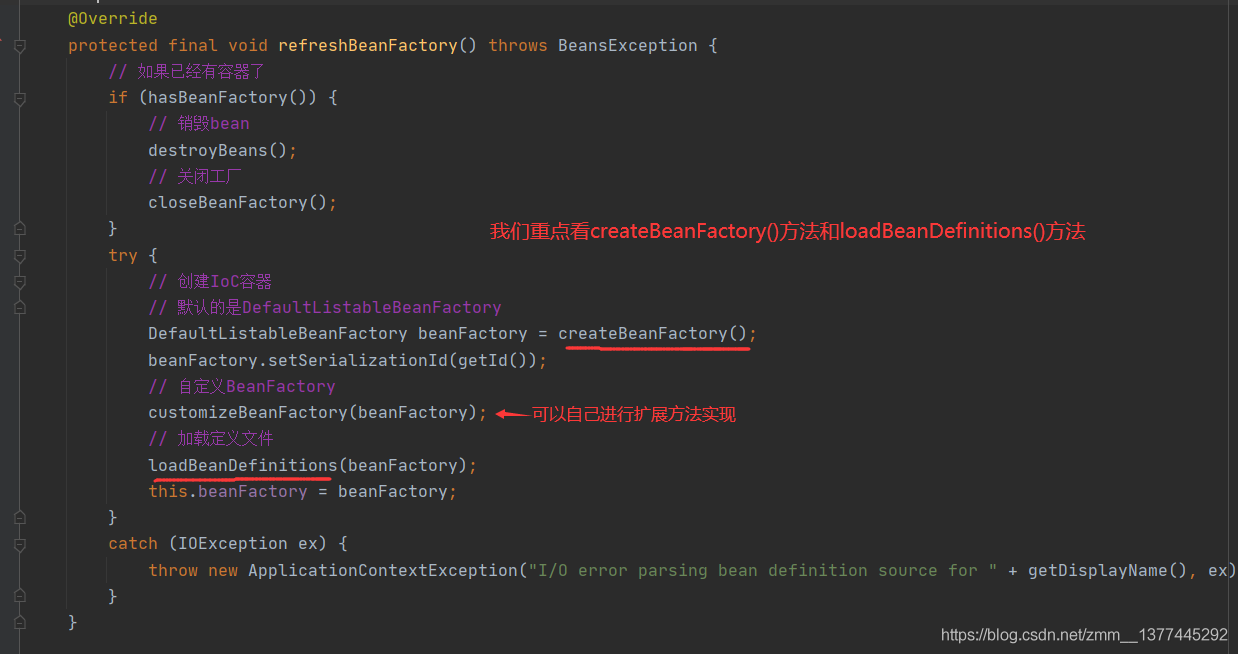
createBeanFactory()方法中
loadBeanDefinitions()方法,也是委派给子类去实现。
我们进去子类AbstractXmlApplicationContext类的loadBeanDefinition()方法。在这里进行了配置文件读取规范的定义,我们继续跟进loadBeanDefinitions()方法。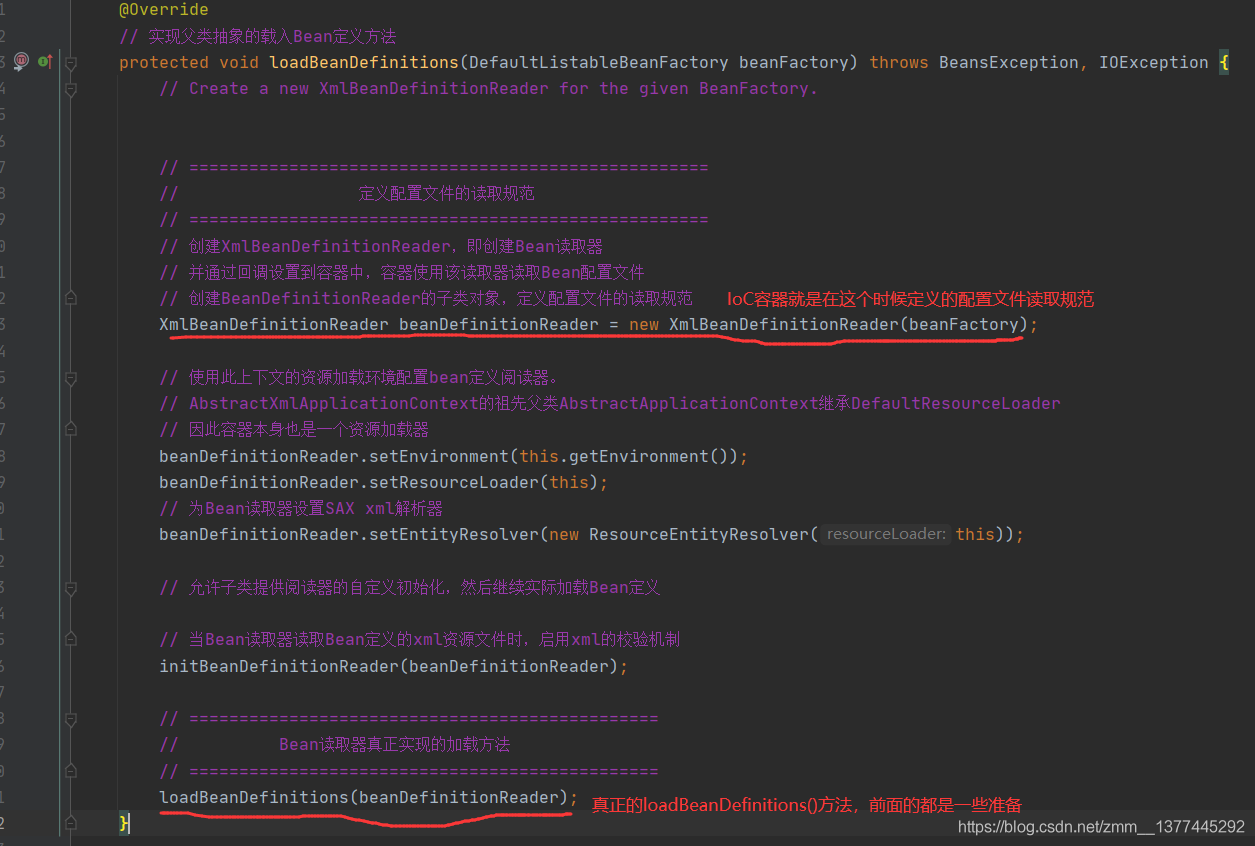
loadBeanDefinitions()方法。传入的可能是个String[]或者Resource[]类型。但是大致流程都差不多:String[]->String->Resource[]->Resource->Document->BeanDefinition。这里就不过多深入了,感兴趣可以照这个流程看下去。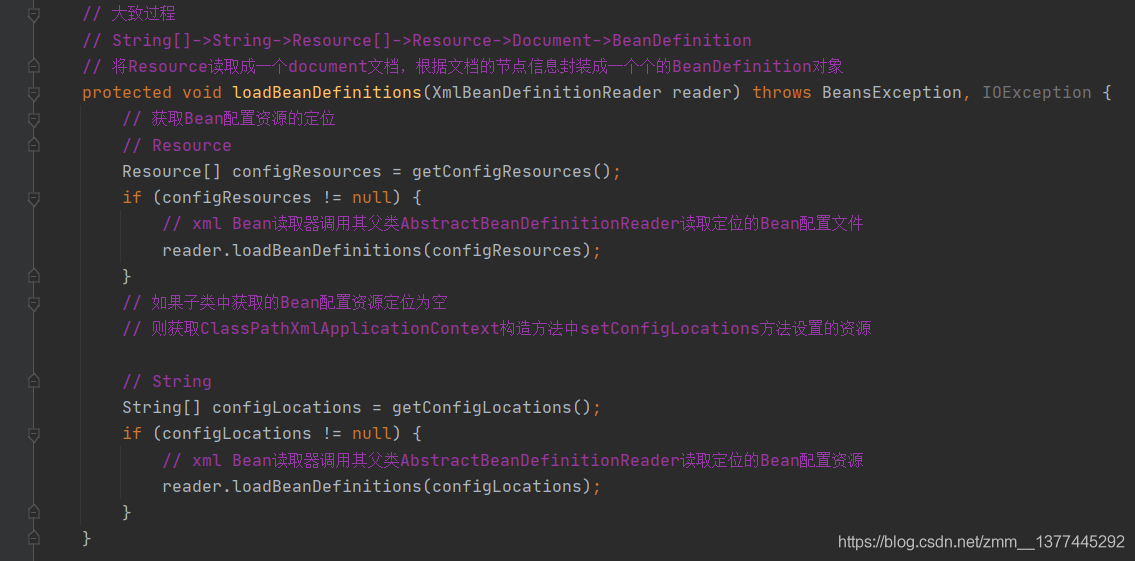
资源文件加载完成后,我们的BeanFactory差不多就创建好了。接着,我们到IoC最重要的过程,Bean对象(不是懒加载的)的实例化和初始化。这里为什么将实例化和初始化分开说呢,是想更好的帮助理解Bean对象的创建过程。其实Spring中更加的细分了一下,分成了实例化(createBeanInstance()方法)、填充属性(populateBean()方法)和初始化(initializeBean()方法)。
实例化:在堆中开辟了一块空间。属性都是系统默认值。
初始化:给属性完成具体的赋值操作,调用具体的初始化方法。
好了,我们进入finishBeanFactoryInitialization()方法,里面你会看到一些对beanFactory的属性设置,其中重点的是preInstantiateSingletons()方,点进去,它会调用DefaultListableBeanFactory的preInstantiateSingletons()方法。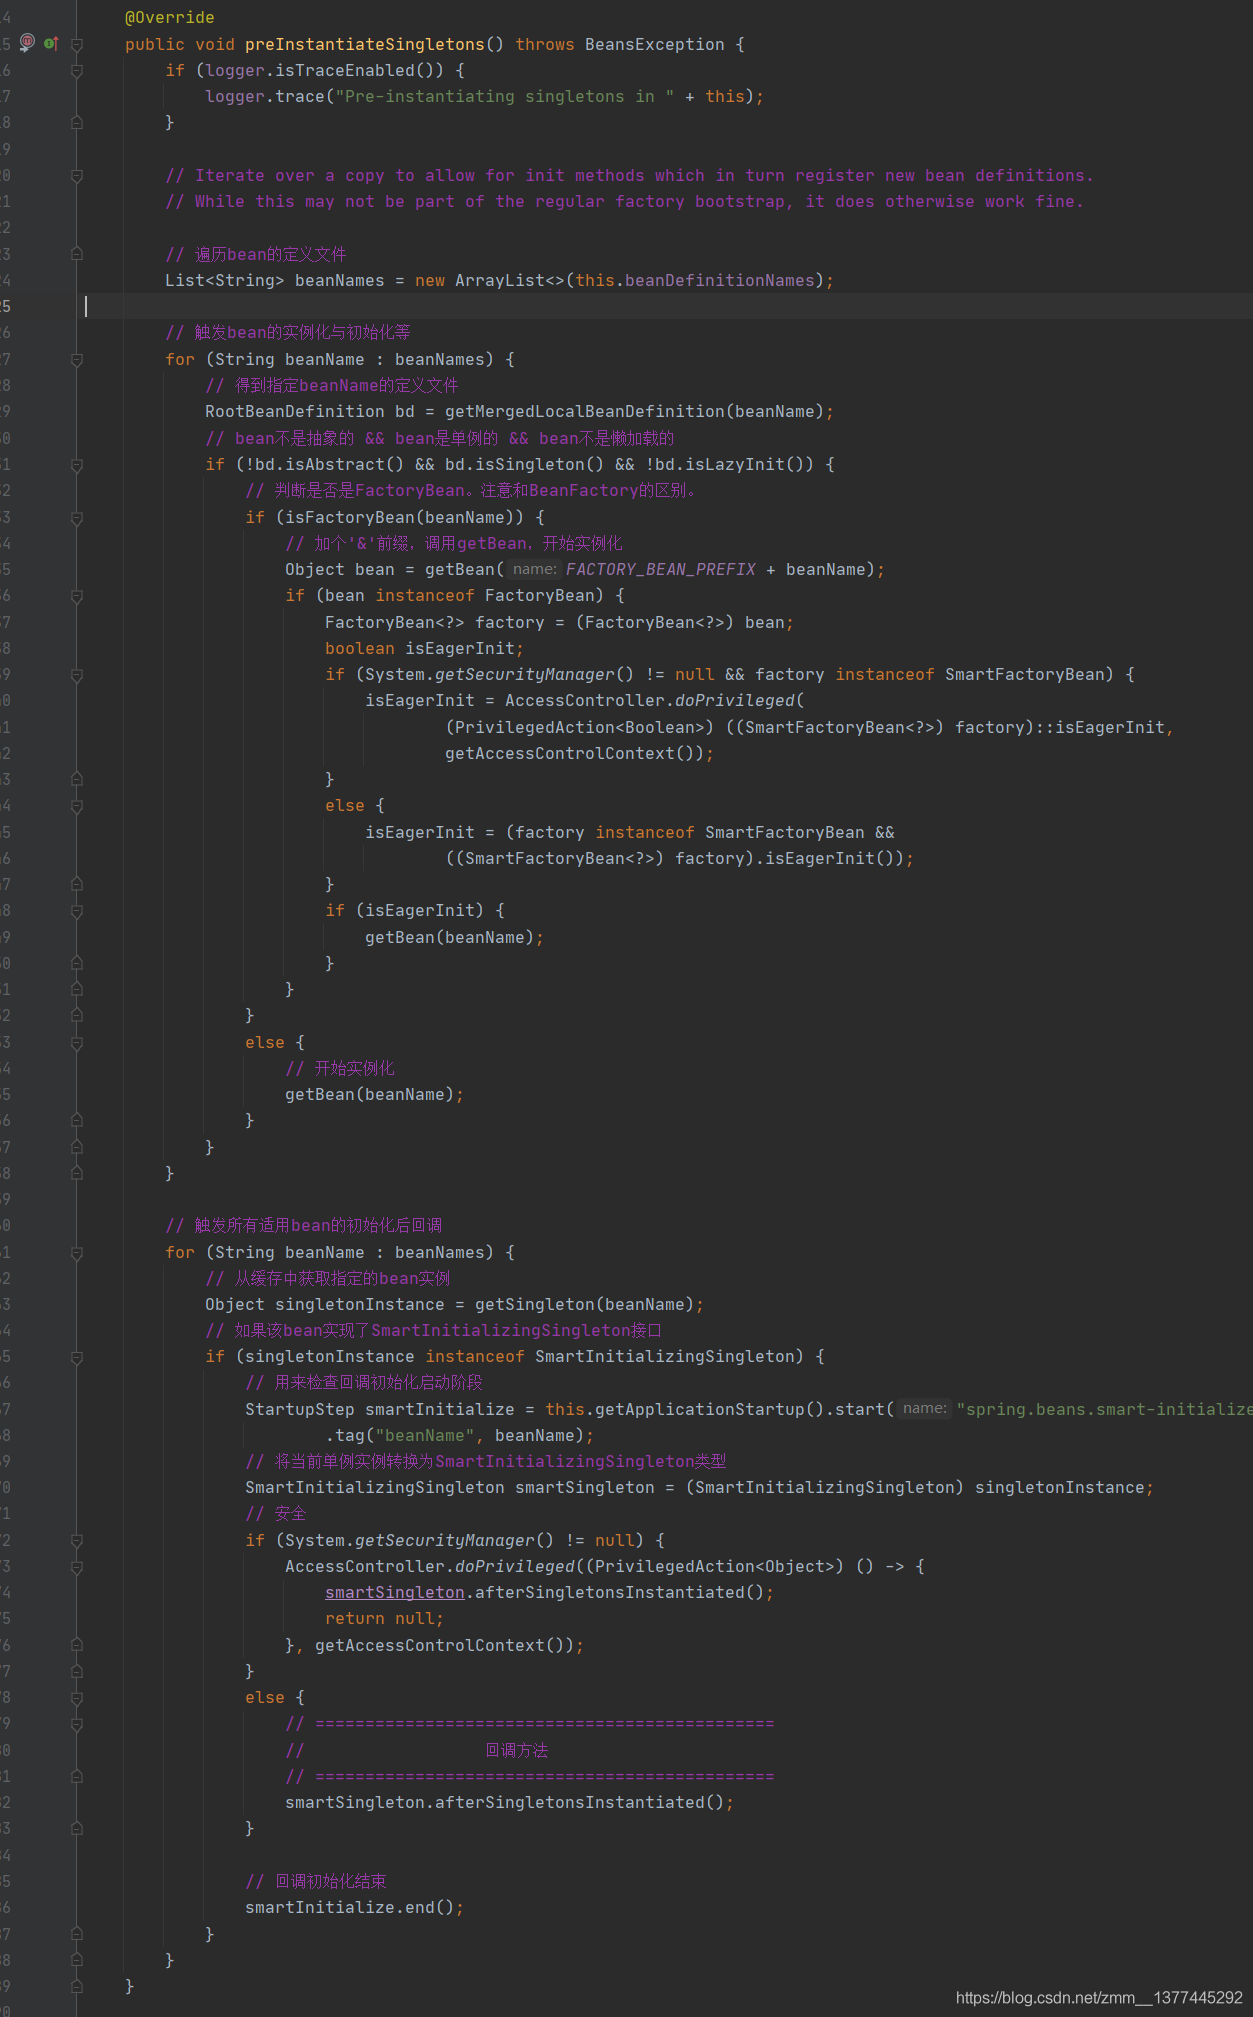
我们可以看到getBean()方法,这里就是准备开始进行bean对象的创建了。点进去,我们可以看真正执行的是doGetBean()方法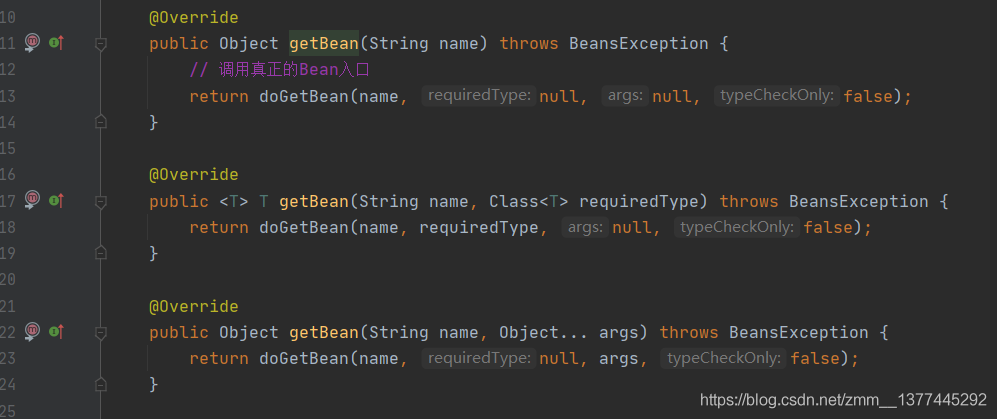
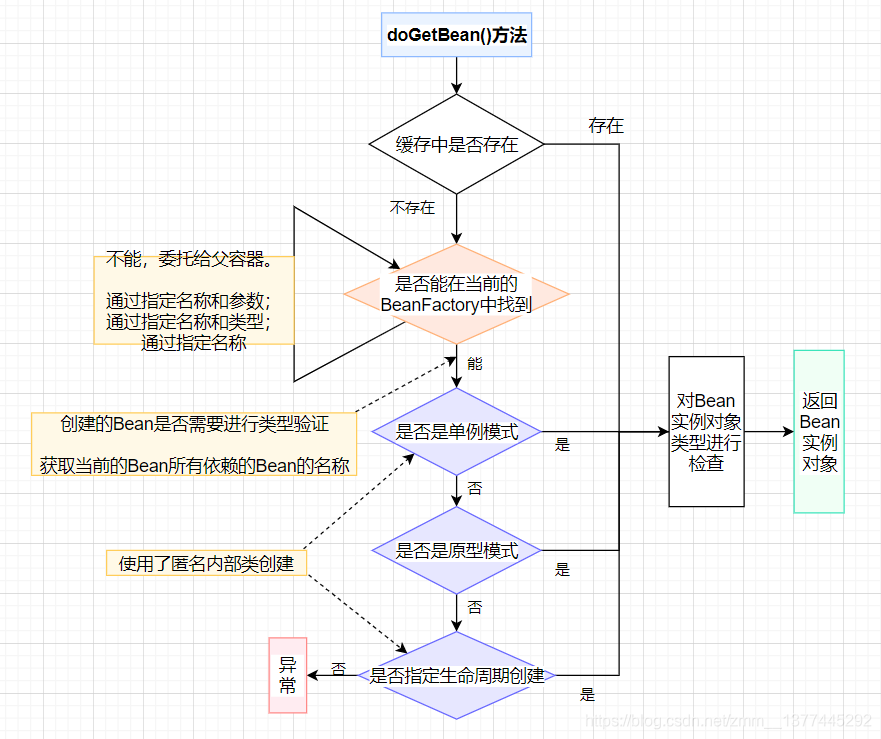
doGetBean()方法,就是根据不同的Bean采用不同的创建策略。
1. 如果Bean是单例的,则在容器创建之前先从缓存中查找,确保整个容器只存在一个实例对象
2. 如果Bean是原型模式的,则容器每次都会创建一个新的实例对象
3. 指定了Bean的生命周期
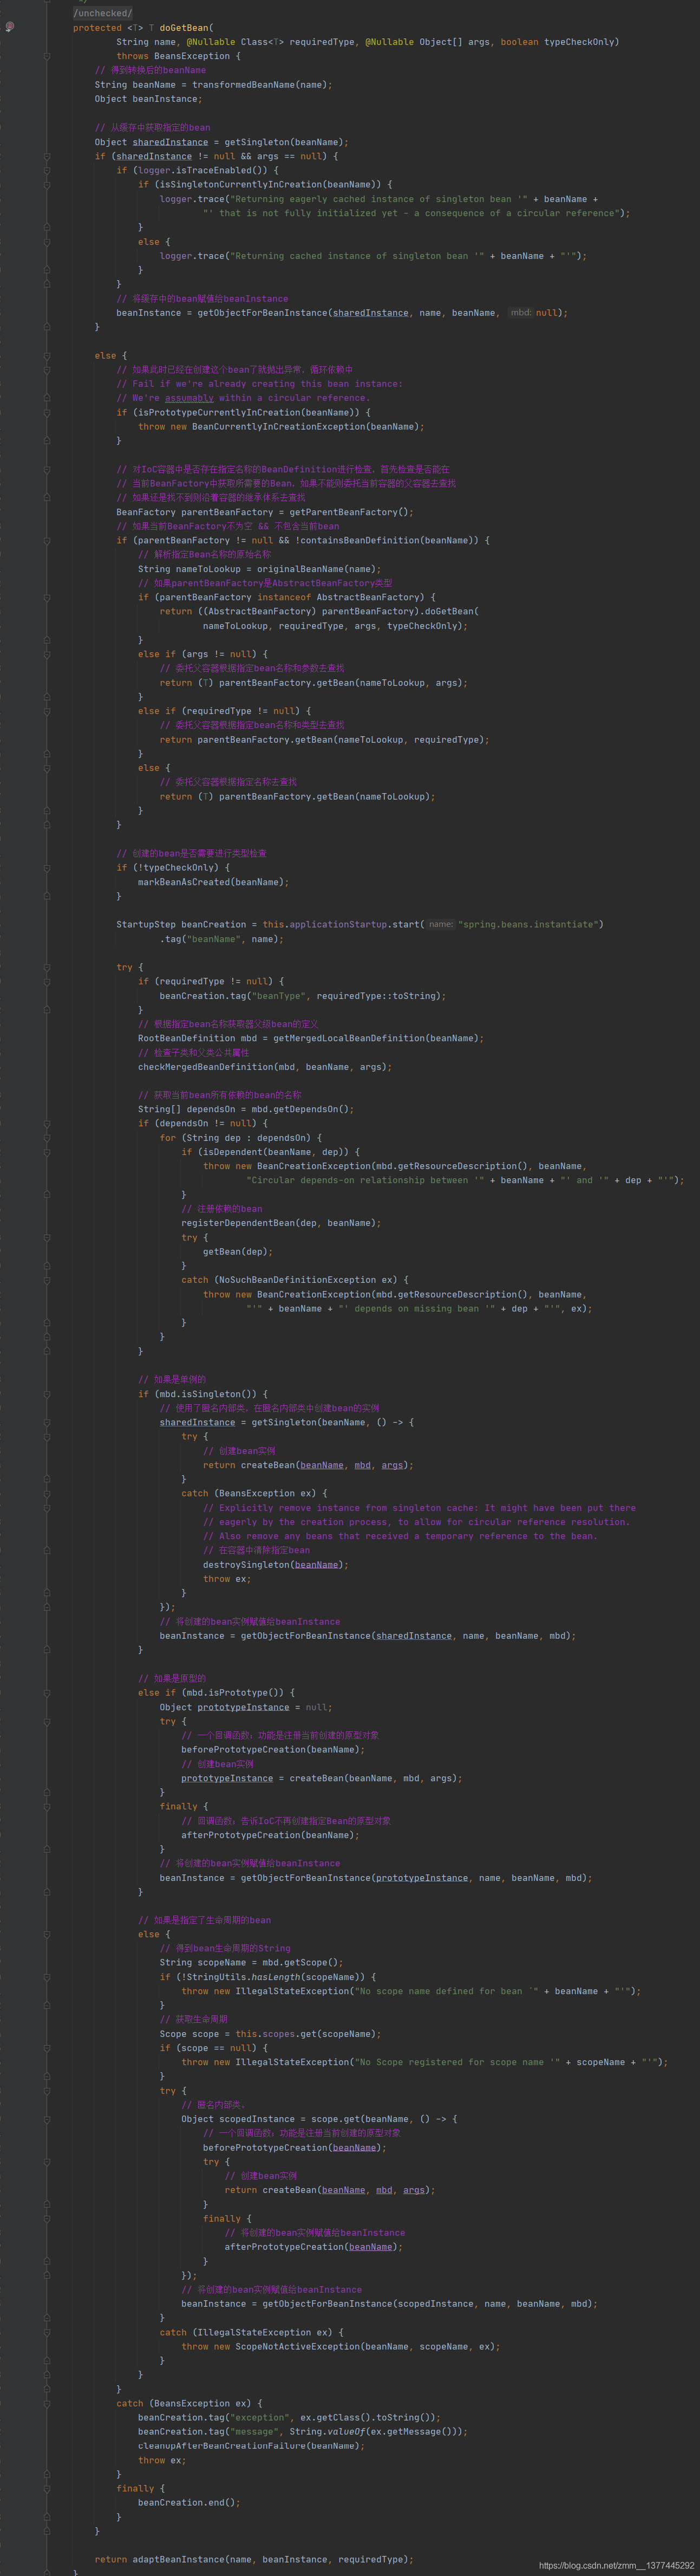
我们进入createBean(),发现还有一个doCreateBean方法(),终于,我们到了真正创建Bean对象的方法。点进去。
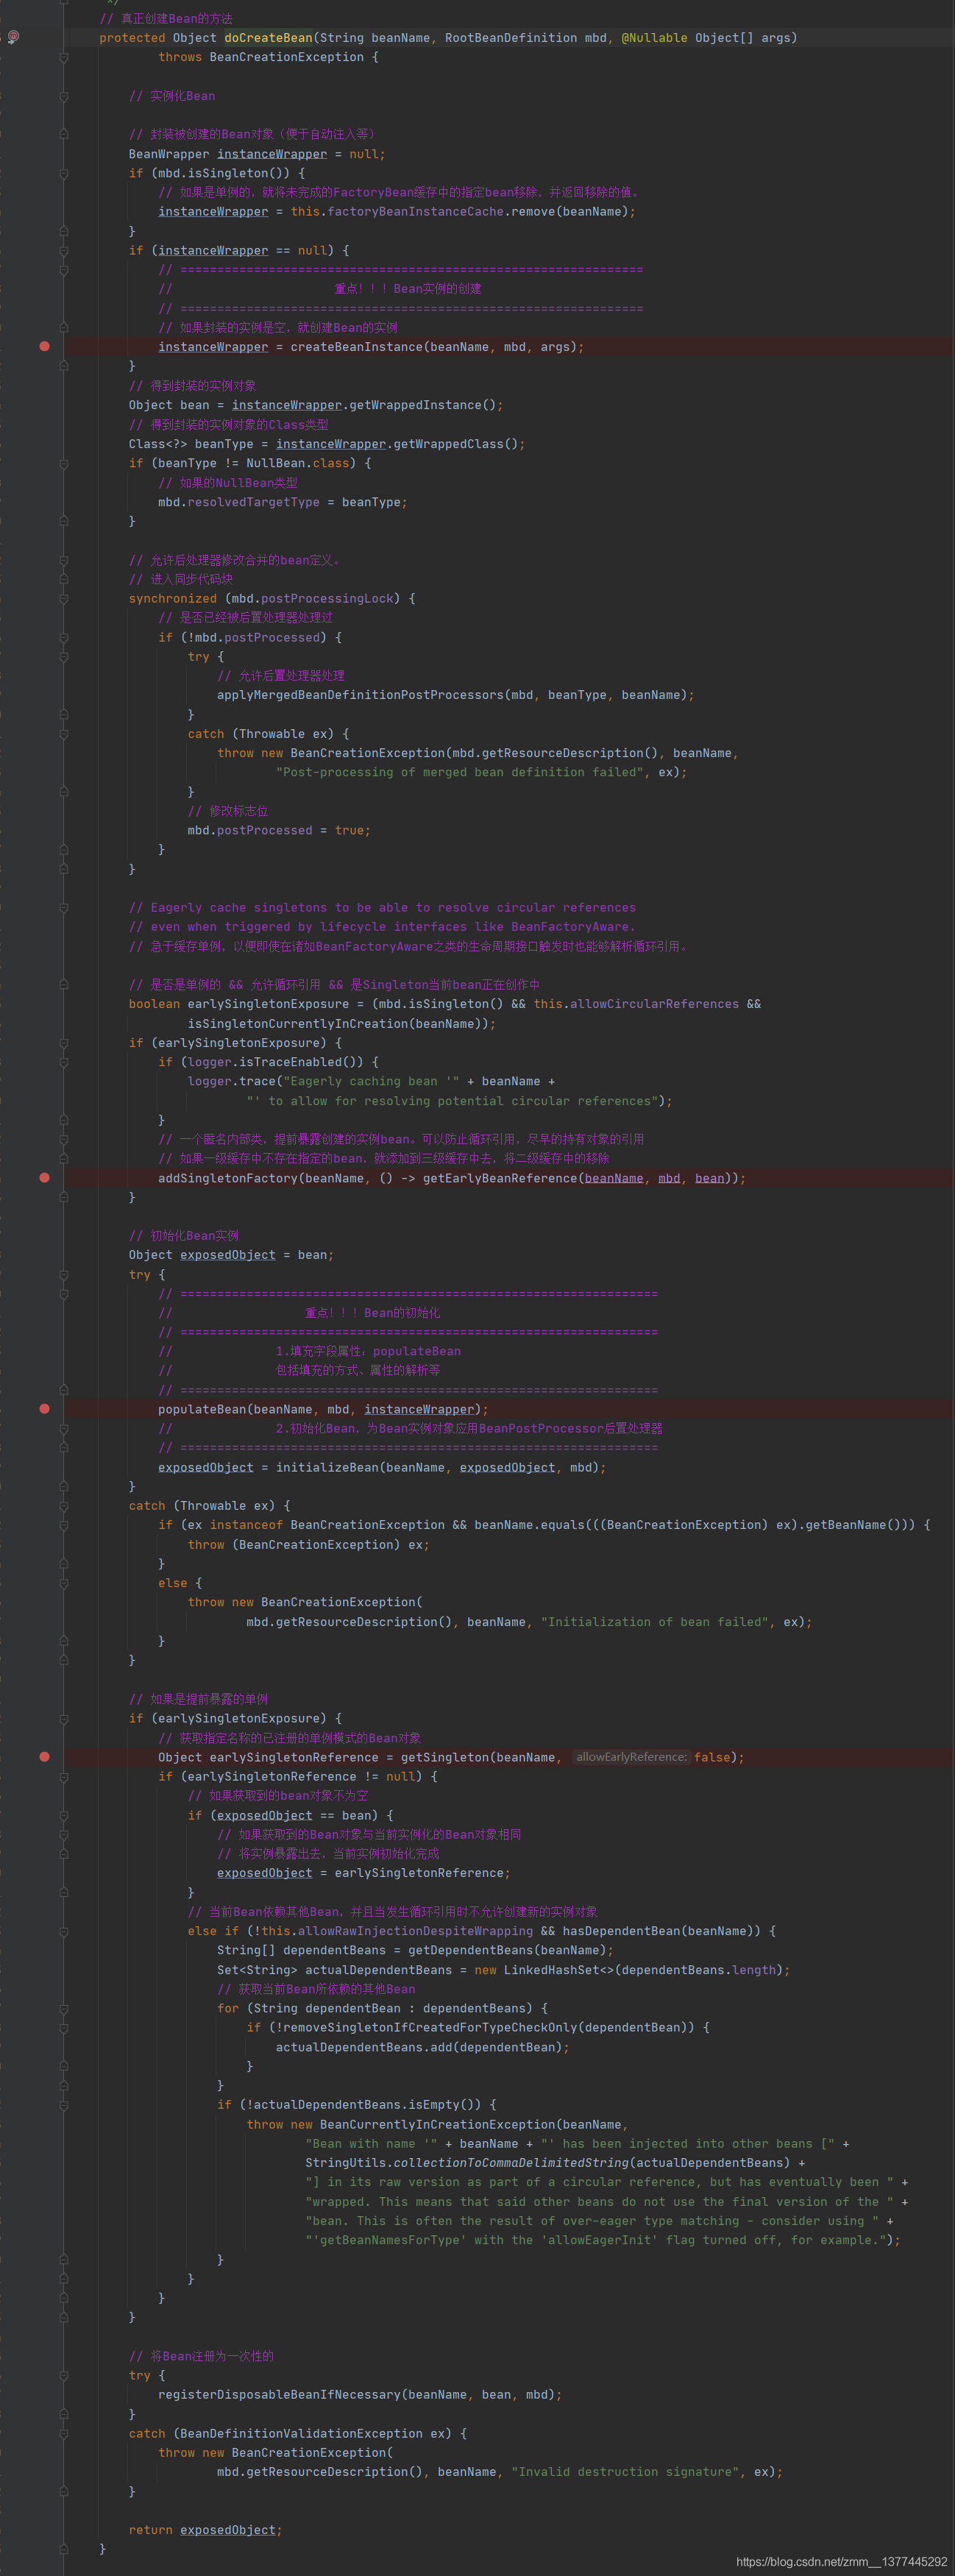
我们发现我们终于找到了之前所说的那三个方法了,创建、填充和初始化。
createBeanInstance()方法返回的是一个BeanWrapper,bean的封装类。
populateBean()则是将bean的一些属性字段进行解析、填充。
在initializeBean()中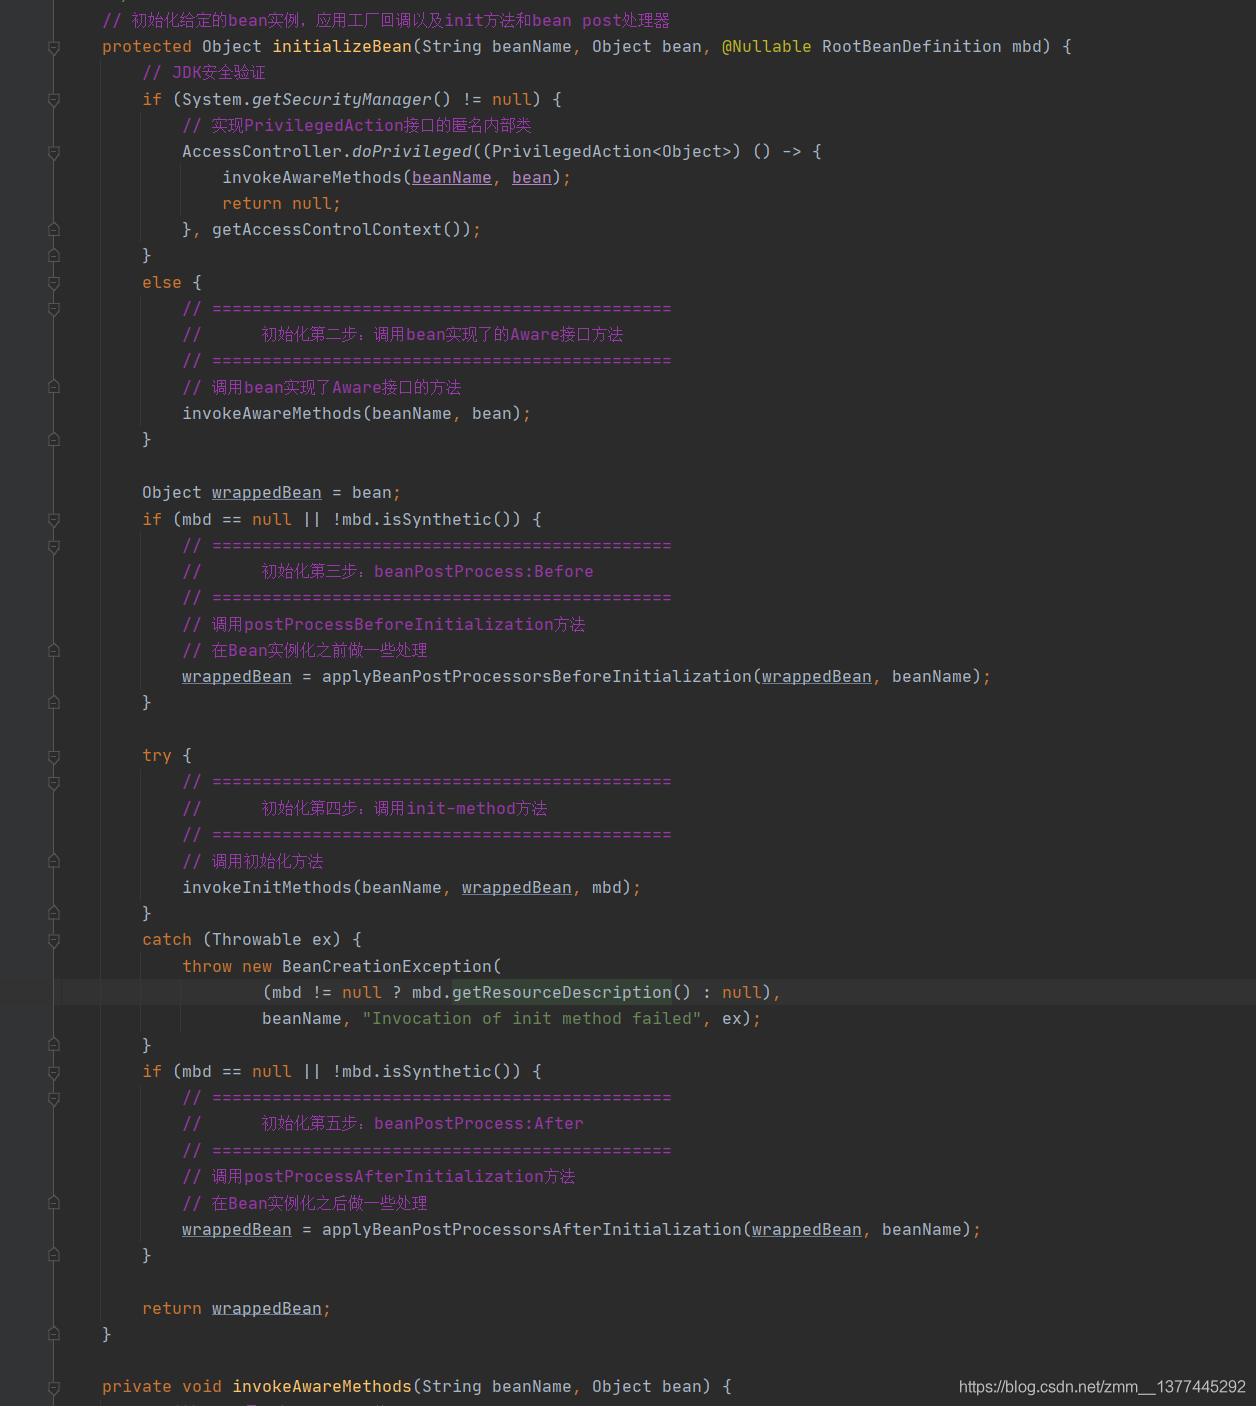
到此,我们一开始的流程图所有的地方差不多都完成了。其中有些细节方面没点进去看看,主要是大致了解IoC的过程。可以自行debug进去看看。
SpringMVC工作流程 struts(servlet) struts2(filter)
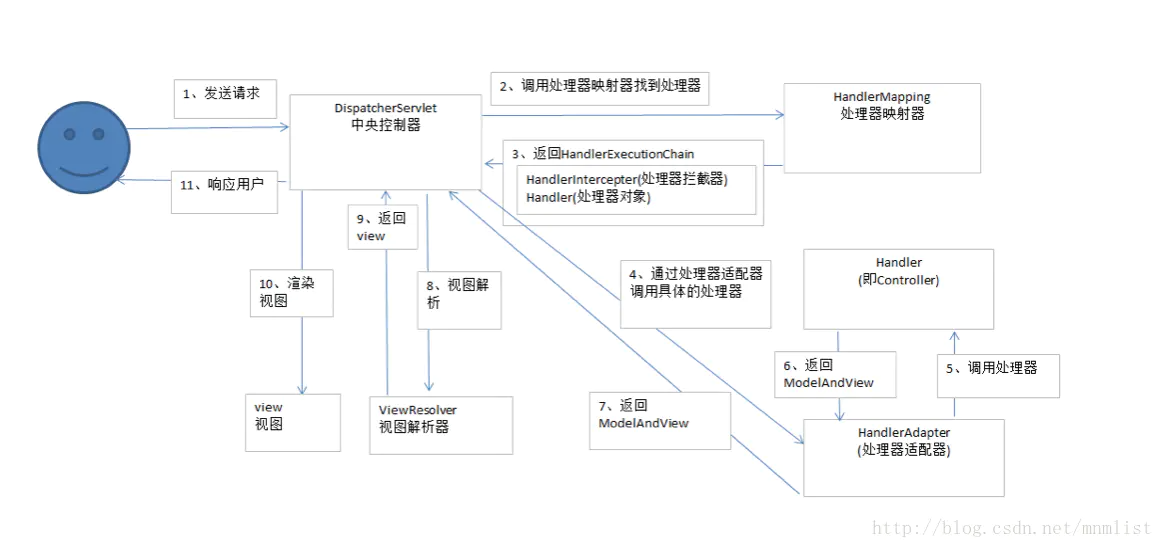
1.DispatcherServlet:前端控制器。用户请求到达前端控制器,它就相当于mvc模式中的c,dispatcherServlet是整个流程控制的中心,由它调用其它组件处理用户的请求,dispatcherServlet的存在降低了组件之间的耦合性,系统扩展性提高。由框架实现
2.HandlerMapping:处理器映射器。HandlerMapping负责根据用户请求的url找到Handler即处理器,springmvc提供了不同的映射器实现不同的映射方式,根据一定的规则去查找,例如:xml配置方式,实现接口方式,注解方式等。由框架实现
3.Handler:处理器。Handler 是继DispatcherServlet前端控制器的后端控制器,在DispatcherServlet的控制下Handler对具体的用户请求进行处理。由于Handler涉及到具体的用户业务请求,所以一般情况需要程序员根据业务需求开发Handler。
4.HandlAdapter:处理器适配器。通过HandlerAdapter对处理器进行执行,这是适配器模式的应用,通过扩展适配器可以对更多类型的处理器进行执行。由框架实现。
5.ModelAndView是springmvc的封装对象,将model和view封装在一起。
6.ViewResolver:视图解析器。ViewResolver负责将处理结果生成View视图,ViewResolver首先根据逻辑视图名解析成物理视图名即具体的页面地址,再生成View视图对象,最后对View进行渲染将处理结果通过页面展示给用户。
7View:是springmvc的封装对象,是一个接口, springmvc框架提供了很多的View视图类型,包括:jspview,pdfview,jstlView、freemarkerView、pdfView等。一般情况下需要通过页面标签或页面模版技术将模型数据通过页面展示给用户,需要由程序员根据业务需求开发具体的页面。
执行流程对应的代码
1.请求到达前端控制器的第一站,先做些准备工作
@Overrideprotected void doService(HttpServletRequest request, HttpServletResponse response) throws Exception {if (logger.isDebugEnabled()) {String requestUri = urlPathHelper.getRequestUri(request);logger.debug("DispatcherServlet with name '" + getServletName() + "' processing " + request.getMethod() +" request for [" + requestUri + "]");}//保护现场// Keep a snapshot of the request attributes in case of an include,// to be able to restore the original attributes after the include.Map<String, Object> attributesSnapshot = null;if (WebUtils.isIncludeRequest(request)) {logger.debug("Taking snapshot of request attributes before include");attributesSnapshot = new HashMap<String, Object>();Enumeration<?> attrNames = request.getAttributeNames();while (attrNames.hasMoreElements()) {String attrName = (String) attrNames.nextElement();if (this.cleanupAfterInclude || attrName.startsWith("org.springframework.web.servlet")) {attributesSnapshot.put(attrName, request.getAttribute(attrName));}}}//将框架相关信息存储至request,方便后面的处理器和视图用到// Make framework objects available to handlers and view objects.request.setAttribute(WEB_APPLICATION_CONTEXT_ATTRIBUTE, getWebApplicationContext());request.setAttribute(LOCALE_RESOLVER_ATTRIBUTE, this.localeResolver);request.setAttribute(THEME_RESOLVER_ATTRIBUTE, this.themeResolver);request.setAttribute(THEME_SOURCE_ATTRIBUTE, getThemeSource());FlashMap inputFlashMap = this.flashMapManager.retrieveAndUpdate(request, response);if (inputFlashMap != null) {request.setAttribute(INPUT_FLASH_MAP_ATTRIBUTE, Collections.unmodifiableMap(inputFlashMap));}request.setAttribute(OUTPUT_FLASH_MAP_ATTRIBUTE, new FlashMap());request.setAttribute(FLASH_MAP_MANAGER_ATTRIBUTE, this.flashMapManager);//请求分发try {doDispatch(request, response);}finally {// Restore the original attribute snapshot, in case of an include.if (attributesSnapshot != null) {restoreAttributesAfterInclude(request, attributesSnapshot);}}}
2.开始处理请求
//通过url查找HandlerMap中最相近的key(url),然后由key获取HandlerMapping对象
//通过处理器映射器获取处理器;
//通过查询处理器适配器获得
protected void doDispatch(HttpServletRequest request, HttpServletResponse response) throws Exception {HttpServletRequest processedRequest = request;HandlerExecutionChain mappedHandler = null;int interceptorIndex = -1;try {ModelAndView mv;boolean errorView = false;try {processedRequest = checkMultipart(request);// Determine handler for the current request//步骤3.1~3.4用于获取包含处理器Handler和拦截器AdapterIntercepters的处理器执行链HandlerExecutionChainmappedHandler = getHandler(processedRequest, false);if (mappedHandler == null || mappedHandler.getHandler() == null) {noHandlerFound(processedRequest, response);return;}// Determine handler adapter for the current request.//步骤4.1~4.2,根据HandlerExecutionChain中的处理器Handler获取处理器适配器HandlerAdapter ha = getHandlerAdapter(mappedHandler.getHandler());// Process last-modified header, if supported by the handler.String method = request.getMethod();boolean isGet = "GET".equals(method);if (isGet || "HEAD".equals(method)) {long lastModified = ha.getLastModified(request, mappedHandler.getHandler());if (logger.isDebugEnabled()) {String requestUri = urlPathHelper.getRequestUri(request);logger.debug("Last-Modified value for [" + requestUri + "] is: " + lastModified);}if (new ServletWebRequest(request, response).checkNotModified(lastModified) && isGet) {return;}}// Apply preHandle methods of registered interceptors.HandlerInterceptor[] interceptors = mappedHandler.getInterceptors();if (interceptors != null) {for (int i = 0; i < interceptors.length; i++) {HandlerInterceptor interceptor = interceptors[i];if (!interceptor.preHandle(processedRequest, response, mappedHandler.getHandler())) {triggerAfterCompletion(mappedHandler, interceptorIndex, processedRequest, response, null);return;}interceptorIndex = i;}}// Actually invoke the handler.//5.1~5.3通过处理器适配器HandlerApapter来调用处理器完成对请求的处理mv = ha.handle(processedRequest, response, mappedHandler.getHandler());// Do we need view name translation?if (mv != null && !mv.hasView()) {mv.setViewName(getDefaultViewName(request));}// Apply postHandle methods of registered interceptors.if (interceptors != null) {for (int i = interceptors.length - 1; i >= 0; i--) {HandlerInterceptor interceptor = interceptors[i];interceptor.postHandle(processedRequest, response, mappedHandler.getHandler(), mv);}}}catch (ModelAndViewDefiningException ex) {logger.debug("ModelAndViewDefiningException encountered", ex);mv = ex.getModelAndView();}catch (Exception ex) {Object handler = (mappedHandler != null ? mappedHandler.getHandler() : null);mv = processHandlerException(processedRequest, response, handler, ex);errorView = (mv != null);}// Did the handler return a view to render?if (mv != null && !mv.wasCleared()) {render(mv, processedRequest, response);if (errorView) {WebUtils.clearErrorRequestAttributes(request);}}else {if (logger.isDebugEnabled()) {logger.debug("Null ModelAndView returned to DispatcherServlet with name '" + getServletName() +"': assuming HandlerAdapter completed request handling");}}// Trigger after-completion for successful outcome.triggerAfterCompletion(mappedHandler, interceptorIndex, processedRequest, response, null);}catch (Exception ex) {// Trigger after-completion for thrown exception.triggerAfterCompletion(mappedHandler, interceptorIndex, processedRequest, response, ex);throw ex;}catch (Error err) {ServletException ex = new NestedServletException("Handler processing failed", err);// Trigger after-completion for thrown exception.triggerAfterCompletion(mappedHandler, interceptorIndex, processedRequest, response, ex);throw ex;}finally {// Clean up any resources used by a multipart request.if (processedRequest != request) {cleanupMultipart(processedRequest);}}}
3 getHandler(HttpServletRequest request),经由HandlerMapping对象获取HandlerExecutionChain(处理器和拦截器)
/*** Return the HandlerExecutionChain for this request.* <p>Tries all handler mappings in order.* @param request current HTTP request* @return the HandlerExecutionChain, or <code>null</code> if no handler could be found*/protected HandlerExecutionChain getHandler(HttpServletRequest request) throws Exception {for (HandlerMapping hm : this.handlerMappings) {if (logger.isTraceEnabled()) {logger.trace("Testing handler map [" + hm + "] in DispatcherServlet with name '" + getServletName() + "'");}HandlerExecutionChain handler = hm.getHandler(request);if (handler != null) {return handler;}}return null;}
- HandlerAdapter getHandlerAdapter(Object handler),根据Handler获取HandlerAdapter
```java
protected HandlerAdapter getHandlerAdapter(Object handler) throws ServletException {
for (HandlerAdapter ha : this.handlerAdapters) {
if (logger.isTraceEnabled()) {
} if (ha.supports(handler)) {logger.trace("Testing handler adapter [" + ha + "]");
} } throw new ServletException(“No adapter for handler [“ + handler +return ha;
}"]: Does your handler implement a supported interface like Controller?");
5.使用处理器完成对请求的处理```javapublic ModelAndView handle(HttpServletRequest request, HttpServletResponse response, Object handler)throws Exception {((Servlet) handler).service(request, response);return null;}public void service(ServletRequest req, ServletResponse res)throws ServletException, IOException{HttpServletRequest request;HttpServletResponse response;if (!(req instanceof HttpServletRequest &&res instanceof HttpServletResponse)) {throw new ServletException("non-HTTP request or response");}request = (HttpServletRequest) req;response = (HttpServletResponse) res;service(request, response);}

若有收获,就点个赞吧
0 人点赞
