1. 介绍
Flume作为一款实时日志收集系统,受到了业界的广泛认可和应用,其由Cloudera开发,初始发行版本为Flume OG(original generation),更新到0.9.4版本后,Cloudera对flume进行了重构,发行了Flume NG(next generation),并将其交给apache托管,成为了apache的顶级项目,官方网站为
2. 特性
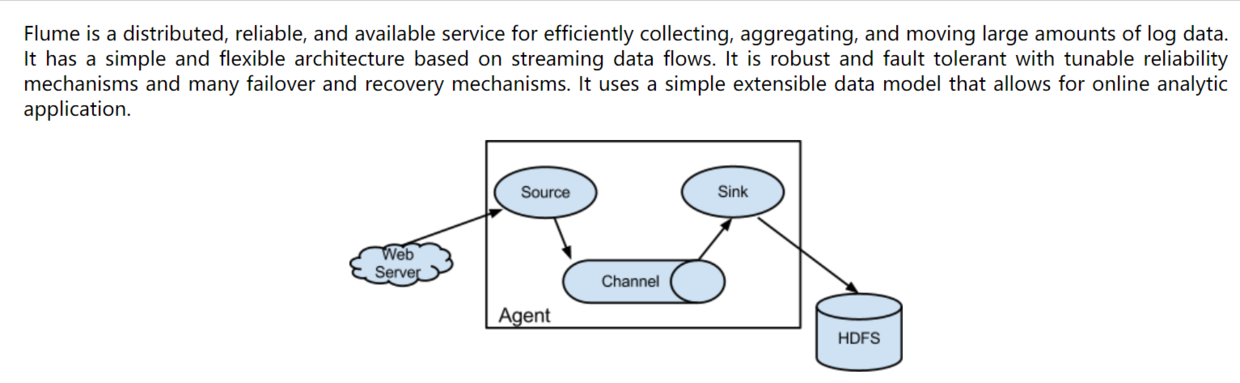
Flume是一个分布式、可靠、高可用的海量日志采集传输系统,支持在日志系统中定制各类数据发送方,用于收集数据;同时,Flume提供对数据进行简单处理,并写到各种数据接受方(比如文本、HDFS、Hbase等)的能力 。
3. 三大组件
Flume 运行的核心是 Agent。Flume以agent为最小的独立运行单位。一个agent就是一个JVM。它是一个完整的数据收集工具,含有三个核心组件,分别是source、 channel、 sink。通过这些组件, Event 可以从一个地方流向另一个地方。
3.1 source
source是数据的收集端,负责将数据捕获后进行特殊的格式化,将数据封装到事件(event) 里,然后将事件推入Channel中。有各种source,包括Avro Source、Exce Source、Spooling Directory Source、NetCat Source、Syslog Source、Syslog TCP Source、Syslog UDP Source、HTTP Source、HDFS Source等等。
3.2 channel
Channel: Flume Channel主要提供一个队列的功能,对source提供中的数据进行简单的缓存。有Memory Channel、JDBC Chanel、File Channel等等。
3.3 sink
Flume Sink取出Channel中的数据,进行相应的存储文件系统,数据库,或者提交到远程服务器。包括HDFS sink、 Logger sink、 Avro sink、 File Roll sink、 Null sink、 HBase sink等等。
4. 应用场景
Flink主要用于同步各源端的数据到指定位置
(1)多代理流
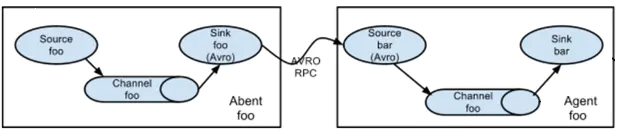
从第一台机器的flume agent传送到第二台机器的flume agent。
例:
规划:
hadoop02:tail-avro.properties
使用 exec “tail -F /home/hadoop/testlog/welog.log”获取采集数据
使用 avro sink 数据到下一个 agent
hadoop03:avro-hdfs.properties
使用 avro 接收采集数据
使用 hdfs sink 数据到目的地
配置文件
#tail-avro.propertiesa1.sources = r1 a1.sinks = k1a1.channels = c1#Describe/configure the sourcea1.sources.r1.type = execa1.sources.r1.command = tail -F /home/hadoop/testlog/date.loga1.sources.r1.channels = c1#Describe the sinka1.sinks.k1.type = avroa1.sinks.k1.channel = c1a1.sinks.k1.hostname = hadoop02a1.sinks.k1.port = 4141a1.sinks.k1.batch-size = 2#Use a channel which buffers events in memorya1.channels.c1.type = memorya1.channels.c1.capacity = 1000a1.channels.c1.transactionCapacity = 100#Bind the source and sink to the channela1.sources.r1.channels = c1a1.sinks.k1.channel = c1
#avro-hdfs.properties
a1.sources = r1
a1.sinks = k1
a1.channels = c1
#Describe/configure the source
a1.sources.r1.type = avro
a1.sources.r1.channels = c1
a1.sources.r1.bind = 0.0.0.0
a1.sources.r1.port = 4141

#Describe k1a1.sinks.k1.type = hdfs
a1.sinks.k1.hdfs.path =hdfs://myha01/testlog/flume-event/%y-%m-%d/%H-%M
a1.sinks.k1.hdfs.filePrefix = date_
a1.sinks.k1.hdfs.maxOpenFiles = 5000
a1.sinks.k1.hdfs.batchSize= 100
a1.sinks.k1.hdfs.fileType = DataStream
a1.sinks.k1.hdfs.writeFormat =Text
a1.sinks.k1.hdfs.rollSize = 102400
a1.sinks.k1.hdfs.rollCount = 1000000
a1.sinks.k1.hdfs.rollInterval = 60
a1.sinks.k1.hdfs.round = true
a1.sinks.k1.hdfs.roundValue = 10
a1.sinks.k1.hdfs.roundUnit = minute
a1.sinks.k1.hdfs.useLocalTimeStamp = true

#Use a channel which buffers events in memory
a1.channels.c1.type = memory
a1.channels.c1.capacity = 1000
a1.channels.c1.transactionCapacity = 100

#Bind the source and sink to the channel
a1.sources.r1.channels = c1
a1.sinks.k1.channel = c1
(2)多路复用采集

在一份agent中有多个channel和多个sink,然后多个sink输出到不同的文件或者文件系统中。
规划:
Hadoop02:(tail-hdfsandlogger.properties)
使用 exec “tail -F /home/hadoop/testlog/datalog.log”获取采集数据
使用 sink1 将数据 存储hdfs
使用 sink2 将数据都存储 控制台
配置文件
#tail-hdfsandlogger.properties
#2个channel和2个sink的配置文件
#Name the components on this agent
a1.sources = s1
a1.sinks = k1 k2
a1.channels = c1 c2

#Describe/configure tail -F source1
a1.sources.s1.type = execa1.sources.s1.command = tail -F /home/hadoop/logs/catalina.out
#指定source进行扇出到多个channnel的规则
a1.sources.s1.selector.type = replicatinga1.sources.s1.channels = c1 c2

#Use a channel which buffers events in memory
#指定channel c1
a1.channels.c1.type = memory
#指定channel c2
a1.channels.c2.type = memory

#Describe the sink
#指定k1的设置
a1.sinks.k1.type = hdfs
a1.sinks.k1.hdfs.path=hdfs://myha01/flume_log/%y-%m-%d/%H-%M
a1.sinks.k1.hdfs.filePrefix = events
a1.sinks.k1.hdfs.maxOpenFiles = 5000
a1.sinks.k1.hdfs.batchSize= 100
a1.sinks.k1.hdfs.fileType = DataStream
a1.sinks.k1.hdfs.writeFormat =Text
a1.sinks.k1.hdfs.rollSize = 102400
a1.sinks.k1.hdfs.rollCount = 1000000
a1.sinks.k1.hdfs.rollInterval = 60
a1.sinks.k1.hdfs.round = true
a1.sinks.k1.hdfs.roundValue = 10
a1.sinks.k1.hdfs.roundUnit = minute
a1.sinks.k1.hdfs.useLocalTimeStamp = true
a1.sinks.k1.channel = c1
#指定k2的
a1.sinks.k2.type = logger
a1.sinks.k2.channel = c2
(3)高可用部署采集
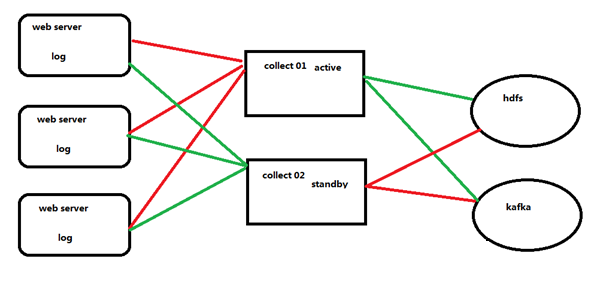
首先在三个web服务器中收集数据,然后交给collect,此处的collect是高可用的,首先collect01是主,所有收集到的数据发送给他,collect02只是出于热备状态不接受数据,当collect01宕机的时候,collect02顶替,然后接受数据,最终将数据发送给hdfs或者kafka。
agent和collecotr的部署

Agent1、Agent2数据分别流入到Collector1和Collector2中,Flume NG 本 身提供了 Failover 机制,可以自动切换和恢复。再由Collector1和Collector2将数据输出到hdfs中。
示意图
配置文件:
#ha_agent.properties
#agent name: agent1
agent1.channels = c1
agent1.sources = r1
agent1.sinks = k1 k2

#set gruop
agent1.sinkgroups = g1

#set channel
agent1.channels.c1.type = memory
agent1.channels.c1.capacity = 1000
agent1.channels.c1.transactionCapacity = 100
agent1.sources.r1.channels = c1
agent1.sources.r1.type = exec
agent1.sources.r1.command = tail -F /home/hadoop/testlog/testha.log
agent1.sources.r1.interceptors = i1 i2
agent1.sources.r1.interceptors.i1.type = static
agent1.sources.r1.interceptors.i1.key = Type
agent1.sources.r1.interceptors.i1.value = LOGIN
agent1.sources.r1.interceptors.i2.type = timestamp

#set sink1agent1.sinks.k1.channel = c1
agent1.sinks.k1.type = avro
agent1.sinks.k1.hostname = hadoop02
agent1.sinks.k1.port = 52020

#set sink2agent1.sinks.k2.channel = c1
agent1.sinks.k2.type = avro
agent1.sinks.k2.hostname = hadoop03
agent1.sinks.k2.port = 52020

#set sink group
agent1.sinkgroups.g1.sinks = k1 k2

#set failover
agent1.sinkgroups.g1.processor.type = failover
agent1.sinkgroups.g1.processor.priority.k1 = 10
agent1.sinkgroups.g1.processor.priority.k2 = 1
agent1.sinkgroups.g1.processor.maxpenalty = 10000
#ha_collector.properties
#set agent name
a1.sources = r1
a1.channels = c1
a1.sinks = k1

#set channel
a1.channels.c1.type = memory
a1.channels.c1.capacity = 1000
a1.channels.c1.transactionCapacity = 100

#other node,nna to nns
a1.sources.r1.type = avro
##当前主机为什么,就修改成什么主机名
a1.sources.r1.bind = hadoop03
a1.sources.r1.port = 52020
a1.sources.r1.interceptors = i1
a1.sources.r1.interceptors.i1.type = static
a1.sources.r1.interceptors.i1.key = Collector
##当前主机为什么,就修改成什么主机名
a1.sources.r1.interceptors.i1.value = hadoop03
a1.sources.r1.channels = c1

#set sink to hdfs
a1.sinks.k1.type=hdfs
a1.sinks.k1.hdfs.path= hdfs://myha01/flume_ha/loghdfs
a1.sinks.k1.hdfs.fileType=DataStream
a1.sinks.k1.hdfs.writeFormat=TEXT
a1.sinks.k1.hdfs.rollInterval=10
a1.sinks.k1.channel=c1
a1.sinks.k1.hdfs.filePrefix=%Y-%m-%d
最后启动:
#先启动 hadoop02 和 hadoop03 上的 collector 角色:
bin/flume-ng agent -c conf -f agentconf/ha_collector.properties -n a1 - Dflume.root.logger=INFO,console
#然后启动 hadoop01,hadoop02 上的 agent 角色:
bin/flume-ng agent -c conf -f agentconf/ha_agent.properties -n agent1 - Dflume.root.logger=INFO,console
5. 安装部署
Flume框架对hadoop和zookeeper的依赖只是在jar包上,并不要求flume启动时必须将hadoop和zookeeper服务也启动。
(1)将安装包上传到服务器并解压
[hadoop@hadoop1 ~]$ tar -zxvf apache-flume-1.8.0-bin.tar.gz -C apps
(2)创建软连接
[hadoop@hadoop1 ~]$ ln -s apache-flume-1.8.0-bin/ flume
(3)修改配置文件
/home/hadoop/apps/apache-flume-1.8.0-bin/conf
[hadoop@hadoop1 conf]$ cp flume-env.sh.template flume-env.sh
(4)配置环境变量
[hadoop@hadoop1 conf]$ vi ~/.bashrc
export FLUME_HOME=/home/hadoop/apps/flume
export PATH=$PATH:$FLUME_HOME/bin
保存使其立即生效
[hadoop@hadoop1 conf]$ source ~/.bashrc
(5)查看版本
[hadoop@hadoop1 ~]$ flume-ng version
6. 使用
flume的用法很简单—-书写一个配置文件,在配置文件当中描述source、channel与sink的具体实现,而后运行一个agent实例,在运行agent实例的过程中会读取配置文件的内容,这样flume就会采集到数据。
配置文件的编写原则:
1>从整体上描述代理agent中sources、sinks、channels所涉及到的组件
# Name the components on this agent
a1.sources = r1
a1.sinks = k1
a1.channels = c1
2>详细描述agent中每一个source、sink与channel的具体实现:即在描述source的时候,需要
指定source到底是什么类型的,即这个source是接受文件的、还是接受http的、还是接受thrift
的;对于sink也是同理,需要指定结果是输出到HDFS中,还是Hbase中啊等等;对于channel
需要指定是内存啊,还是数据库啊,还是文件啊等等。
# Describe/configure the source
a1.sources.r1.type = netcat
a1.sources.r1.bind = localhost
a1.sources.r1.port = 44444

# Describe the sink
a1.sinks.k1.type = logger

# Use a channel which buffers events in memory
a1.channels.c1.type = memory
a1.channels.c1.capacity = 1000
a1.channels.c1.transactionCapacity = 100
3>通过channel将source与sink连接起来
# Bind the source and sink to the channel
a1.sources.r1.channels = c1
a1.sinks.k1.channel = c1
启动agent的shell操作:
flume-ng  agent -n a1  -c  ../conf   -f  ../conf/example.file
-Dflume.root.logger=DEBUG,console
参数说明: -n 指定agent名称(与配置文件中代理的名字相同)
-c 指定flume中配置文件的目录
-f 指定配置文件
-Dflume.root.logger=DEBUG,console 设置日志等级
7. 高级组件
除了三大组件外,Flume还允许用户设置其他高级组件更灵活地控制数据流,包括 Interceptor,Channel Selector 和 Sink Processor等
7.1 Interceptor
Flume-ng 1.7 中目前提供了以下拦截器:
- Timestamp Interceptor:该 Interceptor 在每个 Event 头部插入时间戳,其中key是timestamp,value为当前时刻。
- Host Interceptor:该 Interceptor 在每个 Event 头部插入当前 Agent 所在机器的host或ip,其中key是host(也可自定义)。
- Static Interceptor:静态拦截器,用于在events header中加入一组静态的key和value。
- UUID Interceptor:该 Interceptor 在每个 Event 头部插入一个128位的全局唯一标示,例如 b5755073-77a9-43c1-8fad-b7a586fc1b97。
- Regex Extractor Interceptor:该 Interceptor 可根据正则表达式取出对应的值,并插入到头部
- Regex Filtering Interceptor:该 Interceptor 可根据正则表达式过滤或者保留符合要求的 Event。
7.2 Channel Selector
Channel Selector 允许 Flume Source 选择一个或多个目标 Channel,并将当前 Event 写入这些 Channel。Flume 提供了两种 Channel Selector 实现:
- Replicating Channel Selector:将每个 Event 指定多个 Channel,通过该 Selector,Flume 可将相同数据导入到多套系统中,一遍进行不同地处理。这是Flume 默认采用的 Channel Selector。
- Multiplexing Channel Selector:根据 Event 头部的属性值,将 Event写入对应的 Channel
7.3 Sink Processo
Flume 允许将多个 Sink 组装在一起形成一个逻辑实体,成为 Sink Group。而 Sink Processor 则在 Sink Group 基础上提供负载均衡以及容错功能。当一个 Sink 挂掉了,可由另一个 Sink 接替。Flume 提供了多种 Sink Processor 实现:
- Default Sink Processor:默认的 Sink Processor,仅仅接受一个 Sink,实现了最简单的 source - channel - sink,每个组件只有一个 - Failover Sink Processor:故障转移接收器,Sink Group 中每个 Sink 均被赋予一个优先级,Event 优先由高优先级的 Sink 发送,如果高优先级的 Sink 挂了,则次高优先级的 Sink 接替
- Load balancing Sink Processor:负载均衡接收处理器,Channel 中的 Event 通过某种负载均衡机制,交给 Sink Group 中的所有 Sink 发送,目前 Flume支持两种负载均衡机制,分别是:round_robin(轮训),random(随机)。
8. 进程监控
8.1 Http监控
使用这类监控方式,只需要在启动flume的时候在启动参数上面加上监控配置,例如这样:bin/flume-ng agent --conf conf --conf-file conf/flume_conf.properties --name collect -Dflume.monitoring.type=http -Dflume.monitoring.port=1234
其中-Dflume.monitoring.type=http表示使用http方式来监控,后面的-Dflume.monitoring.port=1234表示我们需要启动的监控服务的端口号为1234,这个端口号可以自己随便配置。然后启动flume以后,通过http://ip:1234/metrics就能够得到flume的1个json格式的监控数据。
8.2ganglia监控
这类监控方式需要先安装ganglia然后启动ganglia,然后再启动flume的时候加上监控配置,例如:bin/flume-ng agent --conf conf --conf-file conf/producer.properties --name collect -Dflume.monitoring.type=ganglia -Dflume.monitoring.hosts=ip:port
其中-Dflume.monitoring.type=ganglia表示使用ganglia的方式来监控,而-Dflume.monitoring.hosts=ip:port表示ganglia安装的ip和启动的端口号。
flume监控还可使用zabbix,但是这类方式需要在flume源码中添加监控模块,相对照较麻烦,由于不是flume自带的监控方式,这里不讨论这类方式。
因此,flume自带的监控方式其实就是http、ganglia两种,http监控只能通过1个http地址访问得到1个json格式的监控数据,而ganglia监控是拿到这个数据后用界面的方式展现出来了,相对照较直观。

若有收获,就点个赞吧
0 人点赞
