- 1 安装要求
- 2 安装与配置
- /etc/profile
- System wide environment and startup programs, for login setup
- Functions and aliases go in /etc/bashrc
- It’s NOT a good idea to change this file unless you know what you
- are doing. It’s much better to create a custom.sh shell script in
- /etc/profile.d/ to make custom changes to your environment, as this
- will prevent the need for merging in future updates.
- 3 Oracle Apex(数据库GUI管理页面)
- 4 常见问题
- 5 其他相关
参考链接: (Oracle Database 11g 快捷版 第 2 版)[https://www.oracle.com/cn/database/technologies/oracle-database-express-edition-11g-release2.html] (Oracle Database 11g 快捷版 第 2 版 下载)[https://www.oracle.com/cn/database/technologies/express-edition.html] (Database Express Edition Installation Guide)[https://docs.oracle.com/cd/E17781_01/install.112/e18802/toc.htm]
1 安装要求
1.1 系统要求
| Requirement | Value |
|---|---|
| 运行内存(RAM) | 最小256MB,建议512MB |
| 硬盘空间 | 最小1.5GB |
| 依赖包 | glibc 大于等于 2.3-2.41 make 大于等于 3.80 binutils 大于等于 2.16.91.0.5 gcc 大于等于 4.1.2 libaio 大于等于 0.3.104 |
1.2 交换空间(Swap Space)要求
Oracle Database XE所需的最小交换空间为2GB或磁盘空间的两倍RAM,以较小的为准。
1.3 安装权限要求
2 安装与配置
2.1 下载Oracle 11g XE
(Oracle Database 11g 快捷版 第 2 版 下载)[https://www.oracle.com/cn/database/technologies/express-edition.html]
2.2 安装配置
Oracle 11g XE 安装文件oracle-xe-11.2.0-1.0.x86_64.rpm.zip上传过程省略。上传完成后如下所示:
[root@localhost opt]# lltotal 308488drwxrwxr-x. 4 root root 76 Aug 29 2011 Disk1-rw-r--r--. 1 root root 315891481 Jul 19 21:50 oracle-xe-11.2.0-1.0.x86_64.rpm.zip[root@localhost opt]# pwd/opt[root@localhost opt]#
使用unzip命令解压oracle-xe-11.2.0-1.0.x86_64.rpm.zip。
[root@localhost opt]# unzip oracle-xe-11.2.0-1.0.x86_64.rpm.zipArchive: oracle-xe-11.2.0-1.0.x86_64.rpm.zipcreating: Disk1/creating: Disk1/upgrade/inflating: Disk1/upgrade/gen_inst.sqlcreating: Disk1/response/inflating: Disk1/response/xe.rspinflating: Disk1/oracle-xe-11.2.0-1.0.x86_64.rpm
使用rpm -ivh oracle-xe-11.2.0-1.0.x86_64.rpm命令安装数据库。
[root@localhost opt]# cd Disk1/[root@localhost Disk1]# lsoracle-xe-11.2.0-1.0.x86_64.rpm response upgrade[root@localhost Disk1]# rpm -ivh oracle-xe-11.2.0-1.0.x86_64.rpmPreparing... ################################# [100%]/var/tmp/rpm-tmp.h5j4r0: line 257: [: 18446744073692774399: integer expression expected/var/tmp/rpm-tmp.h5j4r0: line 271: [: 18446744073692774399: integer expression expectedUpdating / installing...1:oracle-xe-11.2.0-1.0 ################################# [100%]Executing post-install steps...You must run '/etc/init.d/oracle-xe configure' as the root user to configure the database.[root@localhost Disk1]#
安装完成后,按照提示配置数据库。
提示1:配置数据库需要输入时仔细点,输入错了是无法删除的
提示2:需要输入时,直接回车表示使用默认值
[root@localhost Disk1]# /etc/init.d/oracle-xe configureOracle Database 11g Express Edition Configuration-------------------------------------------------This will configure on-boot properties of Oracle Database 11g ExpressEdition. The following questions will determine whether the database shouldbe starting upon system boot, the ports it will use, and the passwords thatwill be used for database accounts. Press <Enter> to accept the defaults.Ctrl-C will abort.Specify the HTTP port that will be used for Oracle Application Express [8080]:8021Specify a port that will be used for the database listener [1521]:Specify a password to be used for database accounts. Note that the samepassword will be used for SYS and SYSTEM. Oracle recommends the use ofdifferent passwords for each database account. This can be done afterinitial configuration:Confirm the password:Do you want Oracle Database 11g Express Edition to be started on boot (y/n) [y]:nStarting Oracle Net Listener...DoneConfiguring database...DoneStarting Oracle Database 11g Express Edition instance...DoneInstallation completed successfully.[root@localhost Disk1]#
数据库配置期间的日志文件在$ORACLE_HOME/config/log/*.路径下,如果没有更改安装路径的话,$ORACLE_HOME=/u01/app/oracle/product/11.2.0/xe/。
2.3 配置环境变量
安装并配置Oracle 11g XE 后,在使用数据库之前需要配置环境变量。Oracle 11g XE提供了脚本,用于设置必要的环境变量。脚本/u01/app/oracle/product/11.2.0/xe/bin/oracle_env.sh的内容如下:
export ORACLE_HOME=/u01/app/oracle/product/11.2.0/xeexport ORACLE_SID=XEexport NLS_LANG=`$ORACLE_HOME/bin/nls_lang.sh`export PATH=$ORACLE_HOME/bin:$PATH
配置方式一:用户配置
编辑用户家目录下的配置文件.bash_profile文件(登录后生效)或者.bashrc文件(打开新shell时生效),在文件中增加以下内容:
. /u01/app/oracle/product/11.2.0/xe/bin/oracle_env.sh
配置方式二:全局配置在全局配置文件~~/etc/profile~~中增加以下内容:
- Linux 下用户自定义的环境变量最好是在
/etc/profile.d/路径下新建个.sh文件,放在新建的.sh文件中。/etc/profile 文件的说明中有明确说到:
/etc/profile
System wide environment and startup programs, for login setup
Functions and aliases go in /etc/bashrc
It’s NOT a good idea to change this file unless you know what you
are doing. It’s much better to create a custom.sh shell script in
/etc/profile.d/ to make custom changes to your environment, as this
will prevent the need for merging in future updates.
参考链接:Linux环境变量到底配置到哪里?
#取自/u01/app/oracle/product/11.2.0/xe/bin/oracle_env.sh文件export ORACLE_HOME=/u01/app/oracle/product/11.2.0/xeexport ORACLE_SID=XEexport NLS_LANG=`$ORACLE_HOME/bin/nls_lang.sh`export PATH=$ORACLE_HOME/bin:$PATH
或者
将/u01/app/oracle/product/11.2.0/xe/bin/oracle_env.sh复制一份,放到/etc/profile.d/路径下。
2.4 远程访问数据库管理页面
默认情况下,数据库管理页面只能本地访问。使用SQL*Plus命令行设置为可远程访问:
[root@localhost ~]# sqlplusSQL*Plus: Release 11.2.0.2.0 Production on Tue Aug 17 13:32:32 2021Copyright (c) 1982, 2011, Oracle. All rights reserved.Enter user-name: systemEnter password:Connected to:Oracle Database 11g Express Edition Release 11.2.0.2.0 - 64bit ProductionSQL> EXEC DBMS_XDB.SETLISTENERLOCALACCESS(FALSE);PL/SQL procedure successfully completed.SQL> exit;Disconnected from Oracle Database 11g Express Edition Release 11.2.0.2.0 - 64bit Production[root@localhost ~]#
2.5 防火墙设置
为保证oracle数据库可远程访问,关闭防火墙或者开放相应的端口。
关闭防火墙:
#关闭防火墙[root@localhost ~]# systemctl stop firewalld.service#取消防火墙开机自启[root@localhost ~]# systemctl disable firewalld.serviceRemoved symlink /etc/systemd/system/multi-user.target.wants/firewalld.service.Removed symlink /etc/systemd/system/dbus-org.fedoraproject.FirewallD1.service.[root@localhost ~]#
或者
开放相应端口:
#设置防火墙开机自启[root@localhost ~]# systemctl enable firewalld.serviceCreated symlink from /etc/systemd/system/dbus-org.fedoraproject.FirewallD1.service to /usr/lib/systemd/system/firewalld.service.Created symlink from /etc/systemd/system/multi-user.target.wants/firewalld.service to /usr/lib/systemd/system/firewalld.service.#启动防火墙[root@localhost ~]# systemctl start firewalld.service#查看已开放的端口[root@localhost ~]# firewall-cmd --list-ports#开放端口(需重启防火墙)# --zone=public 指定的zone为public# --add-port 标识添加的端口,格式为:端口/通讯协议# --permanent 永久生效[root@localhost ~]# firewall-cmd --zone=public --add-port=8021/tcp --permanentsuccess[root@localhost ~]# firewall-cmd --zone=public --add-port=1521/tcp --permanentsuccess#重启防火墙[root@localhost ~]# firewall-cmd --reloadsuccess#查看已开放的端口[root@localhost ~]# firewall-cmd --list-ports8021/tcp 1521/tcp[root@localhost ~]#
3 Oracle Apex(数据库GUI管理页面)
参考链接:https://docs.oracle.com/cd/E11882_01/appdev.112/e12512/adm_login.htm#AEADM168
登录用户名(默认用户):admin
登录密码:Oracle数据库安装时你设置的密码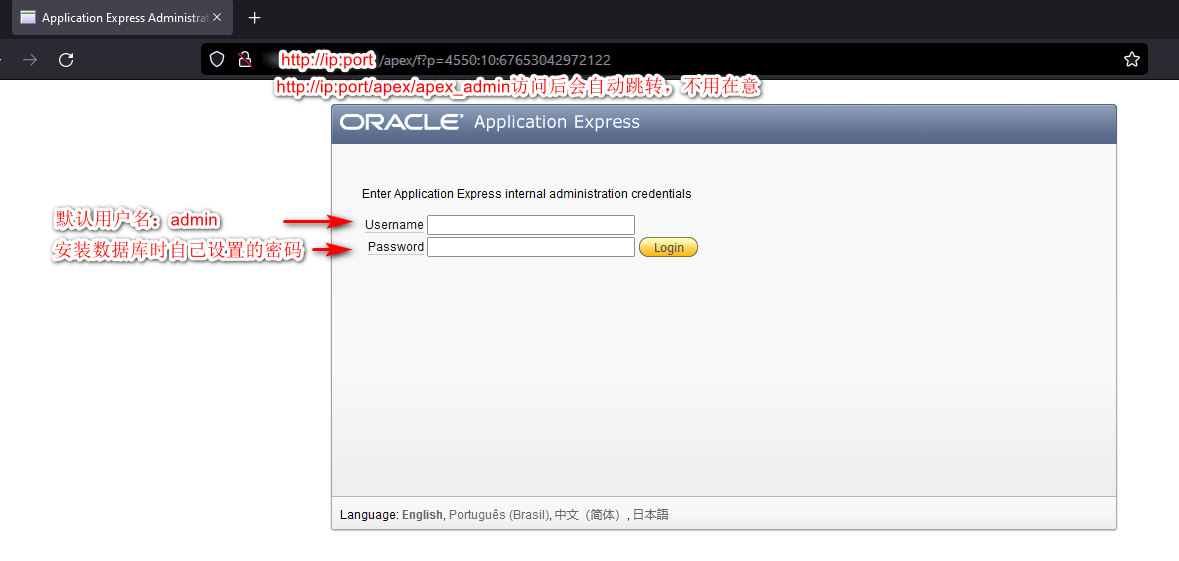
- 初次登录需要重设密码(重设的密码还需要满足密码强度要求,示例:Oracle123+=)
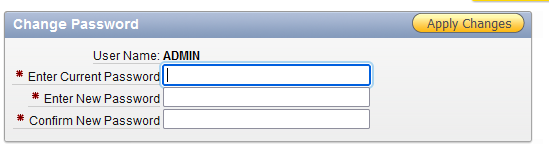
- 修改完密码后,使用新密码登录进入主页,可在右下角区域选择语言

4 常见问题
4.1 启动oracle
在2.2 安装配置 时没有选择开机启动Oracle数据库,所以系统重启后,Oracle数据库需要手动启动。
# 切换为 oracle 用户[root@localhost ~]# su - oracle# 使用 oracle 用户启动监听-bash-4.2$ lsnrctl start# 使用sys以DBA身份登录sqlplus,[root@localhost ~]# sqlplus sys as sysdba# 使用startup命令启动数据库实例SQL> startup;ORACLE instance started.Total System Global Area 409194496 bytesFixed Size 2227000 bytesVariable Size 293602504 bytesDatabase Buffers 109051904 bytesRedo Buffers 4313088 bytesDatabase mounted.Database opened.SQL> exitDisconnected from Oracle Database 11g Express Edition Release 11.2.0.2.0 - 64bit Production
4.2 停止oracle
# 使用sys以DBA身份登录sqlplus,[root@localhost ~]# sqlplus sys as sysdba# 使用shutdown 或者 shutdown immediate关闭数据库实例SQL> shutdown;Database closed.Database dismounted.ORACLE instance shut down....SQL> shutdown immediate;Database closed.Database dismounted.ORACLE instance shut down.# 停止监听[root@localhost ~]# lsnrctl stop
4.3 启动监听报错,TNS-12555: TNS:permission denied
[root@localhost ~]# lsnrctl startLSNRCTL for Linux: Version 11.2.0.2.0 - Production on 17-AUG-2021 15:26:17Copyright (c) 1991, 2011, Oracle. All rights reserved.Starting /u01/app/oracle/product/11.2.0/xe/bin/tnslsnr: please wait...TNSLSNR for Linux: Version 11.2.0.2.0 - ProductionSystem parameter file is /u01/app/oracle/product/11.2.0/xe/network/admin/listener.oraLog messages written to /u01/app/oracle/product/11.2.0/xe/log/diag/tnslsnr/localhost/listener/alert/log.xmlError listening on: (DESCRIPTION=(ADDRESS=(PROTOCOL=IPC)(KEY=EXTPROC_FOR_XE)))TNS-12555: TNS:permission deniedTNS-12560: TNS:protocol adapter errorTNS-00525: Insufficient privilege for operationLinux Error: 1: Operation not permittedListener failed to start. See the error message(s) above...[root@localhost ~]#
提示没权限,切换oracle用户启动监听:
[root@localhost ~]# su - oracleLast login: Tue Aug 17 14:51:05 CST 2021-bash-4.2$ lsnrctl startLSNRCTL for Linux: Version 11.2.0.2.0 - Production on 17-AUG-2021 15:28:57Copyright (c) 1991, 2011, Oracle. All rights reserved.Starting /u01/app/oracle/product/11.2.0/xe/bin/tnslsnr: please wait...TNSLSNR for Linux: Version 11.2.0.2.0 - ProductionSystem parameter file is /u01/app/oracle/product/11.2.0/xe/network/admin/listener.oraLog messages written to /u01/app/oracle/product/11.2.0/xe/log/diag/tnslsnr/localhost/listener/alert/log.xmlListening on: (DESCRIPTION=(ADDRESS=(PROTOCOL=ipc)(KEY=EXTPROC_FOR_XE)))Listening on: (DESCRIPTION=(ADDRESS=(PROTOCOL=tcp)(HOST=192.168.56.102)(PORT=1521)))Connecting to (DESCRIPTION=(ADDRESS=(PROTOCOL=IPC)(KEY=EXTPROC_FOR_XE)))STATUS of the LISTENER------------------------Alias LISTENERVersion TNSLSNR for Linux: Version 11.2.0.2.0 - ProductionStart Date 17-AUG-2021 15:28:59Uptime 0 days 0 hr. 0 min. 0 secTrace Level offSecurity ON: Local OS AuthenticationSNMP OFFDefault Service XEListener Parameter File /u01/app/oracle/product/11.2.0/xe/network/admin/listener.oraListener Log File /u01/app/oracle/product/11.2.0/xe/log/diag/tnslsnr/localhost/listener/alert/log.xmlListening Endpoints Summary...(DESCRIPTION=(ADDRESS=(PROTOCOL=ipc)(KEY=EXTPROC_FOR_XE)))(DESCRIPTION=(ADDRESS=(PROTOCOL=tcp)(HOST=192.168.56.102)(PORT=1521)))Services Summary...Service "PLSExtProc" has 1 instance(s).Instance "PLSExtProc", status UNKNOWN, has 1 handler(s) for this service...The command completed successfully-bash-4.2$
4.4 数据库可视化工具连接报错,ORA-12514, TNS:listener does not currently know of service requested in connect descriptor
原因:
oracle数据库中有监听和实例的概念,监听用来接收用户请求,实例是实际的数据库。实例启动后会向监听进行注册,监听收到请求后会从已注册的实例中进行匹配,选择具体的实例进行处理。
报错原因是oracle监听接收请求后,找不到对应的实例,无法处理请求。
实例启动后没有动态向监听注册。
解决:
静态注册实例,即在listener.ora文件中配置好数据库实例listener.ora和tnsnames.ora文件的路径:/u01/app/oracle/product/11.2.0/xe/network/admin/
# listener.ora Network Configuration File:SID_LIST_LISTENER =(SID_LIST =(SID_DESC =(SID_NAME = PLSExtProc)(ORACLE_HOME = /u01/app/oracle/product/11.2.0/xe)(PROGRAM = extproc))#静态注册XE实例(SID_DESC =(SID_NAME = XE)(ORACLE_HOME = /u01/app/oracle/product/11.2.0/xe)))LISTENER =(DESCRIPTION_LIST =(DESCRIPTION =(ADDRESS = (PROTOCOL = IPC)(KEY = EXTPROC_FOR_XE))(ADDRESS = (PROTOCOL = TCP)(HOST = 192.168.56.102)(PORT = 1521))))
5 其他相关
5.1 创建/修改数据库用户信息
参考链接: Oracle Database XE 11gR2 自带的用户,新建用户,修改用户密码 oracle 给表空间增加多个数据文件
- 新建用户
- 使用sqlplus 登录数据库管理员账号 ```bash [root@localhost ~]# sqlplus
SQL*Plus: Release 11.2.0.2.0 Production on Sat Nov 27 14:58:15 2021
Copyright (c) 1982, 2011, Oracle. All rights reserved.
Enter user-name: sys as sysdba Enter password:
Connected to: Oracle Database 11g Express Edition Release 11.2.0.2.0 - 64bit Production
SQL>
bash-4.2$ sqlplus / as sysdba
SQL*Plus: Release 11.2.0.2.0 Production on Tue Dec 7 10:52:49 2021
Copyright (c) 1982, 2011, Oracle. All rights reserved.
Connected to: Oracle Database 11g Express Edition Release 11.2.0.2.0 - 64bit Production
SQL>
2. 创建表空间```plsql--查看当前有哪些表空间select * from dba_tablespaces;--查看表空间文件路径select * from dba_data_files;--创建表空间create tablespace demo_data datafile '/u01/app/oracle/oradata/XE/demo_data.dbf' size 500m autoextend on next 100m;--为表空间添加多个.dbf文件alter tablespace demo_data add datafile '/u01/app/oracle/oradata/XE/demo_data2.dbf' size 500m autoextend on next 100m;alter tablespace demo_data add datafile '/u01/app/oracle/oradata/XE/demo_data3.dbf' size 500m autoextend on next 100m;
- 删除表空间 ```plsql —删除空的表空间,但是不包含物理文件 drop tablespace tablespace_name;
—删除非空表空间,但是不包含物理文件 drop tablespace tablespace_name including contents;
—删除空表空间,包含物理文件 drop tablespace tablespace_name including datafiles;
—删除非空表空间,包含物理文件 drop tablespace tablespace_name including contents and datafiles;
—如果其他表空间中的表有外键等约束关联到了本表空间中的表的字段,就要加上CASCADE CONSTRAINTS drop tablespace tablespace_name including contents and datafiles CASCADE CONSTRAINTS;
4. 创建用户username: test01<br />password: 123456```plsql--创建用户时就指定用户的表空间create user test01 identified by 123456 default tablespace demo_data;--创建用户时不指定表空间,创建完成后再指定create user test01 identified by 123456;alert user test01 default tablespace demo_data;
对用户授权/取消授权
--授权grant connect,resource,dba to test01;--取消授权revoke dba from test01;
修改用户密码
username: test01
password: abcdefg
alter user test01 identified by abcdefg;
- 删除用户及用户下所有对象
drop user test01 cascade;

若有收获,就点个赞吧
0 人点赞
